Fixture介绍
fixture有明确的名字,在其他函数,模块,类或整个工程调用它时会被激活。
fixture是基于模块来执行的,每个fixture的名字就可以触发一个fixture的函数,它自身也可以调用其他的fixture。
我们可以把fixture看做是资源,在你的测试用例执行之前需要去配置这些资源,执行完后需要去释放资源。比如module类型的fixture,适合于那些许多测试用例都只需要执行一次的操作。
fixture还提供了参数化功能,根据配置和不同组件来选择不同的参数。
fixture主要的目的是为了提供一种可靠和可重复性的手段去运行那些最基本的测试内容。比如在测试网站的功能时,每个测试用例都要登录和退出,利用fixture就可以只做一次,否则每个测试用例都要做这两步也是冗余。
Fixture基础实例
把一个函数定义为Fixture很简单,只要在函数声明之前加上“@pytest.fixture”。其他函数要来调用这个Fixture,只用把它当做一个输入的参数即可。
演示代码:
import pytest

@pytest.fixture()
def before():
    print '
Before each test'

def test_1(before):
    print 'test_1()'

def test_2(before):
    print 'test_2()'
    assert 0    # For test purpose
运行结果:
(wda_python) bash-3.2$ pytest -q test_smtpsimple.py
.F                                                                                                                                 [100%]
================================================================ FAILURES ================================================================
_________________________________________________________________ test_2 _________________________________________________________________

before = None

    def test_2(before):
        print 'test_2()'
>       assert 0    # For test purpose
E       assert 0

test_smtpsimple.py:12: AssertionError
--------------------------------------------------------- Captured stdout setup ----------------------------------------------------------

Before each test
---------------------------------------------------------- Captured stdout call ----------------------------------------------------------
test_2()
1 failed, 1 passed in 0.09 seconds
(wda_python) bash-3.2$
调用fixture
1. 在测试用例中直接调用它,例如上面的基础实例
2. 用fixture decorator调用fixture
可以用以下三种不同的方式来写,我只变化了函数名字和类名字,内容没有变。第一种是每个函数前声明,第二种是封装在类里,类里的每个成员函数声明,第三种是封装在类里在前声明。在可以看到3中不同方式的运行结果都是一样。
import pytest

@pytest.fixture()
def before():
    print '
Before each test'

@pytest.mark.usefixtures("before")
def test_1():
    print 'test_1()'

@pytest.mark.usefixtures("before")
def test_2():
    print 'test_2()'

class Test1:
    @pytest.mark.usefixtures("before")
    def test_3(self):
        print 'test_3()'

    @pytest.mark.usefixtures("before")
    def test_4(self):
        print 'test_4()'

@pytest.mark.usefixtures("before")
class Test2:
    def test_5(self):
        print 'test_5()'

    def test_6(self):
        print 'test_6()'
我们用“pytest -v -s test_module.py”运行详细模式测试并打印输出,运行结果:
================================================== test session starts ===================================================
platform darwin -- Python 2.7.15, pytest-4.1.0, py-1.7.0, pluggy-0.8.0 -- /Users/jackey/Documents/iOS/code/iOS-Auto/MyPyEnv/wda_python/bin/python2.7
cachedir: .pytest_cache
rootdir: /Users/jackey/Documents/iOS/code/iOS-Auto/Agent_Test, inifile:
collected 6 items

test_smtpsimple.py::test_1
Before each test
test_1()
PASSED
test_smtpsimple.py::test_2
Before each test
test_2()
PASSED
test_smtpsimple.py::Test1::test_3
Before each test
test_3()
PASSED
test_smtpsimple.py::Test1::test_4
Before each test
test_4()
PASSED
test_smtpsimple.py::Test2::test_5
Before each test
test_5()
PASSED
test_smtpsimple.py::Test2::test_6
Before each test
test_6()
PASSED

================================================ 6 passed in 0.06 seconds ================================================
(wda_python) bash-3.2$
3. pytest fixture scope
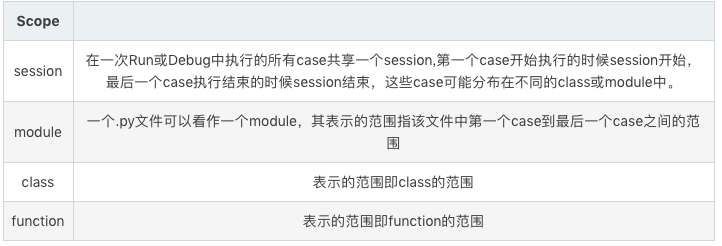
fixture在创建的时候有一个关键字参数scope:
scope='session',它将只运行一次,不管它在哪里定义。
scope='class'表示每个类会运行一次。
scope='module'表示每个module的所有test只运行一次。
scope='function'表示每个test都运行, scope的默认值
实例代码:
import pytest
import time

@pytest.fixture(scope="module")
def mod_header(request):
    print '
------------------'
    print 'module   : %s' % request.module.__name__
    print '-------------------'

@pytest.fixture(scope="function")
def func_header(request):
    print '
------------------'
    print 'function:    %s' % request.module.__name__
    print 'time:        %s' % time.asctime()
    print '-------------------'

def test_1(mod_header,func_header):
    print 'in test_1()'

def test_2(mod_header,func_header):
    print 'in test_2()'
运行结果:
================================================== test session starts ===================================================
platform darwin -- Python 2.7.15, pytest-4.1.0, py-1.7.0, pluggy-0.8.0 -- /Users/jackey/Documents/iOS/code/iOS-Auto/MyPyEnv/wda_python/bin/python2.7
cachedir: .pytest_cache
rootdir: /Users/jackey/Documents/iOS/code/iOS-Auto/Agent_Test, inifile:
collected 2 items

test_smtpsimple.py::test_1
------------------
module   : test_smtpsimple
-------------------

------------------
function:    test_smtpsimple
time:        Sun Jan 13 12:19:25 2019
-------------------
in test_1()
PASSED
test_smtpsimple.py::test_2
------------------
function:    test_smtpsimple
time:        Sun Jan 13 12:19:25 2019
-------------------
in test_2()
PASSED

================================================ 2 passed in 0.04 seconds ================================================
(wda_python) bash-3.2$
可以看到module在整个module中只执行了一次
4. 用autos调用fixture
当默认为False,就可以选择用上面两种方式来试用fixture。
当设置为True时,在一个session内的所有的test都会自动调用这个fixture。
权限大,责任也大,所以用该功能时也要谨慎小心。
import pytest
import time

@pytest.fixture(scope="module", autouse=True)
def mod_header(request):
    print '
------------------'
    print 'module   : %s' % request.module.__name__
    print '-------------------'

@pytest.fixture(scope="function", autouse=True)
def func_header(request):
    print '
------------------'
    print 'function:    %s' % request.module.__name__
    print 'time:        %s' % time.asctime()
    print '-------------------'

def test_1():
    print 'in test_1()'

def test_2():
    print 'in test_2()'
运行结果:
================================================== test session starts ===================================================
platform darwin -- Python 2.7.15, pytest-4.1.0, py-1.7.0, pluggy-0.8.0 -- /Users/jackey/Documents/iOS/code/iOS-Auto/MyPyEnv/wda_python/bin/python2.7
cachedir: .pytest_cache
rootdir: /Users/jackey/Documents/iOS/code/iOS-Auto/Agent_Test, inifile:
collected 2 items

test_smtpsimple.py::test_1
------------------
module   : test_smtpsimple
-------------------

------------------
function:    test_smtpsimple
time:        Sun Jan 13 12:34:59 2019
-------------------
in test_1()
PASSED
test_smtpsimple.py::test_2
------------------
function:    test_smtpsimple
time:        Sun Jan 13 12:34:59 2019
-------------------
in test_2()
PASSED

================================================ 2 passed in 0.04 seconds ================================================
(wda_python) bash-3.2$
5. fixture 返回值
在上面的例子中,fixture返回值都是默认None,我们可以选择让fixture返回我们需要的东西。如果你的fixture需要配置一些数据,读个文件,或者连接一个数据库,那么你可以让fixture返回这些数据或资源。
如何带参数,可以把参数赋值给params,默认是None。对于param里面的每个值,fixture都会去调用执行一次,就像执行for循环一样把params里的值遍历一次。
import pytest

@pytest.fixture(params=[1,2,3])
def test_data(request):
    return request.param

def test_not_2(test_data):
    print 'test_data: %s' % test_data
    assert test_data != 2
运行结果:
========================================================== test session starts ===========================================================
platform darwin -- Python 2.7.15, pytest-4.1.0, py-1.7.0, pluggy-0.8.0 -- /Users/jackey/Documents/iOS/code/iOS-Auto/MyPyEnv/wda_python/bin/python2.7
cachedir: .pytest_cache
rootdir: /Users/jackey/Documents/iOS/code/iOS-Auto/Agent_Test, inifile:
collected 3 items

test_smtpsimple.py::test_not_2[1] test_data: 1
PASSED
test_smtpsimple.py::test_not_2[2] test_data: 2
FAILED
test_smtpsimple.py::test_not_2[3] test_data: 3
PASSED

================================================================ FAILURES ================================================================
_____________________________________________________________ test_not_2[2] ______________________________________________________________

test_data = 2

    def test_not_2(test_data):
        print 'test_data: %s' % test_data
>       assert test_data != 2
E       assert 2 != 2

test_smtpsimple.py:9: AssertionError
=================================================== 1 failed, 2 passed in 0.09 seconds ===================================================
(wda_python) bash-3.2$
可以看到test_not_2里面把用test_data里面定义的3个参数运行里三次。
6. conftest.py配置
如果我们要实现一个测试场景: 用例1需要先登录, 用例2不需要先登录,用例3需要先登录
脚本我们可能会这样写:
#coding: utf-8

import pytest

@pytest.fixture()
def login():
    print '输入账号、密码登录'

def test_step_1(login):
    print '用例步骤1:登录之后其它动作111'

def test_step_2(): #不需要登录
    print '用例步骤2: 不需要登录, 操作222'

def test_step_3(login):
    print '用例步骤3:登录之后其它动作333'

if __name__ == "__main__":
    pytest.main(["-s", "test_smtpsimple.py"])
运行结果:
========================================================== test session starts ===========================================================
platform darwin -- Python 2.7.15, pytest-4.1.0, py-1.7.0, pluggy-0.8.0
rootdir: /Users/jackey/Documents/iOS/code/iOS-Auto/Agent_Test, inifile:
collected 3 items

test_smtpsimple.py 输入账号、密码登录
用例步骤1:登录之后其它动作111
.用例步骤2: 不需要登录, 操作222
.输入账号、密码登录
用例步骤3:登录之后其它动作333
.

======================================================== 3 passed in 0.05 seconds ========================================================
(wda_python) bash-3.2$
上面一个案例是在同一个.py文件中,多个用例调用一个登陆功能,如果有多个.py的文件都需要调用这个登陆功能的话,那就不能把登陆写到用例里面去了。
此时应该要有一个配置文件,单独管理一些预置的操作场景,pytest里面默认读取conftest.py里面的配置
conftest.py配置需要注意以下点:
- conftest.py配置脚本名称是固定的,不能改名称
- conftest.py与运行的用例要在同一个pakage下,并且有__init__.py文件
- 不需要import导入 conftest.py,pytest用例会自动查找
conftest.py
#coding: utf-8

from test_foocompare import Foo
import pytest

@pytest.fixture()
def login():
    print '输入账号、密码登录'
test_simple.py
#coding: utf-8

import pytest

def test_step_1(login):
    print '用例步骤1:登录之后其它动作111'

def test_step_2(): #不需要登录
    print '用例步骤2: 不需要登录, 操作222'

def test_step_3(login):
    print '用例步骤3:登录之后其它动作333'

if __name__ == "__main__":
    pytest.main(["-s", "test_smtps
运行结果:
========================================================== test session starts ===========================================================
platform darwin -- Python 2.7.15, pytest-4.1.0, py-1.7.0, pluggy-0.8.0
rootdir: /Users/jackey/Documents/iOS/code/iOS-Auto/Agent_Test, inifile:
collected 3 items

test_smtpsimple.py 输入账号、密码登录
用例步骤1:登录之后其它动作111
.用例步骤2: 不需要登录, 操作222
.输入账号、密码登录
用例步骤3:登录之后其它动作333
.

======================================================== 3 passed in 0.04 seconds ========================================================
(wda_python) bash-3.2$