上一篇博客我们讲解了 AspectJ 框架如何实现 AOP,然后具体的实现方式我们是通过 xml 来进行配置的。xml 方式思路清晰,便于理解,但是书写过于麻烦。这篇博客我们将用 注解 的方式来进行 AOP 配置。
为了便于大家理解,讲解方式是这样的,我们先给出 xml 的配置,然后介绍如何通过 注解 来进行替代。
1、xml 的方式实现 AOP
①、接口 UserService
|
1
2
3
4
5
6
7
8
|
package com.ys.aop;public interface UserService { //添加 user public void addUser(); //删除 user public void deleteUser();} |
②、实现类 UserServiceImpl
|
1
2
3
4
5
6
7
8
9
10
11
12
|
package com.ys.aop;public class UserServiceImpl implements UserService{ @Override public void addUser() { System.out.println("增加 User"); } @Override public void deleteUser() { System.out.println("删除 User"); }} |
③、切面类,也就是通知类 MyAspect
|
1
2
3
4
5
6
7
8
9
10
11
12
13
14
15
16
17
18
19
20
21
22
23
24
25
26
27
|
package com.ys.aop;import org.aspectj.lang.JoinPoint;public class MyAspect { /** * JoinPoint 能获取目标方法的一些基本信息 * @param joinPoint */ public void myBefore(JoinPoint joinPoint){ System.out.println("前置通知 : " + joinPoint.getSignature().getName()); } public void myAfterReturning(JoinPoint joinPoint,Object ret){ System.out.println("后置通知 : " + joinPoint.getSignature().getName() + " , -->" + ret); } public void myAfterThrowing(JoinPoint joinPoint,Throwable e){ System.out.println("抛出异常通知 : " + e.getMessage()); } public void myAfter(){ System.out.println("最终通知"); }} |
④、AOP配置文件 applicationContext.xml
|
1
2
3
4
5
6
7
8
9
10
11
12
13
14
15
16
17
18
19
20
21
22
23
24
25
26
27
28
29
30
31
32
33
34
35
36
37
38
39
40
41
42
43
44
45
46
47
48
49
50
51
52
53
54
55
56
57
58
59
60
|
<?xml version="1.0" encoding="UTF-8"?><beans xmlns="http://www.springframework.org/schema/beans" xmlns:xsi="http://www.w3.org/2001/XMLSchema-instance" xmlns:context="http://www.springframework.org/schema/context" xmlns:aop="http://www.springframework.org/schema/aop" xsi:schemaLocation="http://www.springframework.org/schema/beans http://www.springframework.org/schema/beans/spring-beans.xsd http://www.springframework.org/schema/aop http://www.springframework.org/schema/aop/spring-aop.xsd http://www.springframework.org/schema/context http://www.springframework.org/schema/context/spring-context.xsd"> <!--1、创建目标类 --> <bean id="userService" class="com.ys.aop.UserServiceImpl"></bean> <!--2、创建切面类(通知) --> <bean id="myAspect" class="com.ys.aop.MyAspect"></bean> <!--3、aop编程 3.1 导入命名空间 3.2 使用 <aop:config>进行配置 proxy-target-class="true" 声明时使用cglib代理 如果不声明,Spring 会自动选择cglib代理还是JDK动态代理 <aop:pointcut> 切入点 ,从目标对象获得具体方法 <aop:advisor> 特殊的切面,只有一个通知 和 一个切入点 advice-ref 通知引用 pointcut-ref 切入点引用 3.3 切入点表达式 execution(* com.ys.aop.*.*(..)) 选择方法 返回值任意 包 类名任意 方法名任意 参数任意 --> <aop:config> <aop:aspect ref="myAspect"> <!-- 切入点表达式 --> <aop:pointcut expression="execution(* com.ys.aop.*.*(..))" id="myPointCut"/> <!-- 3.1 前置通知 <aop:before method="" pointcut="" pointcut-ref=""/> method : 通知,及方法名 pointcut :切入点表达式,此表达式只能当前通知使用。 pointcut-ref : 切入点引用,可以与其他通知共享切入点。 通知方法格式:public void myBefore(JoinPoint joinPoint){ 参数1:org.aspectj.lang.JoinPoint 用于描述连接点(目标方法),获得目标方法名等 --> <aop:before method="myBefore" pointcut-ref="myPointCut"/> <!-- 3.2后置通知 ,目标方法后执行,获得返回值 <aop:after-returning method="" pointcut-ref="" returning=""/> returning 通知方法第二个参数的名称 通知方法格式:public void myAfterReturning(JoinPoint joinPoint,Object ret){ 参数1:连接点描述 参数2:类型Object,参数名 returning="ret" 配置的 --> <aop:after-returning method="myAfterReturning" pointcut-ref="myPointCut" returning="ret" /> <!-- 3.3 最终通知 --> <aop:after method="myAfter" pointcut-ref="myPointCut"/> </aop:aspect> </aop:config></beans> |
⑤、测试
|
1
2
3
4
5
6
7
|
@Testpublic void testAop(){ ApplicationContext context = new ClassPathXmlApplicationContext("applicationContext.xml"); UserService useService = (UserService) context.getBean("userService"); useService.addUser(); useService.deleteUser();} |
⑥、控制台打印结果
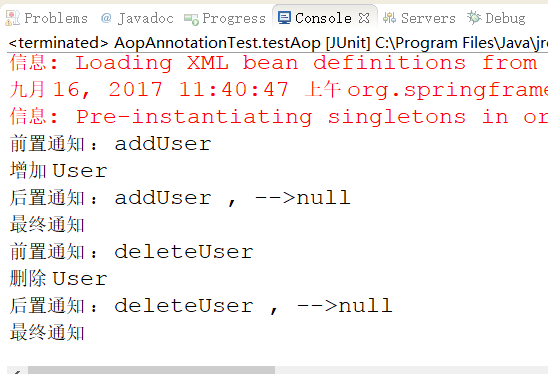
上面的例子很简单,就是在 UserService 的 addUser()方法和 deleteUser()方法增加前置通知和后置通知,这在实际操作中很好理解。比如这是和数据库打交道的话,那么我们在 addUser() 或者 deleteUser() 时,必须要在前面开始事务,操作完毕后提交事务。下面我们就用注解的方式来配置。
2、注解实现 AOP
①、导入相应的 jar 包,以及在 applicationContext.xml 文件中导入相应的命名空间。这个在上面的源码下载链接中都有

|
1
2
3
4
5
6
7
8
9
10
11
12
13
|
<?xml version="1.0" encoding="UTF-8"?><beans xmlns="http://www.springframework.org/schema/beans" xmlns:xsi="http://www.w3.org/2001/XMLSchema-instance" xmlns:context="http://www.springframework.org/schema/context" xmlns:aop="http://www.springframework.org/schema/aop" xsi:schemaLocation="http://www.springframework.org/schema/beans http://www.springframework.org/schema/beans/spring-beans.xsd http://www.springframework.org/schema/aop http://www.springframework.org/schema/aop/spring-aop.xsd http://www.springframework.org/schema/context http://www.springframework.org/schema/context/spring-context.xsd"> </beans> |
②、注解配置 bean
xml配置:
|
1
2
3
4
|
<!--1、创建目标类 --><bean id="userService" class="com.ys.aop.UserServiceImpl"></bean> <!--2、创建切面类(通知) --><bean id="myAspect" class="com.ys.aop.MyAspect"></bean> |
注解配置:
目标类:

切面类:

③、配置扫描注解识别
这个我们在前面也讲过,上面配置的注解,Spring 如何才能识别这些类上添加了注解呢?我们必须告诉他。
在 applicationContext.xml 文件中添加如下配置:
|
1
2
3
4
5
|
<!-- 配置扫描注解类 base-package:表示含有注解类的包名。 如果扫描多个包,则下面的代码书写多行,改变 base-package 里面的内容即可! --> <context:component-scan base-package="com.ys.aop"></context:component-scan> |
④、注解配置 AOP
一、我们用xml配置过如下:

这是告诉 Spring 哪个是切面类。下面我们用注解配置
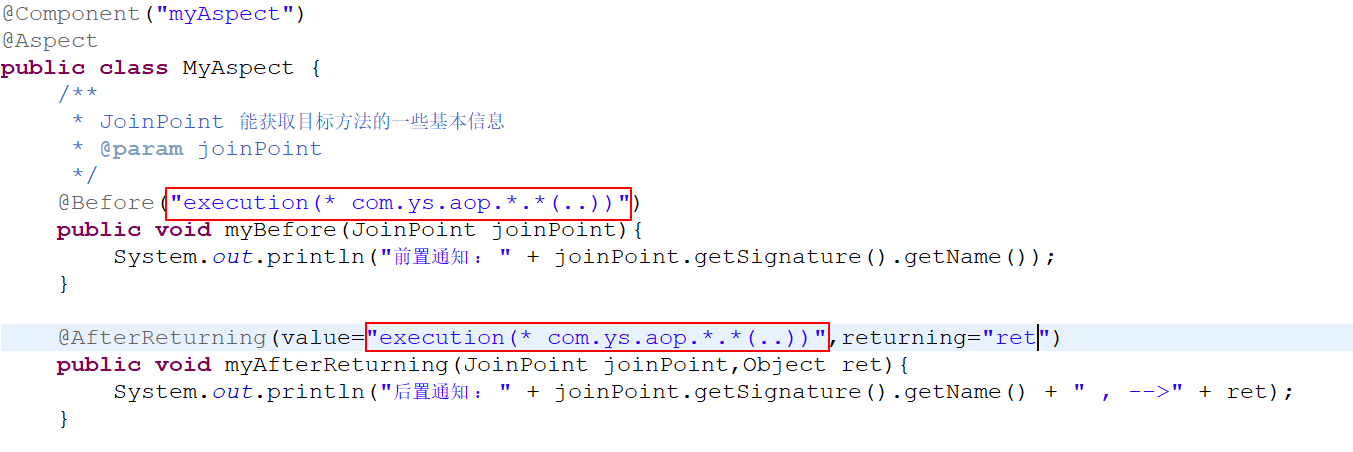
我们在切面类上添加 @Aspect 注解,如下:

二、如何让 Spring 认识我们所配置的 AOP 注解呢?光有前面的类注解扫描是不够的,这里我们要额外配置 AOP 注解识别。
我们在 applicationContext.xml 文件中增加如下配置:
|
1
2
|
<!--2、确定 aop 注解生效 --><aop:aspectj-autoproxy></aop:aspectj-autoproxy> |
三、注解配置前置通知
我们先看 xml 配置前置通知如下:
|
1
2
3
4
5
6
7
8
9
10
11
|
<!-- 切入点表达式 --> <aop:pointcut expression="execution(* com.ys.aop.*.*(..))" id="myPointCut"/> <!-- 3.1 前置通知 <aop:before method="" pointcut="" pointcut-ref=""/> method : 通知,及方法名 pointcut :切入点表达式,此表达式只能当前通知使用。 pointcut-ref : 切入点引用,可以与其他通知共享切入点。 通知方法格式:public void myBefore(JoinPoint joinPoint){ 参数1:org.aspectj.lang.JoinPoint 用于描述连接点(目标方法),获得目标方法名等 --> <aop:before method="myBefore" pointcut-ref="myPointCut"/> |
那么注解的方式如下:

四、注解配置后置通知
xml 配置后置通知:
|
1
2
3
4
5
6
7
8
|
<!-- 3.2后置通知 ,目标方法后执行,获得返回值 <aop:after-returning method="" pointcut-ref="" returning=""/> returning 通知方法第二个参数的名称 通知方法格式:public void myAfterReturning(JoinPoint joinPoint,Object ret){ 参数1:连接点描述 参数2:类型Object,参数名 returning="ret" 配置的 --> <aop:after-returning method="myAfterReturning" pointcut-ref="myPointCut" returning="ret" /> |
注意看,后置通知有个 returning="ret" 配置,这是用来获得目标方法的返回值的。
注解配置如下:

五、测试
|
1
2
3
4
5
6
7
|
@Test public void testAopAnnotation(){ ApplicationContext context = new ClassPathXmlApplicationContext("applicationContext_Annotation.xml"); UserService useService = (UserService) context.getBean("userService"); useService.addUser(); useService.deleteUser(); } |
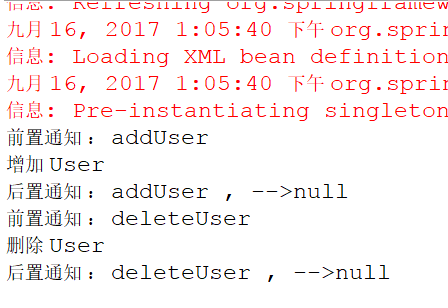
六、控制台打印结果
3、注解改进
我们可以看前置通知和后置通知的注解配置:
注意看红色框住的部分,很显然这里是重复的,而且如果我们有多个通知方法,那就得在每个方法名都写上该注解,而且如果包名够复杂,也很容易写错。那么怎么办呢?
解决办法就是声明公共切入点:
①、在 切面类 MyAspect.java 中新增一个切入点方法 myPointCut(),然后在这个方法上添加 @Pointcut 注解

②、那么前置通知和后置通知,我们可以进行如下改写配置:

4、总结
上面我们只进行了前置通知和后置通知的讲解,还有比如最终通知、环绕通知、抛出异常通知等,配置方式都差不多,这里就不进行一一讲解了。然后我们看一下这些通知的注解:
@Aspect 声明切面,修饰切面类,从而获得 通知。
通知
@Before 前置
@AfterReturning 后置
@Around 环绕
@AfterThrowing 抛出异常
@After 最终
切入点
@PointCut ,修饰方法 private void xxx(){} 之后通过“方法名”获得切入点引用