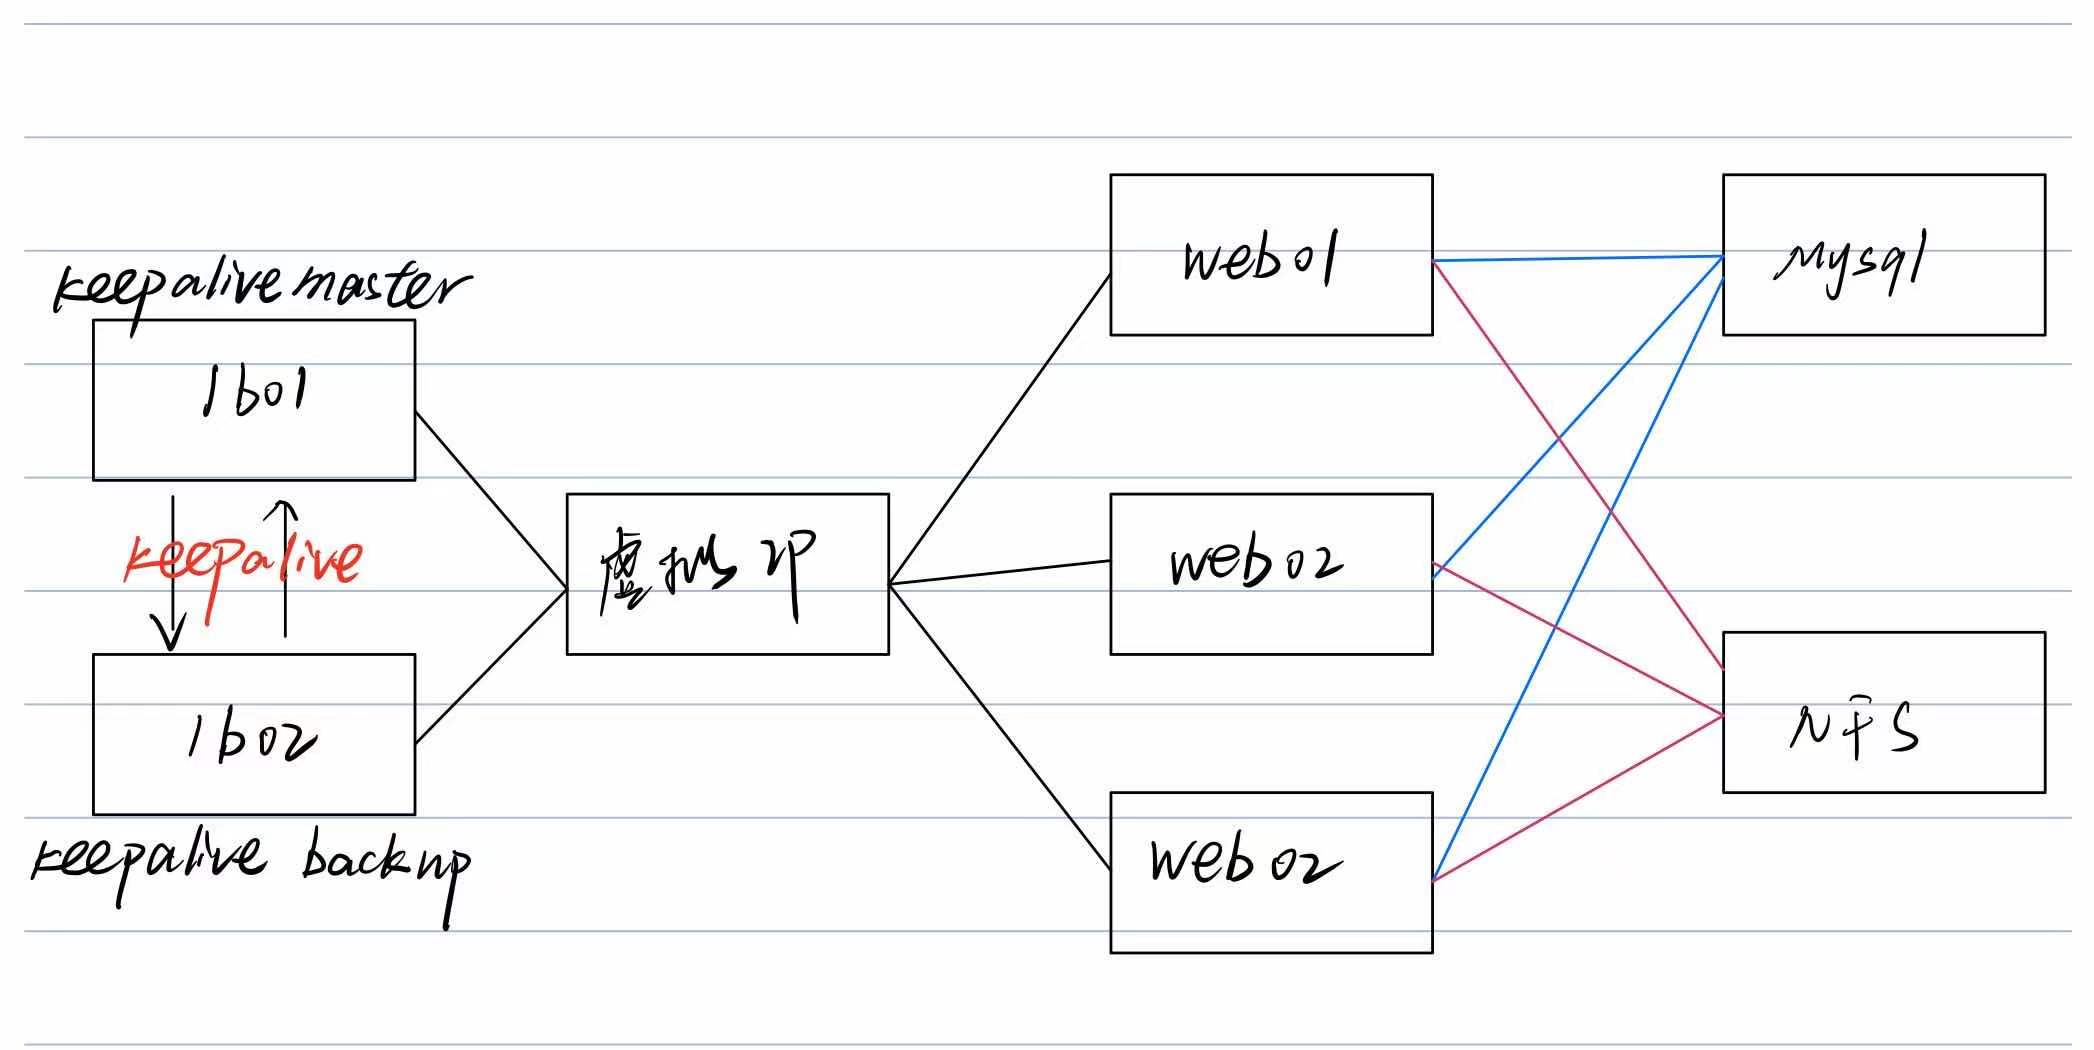
web
三台web挂载nfs端的conf与web
[root@web01 nginx]# mount -t nfs 172.16.1.31:/conf /etc/nginx/conf.d/
[root@web01 web]# mount -t nfs 172.16.1.31:/web /web/

#查看挂载
[root@web01 web]# df -h
Filesystem               Size  Used Avail Use% Mounted on
172.16.1.31:/conf         99G  2.7G   97G   3% /etc/nginx/conf.d
172.16.1.31:/web          99G  2.7G   97G   3% /web
编写Nginx配置文件
[root@web01 conf.d]# cat discuz.conf
server {
        listen 80;
        server_name luntan123.com;
        root /web/DiscuzX/upload;

        location / {
        index index.php;
        }

        location ~* .php$ {
                fastcgi_pass 127.0.0.1:9000;
                fastcgi_param SCRIPT_FILENAME $document_root$fastcgi_script_name;
                #fastcgi_param HTTPS ON;
                include fastcgi_params;
        }
}
上传代码至web目录并解压
[root@web01 web]# ll
total 16616
drwxrwxrwx  6 www www       95 Apr 23 14:08 DiscuzX
drwxr-xr-x 13 www www     4096 May  6 20:28 phpMyAdmin-5.1.0-all-languages
-rw-rw-r--  1 www www 17005138 May  6 23:02 web.tar.gz
drwxr-xr-x  5 www www     4096 May  6 23:05 wordpres

#注:如果安装DiscuzX出现不可写,授权777站点目录
三个web分别用ip访问测试
#db01增加一个discuz的数据库
#创建用户并登录
[root@db01 ~]# mysqladmin -uroot password '***'
[root@db01 ~]# mysql -uroot -p***

#创建数据库
MariaDB [(none)]> create database discuz;
Query OK, 1 row affected (0.00 sec)

# 创建用户给予web以及其它网站使用
MariaDB [mysql]> grant all privileges on *.* to baimo@'%' identified by 'baimo';
Query OK, 0 rows affected (0.01 sec)

MariaDB [mysql]> flush privileges;#刷新
Query OK, 0 rows affected (0.00 sec)

#按照流程安装
配置伪静态
[root@web01 conf.d]# cat discuz.conf
server {
	listen 80;
	server_name luntan123.com;
	root /web/DiscuzX/upload;
	rewrite ^([^.]*)/topic-(.+).html$ $1/portal.php?mod=topic&topic=$2 last;
rewrite ^([^.]*)/article-([0-9]+)-([0-9]+).html$ $1/portal.php?mod=view&aid=$2&page=$3 last;
rewrite ^([^.]*)/forum-(w+)-([0-9]+).html$ $1/forum.php?mod=forumdisplay&fid=$2&page=$3 last;
rewrite ^([^.]*)/thread-([0-9]+)-([0-9]+)-([0-9]+).html$ $1/forum.php?mod=viewthread&tid=$2&extra=page%3D$4&page=$3 last;
rewrite ^([^.]*)/group-([0-9]+)-([0-9]+).html$ $1/forum.php?mod=group&fid=$2&page=$3 last;
rewrite ^([^.]*)/space-(username|uid)-(.+).html$ $1/home.php?mod=space&$2=$3 last;
rewrite ^([^.]*)/blog-([0-9]+)-([0-9]+).html$ $1/home.php?mod=space&uid=$2&do=blog&id=$3 last;
rewrite ^([^.]*)/archiver/(fid|tid)-([0-9]+).html$ $1/archiver/index.php?action=$2&value=$3 last;
rewrite ^([^.]*)/([a-z]+[a-z0-9_]*)-([a-z0-9_-]+).html$ $1/plugin.php?id=$2:$3 last;
if (!-e $request_filename) {
	return 404;
}

	location / {
	index index.php;
	}

	location ~* .php$ {
		fastcgi_pass 127.0.0.1:9000;
        fastcgi_param SCRIPT_FILENAME $document_root$fastcgi_script_name;
		fastcgi_param HTTPS ON;	#http返回的给https乱码开启
                include fastcgi_params;
	}
}
配置负载均衡lb01
需求分析:
1、有证书ssl
2、负载均衡
3、用户访问(.*)的时候自动跳转到https;
生成证书
[root@lb01 nginx]# mkdir ssl_key
[root@lb01 nginx]# cd ssl_key/
[root@lb01 ssl_key]# openssl genrsa -idea -out server.key 2048
[root@lb01 ssl_key]# openssl req -days 36500 -x509 -sha256 -nodes -newkey rsa:2048 -keyout server.key -out server.crt

[root@lb01 ssl_key]# ll
-rw-r--r-- 1 root root 1220 May  9 14:57 server.crt
-rw-r--r-- 1 root root 1704 May  9 14:57 server.key
配置discuz.conf解析
[root@lb01 conf.d]# cat discuz.conf
upstream web {
	server 172.16.1.7:80;
	server 172.16.1.8:80;
	server 172.16.1.9:80;
}	#代理转发的链接池

server {
	listen 80;
	server_name luntan123.com;
	rewrite (.*) https://$server_name$request_uri;
}	#监听80端口和域名,任何请求过来都转发给 https://luntan123.com


server {
	listen 443 ssl;	#http默认端口
	server_name luntan123.com;
    ssl_certificate /etc/nginx/ssl_key/server.crt;
    ssl_certificate_key /etc/nginx/ssl_key/server.key;#证书


	location / {	#接收到请求后负载均衡转发
		proxy_pass http://web;#转发给链接池的ip
		proxy_set_header host $http_host;#携带域名一起转发
	}
}
配置代码
[root@lb01 conf.d]# cat /etc/nginx/conf.d/discuz.conf
upstream web {
	server 172.16.1.7:80;
	server 172.16.1.8:80;
	server 172.16.1.9:80;
}

server {
	listen 80;
	server_name luntan123.com;
	return 302 https://$server_name$request_uri;

}

server {
	listen 443 ssl;
	server_name luntan123.com;

        ssl_certificate /ssl_key/server.crt;
        ssl_certificate_key /ssl_key/server.key;

	location / {
		proxy_pass http://web;
                include proxy_params;
	}
}
配置hosts访问
#访问成功
keepalived
lb02
#配置与lb01一样的证书和conf文件
[root@lb01 ssl_key]# yum install -y keepalived
[root@lb02 ssl_key]# yum install -y keepalived

#查看配置文件
[root@lb01 ssl_key]# rpm -qc keepalived
/etc/keepalived/keepalived.conf
/etc/sysconfig/keepalived
抢占式主节点
#配置keepalived
#配置主节点配置文件
[root@lb01 ~]# vim /etc/keepalived/keepalived.conf
global_defs {					#全局配置
   router_id lb01				#身份验证
}

vrrp_instance VI_1 {
    state MASTER				#状态,只有MASTER和BACKUP,MASTER是主,BACKUP是备
    interface eth0				#网卡绑定,心跳检测
    virtual_router_id 51		#虚拟路由标识,组id,把master和backup判断为一组
    priority 100				#优先级(真正判断是主是从的条件)(值越大优先级越高)
    advert_int 3				#检测状态间隔时间(单位是秒)
    authentication {			#认证
        auth_type PASS			#认证方式
        auth_pass 1111			#认证密码指定
    }
    virtual_ipaddress {
        10.0.0.3				#虚拟的VIP地址
    }
}

#配置主节点配置文件
[root@lb01 ~]# vim /etc/keepalived/keepalived.conf
global_defs {
   router_id lb01
}

vrrp_instance VI_1 {
    state MASTER
    interface eth0
    virtual_router_id 51
    priority 100
    advert_int 3
    authentication {
        auth_type PASS
        auth_pass 1111
    }
    virtual_ipaddress {
        10.0.0.3
    }
}
抢占式备节点
global_defs {
   router_id lb02
}

vrrp_instance VI_1 {
    state BACKUP
    interface eth0
    virtual_router_id 51
    priority 90
    advert_int 3
    authentication {
        auth_type PASS
        auth_pass 1111
    }
    virtual_ipaddress {
        192.168.15.3
    }
}
启动服务并查看
#先启动备节点
[root@lb02 ssl_key]# systemctl start keepalived.service

#查看ip
[root@lb02 ssl_key]# ip addr
inet 192.168.15.3/32 scope global eth0

#启动主节点
[root@lb01 ssl_key]# systemctl start keepalived.service

#查看lb01的ip
[root@lb01 ssl_key]# ip addr
inet 192.168.15.3/32 scope global eth0
#查看lb02的ip已经没有了192.168.15.3/32
keepalived绑定日志
#配置keepalived
[root@lb01 ssl_key]# vim /etc/sysconfig/keepalived
KEEPALIVED_OPTIONS="-D -d -S 0"

#配置rsyslog来抓取日志
[root@lb01 ssl_key]# vim /etc/rsyslog.conf
local0.*             /var/log/keepalived/log

#重启服务
[root@lb01 ssl_key]# systemctl restart keepalived.service rsyslog.service
非抢占式
我们一般配置的都是非抢占式的,因为宕机这种行为一次就够了QAQ
主
global_defs {
   router_id lb01
}

vrrp_instance VI_1 {
    state BACKUP
    interface eth0
    nopreempt
    virtual_router_id 51
    priority 100
    advert_int 3
    authentication {
        auth_type PASS
        auth_pass 1111
    }
    virtual_ipaddress {
        10.0.0.3
    }
}
备
global_defs {
   router_id lb01
}

vrrp_instance VI_1 {
    state BACKUP
    interface eth0
    nopreempt
    virtual_router_id 51
    priority 90
    advert_int 3
    authentication {
        auth_type PASS
        auth_pass 1111
    }
    virtual_ipaddress {
        10.0.0.3
    }
}