一、索引绘图
若要绘制下图目标图形,按普通处理方式则需要一个个进行N多个三角形的顶点处理。图中所用到顶点重复性很高,其实只有7个不同的顶点 --> 索引绘图 --> 将顶点按索引信息进行面的绘制 --> 索引数组:{1,2,3}{3,2,4}{4,2,7}{7,2,5} {4,7,2}{2,7,6}

索引绘图与图元装配中的三角形连接方式结合绘制所需图形。
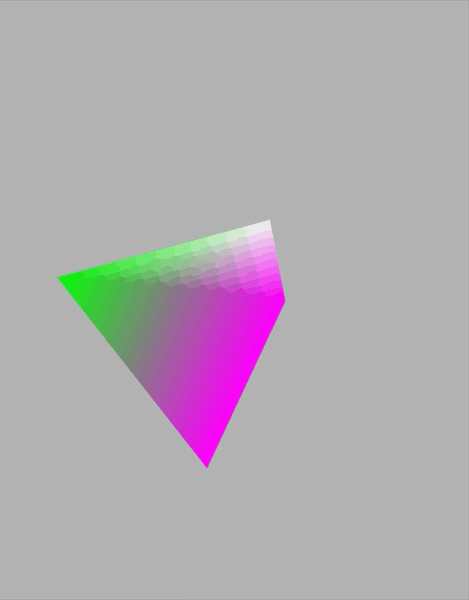
二、案例绘制一个三角锥金字塔 - GLSL
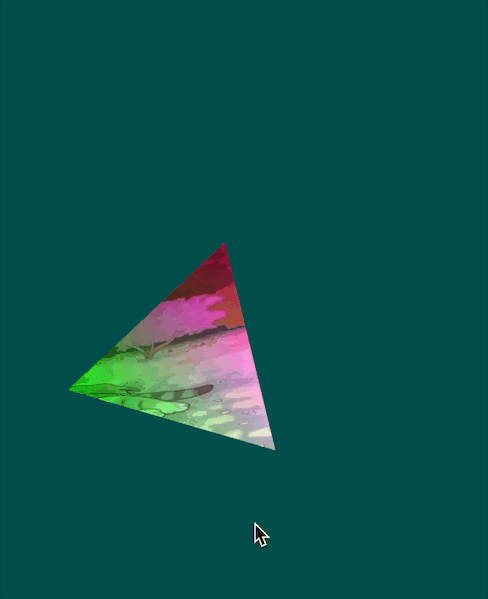
1、效果:
2、顶点数据:
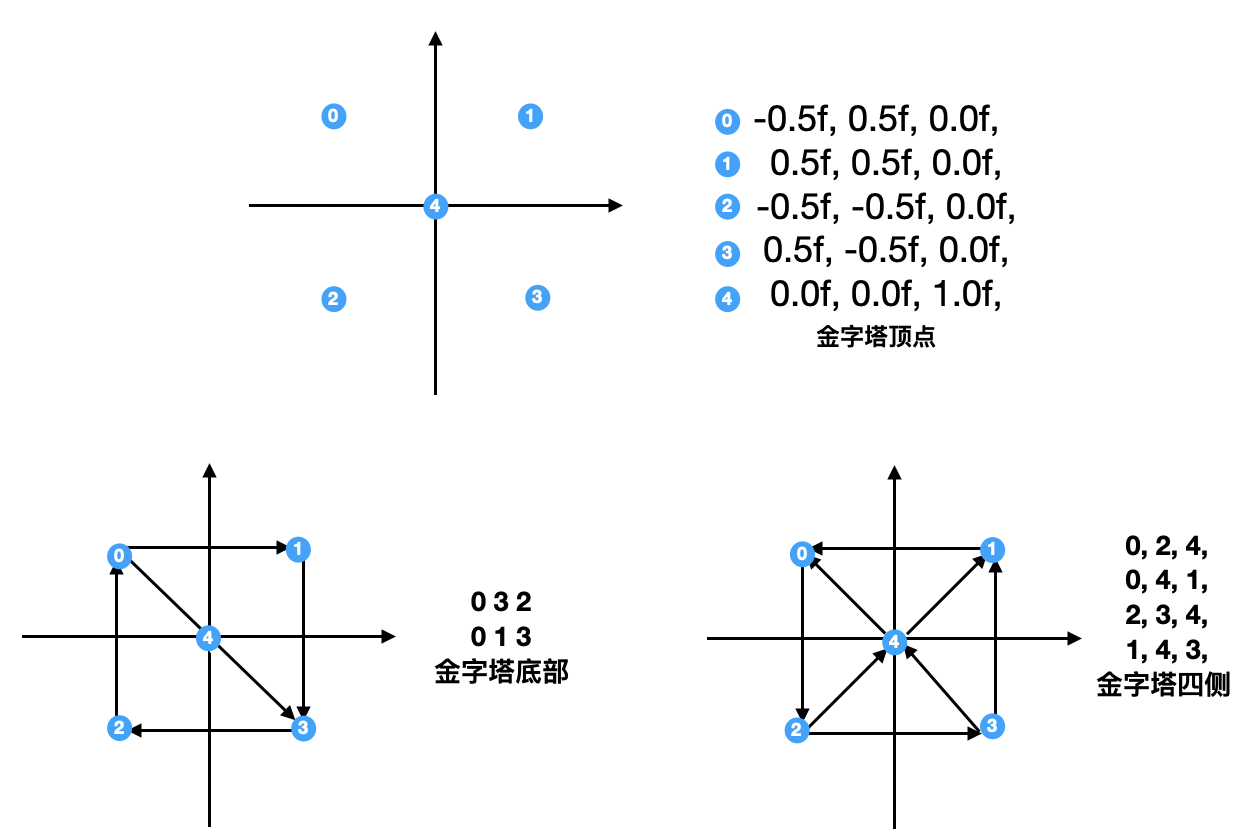
上图,三角锥金字塔所需顶点数据 和 索引信息
3、主要代码
view 代码:
  1 //
  2 //  MyGLSLView.m
  3 //  GL_Demo_GLSL
  4 //
  5 //  Created by Domy on 2020/7/31.
  6 //  Copyright © 2020 Domy. All rights reserved.
  7 //
  8
  9
 10 /*
 11  不采用 GLKBaseEffect,使用编译链接自定义的着色器(shader)。用简单的 glsl 语言来实现顶点、片元着色器,并图形进行简单的变换。
 12  思路:
 13  1.创建图层
 14  2.创建上下文
 15  3.清空缓存区
 16  4.设置RenderBuffer
 17  5.设置FrameBuffer
 18  6.开始绘制
 19  */
 20
 21 #import "MyGLSLView.h"
 22
 23 #import <OpenGLES/ES2/gl.h>
 24
 25 #import "GLESMath.h"
 26
 27
 28 @interface MyGLSLView () {
 29
 30     float xDegree;
 31     float yDegree;
 32     float zDegree;
 33     BOOL bX;
 34     BOOL bY;
 35     BOOL bZ;
 36     NSTimer *myTimer;
 37 }
 38
 39 @property (nonatomic, strong) CAEAGLLayer *myEGLLayer;// 图层
 40 @property (nonatomic, strong) EAGLContext *myContext;// 上下文
 41
 42 @property (nonatomic, assign) GLuint myColorFrameBuffer;//
 43 @property (nonatomic, assign) GLuint myColorRenderBuffer;// 渲染缓冲区
 44
 45 @property (nonatomic, assign) GLuint myProgram;
 46
 47 @end
 48
 49
 50 @implementation MyGLSLView
 51
 52 // 重写系统 layer 方法
 53 +(Class)layerClass {
 54     return [CAEAGLLayer class];
 55 }
 56
 57 - (void)layoutSubviews {
 58
 59     // 1. 创建设置图层
 60     // 设置 layer
 61     self.myEGLLayer = (CAEAGLLayer *)self.layer;
 62
 63     // 设置 scale
 64     [self setContentScaleFactor:[[UIScreen mainScreen] scale]];
 65
 66     // 设置属性
 67     /*
 68      kEAGLDrawablePropertyRetainedBacking:绘图表面显示后,是否保留其内容。
 69      kEAGLDrawablePropertyColorFormat:可绘制表面的内部颜色缓存区格式,这个key对应的值是一个NSString指定特定颜色缓存区对象。默认是kEAGLColorFormatRGBA8;
 70
 71      kEAGLColorFormatRGBA8:32位RGBA的颜色,4*8=32位
 72      kEAGLColorFormatRGB565:16位RGB的颜色,
 73      kEAGLColorFormatSRGBA8:sRGB代表了标准的红、绿、蓝,即CRT显示器、LCD显示器、投影机、打印机以及其他设备中色彩再现所使用的三个基本色素,sRGB的色彩空间基于独立的色彩坐标,可以使色彩在不同的设备使用传输中对应于同一个色彩坐标体系,而不受这些设备各自具有的不同色彩坐标的影响。
 74      */
 75 //    self.myEGLLayer.drawableProperties = @{kEAGLDrawablePropertyRetainedBacking:@(NO),kEAGLDrawablePropertyColorFormat:kEAGLColorFormatRGBA8};
 76     self.myEGLLayer.drawableProperties = [NSDictionary dictionaryWithObjectsAndKeys:@false,kEAGLDrawablePropertyRetainedBacking, kEAGLColorFormatRGBA8,kEAGLDrawablePropertyColorFormat,nil];
 77
 78
 79     // 2. 设置上下文
 80     self.myContext = [[EAGLContext alloc] initWithAPI:kEAGLRenderingAPIOpenGLES2];
 81     if (!self.myContext) {
 82         NSLog(@"create context failed!");
 83         return;
 84     }
 85     BOOL isSetSuccess = [EAGLContext setCurrentContext:self.myContext];
 86     if (!isSetSuccess) {
 87         return;
 88     }
 89
 90
 91     // 3. 清空缓冲区
 92     glDeleteBuffers(1, &_myColorRenderBuffer);
 93     self.myColorRenderBuffer = 0;
 94     glDeleteBuffers(1, &_myColorFrameBuffer);
 95     self.myColorFrameBuffer = 0;
 96
 97
 98     // 4. 设置渲染缓冲区 renderBuffer
 99     // 生成缓冲区 ID
100     GLuint rb;
101     glGenRenderbuffers(1, &rb);
102     self.myColorRenderBuffer = rb;
103     // 绑定缓冲区
104     glBindRenderbuffer(GL_RENDERBUFFER, self.myColorRenderBuffer);
105
106     // 绑到 context: contect 与 eagllayer绑定在一起
107     [self.myContext renderbufferStorage:GL_RENDERBUFFER fromDrawable:self.myEGLLayer];
108
109
110     // 5. 设置帧缓冲区 FrameBuffer
111     glGenBuffers(1, &_myColorFrameBuffer);
112     glBindFramebuffer(GL_FRAMEBUFFER, self.myColorFrameBuffer);
113
114     // 渲染缓冲区 与 帧缓冲区绑在一起
115     /*
116      target:
117      attachment:将 renderBuffer 附着到frameBuffer的哪个附着点上
118      renderbuffertarget
119      renderbuffer
120      */
121     //    glFramebufferRenderbuffer(GLenum target, GLenum attachment, GLenum renderbuffertarget, GLuint renderbuffer)
122     glFramebufferRenderbuffer(GL_FRAMEBUFFER, GL_COLOR_ATTACHMENT0, GL_RENDERBUFFER, self.myColorRenderBuffer);
123
124
125     // 开始绘制
126     [self renderLayer];
127
128 }
129
130 - (void)renderLayer {
131
132     glClearColor(0.7, 0.7, 0.7, 1);
133     glClear(GL_COLOR_BUFFER_BIT);
134
135     /// 1. 设置视口
136     CGFloat mainScale = [UIScreen mainScreen].scale;
137     glViewport(self.frame.origin.x * mainScale, self.frame.origin.y * mainScale, self.frame.size.width * mainScale, self.frame.size.height * mainScale);
138
139     /// 2. 读取着色器代码
140     // 定义路径
141     NSString *verPath = [[NSBundle mainBundle] pathForResource:@"shaderv" ofType:@"vsh"];
142     NSString *fragPath = [[NSBundle mainBundle] pathForResource:@"shaderf" ofType:@"fsh"];
143
144     /// 3. 加载着色器
145     if (self.myProgram) {
146         // delete
147         glDeleteProgram(self.myProgram);
148         self.myProgram = 0;
149     }
150     self.myProgram = [self loadShadersWithVertex:verPath Withfrag:fragPath];
151
152     /// 4. 链接 program
153     glLinkProgram(self.myProgram);
154     // 获取连接状态
155     GLint linkStatus;
156     glGetProgramiv(self.myProgram, GL_LINK_STATUS, &linkStatus);
157     if (linkStatus == GL_FALSE) {// 链接出错
158         // 获取错误信息 log
159         GLchar message[512];
160         glGetProgramInfoLog(self.myProgram, sizeof(message), 0, &message[0]);
161         NSString *messageString = [NSString stringWithUTF8String:message];
162         NSLog(@"Program Link Error:%@",messageString);
163         return;
164     }
165
166     /// 5. 使用 program
167     glUseProgram(self.myProgram);
168
169
170
171     /// 6. 设置顶点、颜色RGB
172     GLfloat attrArr[] = {
173
174         -0.5f, 0.5f, 0.0f,      1.0f, 0.0f, 1.0f, //左上0
175         0.5f, 0.5f, 0.0f,       1.0f, 0.0f, 1.0f, //右上1
176         -0.5f, -0.5f, 0.0f,     1.0f, 1.0f, 1.0f, //左下2
177
178         0.5f, -0.5f, 0.0f,      1.0f, 1.0f, 1.0f, //右下3
179         0.0f, 0.0f, 1.0f,       0.0f, 1.0f, 0.0f, //顶点4
180     };
181     // 索引数组
182     GLuint indices[] = {
183         0, 3, 2,
184         0, 1, 3,
185         0, 2, 4,
186         0, 4, 1,
187         2, 3, 4,
188         1, 4, 3,
189     };
190
191     /// 7. copy 到顶点缓冲区
192     GLuint buffer;
193     glGenBuffers(1, &buffer);
194     glBindBuffer(GL_ARRAY_BUFFER, buffer);
195     // 顶点数据 copy 到缓冲区
196     glBufferData(GL_ARRAY_BUFFER, sizeof(attrArr), attrArr, GL_DYNAMIC_DRAW);
197
198     /// 8. 打开通道
199     // 8.1 顶点
200     // 获取通道 ID
201     /*
202      glGetAttribLocation(GLuint program, const GLchar *name)
203      program:
204      name: 给谁传 --> .vsh 的 position
205      */
206     GLuint position = glGetAttribLocation(self.myProgram, "position");
207     // 打开通道
208     glEnableVertexAttribArray(position);
209     // 读数据
210     glVertexAttribPointer(position, 3, GL_FLOAT, GL_FALSE, sizeof(GLfloat) * 6, NULL);
211
212     // 顶点颜色
213      GLuint positionColor = glGetAttribLocation(self.myProgram, "positionColor");
214      // 设置合适的方式从 buffer 里面读取数据
215      glEnableVertexAttribArray(positionColor);
216      glVertexAttribPointer(positionColor, 3, GL_FLOAT, GL_FALSE, sizeof(GLfloat) * 6, (float *)NULL + 3);
217
218     // 矩阵变换
219     [self configMartix];
220
221
222     /// 11.  绘制
223 //    glDrawArrays(GL_TRIANGLES, 0, 6);
224
225     glEnable(GL_CULL_FACE);
226     glEnable(GL_DEPTH_TEST);
227
228
229     // 使用索引绘图
230     /*
231      void glDrawElements(GLenum mode,GLsizei count,GLenum type,const GLvoid * indices);
232      参数列表:
233      mode:要呈现的画图的模型
234                 GL_POINTS
235                 GL_LINES
236                 GL_LINE_LOOP
237                 GL_LINE_STRIP
238                 GL_TRIANGLES
239                 GL_TRIANGLE_STRIP
240                 GL_TRIANGLE_FAN
241      count:绘图个数
242      type:类型
243              GL_BYTE
244              GL_UNSIGNED_BYTE
245              GL_SHORT
246              GL_UNSIGNED_SHORT
247              GL_INT
248              GL_UNSIGNED_INT
249      indices:绘制索引数组
250
251      */
252     glDrawElements(GL_TRIANGLES, sizeof(indices) / sizeof(indices[0]), GL_UNSIGNED_INT, indices);
253
254
255
256     // 12. 从渲染缓冲区显示到屏幕
257     [self.myContext presentRenderbuffer:GL_RENDERBUFFER];
258 }
259
260 // 旋转 - 矩阵变换
261 - (void)configMartix {
262
263     // 1.找到myProgram中的projectionMatrix、modelViewMatrix 2个矩阵的地址。如果找到则返回地址,否则返回-1,表示没有找到2个对象。
264     GLuint projectionMatrixSlot = glGetUniformLocation(self.myProgram, "projectionMatrix");
265     GLuint modelViewMatrixSlot = glGetUniformLocation(self.myProgram, "modelViewMatrix");
266
267     float width = self.frame.size.width;
268     float height = self.frame.size.height;
269
270     // 2.创建4 * 4投影矩阵
271     KSMatrix4 _projectionMatrix;
272     //(1)获取单元矩阵
273     ksMatrixLoadIdentity(&_projectionMatrix);
274     //(2)计算纵横比例 = 长/宽
275     float aspect = width / height; //长宽比
276     //(3)获取透视矩阵
277     /*
278      参数1:矩阵
279      参数2:视角,度数为单位
280      参数3:纵横比
281      参数4:近平面距离
282      参数5:远平面距离
283 284      */
285     ksPerspective(&_projectionMatrix, 30.0, aspect, 5.0f, 20.0f); //透视变换,视角30°
286     //(4)将投影矩阵传递到顶点着色器
287     /*
288      void glUniformMatrix4fv(GLint location,  GLsizei count,  GLboolean transpose,  const GLfloat *value);
289      参数列表:
290      location:指要更改的uniform变量的位置
291      count:更改矩阵的个数
292      transpose:是否要转置矩阵,并将它作为uniform变量的值。必须为GL_FALSE
293      value:执行count个元素的指针,用来更新指定uniform变量
294      */
295     glUniformMatrix4fv(projectionMatrixSlot, 1, GL_FALSE, (GLfloat*)&_projectionMatrix.m[0][0]);
296
297
298     // 3.创建一个4 * 4 矩阵,模型视图矩阵
299     KSMatrix4 _modelViewMatrix;
300     //(1)获取单元矩阵
301     ksMatrixLoadIdentity(&_modelViewMatrix);
302     //(2)平移,z轴平移-10
303     ksTranslate(&_modelViewMatrix, 0.0, 0.0, -10.0);
304     //(3)创建一个4 * 4 矩阵,旋转矩阵
305     KSMatrix4 _rotationMatrix;
306     //(4)初始化为单元矩阵
307     ksMatrixLoadIdentity(&_rotationMatrix);
308     //(5)旋转
309     ksRotate(&_rotationMatrix, xDegree, 1.0, 0.0, 0.0); //绕X轴
310     ksRotate(&_rotationMatrix, yDegree, 0.0, 1.0, 0.0); //绕Y轴
311     ksRotate(&_rotationMatrix, zDegree, 0.0, 0.0, 1.0); //绕Z轴
312     //(6)把变换矩阵相乘.将_modelViewMatrix矩阵与_rotationMatrix矩阵相乘,结合到模型视图
313      ksMatrixMultiply(&_modelViewMatrix, &_rotationMatrix, &_modelViewMatrix);
314     //(7)将模型视图矩阵传递到顶点着色器
315     /*
316      void glUniformMatrix4fv(GLint location,  GLsizei count,  GLboolean transpose,  const GLfloat *value);
317      参数列表:
318      location:指要更改的uniform变量的位置
319      count:更改矩阵的个数
320      transpose:是否要转置矩阵,并将它作为uniform变量的值。必须为GL_FALSE
321      value:执行count个元素的指针,用来更新指定uniform变量
322      */
323     glUniformMatrix4fv(modelViewMatrixSlot, 1, GL_FALSE, (GLfloat*)&_modelViewMatrix.m[0][0]);
324 }
325
326 // 加载纹理
327 - (void)loadTexture {
328
329     // 9.0 image 转为 CGImageRef
330     CGImageRef spriteImage = [UIImage imageNamed:@"0001"].CGImage;
331     // 图片是否获取成功
332     if (!spriteImage) {
333         NSLog(@"Failed to load image ");
334         return;
335     }
336     // 获取图片宽高
337     size_t width = CGImageGetWidth(spriteImage);
338     size_t height = CGImageGetHeight(spriteImage);
339     // 获取图片字节数 宽*高*4(RGBA)
340     GLubyte *spriteData = (GLubyte *) calloc(width * height * 4, sizeof(GLubyte));
341
342     // 创建上下文
343     /*
344      data:指向要渲染的绘制图像的内存地址
345      width:bitmap 的宽度,单位为像素
346      height:bitmap 的高度,单位为像素
347      bitPerComponent:内存中像素的每个组件的位数,比如 32 位 RGBA,就设置为 8
348      bytesPerRow:bitmap 的没一行的内存所占的比特数
349      colorSpace:bitmap 上使用的颜色空间  kCGImageAlphaPremultipliedLast:RGBA
350      */
351     CGContextRef spriteContext = CGBitmapContextCreate(spriteData, width, height, 8, width*4,CGImageGetColorSpace(spriteImage), kCGImageAlphaPremultipliedLast);
352
353     // 在 CGContextRef 上 --> 将图片绘制出来
354     /*
355      CGContextDrawImage 使用的 Core Graphics 框架,坐标系与 UIKit 不一样。UIKit 框架的原点在屏幕的左上角,Core Graphics 框架的原点在屏幕的左下角。
356      CGContextDrawImage(CGContextRef  _Nullable c, CGRect rect, CGImageRef  _Nullable image)
357      c:绘图上下文
358      rect:rect坐标
359      image:绘制的图片
360      */
361     CGRect rect = CGRectMake(0, 0, width, height);
362     CGContextDrawImage(spriteContext, rect, spriteImage);
363
364
365     // 翻转图片 方案一
366     // x、y 轴平移
367     CGContextTranslateCTM(spriteContext, rect.origin.x, rect.origin.y);
368     // y 平移
369     CGContextTranslateCTM(spriteContext, 0, rect.size.height);
370     // Y 轴方向 Scale -1 翻转
371     CGContextScaleCTM(spriteContext, 1.0, -1.0);
372     // 平移回原点位置处
373     CGContextTranslateCTM(spriteContext, -rect.origin.x, -rect.origin.y);
374     // 重绘
375     CGContextDrawImage(spriteContext, rect, spriteImage);
376
377
378     // 绘完 释放上下文
379     CGContextRelease(spriteContext);
380
381     // 9.1. 绑定纹理到默认的纹理ID
382     glBindTexture(GL_TEXTURE_2D, 0);
383
384     // 9.2. 设置纹理属性
385     /*
386      glTexParameteri(GLenum target, GLenum pname, GLint param)
387      target:纹理维度
388      pname:线性过滤; 为s,t坐标设置模式
389      param:wrapMode; 环绕模式
390      */
391     // 过滤方式
392     glTexParameteri(GL_TEXTURE_2D, GL_TEXTURE_MIN_FILTER, GL_LINEAR);
393     glTexParameteri(GL_TEXTURE_2D, GL_TEXTURE_MAG_FILTER, GL_LINEAR);
394     // 环绕方式
395     glTexParameteri(GL_TEXTURE_2D, GL_TEXTURE_WRAP_S, GL_CLAMP_TO_EDGE);
396     glTexParameteri(GL_TEXTURE_2D, GL_TEXTURE_WRAP_T, GL_CLAMP_TO_EDGE);
397
398     // 9.3 载入纹理
399     /* 载入纹理 glTexImage2D
400     参数1:纹理维度,GL_TEXTURE_2D
401     参数2:mip贴图层次
402     参数3:纹理单元存储的颜色成分(从读取像素图中获得)
403     参数4:加载纹理宽度
404     参数5:加载纹理的高度
405     参数6:为纹理贴图指定一个边界宽度 0
406     参数7、8:像素数据的数据类型, GL_UNSIGNED_BYTE无符号整型
407     参数9:指向纹理图像数据的指针
408     */
409     float fw = width, fh = height;
410     glTexImage2D(GL_TEXTURE_2D, 0, GL_RGBA, fw, fh, 0, GL_RGBA, GL_UNSIGNED_BYTE, spriteData);
411
412     // 9.4 释放 sprite
413     free(spriteData);
414 }
415
416
417
418
419 // 加载着色器
420 // 顶点着色器 和 片元着色器 的代码传进来(.vsh  .fsh)
421 -(GLuint)loadShadersWithVertex:(NSString *)vert Withfrag:(NSString *)frag {
422
423     // 1.定义 着色器
424     GLuint verShader, fragShader;
425
426     // 2.创建程序 program
427     GLint program = glCreateProgram();// 创建一个空的程序对象
428
429     // 3.编译着色器 --> 封装一个方法 compileShaderWithShader:
430     [self compileShaderWithShader:&verShader shaderType:GL_VERTEX_SHADER filePath:vert];
431     [self compileShaderWithShader:&fragShader shaderType:GL_FRAGMENT_SHADER filePath:frag];
432
433     // 4.attach shader, 将shader附着到 程序
434     glAttachShader(program, verShader);
435     glAttachShader(program, fragShader);
436
437     //5.已附着好的 shader 删掉,避免不必要的内存占用
438     glDeleteShader(verShader);
439     glDeleteShader(fragShader);
440
441     return program;// 返回编译好的程序
442 }
443 // 编译着色器
444 /*
445  shader: 着色器 ID
446  type: 着色器类型
447  path: 着色器代码文件路径
448  */
449 - (void)compileShaderWithShader:(GLuint *)shader shaderType:(GLenum)type filePath:(NSString *)path {
450
451     // 1.读取文件路径
452     NSString *file = [NSString stringWithContentsOfFile:path encoding:NSUTF8StringEncoding error:nil];
453     // NSString 转 C 的 char
454     const GLchar *source = (GLchar *)[file UTF8String];
455
456     // 2.创建对应类型的shader
457     *shader = glCreateShader(type);
458
459     // 3.读取着色器源码 将其附着到着色器对象上面
460     /* params:
461      shader: 要编译的着色器对象 *shader
462      numOfStrings: 传递的源码字符串数量 1个
463      参数3:strings: 着色器程序的源码(真正的着色器程序源码)
464      参数4:lenOfStrings: 长度,具有每个字符串长度的数组,或NULL,这意味着字符串是NULL终止的
465      */
466     //    glShaderSource(GLuint shader, GLsizei count, const GLchar *const *string, const GLint *length)
467     glShaderSource(*shader, 1, &source,NULL);
468
469     // 4. 编译
470     glCompileShader(*shader);
471 }
472
473 - (IBAction)rotClick:(UIButton *)sender {
474
475     bX = bY = bZ = YES;
476
477     myTimer = [NSTimer scheduledTimerWithTimeInterval:0.05 target:self selector:@selector(reDegree) userInfo:nil repeats:YES];
478 }
479
480
481 // 旋转
482 -(void)reDegree {
483
484     //如果停止X轴旋转,X = 0则度数就停留在暂停前的度数.
485     //更新度数
486     xDegree += bX * 5;
487     yDegree += bY * 7;
488     zDegree += bZ * 9;
489     //重新渲染
490     [self renderLayer];
491
492 }
493
494 @end
着色器代码:
 1 // 顶点着色器
 2
 3 attribute vec4 position;
 4 attribute vec4 positionColor;
 5
 6 uniform mat4 projectionMatrix;
 7 uniform mat4 modelViewMatrix;
 8
 9 varying lowp vec4 varyColor;
10
11 void main() {
12
13     varyColor = positionColor;
14
15     vec4 vPos;
16
17     //4*4 * 4*4 * 4*1
18     vPos = projectionMatrix * modelViewMatrix * position;
19
20     //ERROR
21     //vPos = position * modelViewMatrix  * projectionMatrix ;
22     gl_Position = vPos;
23 }
1 // 纹理着色器
2 varying lowp vec4 varyColor;
3 void main() {
4
5     gl_FragColor = varyColor;
6 }
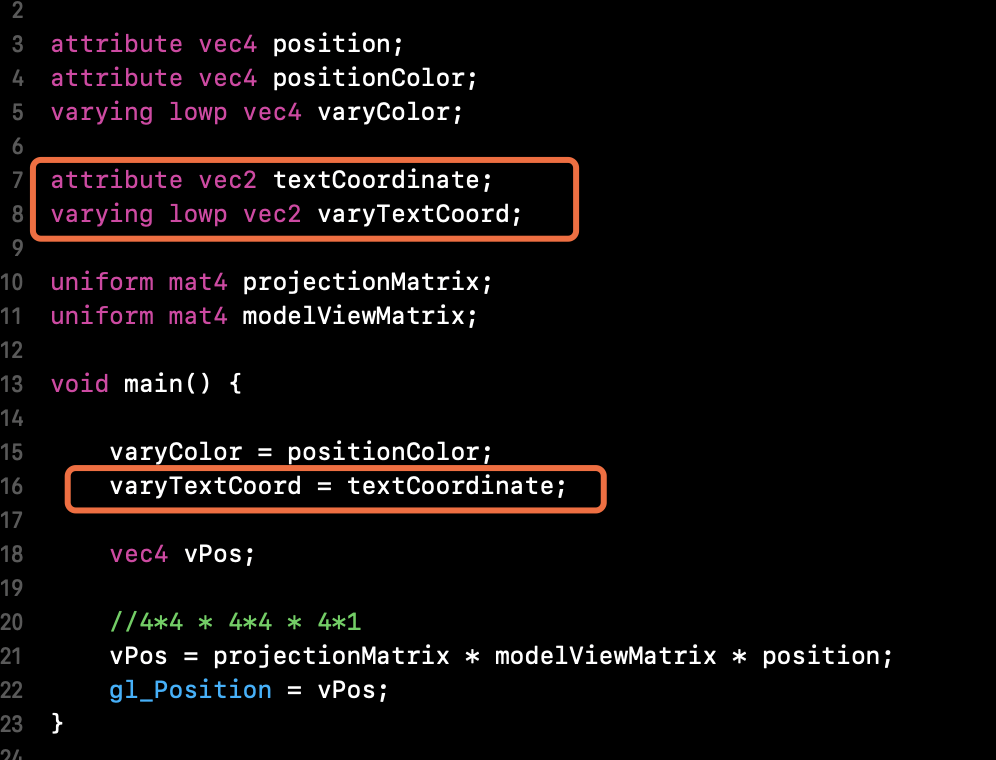
3.1、混合纹理
纹理加载代码和之前Demo相同,不再赘述。
着色器代码所需修改:
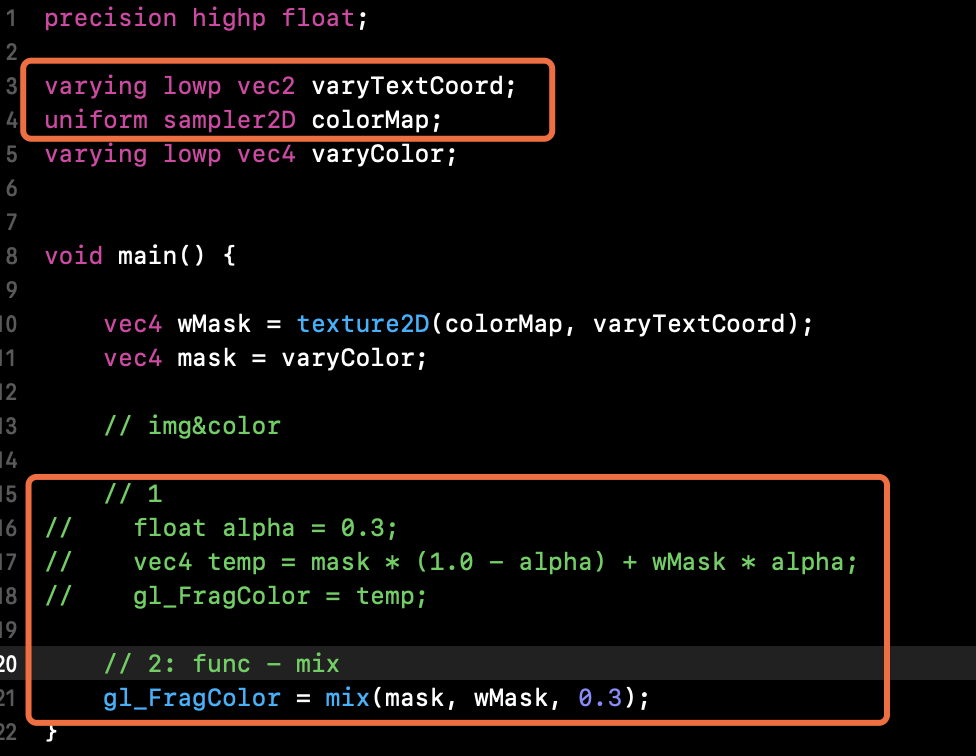
效果见下面效果动图
三、GLKit 索引绘图绘制旋转三角锥 - 颜色纹理混合
效果:
代码:
  1 #import "ViewController.h"
  2
  3 @interface ViewController () {
  4
  5     dispatch_source_t timer;
  6 }
  7
  8 @property (nonatomic, strong) EAGLContext *myContext;
  9 @property (nonatomic, strong) GLKBaseEffect *myEffect;
 10
 11 // 旋转的度数
 12 @property(nonatomic, assign) float XDegree;
 13 @property(nonatomic, assign) float YDegree;
 14 @property(nonatomic, assign) float ZDegree;
 15
 16 @property(nonatomic, assign) int count;// 顶点个数
 17
 18 @end
 19
 20 @implementation ViewController
 21
 22 - (void)viewDidLoad {
 23     [super viewDidLoad];
 24     // Do any additional setup after loading the view.
 25
 26     // 新建图层
 27     [self creatContext];
 28
 29     // 渲染图层
 30     [self render];
 31 }
 32
 33 - (void)render {
 34
 35     // 顶点数据
 36 //    // 3顶点 3颜色
 37 //    GLfloat attrArr[] = {
 38 //        -0.5f, 0.5f, 0.0f,      1.0f, 0.0f, 1.0f, //左上
 39 //        0.5f, 0.5f, 0.0f,       1.0f, 0.0f, 1.0f, //右上
 40 //        -0.5f, -0.5f, 0.0f,     1.0f, 1.0f, 1.0f, //左下
 41 //
 42 //        0.5f, -0.5f, 0.0f,      1.0f, 1.0f, 1.0f, //右下
 43 //        0.0f, 0.0f, 1.0f,       0.0f, 1.0f, 0.0f, //顶点
 44 //    };
 45
 46     // 3顶点 3颜色 2纹理
 47     GLfloat attrArr[] = {
 48             -0.5f, 0.5f, 0.0f,      1.0f, 0.0f, 1.0f,       0.0f, 1.0f,//左上
 49             0.5f, 0.5f, 0.0f,       1.0f, 0.0f, 1.0f,       1.0f, 1.0f,//右上
 50             -0.5f, -0.5f, 0.0f,     1.0f, 1.0f, 1.0f,       0.0f, 0.0f,//左下
 51
 52             0.5f, -0.5f, 0.0f,      1.0f, 1.0f, 1.0f,       1.0f, 0.0f,//右下
 53             0.0f, 0.0f, 1.0f,       0.0f, 1.0f, 0.0f,       0.5f, 0.5f,//顶点
 54         };
 55
 56     // 绘图索引数组
 57     GLuint indexes[] = {
 58         0, 3, 2,
 59         0, 1, 3,
 60         0, 2, 4,
 61         0, 4, 1,
 62         2, 3, 4,
 63         1, 4, 3,
 64     };
 65     self.count = sizeof(indexes) / sizeof(GLuint);//sizeof(indexes[0]);
 66
 67     // 顶点数据copy到缓冲区
 68     GLuint attBuffer;
 69     glGenBuffers(1, &attBuffer);
 70     glBindBuffer(GL_ARRAY_BUFFER, attBuffer);
 71     glBufferData(GL_ARRAY_BUFFER, sizeof(attrArr), attrArr, GL_STATIC_DRAW);
 72
 73     // 索引数据copy到缓冲区
 74     GLuint indexesBuffer;
 75     glGenBuffers(1, &indexesBuffer);
 76     glBindBuffer(GL_ELEMENT_ARRAY_BUFFER, indexesBuffer);
 77     glBufferData(GL_ELEMENT_ARRAY_BUFFER, sizeof(indexes), indexes, GL_STATIC_DRAW);
 78
 79     // 传递使用顶点数据
 80     glEnableVertexAttribArray(GLKVertexAttribPosition);
 81     glVertexAttribPointer(GLKVertexAttribPosition, 3, GL_FLOAT, GL_FALSE, sizeof(GLfloat)*8, NULL);
 82
 83     // 使用传递y颜色数据
 84     glEnableVertexAttribArray(GLKVertexAttribColor);
 85     glVertexAttribPointer(GLKVertexAttribColor, 3, GL_FLOAT, GL_FALSE, sizeof(GLfloat)*8, (GLfloat *)NULL + 3);
 86
 87     // 纹理
 88     glEnableVertexAttribArray(GLKVertexAttribTexCoord0);
 89     glVertexAttribPointer(GLKVertexAttribTexCoord0, 3, GL_FLOAT, GL_FALSE, sizeof(GLfloat) * 8, (GLfloat *)NULL + 6);
 90
 91     // 纹理图片的读取
 92     NSString *filePath = [[NSBundle mainBundle] pathForResource:@"cat" ofType:@"jpg"];
 93     NSDictionary *option = @{GLKTextureLoaderOriginBottomLeft:@(YES)};
 94     GLKTextureInfo *info = [GLKTextureLoader textureWithContentsOfFile:filePath options:option error:nil];
 95
 96     // 绘制
 97     self.myEffect = [[GLKBaseEffect alloc] init];
 98     // 纹理
 99     self.myEffect.texture2d0.enabled = YES;
100     self.myEffect.texture2d0.name = info.name;
101
102     // 投影矩阵
103     float aspect = fabs(self.view.frame.size.width/self.view.frame.size.height);
104     GLKMatrix4 projectionMatrix = GLKMatrix4MakePerspective(GLKMathDegreesToRadians(90.0), aspect, 0.1f, 100.f);
105     // 投影矩阵 scale
106     projectionMatrix = GLKMatrix4Scale(projectionMatrix, 1.0, 1.0, 1.0);
107     self.myEffect.transform.projectionMatrix = projectionMatrix;
108
109     // 模型视图矩阵
110     GLKMatrix4 modelViewMatrix = GLKMatrix4Translate(GLKMatrix4Identity, 0.0f, 0.0f, -2.0f);
111     self.myEffect.transform.modelviewMatrix = modelViewMatrix;
112
113
114     // GCD 定时器  - 旋转
115     double seconds = 0.1;
116     timer = dispatch_source_create(DISPATCH_SOURCE_TYPE_TIMER, 0, 0, dispatch_get_main_queue());
117     dispatch_source_set_timer(timer, DISPATCH_TIME_NOW, seconds * NSEC_PER_SEC, 0.0);
118     dispatch_source_set_event_handler(timer, ^{
119
120         self.XDegree += 0.1f;
121         self.YDegree += 0.1f;
122         self.ZDegree += 0.1f;
123
124     });
125     dispatch_resume(timer);
126 }
127
128 - (void)creatContext {
129
130     self.myContext = [[EAGLContext alloc] initWithAPI:kEAGLRenderingAPIOpenGLES2];
131
132     // view
133     GLKView *kitView = (GLKView *)self.view;
134     kitView.context = self.myContext;
135     kitView.drawableColorFormat = GLKViewDrawableColorFormatRGBA8888;
136     kitView.drawableDepthFormat = GLKViewDrawableDepthFormat24;
137
138     // 设置当前上下文
139     [EAGLContext setCurrentContext:self.myContext];
140
141     // 开启深度测试
142     glEnable(GL_DEPTH_TEST);
143 }
144
145 #pragma mark - GLKView delegate - 绘制 -
146 - (void)glkView:(GLKView *)view drawInRect:(CGRect)rect {
147
148     glClearColor(0.0, 0.3, 0.3, 1);
149     glClear(GL_COLOR_BUFFER_BIT | GL_DEPTH_BUFFER_BIT);
150
151     [self.myEffect prepareToDraw];
152     glDrawElements(GL_TRIANGLES, self.count, GL_UNSIGNED_INT, 0);
153
154 }
155 // update - 旋转
156 - (void)update {
157
158     GLKMatrix4 modelViewMatrix = GLKMatrix4Translate(GLKMatrix4Identity, 0.0f, 0.0f, -3.0);
159     modelViewMatrix = GLKMatrix4RotateX(modelViewMatrix, self.XDegree);
160     modelViewMatrix = GLKMatrix4RotateY(modelViewMatrix, self.YDegree);
161     modelViewMatrix = GLKMatrix4RotateZ(modelViewMatrix, self.ZDegree);
162
163     self.myEffect.transform.modelviewMatrix = modelViewMatrix;
164
165 }
166
167 - (IBAction)rotClick:(UIButton *)sender {
168
169 }
170
171
172 @end