Actuator其实是监控Spring Boot应用的一些信息,如依赖关系,路径处理器关系,线程信息,JVM信息等,但是这些信息都是以json格式返回,没有可视化的页面,需要自己去搜索想要了解的详细信息。
而这些信息可以通过三种方式获取:
1.Actuator端点方式,Rest请求获取(使用spring-boot-starter-actuator自启动,如果不是web工程,还需要加spring-webmvc的依赖)
2.远程shell,使用命令查看(使用spring-boot-starter-remote-shell自启动,监听端口为2000,用户名默认为user,密码会在启动日志可以查看到)
3.JMX方式
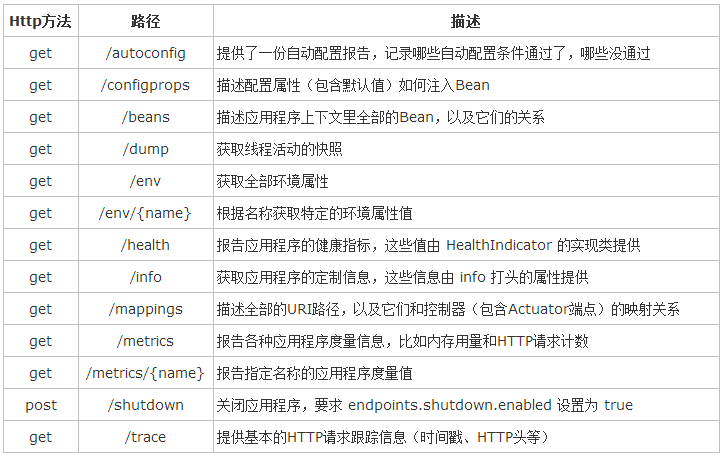
Actuator端点信息:
在使用Actuator端点查看信息时,有如下敏感信息会被隐藏,查看不了(页面出现错误信息的情况)

解决的方法是在application.properties加入如下配置:
management.security.enabled=false
如果我们需要对Actuator进行个性化设置,可在以下几方面进行定制:
1.端点重命名(避免请求路径冲突或者避免默认请求暴露,例如在application.properties中加上配置:endpoint.beans.id=beanlist)
2.端点禁用与启用(例如在application.properties中加上配置:endpoint.beans.enabled=false)
3.自定义度量信息,针对于metrics端点信息
3.1如果是统计的话,可使用CounterService接口跟GaugeService接口,无需实现,spring已经帮我们实现了,只要引用就好
@Controller
@RequestMapping("/myworld")
public class MyController {

    @Resource
    private CounterService counterService;

    @Resource
    private GaugeService gaugeService;

    @ResponseBody
    @RequestMapping("hello")
    public String hello(){
        // 在metrics端点增加hello request属性(访问计数)
        counterService.increment("hello.request");
        // 属性时间更新
        gaugeService.submit(
                "hello.request.saved", System.currentTimeMillis());
        return  "hello";
    }
}
3.2如果需要自定义的一些信息,可实现PublicMetrics接口
@Component
public class ApplicationContextMetrics implements PublicMetrics {

    @Resource
    private ApplicationContext context;

    @Override
    public Collection<Metric<?>> metrics() {
        List<Metric<?>> metrics = new ArrayList<Metric<?>>();
        // 启动时间
        metrics.add(new Metric<Long>("spring.context.startup-date",
                context.getStartupDate()));
        // bean的总数量
        metrics.add(new Metric<Integer>("spring.beans",
                context.getBeanNamesForType(Object.class).length));
        // Controller的数量
        metrics.add(new Metric<Integer>("spring.controllers",
                context.getBeanNamesForAnnotation(Controller.class).length));
        return metrics;
    }
}
4.自定义跟踪数据的仓库(主要针对trace端点,默认保留100条跟踪信息,新来的会覆盖旧有的,我们可以加大容量设为1000或者10000,但还有一种方法就是自定义仓库,实现TraceRepository接口)
我使用的是redis作为跟踪数据的仓库,数据结构采用的set集合,也可以使用list列表,java实体转换json使用的是fastjson
引入redis自启动(如果引入不进来,可指定版本号,有可能spring-boot-starter-redis的版本号不及spring-boot版本的新,如redis自启动版本是1,
而spring-boot的版本是2,默认去找版本号为2的redis自启动是找不到的)
<dependency>
<groupId>org.springframework.boot</groupId>
<artifactId>spring-boot-starter-redis</artifactId>
</dependency>
具体spring-boot的redis使用可参考网上例子,这里不做详细描述,以后可写一篇关于spring redis使用的博文。
在application.properties加入redis的配置:
# REDIS (RedisProperties)
# Redis数据库索引(默认为0)
spring.redis.database=0
# Redis服务器地址
spring.redis.host=127.0.0.1
# Redis服务器连接端口
spring.redis.port=6379
# Redis服务器连接密码(默认为空)
spring.redis.password=
# 连接池中的最大空闲连接
spring.redis.pool.max-idle=200
# 连接池中的最小空闲连接
spring.redis.pool.min-idle=100
spring.redis.pool.max-wait=-1
# 连接超时时间(毫秒)
spring.redis.timeout=3000
代码如下:
@Component
public class RedisTraceRepository implements TraceRepository {

    @Autowired
    private JedisService jedisService;

    @Override
    public List<Trace> findAll() {
        return jedisService.findObjectSet(Trace.class);
    }

    @Override
    public void add(Map<String, Object> map) {
        jedisService.objectSet((new Trace(new Date(), map)));
    }
}
@Service
public class JedisService {

    private static final Map<String, String> mapNames = new ConcurrentHashMap();

    @Autowired
    private RedisTemplate redisTemplate;

       /**
     * 集合添加
     * @param key
     * @param value
     */
    public void add(String key,Object value){
        SetOperations<String, Object> set = redisTemplate.opsForSet();
        set.add(key,value);
    }

    /**
     * 集合获取
     * @param key
     * @return
     */
    public Set<Object> setMembers(String key){
        SetOperations<String, Object> set = redisTemplate.opsForSet();
        return set.members(key);
    }

    private static final boolean isUpperEnglishChar(char value) {
        return value >= 65 && value <= 90;
    }

    private static final <T> String getSimpleName(String simpleName) {
        char[] chars = simpleName.toCharArray();
        StringBuffer sb = new StringBuffer();

        for(int i = 0; i < chars.length; ++i) {
            char c = chars[i];
            if(i > 0 && isUpperEnglishChar(c)) {
                sb.append("_").append(String.valueOf(c).toLowerCase());
            } else {
                sb.append(String.valueOf(c).toLowerCase());
            }
        }

        return new String(sb);
    }

    public static <T> String getMapName(Class<T> clazz) {
        String name = clazz.getName();
        String mapName = (String)mapNames.get(name);
        if(StringUtils.isEmpty(mapName)) {
            mapName = getSimpleName(clazz.getSimpleName());
            mapNames.put(name, mapName);
        }

        return mapName;
    }


    public <T> void objectSet(final T obj) {
        add(getMapName(obj.getClass()), JSON.toJSONString(obj));
    }

    public <T> List<T> findObjectSet(Class<T> clazz) {
        String key =getMapName(clazz);
        Set<Object> set = setMembers(key);
        List<T> list = new ArrayList<T>();
        String value;
        for(Object t :set){
            value =t.toString();
            if(value != null) {
                list.add(JSON.parseObject(value,clazz));
            }
        }
        return  list;
    }
}
5.自定义健康指示器信息(主要针对于health端点,可实现HealthIndicator接口)
@Component
public class BodyHealth implements HealthIndicator {

    @Override
    public Health health() {
        try {
            return Health.up().withDetail("reason", "吃饱了很健康").build();
        } catch (Exception e) {
            return Health.down().withDetail("reason", "吃到一半拉肚子了").build();
        }
    }
}
actuator访问控制:
像rest直接请求端点信息,未免太不安全,所有人都可以看你工程的信息了,特别是/shutdown这请求,直接关了你的工程,那很嗨了。
所以接下来,这里结合spring security做端点访问的控制。
首先引入依赖:
<dependency>
<groupId>org.springframework.boot</groupId>
<artifactId>spring-boot-starter-security</artifactId>
</dependency>
在application.properties加入配置:
management.context-path=/admin
management.security.enabled=true

# 测试用户
security.user.name=admin
security.user.password=admin
security.basic.enabled=true

# 测试用户角色
management.security.roles=ADMIN
在写一个自定义的WebSecurityConfigurerAdapter,用于实现自己的定制实现:
package com.zgz.security;

import com.alibaba.druid.util.StringUtils;
import org.springframework.beans.factory.annotation.Autowired;
import org.springframework.context.annotation.Configuration;
import org.springframework.core.env.Environment;
import org.springframework.security.config.annotation.authentication.builders.AuthenticationManagerBuilder;
import org.springframework.security.config.annotation.web.builders.HttpSecurity;
import org.springframework.security.config.annotation.web.configuration.EnableWebSecurity;
import org.springframework.security.config.annotation.web.configuration.WebSecurityConfigurerAdapter;
import org.springframework.security.config.annotation.web.configurers.ExpressionUrlAuthorizationConfigurer;
import org.springframework.security.core.GrantedAuthority;
import org.springframework.security.core.userdetails.UserDetails;
import org.springframework.security.core.userdetails.UserDetailsService;
import org.springframework.security.core.userdetails.UsernameNotFoundException;

import java.util.Collection;

/**
 * Created by zgz on 2017/12/16.
 */
@Configuration
@EnableWebSecurity
public class WebSecurityConfig extends WebSecurityConfigurerAdapter {
    @Autowired
    Environment env;
    @Override
    protected void configure(HttpSecurity http) throws Exception {
        http.authorizeRequests()
                .antMatchers("/").access("hasRole('READER')")
                    // 这里对/admin/**的请求都判断有没有ADMIN角色,还记得配置文件配了对actuator端点的访问基路径吗(/admin),
                    // 没错,为了不影响其他请求,这里只对actuator端点进行鉴权
                .antMatchers("/admin/**").access("hasRole('ADMIN')")
                .antMatchers("/**").permitAll().and().formLogin().and().httpBasic();;
    }

    /** 如果不想在配置文件添加测试用户,也可在这里添加用户
    @Override
    protected void configure(
            AuthenticationManagerBuilder auth) throws Exception {
        auth.inMemoryAuthentication()
                .withUser("admin").password("admin")
                .roles("ADMIN");
    }
    **/
}
以上这里只是为了举例实现对actuator的访问控制,其实spring security还有很多可说,这里就不做详述,以后可再写一篇关于spring security的博文。
以上纯属个人整理跟理解,如有错误,请帮忙纠正我,在此感谢!