环境: CDH5.12.1 、 centos7
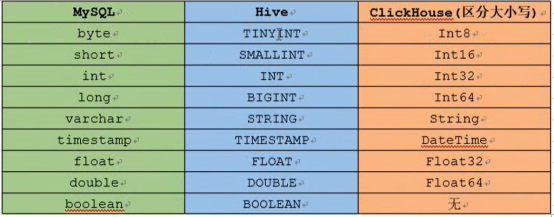
数据库类型
1、权限问题
dfs.permissions 设置为false(可以在配置界面勾选掉)
2、关闭安全模式,允许读写
hdfs dfsadmin -safemode leave
3、创建hive表
drop table if exists default.opportunity;

create table default.opportunity(id BIGINT,consultant_account STRING,first_consultant_account STRING,group_id BIGINT,
first_group_id BIGINT,sale_department_id BIGINT,first_sale_department_id BIGINT,legion_id BIGINT, first_legion_id BIGINT,
business_id  BIGINT,student_id BIGINT,province_id BIGINT,city_id BIGINT,create_user STRING, online_group_id BIGINT,
online_center_id BIGINT, create_time TIMESTAMP,allocate_time TIMESTAMP,apply_time TIMESTAMP,  auto_apply_time TIMESTAMP
)ROW FORMAT DELIMITED FIELDS TERMINATED BY '	';
4、sqoop全量导入数据
sqoop import
--connect jdbc:mysql://192.168.75.101:3306/dragnet
--username root
--password yang156122
--query 'select  id,consultant_account ,first_consultant_account,group_id, first_group_id,sale_department_id,first_sale_department_id,legion_id,first_legion_id,business_id,student_id,province_id,city_id,create_user,online_group_id,online_center_id,create_time,allocate_time,apply_time,auto_apply_time from opportunity where $CONDITIONS'
--target-dir /user/sqoop2/opportunity
--delete-target-dir
--num-mappers 1
--compress
--compression-codec org.apache.hadoop.io.compress.SnappyCodec
--direct
--fields-terminated-by '	'
###############实际案例##############
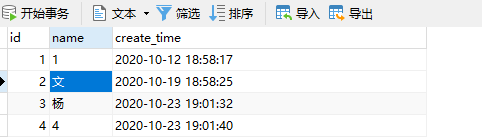
说明: 库表结构
1、创建库表
drop table if exists default.data
create table default.data(id BIGINT,name STRING, create_time TIMESTAMP)ROW FORMAT DELIMITED FIELDS TERMINATED BY ',';
2、全量导入
sqoop import
--connect jdbc:mysql://192.168.75.101:3306/dragnet
--username root
--password yang156122
--table data
--hive-import
--fields-terminated-by ','
--m 1
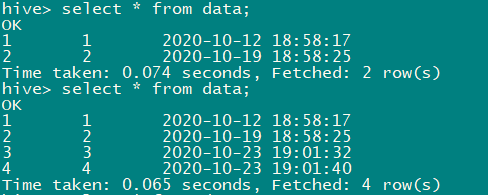
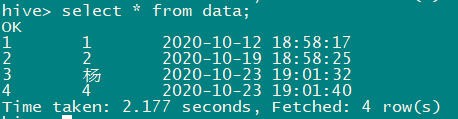
3、增量导入
sqoop import --connect jdbc:mysql://192.168.75.101:3306/dragnet
--username root
--password yang156122
--table data
--target-dir '/user/hive/warehouse/data'
--check-column create_time
--incremental lastmodified
--last-value '2020-10-23 00:00:00'
--m 1
--merge-key id
4、编写定时任务,并重启
/bin/systemctl restart crond.service