概念
Angular中的数据绑定指的是同一组件中控制器文件(.ts)与视图文件(.html)之间的数据传递。
分类
流向
单向绑定
它的意思是要么是ts文件为html文件赋值,要么相反。
ts->html
	<div>
	  <img src="{{imgUrl}}">
	  <img [src]="imgUrl">
	</div>
html->ts
<input (keyup)="press($event)">
小结:ts->html使用插值表达式{{value}}或[attr],html->ts使用(event)。ts->html较为常用。
双向绑定
ts文件与html文件中绑定的值同时改变。
下列代码表示当HTML文件输入框内容改变时,ts文件的属性name的值同时改变。
<input [(ngModel)]="name">
它的作用等于:
html
<input [value]="name" (input)="doOnInput($event)">
ts
  doOnInput(event: any) {
    this.name = event.target.value;
  }
目标
Dom属性
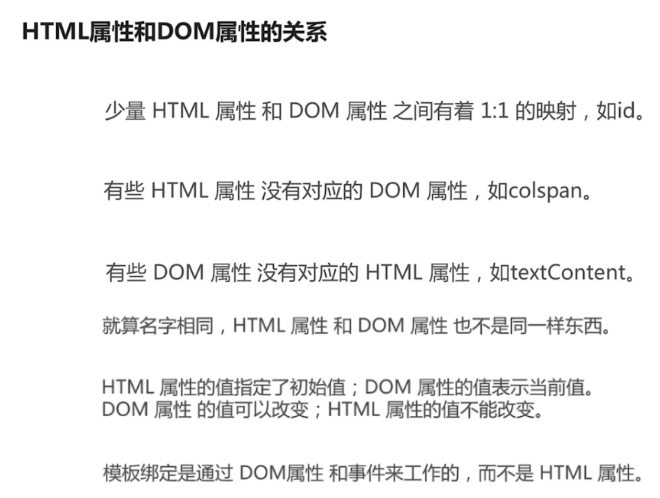
首先看看Dom属性和HTML属性的关系:
	<!--Dom属性绑定-->
	<input value="Yan" (input)="doOnInput($event)">
HTML属性
上面已经提到,colspan没有对应的Dom属性,只能使用HTML属性绑定:
	<!--html属性绑定-->
	<table border="solid">
	  <tr>
	    <!-- 以下表达式会报错:colspan不是td的属性
	    <td [colspan]="colspanSize">hello</td>
	    -->
	    <td [attr.colspan]="colspanSize" align="center">hello</td>
	  </tr>
	  <tr>
	    <td>嘻嘻</td>
	    <td>哈哈</td>
	  </tr>
	</table>
protected colspanSize: number = 2;
类绑定
<!--单一类的控制-->
<div class="a b" [class.c]="isBig">判定是否有c类:{{isBig}}</div>
<!--多个类的控制-->
<div [ngClass]="divClasses">是否有类a:{{divClasses.a}}、b:{{divClasses.b}}和c:{{divClasses.c}}</div>
<!--以下两种方式效果相同,均为divClass的值'fontRedClass'-->
<div [class]="divClass">红色字体</div>
<div class="{{divClass}}">红色字体</div>
protected divClass = 'fontRedClass';

  protected divClasses: any = {
    a: Math.random() < 0.5,
    b: Math.random() < 0.5,
    c: Math.random() < 0.5
  };
.fontRedClass {
  color:red;
}
.a {
  background: yellowgreen;
}
.b {
  font-family: 华文隶书;
}
.c {
  font-size: 20px;
}
样式绑定
<!--单一样式绑定-->
<div [style.color]="isRed?'red':'green'">单一样式绑定</div>
<!--多个样式绑定-->
<div [ngStyle]="divStyles">多个样式绑定</div>
protected isRed = Math.random() < 0.5;
protected divStyles: any = {
  color: 'red',
  background: 'yellowgreen'
};
响应式编程
响应式编程主要是通过观察者模式实现,在Angular中的Rxjs即是它的具体实现,它们的关系如下:
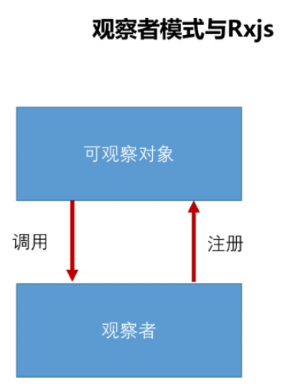
在Rxjs中,观察者模式的基本实现如下:
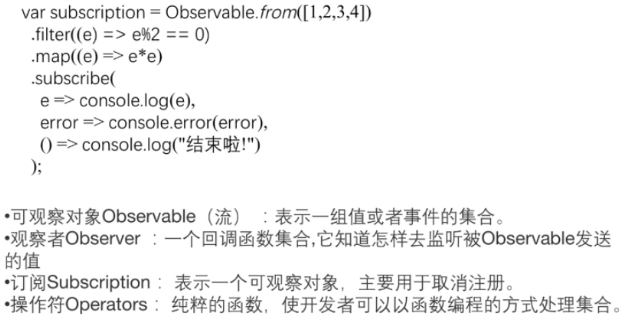
Observable类似于java中的Stream。
上图只是简单的数组流,实际上,万物皆可用流处理,比如页面上的按钮点击事件:
import {Observable} from 'rxjs/';

let button = document.querySelector('button');

Observable.fromEvent(button,'click');
使用formControl来监听输入的值,并用流的方式处理(打印):
<!--响应式编程-->
<input [formControl]="formControl">
注意:要使用[formControl]需要在app.module.ts中引入模块ReactiveFormsModule。
import {FormControl} from '@angular/forms';

protected formControl: FormControl = new FormControl();

constructor() {
  this.formControl.valueChanges
  .debounceTime(500).subscribe(bookname => this.print(bookname));
  }
模板变量
模板变量是在html标签上使用#开头来定义的变量,它代表html元素本身。
<input (keyup)="onKeyUp($event)">
<input #iValue (keyup)="onKeyUp(iValue.value)">
 onKeyUp(param: any) {
   let iInput;
   try {
     iInput = param.target.value;
   } catch (e) {
     iInput = param;
   }
   console.log(iInput);
 }
管道
管道是用来对输入的数据进行处理,如大小写转换、数值和日期格式化等。

基础知识不再赘述,请看推荐博客:
Demo:
- 生成组件
ng g component pipe - html
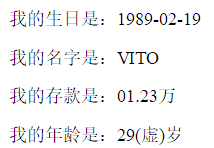
<p>我的生日是:{{birthday | date:'yyyy-MM-dd'}}</p>
<p>我的名字是:{{name | uppercase}}</p>
<p>我的存款是:{{deposit | number:'2.2-2'}}万</p>
- ts
  protected birthday:Date = new Date(1989,1,19);
  protected name:string = 'Vito';
  protected deposit:number = 1.23456;
- 自定义管道
age:ng g pipe pipe/age
import { Pipe, PipeTransform } from '@angular/core';

@Pipe({
  name: 'age'
})
export class AgePipe implements PipeTransform {

  transform(value: any, args?: any): any {
    let year: number = new Date().getFullYear();
    let res:string;
    if (args)
    {
      res = (year- value.getFullYear()+ 1) +'(虚)';
    } else {
      res = year- value.getFullYear() +'';
    }
    return res;
  }

}
- html中新增
<p>我的年龄是:{{birthday | age:true}}岁</p>
- 效果