写一个爬虫需要做很多事情,比如:发送网络请求、数据解析、数据存储、反反爬虫机制(更换ip地址、设置请求头等)、异步请求等。从零开始写这样的爬虫比较麻烦,因此使用Scrapy框架则非常方便,而且效率非常高。
---Scrapy架构图:
Scrapy流程图(1):


引擎(Scrapy Engine):用来处理整个系统的数据流,触发事务(框架核心)。
调度器(Scheduler):用来接收引擎发过来的请求,压入队列中,并在引擎再次请求的时候返回,可以想象成一个URL的优先队列,由它来决定下一个抓取的网址是什么,同时去除重复的网址。
下载器(Downloader):用于下载网页内容,并将网页内容返回给Spiders。
爬虫(Spiders):爬虫是主要干活的,用于从特定的网页中提取自己需要的信息,即所谓的实体(Item),用户也可以从中提取出链接,让Scrapy继续抓取下一个页面。
项目管道(Item pipelines):负责处理爬虫从网页中抽取的实体,主要的功能是持久化实体、验证实体的有效性、清除不需要的信息。当页面被爬虫解析后,将被发送到项目管道,并经过几个特定的次序处理数据。
下载器中间件(Downloader Middlewares):位于Scrapy引擎和下载器之间的框架,主要是处理Scrapy引擎与下载器之间的请求及响应。
爬虫中间件(Spider Middlewares):介于Scrapy引擎和爬虫之间的框架,主要工作是处理spider的响应输入和请求输出。
调度中间件(Scheduler Middlewares):介于Scrapy引擎和调度之间的中间件,从Scrapy引擎发送到调度的请求和响应。
---Scrapy命令:
全局命令(Global commands): 项目仅有命令(Project-only commands):

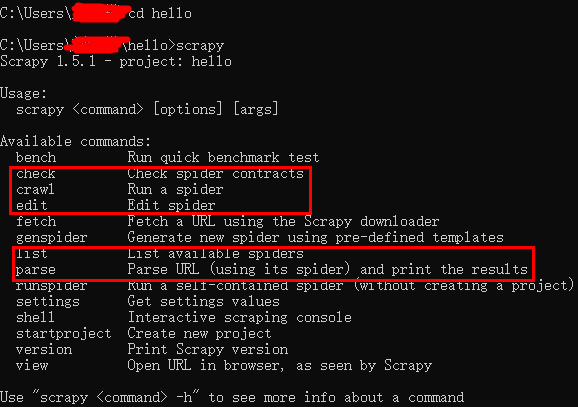
利用命令新建一个scrapy项目,查看并分析其项目结构:
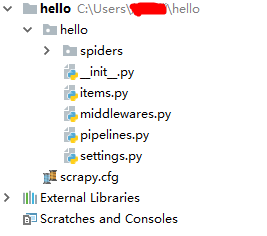
scrapy.cfg:项目的配置文件,里面包含一些配置信息
spiders包:定义自己的爬虫
_init_.py:初始化文件
items.py:定义要抓取的字段
middlewares.py:实现功能的扩展,添加自定义功能,比如添加伪装等
pipelines.py:当spider抓取到内容(item)以后,会被送到这里,这些信息(item)在这里会被清洗,去重,保存到文件或者数据库。即进行信息的后续处理 setting.py:设置文件,用来设置爬虫的默认信息,相关功能开启与否,比如是否遵循robots协议,设置默认的headers,设置文件的路径,中间件的执行顺序等等
---项目1:
利用startproject新建spider项目和genspider新建好该项目的爬虫之后,先对setting文件进行修改配置:
ROBOTSTXT_OBEY = False  #修改为False
.....
.....
.....
# Override the default request headers:伪装头部
DEFAULT_REQUEST_HEADERS = {
   'Accept': 'text/html,application/xhtml+xml,application/xml;q=0.9,*/*;q=0.8',
   'Accept-Language': 'en',
   'User-Agent': 'Mozilla/5.0 (Windows NT 10.0; WOW64) AppleWebKit/537.36 (KHTML, like Gecko) Chrome/63.0.3239.132 Safari/537.36'
}
修改生成的qsbk_spider.py文件,将自己的爬虫内容写入:
# -*- coding: utf-8 -*-
import scrapy
from qsbk.items import QsbkItem

class QsbkSpiderSpider(scrapy.Spider):
    name = 'qsbk_spider'
    allowed_domains = ['qiushibaike.com']
    start_urls = ['https://www.qiushibaike.com/8hr/page/1/']
    base_domain = "https://www.qiushibaike.com"

    def parse(self, response):
        duanzidivs = response.xpath("//div[@id='content-left']/div")
        for duanzidiv in duanzidivs:
            #使用xpath进行提取数据,提取出来的数据是一个‘Selector’或‘SelectorList’对象
            #若要获取对象中的字符串,使用getall()和get()方法
            #getall():获取‘Selector’中的所有文本,返回一个列表
            #get():获取‘Selector’中的第一个文本,返回一个str类型
            author = duanzidiv.xpath(".//h2/text()").get().strip()
            content = duanzidiv.xpath(".//div[@class='content']//text()").getall()
            content = "".join(content).strip()
            #duanzi = {"作者:": author,"内容:": content}按照字典返回
            item = QsbkItem(author = author,content = content)
            #交付给pipline处理
            yield item #变成生成器
        next_url = response.xpath("//ul[@class='pagination']/li[last()]/a/@href").get()
        if not next_url:
            return
        else:
            yield scrapy.Request(self.base_domain + next_url,callback=self.parse)
设置item数据模型:
# -*- coding: utf-8 -*-

# Define here the models for your scraped items
#
# See documentation in:
# https://doc.scrapy.org/en/latest/topics/items.html

import scrapy

#定义item数据模型
class QsbkItem(scrapy.Item):
    # define the fields for your item here like:
    # name = scrapy.Field()
    author = scrapy.Field()
    content = scrapy.Field()
    pass
若要将数据爬到本地存储,则要将item交付到pipeline中,所以要修改pipelines.py文件,编写存储的类型格式:
# -*- coding: utf-8 -*-

# Define your item pipelines here
#
# Don't forget to add your pipeline to the ITEM_PIPELINES setting
# See: https://doc.scrapy.org/en/latest/topics/item-pipeline.html
'''
方法一:
import json
#专门用来保存数据
class QsbkPipeline(object):
    #初始化
    def __init__(self):
        self.fp = open("duanzi.json",'w',encoding="utf-8")
    #开始执行爬虫
    def open_spider(self,spider):
        print("爬虫开始。。。")
    #当爬虫有item传过来时会被调用
    def process_item(self, item, spider):
        item_jsom = json.dumps(dict(item),ensure_ascii=False)
        self.fp.write(item_jsom+'
')
        return item
    #关闭爬虫
    def close_spider(self,spider):
        self.fp.close()
        print("爬虫结束。。。")
'''
'''
方法二:使用自带的法方法,但这是先将数据存储到内存,然后调用finish_exporting写回json文件,比较耗内存
from scrapy.exporters import JsonItemExporter
class QsbkPipeline(object):
    #初始化
    def __init__(self):
        self.fp = open("duanzi.json",'wb')
        self.exporter = JsonItemExporter(self.fp,ensure_ascii=False)
        self.exporter.start_exporting()
    #开始执行爬虫
    def open_spider(self,spider):
        print("爬虫开始。。。")
    #当爬虫有item传过来时会被调用
    def process_item(self, item, spider):
        self.exporter.export_item(item)
        return item
    #关闭爬虫
    def close_spider(self,spider):
        self.exporter.finish_exporting()
        self.fp.close()
        print("爬虫结束。。。")
'''
#方法三:适合存储大量的数据
from scrapy.exporters import JsonLinesItemExporter
class QsbkPipeline(object):
    #初始化
    def __init__(self):
        self.fp = open("duanzi.json",'wb')
        self.exporter = JsonLinesItemExporter(self.fp,ensure_ascii=False)
    #开始执行爬虫
    def open_spider(self,spider):
        print("爬虫开始。。。")
    #当爬虫有item传过来时会被调用
    def process_item(self, item, spider):
        self.exporter.export_item(item)
        return item
    #关闭爬虫
    def close_spider(self,spider):
        self.fp.close()
        print("爬虫结束。。。")
此时已经修改了定义的item模型和设置了pipeline,需要打开pipeline的item流设置,修改setting文件,这里pipeline后面定义了一个数,若一个爬虫中有多个,则数越小优先级越高:
......
# Configure item pipelines
# See https://doc.scrapy.org/en/latest/topics/item-pipeline.html
ITEM_PIPELINES = {
    'qsbk.pipelines.QsbkPipeline': 300,
}
......
将命令行执行指令写入python文件中:
from scrapy import cmdline
cmdline.execute("scrapy crawl qsbk_spider".split())
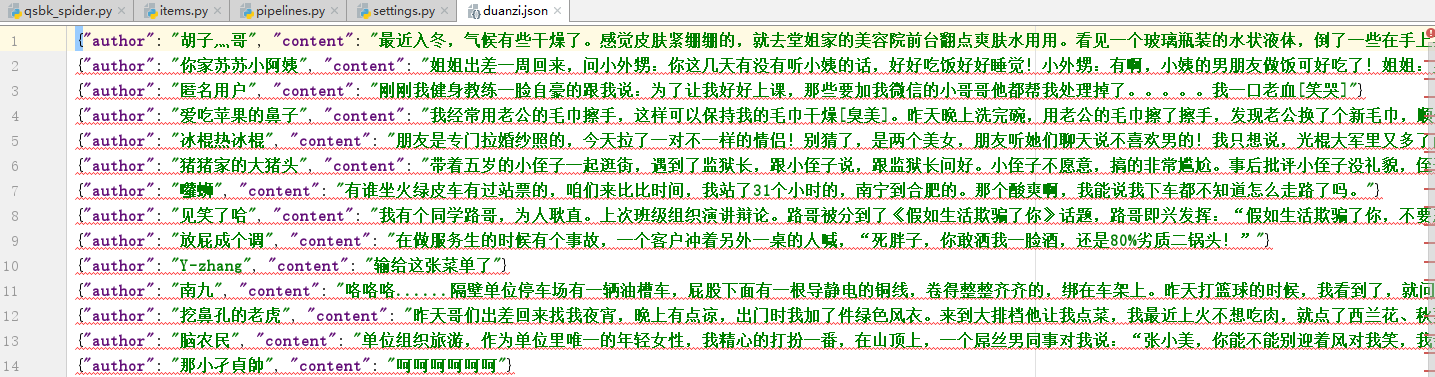
保存的数据结果:
---项目2(使用scrapy中更高级的CrawlSpider爬虫模式进行爬取,可以根据设置的url格式自动爬取url)
使用startproject和genspider -t crawl命令来建立项目文件和crawl爬虫,和项目一样配置setting文件,此处不再演示
编写spider文件:
# -*- coding: utf-8 -*-
import scrapy
from scrapy.linkextractors import LinkExtractor
from scrapy.spiders import CrawlSpider, Rule
from wechatapp.items import WechatappItem

class WechatSpiderSpider(CrawlSpider):
    name = 'wechat_spider'
    allowed_domains = ['wxapp-union.com']
    start_urls = ['http://www.wxapp-union.com/portal.php?mod=list&catid=1&page=1']

    #限定爬取的url,类似正则表达式
    #callback:回调函数,表示是否要对该url调用这里的函数
    #follow:是否跟进
    rules = (
        Rule(LinkExtractor(allow=r'.+mod=list&catid=1&page=d'), follow=True),
        Rule(LinkExtractor(allow=r'.+article-.+.html'), callback="parse_detail",follow=False)
    )

    def parse_detail(self, response):
        title = response.xpath("//h1[@class='ph']/text()").get()
        author_p = response.xpath("//p[@class='authors']")
        author = author_p.xpath(".//a/text()").get()
        pub_time = author_p.xpath(".//span/text()").get()
        content = response.xpath("//td[@id='article_content']//text()").getall()
        content = "".join(content).strip()
        item = WechatappItem(title = title,author = author,pub_time = pub_time,content = content)
        yield item
设置item模式:
# -*- coding: utf-8 -*-

# Define here the models for your scraped items
#
# See documentation in:
# https://doc.scrapy.org/en/latest/topics/items.html

import scrapy


class WechatappItem(scrapy.Item):
    # define the fields for your item here like:
    # name = scrapy.Field()
    title = scrapy.Field()
    author = scrapy.Field()
    pub_time = scrapy.Field()
    content = scrapy.Field()
编写pipeline存储本地:
# -*- coding: utf-8 -*-

# Define your item pipelines here
#
# Don't forget to add your pipeline to the ITEM_PIPELINES setting
# See: https://doc.scrapy.org/en/latest/topics/item-pipeline.html
from scrapy.exporters import JsonLinesItemExporter
class WechatappPipeline(object):
    def __init__(self):
        self.fp = open("title.json",'wb')
        self.exporter = JsonLinesItemExporter(self.fp,ensure_ascii=False,encoding = 'utf-8')

    def process_item(self, item, spider):
        self.exporter.export_item(item)
        return item

    def close_spider(self):
        self.fp.close()
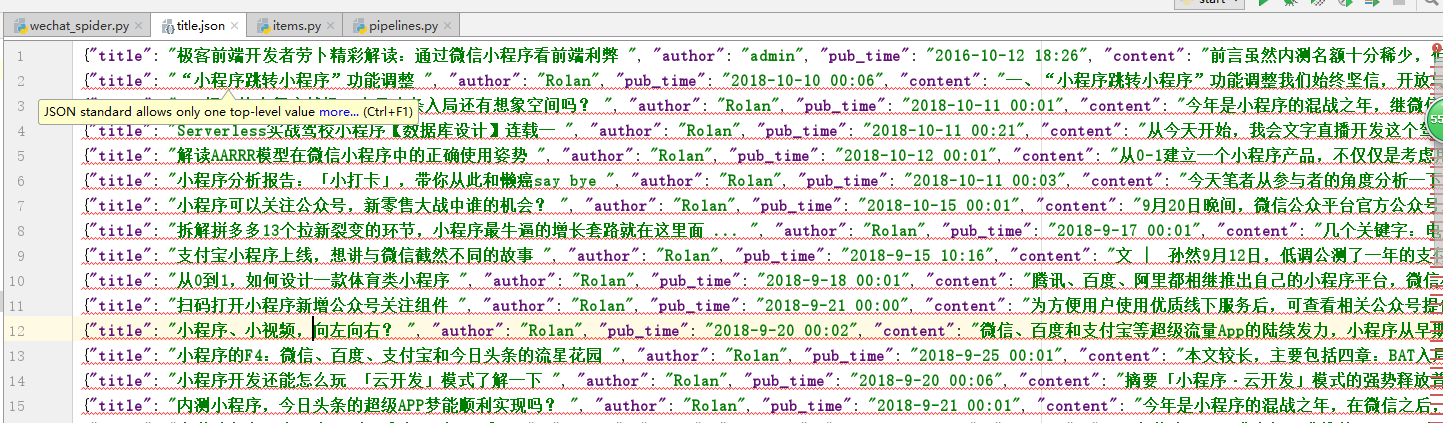
最后设置setting打开pipeline,最后结果如下:
在CrawlSpider中,'LinkExtractor'和'Rule'决定着爬虫的具体走向,在Rule中的allow的设置只要能识别我们想要的爬取的url正则表达式即可;follow的使用要根据自己的需求,当要爬取满足条件的url时才设置True,否则就False;使用callback时,如果要选择爬取该网页的标签内容,则使用,否则如果只是为了获取url则不必使用。