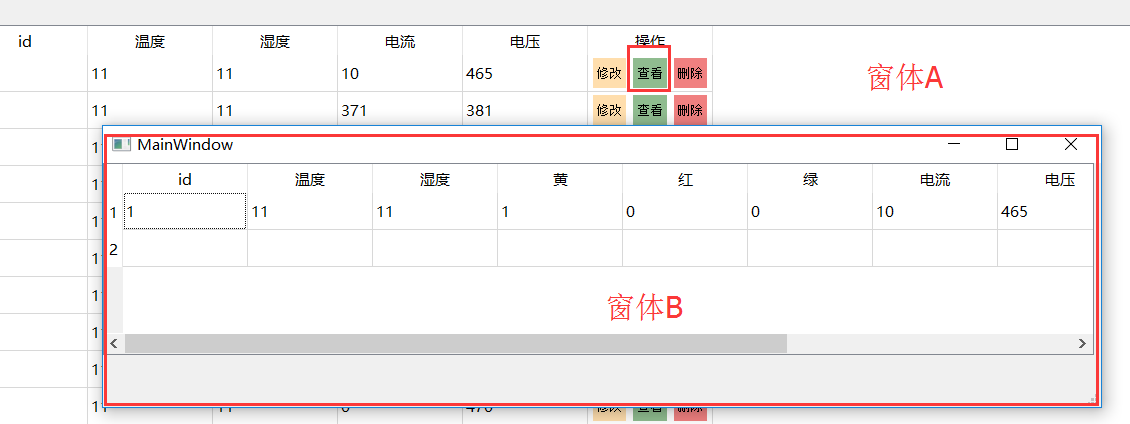
如何在窗体A里点击按钮跳转到窗体B
窗口A是Main Window类型,窗口B不能是Main Window,否则会报错,可以是Widget
1、窗体B 的UI文件
 1 # -*- coding: utf-8 -*-
 2
 3 # Form implementation generated from reading ui file 'tableInfoUi.ui'
 4 #
 5 # Created by: PyQt5 UI code generator 5.9
 6 #
 7 # WARNING! All changes made in this file will be lost!
 8
 9 from PyQt5 import QtCore, QtGui, QtWidgets
10
11 class tableInfoUi(object):
12     def setupUi(self, infoForm):
13         infoForm.setObjectName("infoForm")
14         infoForm.resize(1033, 276)
15         self.tableInfo = QtWidgets.QTableWidget(infoForm)
16         self.tableInfo.setGeometry(QtCore.QRect(10, 20, 1001, 192))
17         self.tableInfo.setRowCount(1)
18         self.tableInfo.setColumnCount(10)
19         self.UiStyle()  # 表格样式
20         self.tableInfo.setObjectName("tableInfo")
21         self.exitBtn = QtWidgets.QPushButton(infoForm)
22         self.exitBtn.setGeometry(QtCore.QRect(400, 240, 93, 28))
23         self.exitBtn.setObjectName("exitBtn")
24
25         self.retranslateUi(infoForm)
26         QtCore.QMetaObject.connectSlotsByName(infoForm)
27
28     def retranslateUi(self, infoForm):
29         _translate = QtCore.QCoreApplication.translate
30         infoForm.setWindowTitle(_translate("infoForm", "Form"))
31         self.exitBtn.setText(_translate("infoForm", "退出"))
32
33     def UiStyle(self):
34         horizontalHeader = ['id','温度','湿度','黄','红','绿','电流','电压','ip','时间']  # 表头内容
35         self.tableInfo.setHorizontalHeaderLabels(horizontalHeader)
2、窗体B数据处理
 1 import sys
 2 import os.path
 3 from PyQt5.QtWidgets import (QMainWindow, QDialog, QWidget, QAction, QHBoxLayout, QVBoxLayout, QGridLayout,  QToolTip,
 4                              QPushButton, QMessageBox, QDesktopWidget, QApplication, QLabel, QTableWidget, QTableWidgetItem,
 5                              QFrame, QComboBox, QAbstractItemView, QHeaderView, QLineEdit)
 6 from PyQt5.QtCore import (QCoreApplication, Qt, QRect, QSize)
 7 from PyQt5.QtGui import (QIcon, QFont, QColor, QBrush, QTextCursor, QPixmap)
 8 from PyQt5 import QtCore, QtGui, QtWidgets
 9 from MysqlHelper import MysqlHelper
10 from tableInfoUi import tableInfoUi
11 class tableInfoModel(QWidget):
12     def __init__(self,id):
13         super(tableInfoModel, self).__init__()
14         self.tableId=id
15         self.helper = MysqlHelper()
16         self.viewUi = tableInfoUi()
17         self.main()
18
19     def main(self):
20         self.viewUi.setupUi(self)
21         self.listData(self.tableId)
22         self.viewUi.exitBtn.clicked.connect(self.exit)
23         self.show()
24
25     def listData(self,id):
26         # self.viewUi.viewWidget.setRowCount(0)
27         id=str(id)
28         sql="select * from test where id="+id
29         rs=self.helper.fetchone(sql)
30         for colum_number, data in enumerate(rs):
31             self.viewUi.tableInfo.setItem(0, colum_number, QtWidgets.QTableWidgetItem(str(data)))
32     # 关闭窗口
33     def exit(self):
34         self.close()
35 if __name__ == '__main__':
36     app = QApplication(sys.argv)
37     tableInfoModel = tableInfoModel()
38     sys.exit(app.exec_())
3、窗体A内 定义触发按钮方法
    # 查看
    def viewTable(self,id):
        self.tableInfoModel = tableInfoModel(id)
        self.tableInfoModel.show()
1 viewBtn.clicked.connect(lambda: self.viewTable(id))
4、效果