mybatis源码(十一) mybatis插件原理及其应用
mybatis插件:MyBatis提供了扩展机制,能够在执行Mapper时改变SQL的执行行为。这种扩展机制是通过拦截器来实现的,用户自定义的拦截器也被称为MyBatis 插件。MyBatis框架支持对Executor、ParameterHandler、ResultSetHandler、 StatementHandler四种组件的方法进行拦截。
Executor 的创建是在SqlSession创建的时候创建的


  private SqlSession openSessionFromDataSource(ExecutorType execType, TransactionIsolationLevel level, boolean autoCommit) {
    Transaction tx = null;
    try {
      // 获取Mybatis主配置文件配置的环境信息
      final Environment environment = configuration.getEnvironment();
      // 创建事务管理器工厂
      final TransactionFactory transactionFactory = getTransactionFactoryFromEnvironment(environment);
      // 创建事务管理器
      tx = transactionFactory.newTransaction(environment.getDataSource(), level, autoCommit);
      // 根据Mybatis主配置文件中指定的Executor类型创建对应的Executor实例
      final Executor executor = configuration.newExecutor(tx, execType);
      // 创建DefaultSqlSession实例
      return new DefaultSqlSession(configuration, executor, autoCommit);
    } catch (Exception e) {
      closeTransaction(tx); // may have fetched a connection so lets call close()
      throw ExceptionFactory.wrapException("Error opening session.  Cause: " + e, e);
    } finally {
      ErrorContext.instance().reset();
    }
  }
StatementHandler 的创建是在执行sql语句前创建的,例如:
public class SimpleExecutor extends BaseExecutor {

  public SimpleExecutor(Configuration configuration, Transaction transaction) {
    super(configuration, transaction);
  }

  @Override
  public int doUpdate(MappedStatement ms, Object parameter) throws SQLException {
    Statement stmt = null;
    try {
      Configuration configuration = ms.getConfiguration();
      StatementHandler handler = configuration.newStatementHandler(this, ms, parameter, RowBounds.DEFAULT, null, null);
      stmt = prepareStatement(handler, ms.getStatementLog());
      return handler.update(stmt);
    } finally {
      closeStatement(stmt);
    }
  }
ParameterHandler、ResultSetHandler是在SimpleStatementHandler、PreparedStatementHandler、CallableStatementHandler的构造方法中,调用父类的构造方法实现的
  protected BaseStatementHandler(Executor executor, MappedStatement mappedStatement, Object parameterObject, RowBounds rowBounds, ResultHandler resultHandler, BoundSql boundSql) {
    this.configuration = mappedStatement.getConfiguration();
    this.executor = executor;
    this.mappedStatement = mappedStatement;
    this.rowBounds = rowBounds;

    this.typeHandlerRegistry = configuration.getTypeHandlerRegistry();
    this.objectFactory = configuration.getObjectFactory();

    if (boundSql == null) { // issue #435, get the key before calculating the statement
      generateKeys(parameterObject);
      boundSql = mappedStatement.getBoundSql(parameterObject);
    }

    this.boundSql = boundSql;

    this.parameterHandler = configuration.newParameterHandler(mappedStatement, parameterObject, boundSql);
    this.resultSetHandler = configuration.newResultSetHandler(executor, mappedStatement, rowBounds, parameterHandler, resultHandler, boundSql);
  }
总之,都是在执行sql前,就创建的对象
1.为什么只能拦截这四种插件呢?
1.mybatis可以根据用户配置的参数创建不同的实例,根据Configuration对象。(这4个组件)
2.mybatis通过工厂方式创建4种组件,在工厂方法中,可以执行拦截逻辑
Configuration类部分代码如下:
  public ParameterHandler newParameterHandler(MappedStatement mappedStatement, Object parameterObject, BoundSql boundSql) {
    ParameterHandler parameterHandler = mappedStatement.getLang().createParameterHandler(mappedStatement, parameterObject, boundSql);
    // 执行拦截器链的拦截逻辑
    parameterHandler = (ParameterHandler) interceptorChain.pluginAll(parameterHandler);
    return parameterHandler;
  }

  public ResultSetHandler newResultSetHandler(Executor executor, MappedStatement mappedStatement, RowBounds rowBounds, ParameterHandler parameterHandler,
      ResultHandler resultHandler, BoundSql boundSql) {
    ResultSetHandler resultSetHandler = new DefaultResultSetHandler(executor, mappedStatement, parameterHandler, resultHandler, boundSql, rowBounds);
    // 执行拦截器链的拦截逻辑
    resultSetHandler = (ResultSetHandler) interceptorChain.pluginAll(resultSetHandler);
    return resultSetHandler;
  }

  public StatementHandler newStatementHandler(Executor executor, MappedStatement mappedStatement, Object parameterObject, RowBounds rowBounds, ResultHandler resultHandler, BoundSql boundSql) {
    StatementHandler statementHandler = new RoutingStatementHandler(executor, mappedStatement, parameterObject, rowBounds, resultHandler, boundSql);
    // 执行拦截器链的拦截逻辑
    statementHandler = (StatementHandler) interceptorChain.pluginAll(statementHandler);
    return statementHandler;
  }

  public Executor newExecutor(Transaction transaction) {
    return newExecutor(transaction, defaultExecutorType);
  }

  public Executor newExecutor(Transaction transaction, ExecutorType executorType) {
    executorType = executorType == null ? defaultExecutorType : executorType;
    executorType = executorType == null ? ExecutorType.SIMPLE : executorType;
    Executor executor;
    // 根据executor类型创建对象的Executor对象
    if (ExecutorType.BATCH == executorType) {
      executor = new BatchExecutor(this, transaction);
    } else if (ExecutorType.REUSE == executorType) {
      executor = new ReuseExecutor(this, transaction);
    } else {
      executor = new SimpleExecutor(this, transaction);
    }
    // 如果cacheEnabled属性为ture,这使用CachingExecutor对上面创建的Executor进行装饰
    if (cacheEnabled) {
      executor = new CachingExecutor(executor);
    }
    // 执行拦截器链的拦截逻辑
    executor = (Executor) interceptorChain.pluginAll(executor);
    return executor;
  }
可以看到这四个方法里面,都有一个interceptorChain.pluginAll 的调用过程
pluginAll 返回ParameterHandler、ResultSetHandler、StatementHandler、Executor的代理对象
可以看下InterceptorChain 的源代码
public class InterceptorChain {

  // 通过List对象维护所有拦截器实例
  private final List<Interceptor> interceptors = new ArrayList<Interceptor>();

  // 调用所有拦截器对象的plugin()方法执行拦截逻辑
  public Object pluginAll(Object target) {
    for (Interceptor interceptor : interceptors) {
      target = interceptor.plugin(target);
    }
    return target;
  }

  public void addInterceptor(Interceptor interceptor) {
    interceptors.add(interceptor);
  }

  public List<Interceptor> getInterceptors() {
    return Collections.unmodifiableList(interceptors);
  }

}
由上代码可以看到,mybatis的拦截器执行链中维护了一个所有拦截器的List集合。拦截器链执行的方法调用是interceptor.plugin(targer),
看下Interceptor接口,里面只有三个方法
public interface Interceptor {

  Object intercept(Invocation invocation) throws Throwable;

  Object plugin(Object target);

  void setProperties(Properties properties);

}
Interceptor接口中定义了3个方法:
intercept()方法用于定义拦截逻辑,该方法会在目标方法调用时执行。
plugin()方法用于创建Executor、ParameterHandler、 ResultSetHandler 或Statementh Handler的代理对象,该方法的参数即为Executor、ParameterHandler、ResultSetHandler或StatementHandler组件的实例。
setProperties()方法用于设置插件的属性值。
需要注意的是,intercept()接 收一一个Invocation对象作为参数,Invocation对象中封装了目标对象的方法及参数信息。
Invocation类的源代码如下:
Invocation类中提供了一个proceed()方法,该方法用于执行目标方法的逻辑。所以在自定义插件类中,拦截逻辑执行完毕后一般都需要调用proceed()方法执行目标方法的原有逻辑。
public class Invocation {

  // 目标对象,即ParameterHandler、ResultSetHandler、StatementHandler或者Executor实例
  private final Object target;
  // 目标方法,即拦截的方法
  private final Method method;
  // 目标方法参数
  private final Object[] args;

  public Invocation(Object target, Method method, Object[] args) {
    this.target = target;
    this.method = method;
    this.args = args;
  }

  public Object getTarget() {
    return target;
  }

  public Method getMethod() {
    return method;
  }

  public Object[] getArgs() {
    return args;
  }

  /**
   * 执行目标方法
   * @return 目标方法执行结果
   * @throws InvocationTargetException
   * @throws IllegalAccessException
   */
  public Object proceed() throws InvocationTargetException, IllegalAccessException {
    return method.invoke(target, args);
  }

}
当我们自定义拦截器的时候,需要实现该接口。mybatis中提供了ExamplePlugin类,供我们参考,可以看一下源代码
@Intercepts({})
public class ExamplePlugin implements Interceptor {
  private Properties properties;
  @Override
  public Object intercept(Invocation invocation) throws Throwable {
    // TODO:自定义拦截逻辑
    return invocation.proceed();
  }

  @Override
  public Object plugin(Object target) {
    // 调用Plugin类的wrap()方法返回一个动态代理对象
    return Plugin.wrap(target, this);
  }

  @Override
  public void setProperties(Properties properties) {
    // 设置插件的属性信息
    this.properties = properties;
  }

  public Properties getProperties() {
    return properties;
  }

}
我们深入interceptor.plugin(target);的方法,发现他调用的是Plugin.wrap(target, this); 继续深入,查看PluginPlugin的源代码如下:
public class Plugin implements InvocationHandler {

    //目标对象,即Executor、ParameterHandler、ResultSetHandler、StatementHandler对象
    private final Object target;
    // 用户自定义拦截器实例
    private final Interceptor interceptor;
    // Intercepts注解指定的方法
    private final Map<Class<?>, Set<Method>> signatureMap;

    private Plugin(Object target, Interceptor interceptor, Map<Class<?>, Set<Method>> signatureMap) {
        this.target = target;
        this.interceptor = interceptor;
        this.signatureMap = signatureMap;
    }

    /**
     * wrap()方法的第一个参数为目标对象,即Executor、ParameterHandler、 ResultSetHandler、 StatementHandler类的实例;
     * 第二个参数为拦截器实例。在wrap()方法中首先调用getSignatureMap()方法获取Intercepts注解指定的要拦截的组件及方法,
     * 然后调用getAllInterfaces()方法获取当前Intercepts注解指定要拦截的组件的接口信息,接着调用Proxy类的静态方法
     * newProxyInstance()创建一个动态代理对象。
     * 该方法用于创建Executor、ParameterHandler、ResultSetHandler、StatementHandler的代理对象
     *
     * @param target
     * @param interceptor
     * @return
     */
    public static Object wrap(Object target, Interceptor interceptor) {

        // 调用getSignatureMap()方法获取自定义插件中,通过Intercepts注解指定的方法
        Map<Class<?>, Set<Method>> signatureMap = getSignatureMap(interceptor);
        Class<?> type = target.getClass();
        Class<?>[] interfaces = getAllInterfaces(type, signatureMap);
        if (interfaces.length > 0) {
            return Proxy.newProxyInstance(
                    type.getClassLoader(),
                    interfaces,
                    new Plugin(target, interceptor, signatureMap));
        }
        return target;
    }

    /**
     * Plugin类的invoke()方法会在调用目标对象的方法时执行,在invoke()方法中首先判断该方法是否被Intercepts注解指定为被拦截的方法,如果是,则调用用户自定义
     * 拦截器的intercept()方法,并把目标方法信息封装成Invocation对象作为intercept()方法的参数。
     *
     * @param proxy
     * @param method
     * @param args
     * @return
     * @throws Throwable
     */
    @Override
    public Object invoke(Object proxy, Method method, Object[] args) throws Throwable {
        try {
            // 如果该方法是Intercepts注解指定的方法,则调用拦截器实例的intercept()方法执行拦截逻辑
            Set<Method> methods = signatureMap.get(method.getDeclaringClass());
            if (methods != null && methods.contains(method)) {
                return interceptor.intercept(new Invocation(target, method, args));
            }
            return method.invoke(target, args);
        } catch (Exception e) {
            throw ExceptionUtil.unwrapThrowable(e);
        }
    }

    /**
     * Plugin类的getSignatureMap()方法中,首先获取Intercepts注解,然后获取Intercepts注解中配置的所有Signature注解,接着对所有的Signature注解信息进行遍历,
     * 将Signature注解中指定要拦截的组件及方法添加到Map对象中,其中
     * Key为Executor、 ParameterHandler、ResultSetHandler或StatementHandler对应的Class对象,Value为拦截的所有方法对应的Method对象数组。
     *
     * @param interceptor
     * @return
     */
    private static Map<Class<?>, Set<Method>> getSignatureMap(Interceptor interceptor) {
        // 获取Intercepts注解信息
        Intercepts interceptsAnnotation = interceptor.getClass().getAnnotation(Intercepts.class);
        if (interceptsAnnotation == null) {
            throw new PluginException("No @Intercepts annotation was found in interceptor " + interceptor.getClass().getName());
        }
        // 获取所有Signature注解信息
        Signature[] sigs = interceptsAnnotation.value();
        Map<Class<?>, Set<Method>> signatureMap = new HashMap<Class<?>, Set<Method>>();
        // 对所有Signature注解进行遍历,把Signature注解指定拦截的组件及方法添加到Map中
        for (Signature sig : sigs) {
            Set<Method> methods = signatureMap.get(sig.type());
            if (methods == null) {
                methods = new HashSet<Method>();
                signatureMap.put(sig.type(), methods);
            }
            try {
                Method method = sig.type().getMethod(sig.method(), sig.args());
                methods.add(method);
            } catch (NoSuchMethodException e) {
                throw new PluginException("Could not find method on " + sig.type() + " named " + sig.method() + ". Cause: " + e, e);
            }
        }
        return signatureMap;
    }

    /**
     * 获取目标类型的接口信息
     *
     * @param type
     * @param signatureMap
     * @return
     */
    private static Class<?>[] getAllInterfaces(Class<?> type, Map<Class<?>, Set<Method>> signatureMap) {
        Set<Class<?>> interfaces = new HashSet<Class<?>>();
        while (type != null) {
            for (Class<?> c : type.getInterfaces()) {
                if (signatureMap.containsKey(c)) {
                    interfaces.add(c);
                }
            }
            type = type.getSuperclass();
        }
        return interfaces.toArray(new Class<?>[interfaces.size()]);
    }

}
由上述代码,发现Plugin,实现了InvocationHandler 即JDK内置的动态代理方式创建代理对象,同时使用Proxy.newProxyInstance返回了代理对象。
如上面的代码所示,wrap()方法的第一个参数为目标对象,即Executor、ParameterHandler、 ResultSetHandler、 StatementHandler类的实例;第二个参数为拦截器实例。在wrap()方法中首先调用
getSignatureMap()方法获取Intercepts注解指定的要拦截的组件及方法,然后调用getAllInterfaces()方法获取当前Intercepts注解指定要拦截的组件的接口信息,接着调用Proxy类的静态方法
newProxyInstance()创建一个动态代理对象。
2.自定义mybatis插件
2.1mybatis自定义插件,都必须实现Interceptor接口,并在intercept()中编写拦截逻辑
2.2 拦截器上面要添加@Intercepts注解,标注拦截器的类型和拦截的方法
例如:
@Intercepts({
        @Signature(method = "prepare", type = StatementHandler.class, args = {Connection.class, Integer.class})
})
public class PageInterceptor implements Interceptor {
2.3 通过plugin()方法返回一个动态代理对象
例如:
    /**
     * 拦截器对应的封装原始对象的方法
     */
    public Object plugin(Object target) {
        return Plugin.wrap(target, this);
    }
2.4通过setProperties方法设置Plugin标签中配置的属性值
例如:
    /**
     * 设置注册拦截器时设定的属性
     */
    public void setProperties(Properties properties) {
        this.databaseType = properties.getProperty("databaseType");
    }
2.5 mybaits提供了ExamplePlugin的例子供参考
@Intercepts({})
public class ExamplePlugin implements Interceptor {
  private Properties properties;
  @Override
  public Object intercept(Invocation invocation) throws Throwable {
    // TODO:自定义拦截逻辑
    return invocation.proceed();
  }

  @Override
  public Object plugin(Object target) {
    // 调用Plugin类的wrap()方法返回一个动态代理对象
    return Plugin.wrap(target, this);
  }

  @Override
  public void setProperties(Properties properties) {
    // 设置插件的属性信息
    this.properties = properties;
  }

  public Properties getProperties() {
    return properties;
  }

}
3.mybatis插件加载的地方
3.1 在mybatis的plugins标签下面,配置要加载的插件
 1 <?xml version="1.0" encoding="UTF-8" ?>
 2 <!DOCTYPE configuration
 3     PUBLIC "-//mybatis.org//DTD Config 3.0//EN"
 4     "http://mybatis.org/dtd/mybatis-3-config.dtd">
 5
 6 <configuration>
 7   <settings>
 8      <setting name="useGeneratedKeys" value="true"/>
 9   </settings>
10
11 // 配置插件
12   <plugins>
13     <plugin interceptor="com.blog4java.plugin.pager.PageInterceptor">
14        <property name="databaseType" value="hsqldb"/>
15     </plugin>
16
17     <plugin interceptor="com.blog4java.plugin.slowsql.SlowSqlInterceptor">
18        <property name="limitSecond" value="0"/>
19     </plugin>
20   </plugins>
21
22   <environments default="dev" >
23      <environment id="dev">
24        <transactionManager type="JDBC">
25           <property name="" value="" />
26        </transactionManager>
27        <dataSource type="UNPOOLED">
28           <property name="driver" value="org.hsqldb.jdbcDriver" />
29           <property name="url" value="jdbc:hsqldb:mem:mybatis" />
30           <property name="username" value="sa" />
31           <property name="password" value="" />
32        </dataSource>
33      </environment>
34      <environment id="qa">
35        <transactionManager type="JDBC">
36           <property name="" value="" />
37        </transactionManager>
38        <dataSource type="UNPOOLED">
39           <property name="driver" value="org.hsqldb.jdbcDriver" />
40           <property name="url" value="jdbc:hsqldb:mem:mybatis_qa" />
41           <property name="username" value="admin" />
42           <property name="password" value="admin" />
43        </dataSource>
44      </environment>
45   </environments>
46
47   <mappers>
48      <mapper resource="com/blog4java/mybatis/example/mapper/UserMapper.xml"/>
49   </mappers>
50 </configuration>
3.2 从XmlConfigBuilder类开始解析mybaits-config的主配置文件
首先调用XmlConfigBuilder.parse()方法
  public Configuration parse() {
    // 防止parse()方法被同一个实例多次调用
    if (parsed) {
      throw new BuilderException("Each XMLConfigBuilder can only be used once.");
    }
    parsed = true;
    // 调用XPathParser.evalNode()方法,创建表示configuration节点的XNode对象。
    // 调用parseConfiguration()方法对XNode进行处理
    parseConfiguration(parser.evalNode("/configuration"));
    return configuration;
  }
然后调用parseConfiguration 解析<configuration>标签
  private void parseConfiguration(XNode root) {
    try {
      //issue #117 read properties first
      propertiesElement(root.evalNode("properties"));
      Properties settings = settingsAsProperties(root.evalNode("settings"));
      loadCustomVfs(settings);
      typeAliasesElement(root.evalNode("typeAliases"));
      pluginElement(root.evalNode("plugins"));
      objectFactoryElement(root.evalNode("objectFactory"));
      objectWrapperFactoryElement(root.evalNode("objectWrapperFactory"));
      reflectorFactoryElement(root.evalNode("reflectorFactory"));
      settingsElement(settings);
      // read it after objectFactory and objectWrapperFactory issue #631
      environmentsElement(root.evalNode("environments"));
      databaseIdProviderElement(root.evalNode("databaseIdProvider"));
      typeHandlerElement(root.evalNode("typeHandlers"));
      mapperElement(root.evalNode("mappers"));
    } catch (Exception e) {
      throw new BuilderException("Error parsing SQL Mapper Configuration. Cause: " + e, e);
    }
  }
然后调用pluginElement(root.evalNode("plugins")); 解析mybatis主配置文件下面的plugins标签
    private void pluginElement(XNode parent) throws Exception {
    if (parent != null) {
      for (XNode child : parent.getChildren()) {
        // 获取<plugin>标签的interceptor属性
        String interceptor = child.getStringAttribute("interceptor");
        // 获取拦截器属性,转换为Properties对象
        Properties properties = child.getChildrenAsProperties();
        // 创建拦截器实例
        Interceptor interceptorInstance = (Interceptor) resolveClass(interceptor).newInstance();
        // 设置拦截器实例属性信息
        interceptorInstance.setProperties(properties);
        // 將拦截器实例添加到拦截器链中
        configuration.addInterceptor(interceptorInstance);
      }
    }
  }
由上代码可以看出,循环解析<plugins>标签下面的每一个<plugin> ,然后创建拦截器添加到集合中
Configuration.addInterceptor(interceptorInstance) 的源码如下:
public void addInterceptor(Interceptor interceptor) {
    interceptorChain.addInterceptor(interceptor);
  }
刚才说过,interceptorChain内部维护了一个List集合,用来存储拦截器
4.Mybatis插件创建动态代理对象的工作原理
以执行一个查询操作为例,SqlSession是MyBatis中提供的面向用户的操作数据库的接口,而真正执行SQL操作的是Executor组件。MyBatis通过工厂模式创建Executor实例,
Configuration类中提供了一个newExecutor()工厂 方法,该方法返回的实际上是一个Executor的动态代理对象。
SqlSession获取Executor实例的过程如下:
(1) SqlSession中会调用Configuration类提供的newExecutor()工厂方法创建Executor对象。
(2) Configuration类中通过一个InterceptorChain对象维护了用户自定义的拦截器链。newExecutor()工厂方法中调用InterceptorChain对象的pluginAll()方法。
(3) InterceptorChain对象 的pluginAll()方法中会调用自定义拦截器的plugin()方法。
(4)自定义拦截器的plugin()方法是由我们来编写的,通常会调用Plugin类的wrap()静态方法创建一个代理对象。
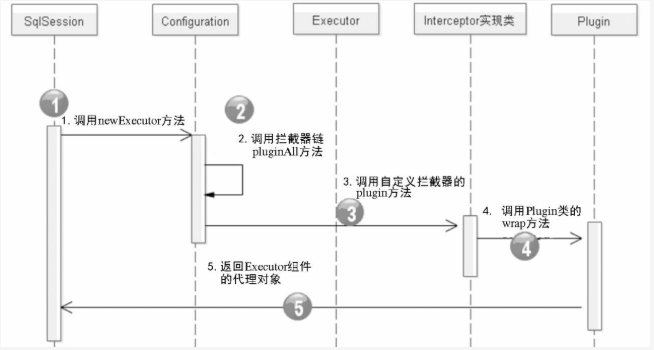
mybatis动态代理对象创建过程
Sq|Session获取到的Executor实例实际上已经是一个动态代理对象了。当我们调用SqlSession对象的selectOne()方法执行查询操作时,大致会经历下面几个过程:
(1)SqlSession操作数据库需要依赖于Executor组件,SqlSession会调用Configuration对象的newExecutor()方法获取Executor的实例。
(2) SqlSession获取到的是Executor组件的代理对象,执行查询操作时会调用代理对象的query()方法。
(3)按照JDK动态代理机制,调用Executor代理对象的query()方法时,会调用Plugin类的invoke()方法。
(4) Plugin类的invoke()方法中会调用自定义拦截器对象的intercept()方法执行拦截逻辑。
(5)自定义拦截器对象的intercept()方法调用完毕后,调用目标Executor对象的query()方法。
(6)所有操作执行完毕后,会将查询结果返回给SqlSession对象。

mybatis插件拦截逻辑执行过程