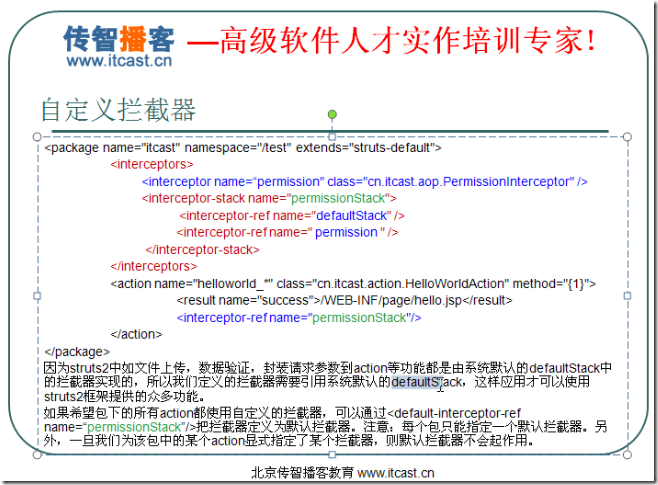
1. 自定义拦截器
首先要实现一个接口:com.opensymphony.xwork2.interceptor.Interceptor接口
重写接口中的方法,主要要重写方法intercept
2.注册拦截器
需要注意的一点就是:如果为一个action自定义了拦截器之后,如果要关联时最好是要首先关联struts2框架自带的defaultStack这个拦截器,它里面包含了很多的框架的拦截器
然后再关联自定义的拦截器,这样就充分的发挥了框架的功能
还有,每个包只能定义一个默认的拦截器,而且如果对某个action关联了拦截器,那么默认的拦截器无效

3.测试实例:
下面是一个实例:当用户登录了,action方法(file,就是上传文件)才会启用,如果用户没有登录,那么用户不能执行action中的方法,即不能上传文件
保留上一节编写的文件上传功能
还是原来的项目:strutspackage.xml 主要设置拦截器和login的action

    <package name="yinger" namespace="/yinger" extends="struts-default">

        <interceptors>
            <interceptor name="userInterceptor" class="com.interceptor.UserInterceptor"></interceptor>
            <interceptor-stack name="userStack">
                <interceptor-ref name="defaultStack"></interceptor-ref>
                <interceptor-ref name="userInterceptor"></interceptor-ref>
            </interceptor-stack>
        </interceptors>

        <action name="login" class="com.yinger.HelloWorld"
            method="login">
            <result name="message">/message.jsp</result>
        </action>
        <action name="file" class="com.yinger.HelloWorld"
            method="file">
            <interceptor-ref name="userStack"></interceptor-ref>
            <result name="file">/message.jsp</result>
            <result name="login">/login.jsp</result>
        </action>
拦截器定义:UserInterceptor 重写intercept方法

package com.interceptor;

import com.opensymphony.xwork2.ActionContext;
import com.opensymphony.xwork2.ActionInvocation;
import com.opensymphony.xwork2.interceptor.Interceptor;

public class UserInterceptor implements Interceptor {

    private static final long serialVersionUID = -6103174624961076452L;

    public void destroy() {

    }

    public void init() {

    }

    public String intercept(ActionInvocation invocation) throws Exception {
        System.out.println("Start to interceptor!");
        if(ActionContext.getContext().getSession().get("name")!=null){
            System.out.println("User is in session!");
            return invocation.invoke();//返回action的方法返回的视图
        }else{
            System.out.println("User is not in session!");
            return "login";
        }
    }

}
新增页面 login.jsp 主要内容

  <body>
    <s:form method="post" action="login" namespace="/yinger">
         name:<br><input name="onePerson.name" /><br>
         id:<br><input name="onePerson.id" /><br>
        <input type="submit" name="submit" value="提交" /><br>
    </s:form>
  </body>
file.jsp 主要内容:
<body>
<s:form enctype="multipart/form-data" method="post" action="file" namespace="/yinger" >
File to upload:<br>
<input type="file" name="file" /><br>
<input type="submit" name="submit" value="提交" /><br>
</s:form>
</body>
message.jsp 中就是一个 ${message }
action类HelloWorld中的重要内容

    private File file;
    private String fileFileName;
    private String fileContentType;

    public String login(){
        ActionContext.getContext().getSession().put("name", onePerson.getName());
        message = "User logins!";
        return "message";
    }

    public String file() throws Exception{
        String realpath = ServletActionContext.getServletContext().getRealPath("/images");//得到上下文路径
        File newFile = new File(realpath);//新建一个File,如果不存在这个目录就创建出这个目录
        if(!newFile.exists()){
            newFile.mkdirs();
        }
        FileUtils.copyFile(file, new File(newFile, fileFileName));//然后复制文件
        message="文件上传成功!<br>";
        message+="文件名称:"+fileFileName;
        message+="<br>文件类型:"+fileContentType;
        return "file";
    }
测试结果:
首先进入到file.jsp,测试,上传了文件之后点击“提交”

之后调用了file这个action,但是被拦截器了,因为用户没有登陆!于是就返回到了登陆界面

登陆后,提示:用户登录了

然后重新测试,上传文件,最后提示:文件上传成功!

