内容回顾:
-- ES6常用语法
-- var let const
-- 模板字符串
-- 反引号
-- ${}
-- 箭头函数
-- 普通函数取决于函数最近的调用者
-- 箭头函数取决当前环境
-- 类
-- class定义类
-- constructor
-- extends super()
-- 数据的解构
-- Vue的常用指令
-- v-for
-- v-if
-- v-show
-- v-bind
-- v-on
-- v-model
-- v-text
-- v-html
-- 指令的修饰符
-- .number
-- .lazy
-- .trim
-- 自定义指令
-- Vue.directive("指令名称", function(el, bindding))
-- el绑定指令的元素
-- bindding放指令相关所有信息的对象
-- bindding.value 指令的值
-- bindding.modifiers 指令修饰符
-- 获取DOM
-- 给标签元素绑定ref属性
-- this.$refs.属性值
-- 计算属性
-- computed
-- 放入缓存
-- 只有数据改变的时候才会重新计算
-- 组件
-- 全局注册
-- Vue.component("组件的名称",{})
-- 所有的vue实例对象都可以用
-- 局部注册
-- 注册到Vue实例对象里
-- 注册到哪个实例 哪个实例可以用
-- 子组件注册
-- 注册到父组件里 components
-- 父子组件通信
-- 在父组件中给子组件绑定属性<child :xxx="~~~"></child>
-- 子组件props:["xxx"]
-- 子父组件通信
-- 子组件要提交事件 this.$emit("事件名称", data)
-- 在父组件中给子组件绑定事件<child @xxx="~~~"></child>
-- 非父子组件通信
-- 中间调度器 let event = new Vue()
-- 其中一个组件 event.$emit("事件名称", data)
-- 另一个组件mounted中 event.$on("事件名称",function(data){})
-- 混合
-- 代码封装
-- mixins: ["xxx"]
-- 插槽
-- 给我们组件做内容分发
-- 路由
-- 路由的注册
-- 定义路由规则对象 每个路由对应的组件
-- let routes = [
{
path:"/",
component: {}
}
]
-- 实例化VueRouter对象并且把路由规则对象注册到里面
-- let router = new VueRouter({
routes: routes
})
-- 把VueRouter实例化对象注册到Vue实例对象里
-- const app = new Vue({
el: "#app",
router: router
})
-- 在<div id="app"></div>里
-- router-link
-- router-view
-- 参数
-- this.$route.params.xxx
-- /user/:xxx
-- this.$route.query.xxx
-- /user/:xxx?age=1
-- 命名
-- 给路由添加name属性
-- :to="{name:'xxx',params:{},query:{}}"
-- 路由视图的命名
-- 我们路由可以对应多个组件
-- router-view 有name属性 值是我们组件名称
-- 子路由
-- children:[]
-- 在父路由对应的组件里写router-link 以及router-view
-- 手动路由
-- this.$router.push("路由")
-- $route以及$router区别
-- $route 当前路由的所有信息 path fullpath meta params query
-- $router 是VueRouter对象
-- 路由的钩子函数
-- router.beforeEach(function(to, from, next){})
-- to 你要去哪
-- from 你从哪里来
-- next 方法
-- 必须执行
-- 路由正常跳转 next()
-- 跳转到指定路由 next("path")
-- router.afterEach(function(to, from){})
vue生命周期简介:
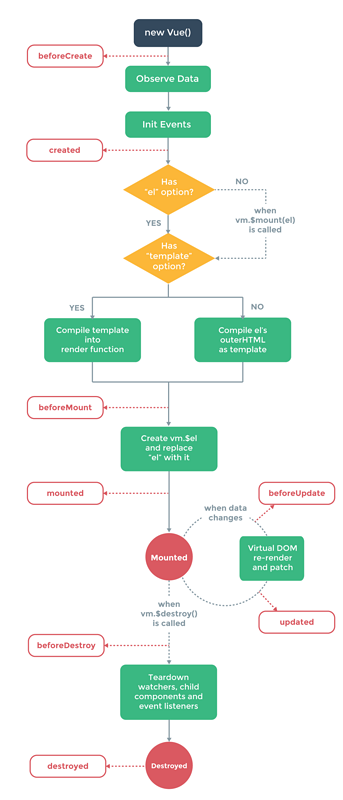
那么 执行顺序以及什么时候执行,我们上代码来看~~~
生命周期中的钩子函数:
<!DOCTYPE html>
<html lang="en">
<head>
    <meta charset="UTF-8">
    <title>Title</title>
    <script src="https://cdn.bootcss.com/vue/2.5.17-beta.0/vue.js"></script>
    <script src="https://cdn.bootcss.com/vue-router/3.0.1/vue-router.js"></script>
</head>
<body>
<div id="app">
    {{name}}
    <hr>
    {{list}}
</div>
<script>
    const app = new Vue({
        el:'#app',
        data:{
            name:'yangbo',
            list:[1,2]
        },
        methods:{
            init:function () {
                console.log('bbbbbbb')
            }
        },
        beforeCreate(){
            console.group("BeforeCreate**************")
            console.log("el:", this.$el)
            console.log("data:", this.$data)
            console.log("name:", this.name)
            console.log("init:", this.init)
        },
        created(){
            console.group("Created**************")
            console.log("el:", this.$el)
            console.log("data:", this.$data)
            console.log("name:", this.name)
            console.log("init:", this.init)
        },
        beforeMount(){
            console.group("BeforeMount**************")
            console.log("el:", this.$el)
            console.log("data:", this.$data)
            console.log("name:", this.name)
            console.log("init:", this.init)
        },
        mounted(){
            console.group("mounted**************")
            console.log("el:", this.$el)
            console.log("data:", this.$data)
            console.log("name:", this.name)
            console.log("init:", this.init)
        },
        beforeUpdate(){
            console.group("BeforeUpdate*************")
            console.log("el:", this.$el)
            console.log("data:", this.$data)
            console.log("name:", this.name)
            console.log("init:", this.init)
        },
        updated(){
            console.group("Update*************")
            console.log("el:", this.$el)
            console.log("data:", this.$data)
            console.log("name:", this.name)
            console.log("init:", this.init)
        },
        beforeDestroy(){
            console.group("BeforeDestroy*************")
            console.log("el:", this.$el)
            console.log("data:", this.$data)
            console.log("name:", this.name)
            console.log("init:", this.init)
        },
        destroyed(){
            console.group("Destroy*************")
            console.log("el:", this.$el)
            console.log("data:", this.$data)
            console.log("name:", this.name)
            console.log("init:", this.init)
        },

    })
</script>
</body>
</html>
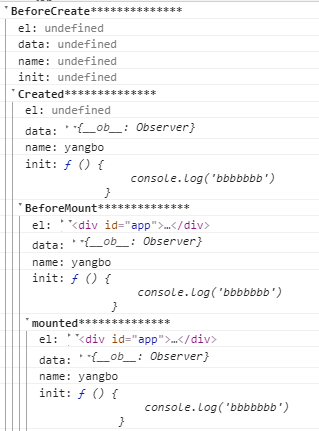

create 和 mounted 相关
执行上面代码,可以看到:
beforecreated :el 和 data 并未初始化
created:完成了data数据的初始化 el 没有
beforeMount:完成了el 和 data的初始化
mounted:完成了加载
也就是说~加载前的状态是虚拟DOM技术,先把坑站住了~加载之后才真正的把值渲染进去~
update 相关
我们在浏览器console里执行命令:
app.name = "hello~"
我们就出发了update相关的钩子函数~也就是说data里的值被修改会出发update的操作~
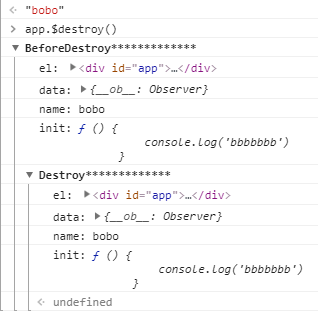
destroy 相关
我们在浏览器console里执行命令:
app.$destroy();
触发了destroy相关的钩子函数,也就是说组件被销毁~
更改信息的值~DOM中的值不变~也就是说DOM元素依然存在只是不受vue控制了~~