一、Oauth 2.0 授权模式
1. 授权码模式(Authorization code)
2. 隐式授权模式(Implicit)
3. 密码模式(Resource owner password credentials)
4. 客户端模式(Client credentials)
二、 创建Oauth2.0 认证服务
基于SpringBoot ,搭建过程在此不做讲解。
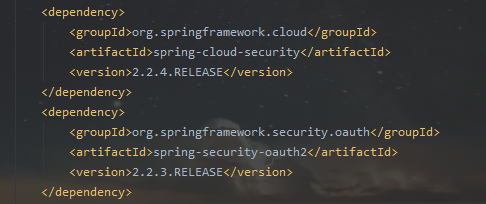
1. pom.xml
引入security 和 oauth2 相关包
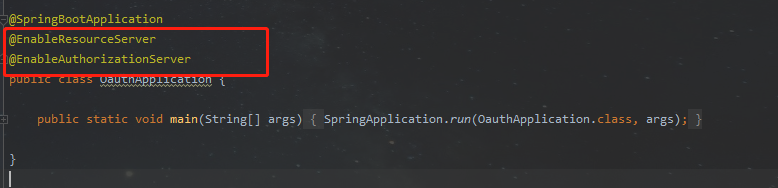
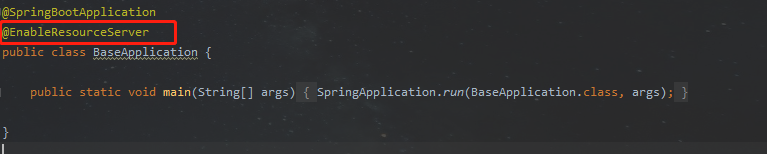
2. 启动类添加@EnableResourceServer和@EnableAuthorizationServer注解
@EnableResourceServer 表示这是一个需要认证的资源服务
@EnableAuthorizationServer 表示这也是一个认证服务
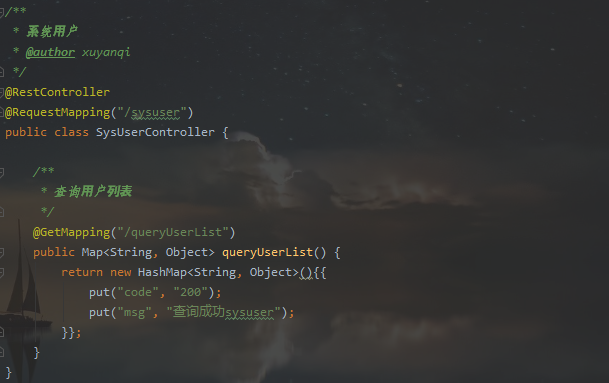
3. 创建Controller访问
4. 创建WebSecurityConfig配置类
/**
 * 配置Security配置类
 * @author xuyanqi
 * @date 2020-08-30
 */
@Configuration
@Order(1)
public class WebSecurityConfig extends WebSecurityConfigurerAdapter {

    /**
     * 处理验证
     * @return
     * @throws Exception
     */
    @Override
    @Bean
    public AuthenticationManager authenticationManagerBean() throws Exception {
        return super.authenticationManagerBean();
    }


    /**
     * 处理返回的用户信息,用户信息将由Security返回
     * @return
     * @throws Exception
     */
    @Override
    @Bean
    public UserDetailsService userDetailsServiceBean() throws Exception {
        return super.userDetailsServiceBean();
    }

    /**
     * 配置用户及权限
     * @param auth
     * @throws Exception
     */
    @Override
    protected void configure(AuthenticationManagerBuilder auth) throws Exception {
        auth.inMemoryAuthentication()
                .withUser("xuyanqi")
                .password(passwordEncoder().encode("xuyanqi"))
                .roles("admin");
    }


    @Bean
    public  PasswordEncoder passwordEncoder() {
        return new BCryptPasswordEncoder();
    }
    /**
     * 配置拦截机制
     * @param http
     * @throws Exception
     */
    @Override
    protected void configure(HttpSecurity http) throws Exception {
        http.antMatcher("/oauth/**")
                .authorizeRequests()
                .antMatchers("/oauth/**").permitAll()
                .and().csrf().disable();
    }
}
5. 创建Oauth2.0 AuthorizationServerConfig认证配置类
/**
 * 配置Oauth2配置类
 * @author xuyanqi
 * @date 2020-08-30
 */
@Configuration
@Order(2)
public class AuthorizationServerConfig extends AuthorizationServerConfigurerAdapter {
    @Autowired
    private AuthenticationManager authenticationManagerBean;

    @Autowired
    private UserDetailsService userDetailsServiceBean;

    @Autowired
    private PasswordEncoder passwordEncoder;

    /**
     * 定义客户端
     * @param clients
     * @throws Exception
     */
    @Override
    public void configure(ClientDetailsServiceConfigurer clients) throws Exception {
        clients.inMemory()
                //应用名称
                .withClient("test")
                //应用秘钥
                .secret(passwordEncoder.encode("test"))
                // 授权类型
                .authorizedGrantTypes(
                        "refresh_token",
                        "password",
                        "client_credentials"
                )
                // 令牌可操作性的范围
                .scopes("webclient", "mobileclient");
    }

    @Override
    public void configure(AuthorizationServerEndpointsConfigurer endpoints) throws Exception {
        endpoints.authenticationManager(authenticationManagerBean)
                .userDetailsService(userDetailsServiceBean);
    }

    @Override
    public void configure(AuthorizationServerSecurityConfigurer security) throws Exception {
        // 允许Form表单身份验证
        security.allowFormAuthenticationForClients();
    }
}
6. 创建ResourceServiceConfig资源权限配置类
/**
 * 资源权限配置类
 * @author xuyanqi
 */
@Configuration
public class ResourceServiceConfig extends ResourceServerConfigurerAdapter {
    @Override
    public void configure(HttpSecurity http) throws Exception {
        http.authorizeRequests()
                .antMatchers("/spnuser/**")
                .hasAnyRole("admin")
                .anyRequest().authenticated();
    }
}
三、 创建资源服务
1. pom.xml

2. 启动类配置
表示该服务是需要授权的资源服务
3. 配置appliction.yml
server:
  port: 8081
security:
  oauth2:
    client:
      client-id: test
      client-secret: test
      user-authorization-uri: http://localhost:8080/oauth/authorize
      access-token-uri: http://localhost:8080/oauth/token
    resource:
      user-info-uri: http://localhost:8080/spnuser/user
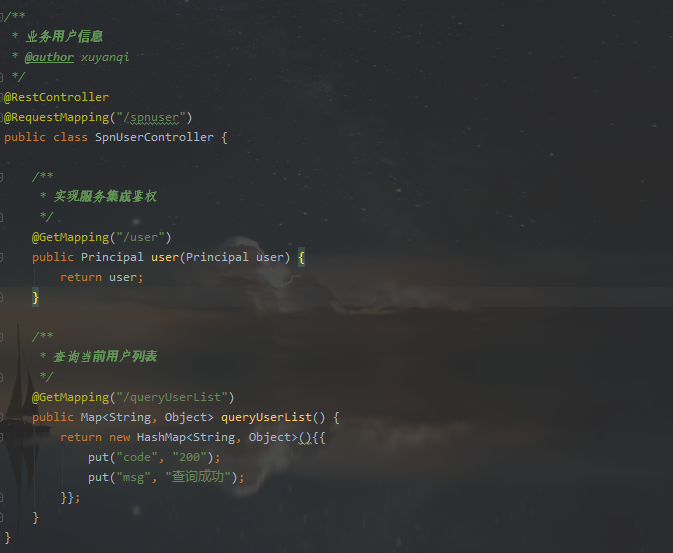
4. 创建Controller访问