numpy模块
numpy是Python的一种开源的数据计算扩展库,用来存储和处理大型矩阵
- 区别于list列表,提供数组操作,数组运算,以及统计分布和简单的数学模型
- 计算速度快
矩阵即numpy的ndarray对象,创建矩阵就是把一个列表传入np.array()方法
import numpy as np #约定俗成 np代表numpy#一维arr = np.array([1,2,3,4])print(arr)[1,2,3,4]#二维arr = np.array([[1,2,3,4],[5,6,7,8]])[[1,2,3,4] [5,6,7,8]]#三维[[[1,2,3,4], [1,2,3,4], [1,2,3,4]], [[2,3,4,5], [3,4,5,6], [3,4,5,6]], [[5,6,7,8], [5,6,7,8], [5,6,7,8]]]arr = [[1,2,3] [4,5,6]]#获取矩阵的行和列print(arr.shape)(2,3)#获取矩阵的行print(arr.shape[0])2# 获取矩阵的列print(arr.shape[1])3
切割矩阵
# 取所有元素print(arr[:,:])# 取第一行所有元素print(arr[:1,:])print(arr[0,[0,1,2,3,....(n个数则n-1)]])# 取第一列所有元素print(arr[:,:1])print(arr[[0,1,2,3,..],0])# 取第一行第一列的元素print(arr[0,0])#取大于5的元素,返回一个数组print(arr[arr > 5])#生成布尔矩阵print(arr > 5)[[False False False] [True False True ]]
矩阵元素替换
类似于列表的替换
# 取第一行所有元素变为0arr1 = arr.copy()arr1[:1,:] = 0print(arr1)# 去所有大于5的元素变为0arr2 = arr.copy()arr2[arr >5] = 0print(arr2)#对矩阵清零arr3 = arr.copy()arr3[:,:] = 0print(arr3)
矩阵的合并
arr1 = [[1,2] [3,4]]arr2 = [[5,6] [7,8]]# 合并矩阵的行,用hstack的合并的话 会具有相同的行#方法1np.hstack((arr1,arr2))[[1,2,5,6] [3,4,7,8]]#方法2print(np.concatenate((arr1,arr2),axis=1))[[1,2,5,6] [3,4,7,8]]# 合并矩阵的列,用vstack#方法1np.vstack((arr1,arr2))[[1,2] [3,4] [5,6] [7,8]]# 方法2print(np.contatenate((arr1,arr2),axis=0))
通过函数创建矩阵
arangeprint(np.arange(10))#0-9数组[0 1 2 3 4 5 6 7 8 9]print(np.arange(1,5))#1-4数组[1 2 3 4]print(np.arange(1,20,2))#1-19,步长为2的数组[1 3 5 7 9 11 13 15 17 19]linspace/logspace#构造一个等差数列,取头也取尾np.linspace(0,20,5)[0.5.10.15.20]#构造一个等比数列,从10**0取到10**20,取5个数np.logspace(0,20,5)[ 1.00000e+00 1.00000e+05 1.00000e+10 1.00000e+15 1.00000e+20]zero/ones/eye/empty#构造全0矩阵np.zeros((3,4))[[0. 0. 0. 0.] [0. 0. 0. 0.] [0. 0. 0. 0.]]#构造全1矩阵np.ones((X,Y))#构造N个主元的单位矩阵np.eye(n)#例[[1. 0. 0.] [0. 1. 0.] [0. 0. 1.]]#构造一个随机矩阵,里面元素为随机生成np.empty((x,y))# fromstring通过对字符串的字符编码所对应ASCII编码的位置,生成一个ndarray对象s = 'abcdef'# np.int8表示一个字符的字节数为8print(np.fromstring(s, dtype=np.int8))[ 97 98 99 100 101 102]def func(i, j): """其中i为矩阵的行,j为矩阵的列""" return i*j# 使用函数对矩阵元素的行和列的索引做处理,得到当前元素的值,索引从0开始,并构造一个3*4的矩阵print(np.fromfunction(func, (3, 4)))[[ 0. 0. 0. 0.] [ 0. 1. 2. 3.] [ 0. 2. 4. 6.]]
矩阵的运算
+ - * / % **n
矩阵的点乘
必须满足第一个矩阵的列 = 第二个矩阵的行
arr1 = np.array([[1, 2, 3], [4, 5, 6]])print(arr1.shape)(2, 3)arr2 = np.array([[7, 8], [9, 10], [11, 12]])print(arr2.shape)(3, 2)assert arr1.shape[0] == arr2.shape[1]# 2*3·3*2 = 2*2print(arr1.dot(arr2))[[ 58 64] [139 154]]
矩阵的转置
相当于矩阵的行和列呼唤
arr = np.array([[1, 2, 3], [4, 5, 6]])print(arr)[[1 2 3] [4 5 6]]print(arr.transpose())[[1 4] [2 5] [3 6]]print(arr.T)[[1 4] [2 5] [3 6]]
矩阵的逆
矩阵行和列相同时候才可逆
arr = np.array([[1, 2, 3], [4, 5, 6], [7, 8, 9]])print(arr)[[1 2 3] [4 5 6] [7 8 9]]print(np.linalg.inv(arr))[[ 3.15251974e+15 -6.30503948e+15 3.15251974e+15] [ -6.30503948e+15 1.26100790e+16 -6.30503948e+15] [ 3.15251974e+15 -6.30503948e+15 3.15251974e+15]]# 单位矩阵的逆是单位矩阵本身arr = np.eye(3)print(arr)[[ 1. 0. 0.] [ 0. 1. 0.] [ 0. 0. 1.]]print(np.linalg.inv(arr))[[ 1. 0. 0.] [ 0. 1. 0.] [ 0. 0. 1.]]
collections模块
- 计数器(Counter)
- 双向队列(deque)
- 默认字典(defaultdict)
- 有序字典(OrderedDict)
- 可命名元组(namedtuple)
1. Counter
Counter作为字典dicit()的一个子类用来进行hashtable计数,将元素进行数量统计,计数后返回一个字典,键值为元素,值为元素个数
常用方法:
| most_common(int) | 按照元素出现的次数进行从高到低的排序,返回前int个元素的字典 |
|---|---|
| elements | 返回经过计算器Counter后的元素,返回的是一个迭代器 |
| update | 和set集合的update一样,对集合进行并集更新 |
| substract | 和update类似,只是update是做加法,substract做减法,从另一个集合中减去本集合的元素 |
| iteritems | 返回由Counter生成的字典的所有item |
| iterkeys | 返回由Counter生成的字典的所有key |
| itervalues | 返回由Counter生成的字典的所有value |
2. deque
deque属于高性能的数据结构之一,常用方法如下:
| append | 队列右边添加元素 |
|---|---|
| appendleft | 队列左边添加元素 |
| clear | 清空队列中的所有元素 |
| count | 返回队列中包含value的个数 |
| extend | 队列右边扩展,可以是列表、元组或字典,如果是字典则将字典的key加入到deque |
| extendleft | 同extend,在左边扩展 |
| pop | 移除并返回队列右边的元素 |
| popleft | 移除并返回队列左边的元素 |
| remove(value) | 移除队列第一个出现的元素 |
| reverse | 队列的所有元素进行反转 |
| rotate(n) | 对队列数进行移动 |
3. defaultdict
- 默认字典,字典的一个子类,继承所有字典的方法,默认字典在进行定义初始化的时候得指定字典值有默认类型
- 注:字典dic在定义的时候就定义好了值为字典类型,虽然现在字典中还没有键值 k1,但仍然可以执行字典的update方法. 这种操作方式在传统的字典类型中是无法实现的,必须赋值以后才能进行值得更新操作,否则会报错。
4. OrderedDict
有序字典也是字典的一个子类
5. namedtuple
namedtuple由自己的类工厂namedtuple()进行创建,而不是由表中的元组进行初始化,通过namedtuple创建类的参数包括类名称和一个包含元素名称的字符串
Matplotlib模块:绘图和可视化
一、简单介绍Matplotlib
1、Matplotlib是一个强大的Python绘图和数据可视化的工具包
2、安装方法:pip install matplotlib
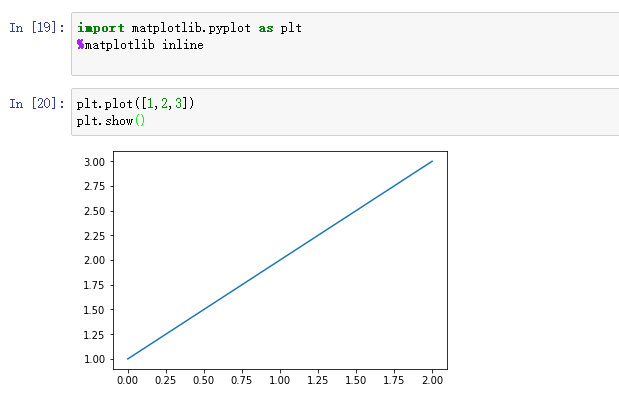
3、引用方法:import matplotlib.pyplot as plt
4、绘图函数:plt.plot()
5、显示图像:plt.show()
二、Matplotlib:plot函数
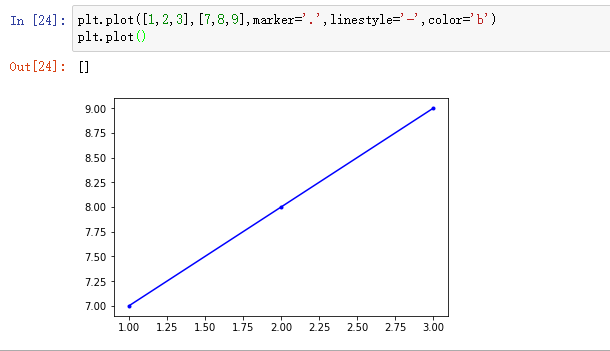
1、plot函数:绘制折线图
- 线型linestyle(-,-.,--,..)
- 点型marker(v,^,s,*,H,+,x,D,o,…)
- 颜色color(b,g,r,y,k,w,…)
2、plot函数绘制多条曲线
3、pandas包对plot的支持
三、Matplotlib-图像标注
- 设置图像标题:plt.title()
- 设置x轴名称:plt.xlabel()
- 设置y轴名称:plt.ylabel()
- 设置x轴范围:plt.xlim()
- 设置y轴范围:plt.ylim()
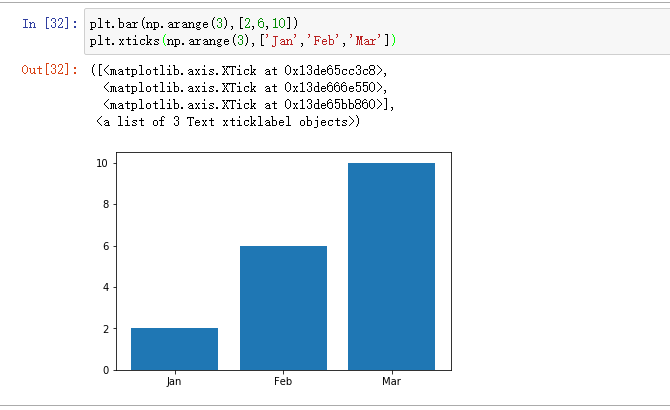
- 设置x轴刻度:plt.xticks()
- 设置y轴刻度:plt.yticks()
- 设置曲线图例:plt.legend()
四、Matplotlib实例——绘制数学函数图像
使用Matplotlib模块在一个窗口中绘制数学函数y=x, y=x2, y=3x3+5x2+2x+1的图像,使用不同颜色的线加以区别,并使用图例说明各个线代表什么函数。
五、Matplotlib:画布与子图
画布:figure
- fig = plt.figure()
图:subplot
- ax1 = fig.add_subplot(2,2,1)
调节子图间距:
- subplots_adjust(left, bottom, right, top, wspace, hspace)
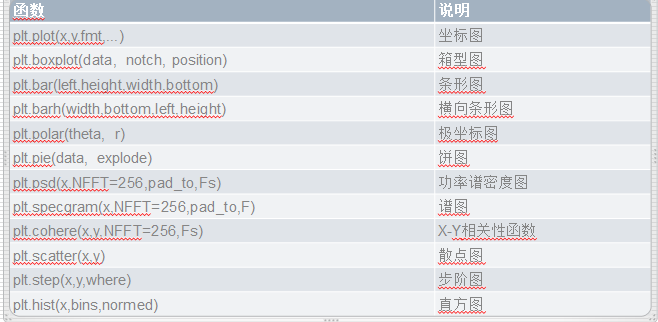
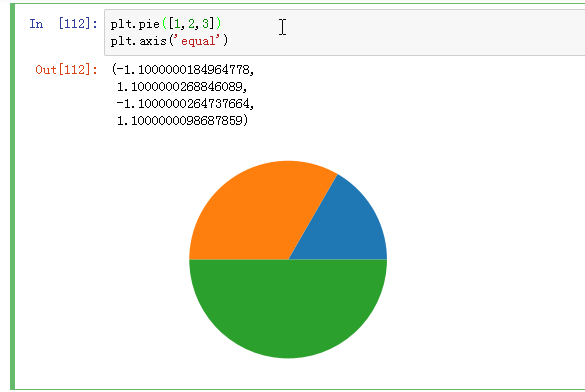
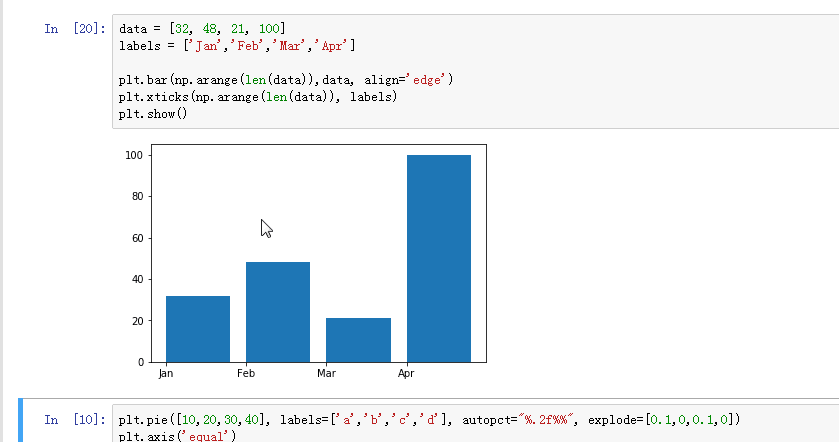
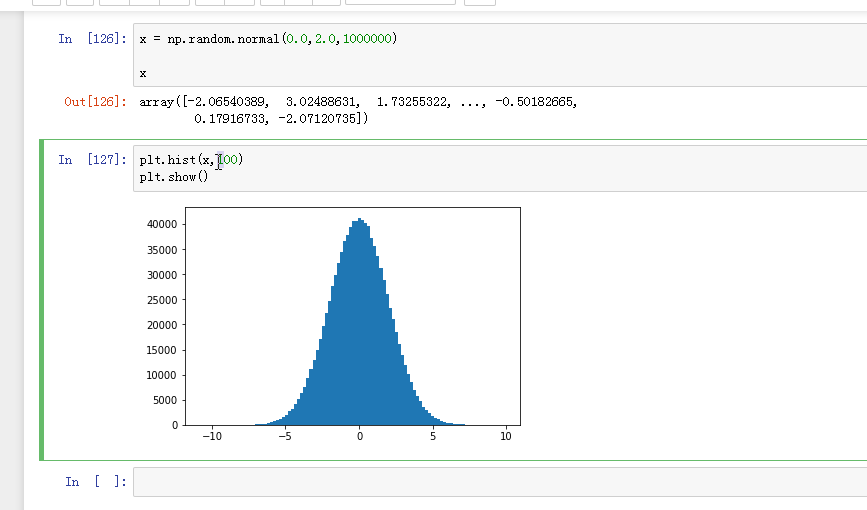
六、Matplotlib-支持的图类型
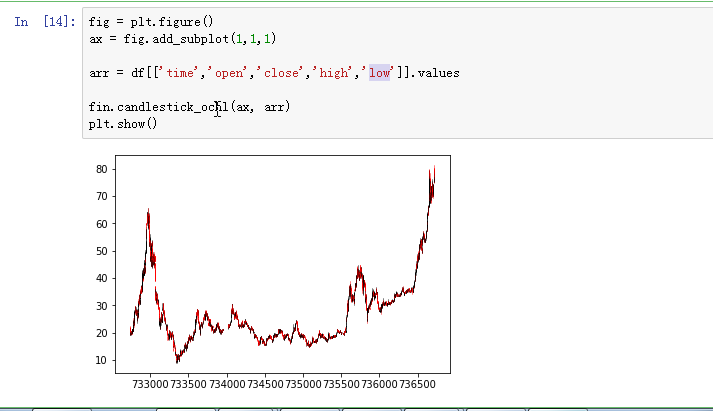
七、Matplotlib——绘制K线图
matplotlib.finanace子包中有许多绘制金融相关图的函数接口。
绘制K线图:matplotlib.finance.candlestick_ochl函数
八、示例代码
使用之前首先下载:pip install Matplotlib
接着引入:import matplotlib.pylot as plt
绘图函数:plt.plot()
显示函数:plt.show()
使用plt.plot?可以查看它的参数
我们通过加参数,可以更改这个图线的形状


pandas模块:
pandas是一个强大的Python数据分析的工具包,是基于NumPy构建的。
pandas的主要功能:
1. 具备对其功能的数据结构DataFrame、Series
2. 集成时间序列功能
3. 提供丰富的数学运算和操作
4. 灵活处理缺失数据
安装方法:
pip install pandas
引用方法:
import pandas as pd
Series --- 一维数据对象
Series是一种类似于一维数据的对象,由一组数据和一组与之相关的数据标签(索引)组成。
创建方式:
import pandas as pd
pd.Series([4,7,-5,3])
pd.Series([4,7,-5,3],index=['a','b','c','d'])
pd.Series({'a':1,'b':2})
pd.Series(0,index=['a','b','c','d'])
获取值数组和索引数组: values属性和index属性
Series比较像列表(数组)和字典的结合体
示例代码:
# Series创建方式
import pandas as pd
import numpy as np

pd.Series([2,3,4,5])  # 列表创建Series
"""
输出结果:
0    2
1    3
2    4
3    5
dtype: int64

# 左边一列是 索引,右边一列是值
"""

pd.Series([2,3,4,5],index=["a","b","c","d"])  # 指定索引
"""
输出结果:
a    2
b    3
c    4
d    5
dtype: int64
"""

# Series支持array 的特性(下标)
pd.Series(np.arange(5))  # 数组创建 Series
"""
输出结果:
0    0
1    1
2    2
3    3
4    4
dtype: int32
"""

sr = pd.Series([2,3,4,5],index=["a","b","c","d"])
sr
"""
a    2
b    3
c    4
d    5
dtype: int64
"""

# 索引:
sr[0]
#  输出结果: 2  # sr虽然指定了 标签索引,但仍可以利用 下标索引 的方式获取值

sr[[1,2,0]]  # sr[[索引1,索引2,...]]
"""
b    3
c    4
a    2
dtype: int64
"""

sr['d']
# 输出结果: 5

# Series可以和标量进行运算
sr+2
"""
a    4
b    5
c    6
d    7
dtype: int64
"""

# 两个相同大小(长度相同)的 Series 也可以进行运算
sr + sr
"""
a     4
b     6
c     8
d    10
dtype: int64
"""

# 切片
sr[0:2]  # 也是 顾首不顾尾
"""
a    2
b    3
dtype: int64
"""

# Series也支持 numpy 的通用函数
np.abs(sr)
"""
a    2
b    3
c    4
d    5
dtype: int64
"""

# 支持布尔型索引过滤
sr[sr>3]
"""
c    4
d    5
dtype: int64
"""

sr>3
"""
a    False
b    False
c     True
d     True
dtype: bool
"""

# Series支持字典的特性(标签)
# 通过字典创建 Series
sr = pd.Series({"a":1,"b":2})
sr
"""
a    1
b    2
dtype: int64
# 字典的 key 会当作 标签
"""
sr["a"]
# 输出结果: 1
sr[0]
# 输出结果: 1

# 判断 一个字符串 是不是一个Series 中的标签
"a" in sr
# 输出结果: True

for i in sr:
    print(i)
"""
打印结果:
1
2

# for 循环中,遍历的是 Seires 中的 值(value),而不是它的标签;这是和字典不同的地方
"""

# 分别获取 Series 的值和索引
sr.index  # 获取索引
# 输出结果: Index(['a', 'b'], dtype='object')  # 是一个 Index 类的对象,其和数组对象(Array)完全一样
sr.index[0]
# 输出结果: 'a'

sr.values  # 获取 Series 的值
# 输出结果: array([1, 2], dtype=int64)

# 键索引
sr['a']
# 输出结果: 1
sr[['a','b']] # 也是 花式索引
"""
a    1
b    2
dtype: int64
"""

sr = pd.Series([1,2,3,4,5,6],index=['a','b','c','d','e','f'])
sr
"""
a    1
b    2
c    3
d    4
e    5
f    6
dtype: int64
"""
sr[['a','c']]
"""
a    1
c    3
dtype: int64
"""
sr['a':'c']  # 通过标签进行切片; 首尾相顾,前包后也包
"""
a    1
b    2
c    3
dtype: int64
"""
series 整数索引问题:
整数索引的pandas对象很容易出错,如:
import pandas as pd
import numpy as np

sr = pd.Series(np.arange(10))
sr
"""
0    0
1    1
2    2
3    3
4    4
5    5
6    6
7    7
8    8
9    9
dtype: int32
# 上述的整数索引是自动生成的索引
"""

sr2 = sr[5:].copy()
sr2
"""
5    5
6    6
7    7
8    8
9    9
dtype: int32
# 上述的索引仍然是整数索引,但是不是从0开始的
"""
sr2[5]  # 此时的 5 解释为 标签,而不是下标(索引)
# 输出结果: 5

# sr2[-1]  # 会报错;因为当索引是整数的时候,[] 中的内容一定会被解释为 标签

# 解决方法: loc 和 iloc
sr2.loc[5]  # loc 表示 [] 中的内容解释为 标签
# 输出结果: 5
sr2.iloc[4] # iloc 表示 [] 的内容解释为 下标(索引)
# 输出结果: 9
sr2.iloc[0:3]
"""
5    5
6    6
7    7
"""
# 所以 用整数索引的时候 一定要 loc 和 iloc 进行区分
如果索引是整数类型,则根据整数进行下标获取值时总是面向标签的
解决方法:loc 属性(将索引解释为标签) 和 iloc 属性(将索引解释为下标)
Series --- 数据对齐
pandas 在进行两个Series对象的运算时,会按照索引进行对齐然后计算
示例代码:
# Series -- 数据对齐
import pandas as pd

sr1 = pd.Series([12,23,34],index=["c","a","d"])
sr2 = pd.Series([11,20,10],index=["d","c","a"])
sr1 + sr2
"""
a    33    # 23+10
c    32    # 12+20
d    45    # 34+11
dtype: int64
# 数据会按照标签对齐
"""
# pandas 在进行两个Series对象的运算时,会按照索引进行对齐然后计算

# 注: pandas 的索引支持重复,但我们不要让索引重复
pd.Series([1,2],index=["a","a"])
"""
a    1
a    2
dtype: int64
"""

# 两个 pandas对象的长度不一样时
sr3 = pd.Series([12,23,34],index=["c","a","d"])
sr4 = pd.Series([11,20,10,21],index=["d","c","a","b"])
sr3+sr4
"""
a    33.0
b     NaN
c    32.0
d    45.0
dtype: float64
# 在 pandas 中 NaN 会被当作数据缺失值
"""

sr5 = pd.Series([12,23,34],index=["c","a","d"])
sr6 = pd.Series([11,20,10],index=["b","c","a"])
sr5+sr6
"""
a    33.0
b     NaN
c    32.0
d     NaN
dtype: float64
"""
#使上述结果中索引"b"处的值为 21、在索引"d"处的值为34 的方法: add sub mul div  (分别是 加减乘除);如:sr5.add(sr2,fill_value=0)
sr5.add(sr6)
"""
a    33.0
b     NaN
c    32.0
d     NaN
dtype: float64
# 不加 fill_value 时, sr5.add(sr6) 和 sr5+sr6 一样的效果
"""

sr5.add(sr6,fill_value=0)  # fill_value 的作用:如果一个Series对象中有某个标签,但另外一个Series对象中没有该标签,那么没有该标签的那个值就被赋值为 fill_value 的值
"""
a    33.0
b    11.0
c    32.0
d    34.0
dtype: float64
"""