1.前言
刚接触hibernate的时候,第一感觉就是麻烦,因为要使用hibernate的话,要写许许多多的.hbm.xml的配置文件,每一个pojo要写一个,然后保存着主外键关联的关系表也要写.bhm.xml。但是又不得不写,所以每次用hibernate的时候,心里总是嫌麻烦。前段时间接触到一个项目,发现项目中并没有配置.hbm.xml文件,后来一看是因为项目使用了HibernateAnnotation,只需要写注释而不要写配置文件,大大减少了配置hibernate的复杂度。今天主要就是讲讲如何使用HibernateAnnotation。
2. 正文
因为前面写过一篇博客:MyEclipse环境下Hibernate入门实例。讲的就是一个hibernate的小实例,因此本文不再从头开始讲hibernate,而是在这篇博客的基础上讲解如何使用Annotation来代替原有的.hbm.xml文件的编写。
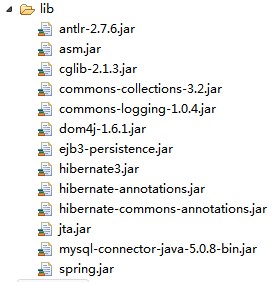
2.1应用程序所使用的jar文件
开发hibernate的应用程序,常常会引用到其他的jar文件, 下面我列出这对这个实例,我所使用的jar文件。如下图所示:
2.2对hibernate.cfg.xml文件的修改
因为使用了Annotation,所以在hibernate.cfg.xml就不再需要添加.hbm.xml文件的映射,而是直接映射到pojo实体类即可。hibernate.cfg.xml如下所示:
<?xml version='1.0' encoding='UTF-8'?>
<!DOCTYPE hibernate-configuration PUBLIC
"-//Hibernate/Hibernate Configuration DTD 3.0//EN"
"http://hibernate.sourceforge.net/hibernate-configuration-3.0.dtd">
<hibernate-configuration>
<session-factory>
<property name="dialect">org.hibernate.dialect.MySQLDialect</property>
<!-- <property name="show_sql">true</property>-->
<!-- 连接字符串 -->
<property name="connection.url">jdbc:mysql://localhost:3306/demo</property>
<property name="connection.username">root</property>
<property name="connection.password">123456</property>
<!-- 数据库驱动 -->
<property name="connection.driver_class">com.mysql.jdbc.Driver</property>
<!-- 加载映射时不再是加载映射文件,而是直接映射到实体类 -->
<mapping class="com.demo.hibernate.beans.User"/>
</session-factory>
</hibernate-configuration>
2.3对User实体类的修改
我们需要在User这个实体类中写上注释,这些注释包括这个实体所对应数据库中的表,表中各个字段等等内容。修改如下代码所示:
package com.demo.hibernate.beans;
import static javax.persistence.GenerationType.IDENTITY;
import javax.persistence.Column;
import javax.persistence.Entity;
import javax.persistence.GeneratedValue;
import javax.persistence.Id;
import javax.persistence.Table;
@Entity
@Table(name = "user", catalog = "demo")
public class User {
private int id;
private String username;
private String password;
private String email;
@Id
@GeneratedValue(strategy = IDENTITY)
@Column(name = "id", unique = true, nullable = false)
public int getId() {
return id;
}
public void setId(int id) {
this.id = id;
}
@Column(name = "username", length = 50)
public String getUsername() {
return username;
}
public void setUsername(String username) {
this.username = username;
}
@Column(name = "password", length = 50)
public String getPassword() {
return password;
}
public void setPassword(String password) {
this.password = password;
}
@Column(name = "email", length = 50)
public String getEmail() {
return email;
}
public void setEmail(String email) {
this.email = email;
}
}
3.总结
因为我们这里只有一个实体,所以不存在主外键依赖,如果存在主外键依赖,有一对多,多对多的情况,那么注释会更加麻烦,这个等我搞明白了我再补上。