1. 第一节安装及创建项目
1.1 安装nodejs
https://nodejs.org/en/download/ (根据自己的电脑系统选择下载版本)
下载完成点击【Next】一直到【install】
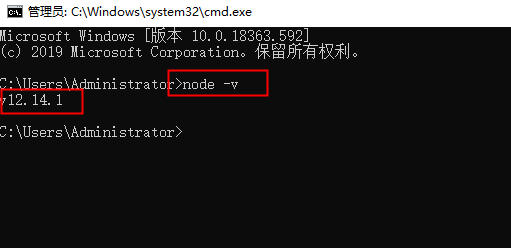
node -v 查看是否安装完成
>> v12.14.1 表示安装成功
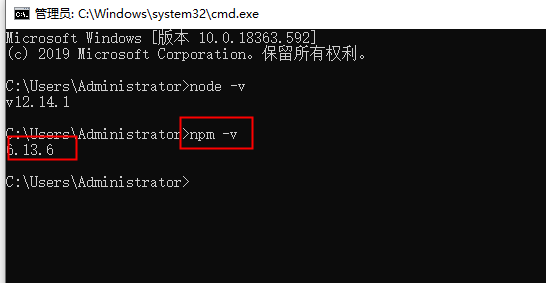
npm -v 查看npm是否安装成功
>> 6.13.6 表示安装成功
1.2 安装vue脚手架
npm install -g @vue/cli (等待安装完成)
vue -V 查看版本
>> @vue/cli 4.1.2 表示安装成功

1.3 安装淘宝镜像cnpm
npm install -g cnpm --registry=https://registry.npm.taobao.org
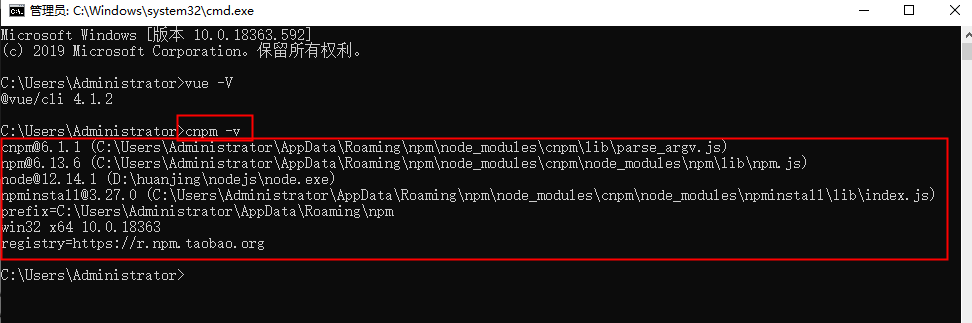
cnpm -v
>> cnpm@6.1.1 (C:UsersAdministratorAppDataRoaming
pm
ode_modulescnpmlibparse_argv.js)
>> npm@6.13.6 (C:UsersAdministratorAppDataRoaming
pm
ode_modulescnpm
ode_modules
pmlib
pm.js)
>> node@12.14.1 (D:huanjing
odejs
ode.exe)
>> npminstall@3.27.0 (C:UsersAdministratorAppDataRoaming
pm
ode_modulescnpm
ode_modules
pminstalllibindex.js)
>> prefix=C:UsersAdministratorAppDataRoaming
pm
>> win32 x64 10.0.18363
>> registry=https://r.npm.taobao.org
1.4 建立项目仓库(Github|Coding)
(1) Github: http://www.github.com/
(2) Coding: https://coding.net/
(3) 安装git命令行工具 https://blog.csdn.net/qq_32786873/article/details/80570783
1.5 GIT 常用命令
(1) 拷贝项目:git clone <仓库地址>
(2) 创建分支:git branch <name>
(3) 创建并进入分支:git checkout -b <name>
(4) 切分支:git checkout <name>
(4) 查看状态:git status
(5) 添加所有文件:git add
(6) 提交:git comment -m <当前提交的描述>
(7) 拉取:git pull
(8) 推送:git push
git push --set-upstream origin dev
(9) 查看分支 git branch --list
(10) 查看分支(包含远程分支):git branch -a
(11) git clone git@github.com:XXXXXX/XXXX.git
***
问题 :git@github.com: Permission denied (publickey).
解决 :
ssh-keygen -t rsa -C "你的邮箱名"
生成秘钥文件
***
1.6 创建项目
(1) vue create vue-admin
(2) 选第一个 回车
(3) 选第二个 回车
(4) 选[1,4,5,6,7] 回车
(5) Y表示路由以后会带# ,N表示路由路由以后不带# (http://www.abc.com/#/hello)
(6) 选第二个
(7) 选第四个
(8) 选第一个
(9) n
1.7 启动项目
cd vue-admin
npm run serve

大功告成!!!
2. 第二节(vue.config.js,全局配置,elementui组件)
2.1 创建配置文件
(1) 在项目根目录创建 vue.congig.js 文件
配置手册 :https://cli.vuejs.org/zh/config/#css-extract
(2) 创建normalize.scss
(3) 安装 element 组件
npm i element-ui -S
(4) 导入组件
在根目录下的 main.js 中写入以下内容:
import Vue from "vue";
import App from "./App.vue";
import router from "./router";
import store from "./store";

// 新增
import ElementUI from 'element-ui';
import 'element-ui/lib/theme-chalk/index.css';
Vue.use(ElementUI);

Vue.config.productionTip = false;
new Vue({
    router,
    store,
    render: h => h(App)
}).$mount("#app");
(5) 配置全局样式
在根目录下的 vue.config.js 中写入以下内容:
module.exports = {
    /* 部署生产环境和开发环境下的URL:可对当前环境进行区分,    baseUrl 从 Vue CLI 3.3 起已弃用,要使用publicPath */
  /* baseUrl: process.env.NODE_ENV === 'production' ? './' : '/' */
  publicPath: process.env.NODE_ENV === 'production' ? '/public/' : './',
  /* 输出文件目录:在npm run build时,生成文件的目录名称 */
  outputDir: 'dist',
  /* 放置生成的静态资源 (js、css、img、fonts) 的 (相对于 outputDir 的) 目录 */
  assetsDir: "assets",
  /* 是否在构建生产包时生成 sourceMap 文件,false将提高构建速度 */
  productionSourceMap: false,
  /* 默认情况下,生成的静态资源在它们的文件名中包含了 hash 以便更好的控制缓存,你可以通过将这个选项设为 false 来关闭文件名哈希。(false的时候就是让原来的文件名不改变) */
  filenameHashing: false,
  /* 代码保存时进行eslint检测 */
  lintOnSave: true,
  /* webpack-dev-server 相关配置 */

  devServer: {
    /* 自动打开浏览器 */
    open: false,
    /* 设置为0.0.0.0则所有的地址均能访问 */
    host: '0.0.0.0',
    port: 8080,
    https: false,
    hotOnly: false,
  },

  // 配置样式
  css: {
    loaderOptions: {
      sass: {
        prependData: `@import "~@/styles/main.scss";`
      }
    }
  }
}
2.2 路由
(1) 重定向路由
redirect: "login"
(2) 路由配置
在 src/router/index.js 中写入以下内容:
import Vue from "vue";
import VueRouter from "vue-router";
Vue.use(VueRouter);
const routes = [
  {
    path: "/",
    redirect: "login"
  },
  {
    path: "/login",
    name: "login",
    component: () => import("../views/pages/Login.vue")
  }
];
const router = new VueRouter({
  routes
});
export default router;
3. 第三节(vue文件标准结构,v-for遍历,key,v-binb属性,@click属性,绑定class,基础数据类型,引用数据类型区别)
3.1 vue 文件标准结构
(1) 固定的3块内容:
template,script,style
(2) template
必须有一层父元素,否则会报错,元素不一定是div标签,其他的也可以
(3) script
<script>
export default {
  name: "login", // 当前元素名称
  components: {}, // 组件,有引入组件时,放置组件名称,
  data() { // 数据,v-model绑定数据使用
    return {};
  },
  created() {}, // 创建完成时(生命周期其中一个)
  mounted() {}, // 挂载完成时(生命周期其中一个)
  methods: {}, // 定义函数
  props: {}, // 子组件接收父组件参数
  watch: {} // 子组件接收父组件参数
};
</script>
(4) style
<style lang="scss" scoped>
</style>
lang="scss" // 定义类型
scoped // 局部,定义时:只有当前文件应用样式,否则为全局样式
3.2 v-for遍历
(1) 用法:
基于源数据多次渲染元素或模板块。此指令之值,必须使用特定语法 alias in expression ,为当前遍历的元素提供别名:
<div v-for="item in items">
    {{ item.text }}
</div>
另外也可以为数组索引指定别名 (或者用于对象的键):
<div v-for="(item, index) in items"></div>
<div v-for="(val, key) in object"></div>
<div v-for="(val, name, index) in object"></div>
v-for 的默认行为会尝试原地修改元素而不是移动它们。要强制其重新排序元素,你需要用特殊属性 key 来提供一个排序提示:
<div v-for="item in items" :key="item.id">
{{ item.text }}
</div>
(2) v-for(简单理解就是数据循环)基于源数据多次渲染元素或模板块。
基础模式:
<template>
  <ul id="demo">
    <li v-for="item in items" :key="itme.id">
      {{ item.message }}
    </li>
  </ul>
<template>
<script>
  var example1 = new Vue({
    el: '#demo',
    data: {
      items: [
        { message: 'Foo' },
        { message: 'Bar' }
      ]
    }
  })
<script>
带索引:
<template>
  <ul id="demo">
    <li v-for="(item,index) in items" :key="itme.id">
      {{ item.message }}{{ index }}
    </li>
  </ul>
<template>

<script>
  var example1 = new Vue({
    el: '#demo',
    data: {
      items: [
        { message: 'Foo' },
        { message: 'Bar' }
      ]
    }
  })
<script>
(3) 实例
我们可以用 v-for 指令基于一个数组来渲染一个列表。v-for 指令需要使用 item in items 形式的特殊语法,其中 items 是源数据数组,而 item 则是被迭代的数组元素的别名。
<template>
  <ul id="example-1">
    <li v-for="item in items">
      {{ item.message }}
    </li>
  </ul>
<template>

<script>
var example1 = new Vue({
  el: '#example-1',
  data: {
    items: [
      { message: 'Foo' },
      { message: 'Bar' }
    ]
  }
})
<script>
3.3 v-bind绑定属性
(1) 绑定方式
v-bind:class 或:class
(2) :class的几种绑定方式
最简单的绑定
:class="{ 'active': isActive }"
Test.vue(文件)
<template>
  <div id="app">
    <ul class="demo">
      <li :class="{ 'active': isActive }" v-for="(item,index) in itmes" :key="item.id">{{ item.message }}索引:{{ index }}</li>
    </ul>
  </div>
</template>


<script>
export default {
  name: "demo",
  data() {
    // 数据,v-model绑定数据使用
    return {
      itmes: [{
        message: '列表选项(1)'
      },
      {
        message: '列表选项(2)'
      },
      {
        message: '列表选项(3)'
      },
      {
        message: '列表选项(4)'
      },
    ],
    isActive: false,
    };
  },
};
</script>
<style lang="scss">
  .demo {
    text-align: center;
  li {
     150px;
    line-height: 36px;
    font-size: 14px;
    color: #000;
    border-radius: 2px;
    cursor: pointer;
  }
  .active {
    background-color: midnightblue;
  }
  }
</style>
判断是否绑定一个active
:class="{ active: isActive == 10 }"
:class="{ active: isActive == index }"
<template>
  <div id="app">
    <ul class="demo">
      <li :class="{ 'active': isActive==index }" v-for="(item,index) in itmes" :key="item.id">{{ item.message }}索引:{{ index }}</li>
    </ul>
  </div>
</template>
<script>
export default {
  name: "demo",
  data() {
    // 数据,v-model绑定数据使用
    return {
      itmes: [{
        message: '列表选项(1)'
      },
      {
        message: '列表选项(2)'
      },
      {
        message: '列表选项(3)'
      }],
      isActive: 2,
    };
  },
};
</script>

<style lang="scss">
.demo {
  text-align: center;
  li {
     150px;
    line-height: 36px;
    font-size: 14px;
    color: #000;
    border-radius: 2px;
    cursor: pointer;
  }

  .active {
    background-color: red;
  }
}
</style>
3.4 基础数据类型
(1) 基本数据类型(按值访问):
ndefined,Null,Boolean,Number,String
概述
基本数据类型复制:复制的是该变量的副本,这两个变量可以参与任何操作而不相互影响
let a = 11;
let b = a;
b = 22;
console.log(`b:${b}`); // 22 注意这里的单引号
console.log(`a:${a}`); // 11 注意这里的单引号
<script>
export default {
  // 当前元素名称
  name: "login",

  // 组件,有引入组件时,放置组件名称,
  components: {},

  // 数据,v-model绑定数据使用
  data() {
    return {
      menuTab: [{
        text: '登录',
        status: true
      },
      {
        text: '注册',
        status: false
      }],
      isActive: false,
    };
  },

  // 创建完成时(生命周期其中一个)
  created() {},

  // 挂载完成时(生命周期其中一个)
    mounted() {
    let a = 11;
    let b = a;
    b = 22;
    console.log(`b:${b}`); // 22
    console.log(`a:${a}`); // 11
  },

  // 定义函数
  methods: {
    // 数据驱动视图进行渲染
    // js操作DOM元素
    togglenMneu(data) {
      console.log(data);
    }
  },
  props: {}, // 子组件接收父组件参数
  watch: {} // 子组件接收父组件参数
};
</script>
(2) 引用数据类型(按引用访问):
object,Array,function
概述
引用数据类型复制:复制的是该变量的指针,该指针指向存储在堆中的一个对象。复制操作结束后,两个变量实际上将引用同一个对象。因此,改变其中一个变量,就会影响另一个变量
let aArr = [11,22]; // [11,22]就是 object
let bArr = aArr;
let cArr = bArr;
cArr[0] = 33; // 直接修改了[11,22]对象
console.log(`aArr:${aArr}`); // aArr:33,22 注意这里的单引号
console.log(`bArr:${bArr}`); // bArr:33,22 注意这里的单引号
console.log(`cArr:${cArr}`); // cArr:33,22 注意这里的单引号
<script>
export default {
  // 当前元素名称
  name: "login",

  // 组件,有引入组件时,放置组件名称,
  components: {},

  // 数据,v-model绑定数据使用
  data() {
    return {
      menuTab: [{
        text: '登录',
        status: true
      },
      {
        text: '注册',
        status: false
      }],
      isActive: false,
    };
  },

  // 创建完成时(生命周期其中一个)
  created() {},

  // 挂载完成时(生命周期其中一个)
  mounted() {
    let aArr = [11, 22];
    let bArr = aArr;
    let cArr = bArr;
    cArr[0] = 33;
    console.log(`aArr:${aArr}`); // 11    注意这里的单引号
    console.log(`bArr:${bArr}`); // 11    注意这里的单引号
    console.log(`cArr:${cArr}`); // 11    注意这里的单引号
  },

  // 定义函数
  methods: {
    // 数据驱动视图进行渲染
    // js操作DOM元素
    togglenMneu(data) {
      console.log(data);
    }
  },
  props: {}, // 子组件接收父组件参数
  watch: {} // 子组件接收父组件参数
};
</script>
4. 第四节 熟悉element-ui 组件,制作表单验证,了解组件用法
4.1 熟悉element-ui
https://element.eleme.cn/#/zh-CN/component/installation
4.2 v-model
表单控件或者组件上创建双向绑定。
input,select,textarea,component
4.3 form表单实例
<template>
    <div id="login">
        <div class="login-wrap">
            <ul class="menu-tab">
                <li v-for="(item,index) in menuTab" :key="item.id" :class="{'current':item.status}" @click="togglenMneu(item)">{{ item.text }}</li>
            </ul>

            <!--表单 start-->
            <el-form :model="ruleForm" status-icon :rules="rules" ref="ruleForm" class="login-form" size="medium ">
                <el-form-item prop="mailbox" class="itme-form">
                    <lable>邮箱</lable>
                    <el-input type="text" v-model="ruleForm.mailbox" autocomplete="off"></el-input>
                </el-form-item>

                <el-form-item prop="password" class="itme-form">
                    <lable>密码</lable>
                    <el-input type="text" v-model="ruleForm.password" autocomplete="off" minlength="8" maxlength="20"></el-input>
                </el-form-item>

                <el-form-item prop="code" class="itme-form">
                    <lable>验证码</lable>
                    <el-row :gutter="11">
                        <el-col :span="15">
                            <el-input v-model.number="ruleForm.code" minlength="6" maxlength="6"></el-input>
                        </el-col>
                        <el-col :span="9">
                            <el-button type="success" class="block">获取验证码</el-button>
                        </el-col>
                    </el-row>

                </el-form-item>
                <el-form-item>
                    <el-button type="danger" @click="submitForm('ruleForm')" class="login-btn block">提交</el-button>
                </el-form-item>
            </el-form>
            <!--表单 end-->
        </div>
    </div>
</template>

<script>
    export default {
        // 当前元素名称
        name: "login",

        // 组件,有引入组件时,放置组件名称,
        components: {},

        // 数据,v-model绑定数据使用
        data() {
            // 验证验证码
            var checkCode = (rule, value, callback) => {
                let reg = /^[a-z0-9]{6}$/;
                if (value === '') {
                    return callback(new Error('验证码不能为空'));
                } else if (!reg.test(value)) {
                    return callback(new Error('验证码格式错误'));
                } else {
                    callback();
                }
            };
            // 验证邮箱是否合法
            var validateMailbox = (rule, value, callback) => {
                let reg = /^([a-zA-Z]|[0-9])(w|-)+@[a-zA-Z0-9]+.([a-zA-Z]{2,4})$/;
                if (value === '') {
                    callback(new Error('请输入邮箱'));
                } else if (!reg.test(value)) {
                    callback(new Error('邮箱格式错误'));
                } else {
                    callback();
                }
            };
            var validatePassword = (rule, value, callback) => {
                let reg = /^(?!D+$)(?![^a-zA-Z]+$)S{8,20}$/;
                if (value === '') {
                    callback(new Error('请输入密码'));
                } else if (!reg.test(value)) {
                    console.log(value);
                    callback(new Error('密码应为8-20位的数字加字母'));
                } else {
                    callback();
                }
            };
            return {
                menuTab: [{
                        text: '登录',
                        status: true
                    },
                    {
                        text: '注册',
                        status: false
                    },
                ],
                ruleForm: {
                    mailbox: '',
                    password: '',
                    code: ''
                },
                rules: {
                    mailbox: [{
                        validator: validateMailbox,
                        trigger: 'blur'
                    }],
                    password: [{
                        validator: validatePassword,
                        trigger: 'blur'
                    }],
                    code: [{
                        validator: checkCode,
                        trigger: 'blur'
                    }]
                }
            };
        },

        // 创建完成时(生命周期其中一个)
        created() {},

        // 挂载完成时(生命周期其中一个)
        mounted() {
            let aArr = [11, 22];
            let bArr = aArr;
            let cArr = bArr;
            cArr[0] = 33;
            console.log(`aArr:${aArr}`); // 11    注意这里的单引号
            console.log(`bArr:${bArr}`); // 11    注意这里的单引号
            console.log(`cArr:${cArr}`); // 11    注意这里的单引号
        },

        // 定义函数
        methods: {
            // 数据驱动视图进行渲染
            // js操作DOM元素
            togglenMneu(data) {
                this.menuTab.forEach(elem => {
                    elem.status = false
                });
                data.status = true;
            },

            submitForm(formName) {
                this.$refs[formName].validate((valid) => {
                    if (valid) {
                        alert('submit!');
                    } else {
                        console.log('error submit!!');
                        return false;
                    }
                });
            }
        },
        props: {}, // 子组件接收父组件参数
        watch: {} // 子组件接收父组件参数
    };
</script>

<style lang="scss">
    #login {
        height: 100vh;
        background-color: #344a5f;
    }

    .login-wrap {
         330px;
        margin: auto;
    }

    .menu-tab {
        text-align: center;

        li {
            display: inline-block;
             88px;
            line-height: 36px;
            font-size: 14px;
            color: #fff;
            border-radius: 2px;
            cursor: pointer;
        }

        .current {
            background-color: midnightblue;
        }
    }

    .login-form {
        margin-top: 29px;

        lable {
            display: block;
            font-size: 14px;
            color: #fff;
            margin-bottom: 3px;
        }

        .itme-form {
            margin-bottom: 13px;
        }

        .block {
            display: block;
             100%;
        }

        .login-btn {
            margin-top: 19px;
        }
    }
</style>
**************************************** 未完待续 ***********************************