三层架构综合实验(详细)
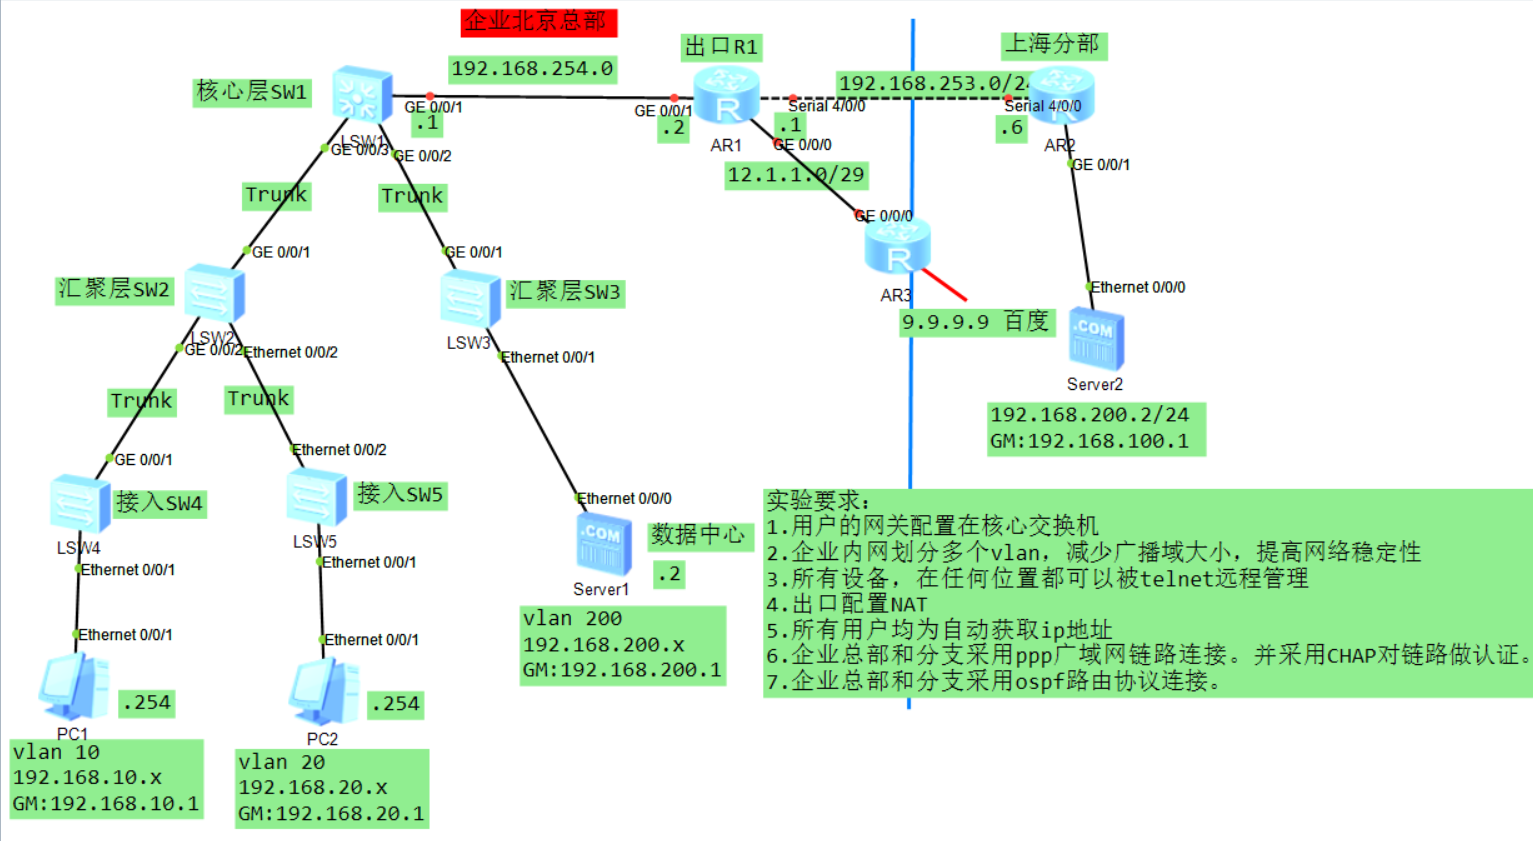
实验要求:
1.企业内网划分多个vlan,减少广播域大小,提高网络稳定性
接入SW4
<Huawei>sy
Enter system view, return user view with Ctrl+Z.
[Huawei]sy SW4
[SW4]un in en
Info: Information center is disabled.
[SW4]vlan batch 10 999
[SW4]int e0/0/1
[SW4-Ethernet0/0/1]port link-type access
[SW4-Ethernet0/0/1]port default vlan 10
[SW4-Ethernet0/0/1]int gi0/0/1
[SW4-GigabitEthernet0/0/1]port link-type trunk
[SW4-GigabitEthernet0/0/1]port trunk allow-pass vlan 10 999  //999为管理vlan
[SW4-GigabitEthernet0/0/1]

接入SW5
<Huawei>
<Huawei>sy
Enter system view, return user view with Ctrl+Z.
[Huawei]sy SW5
[SW5]un in en
Info: Information center is disabled.
[SW5]vlan batch 20 999
[SW5-vlan20]int e0/0/1
[SW5-Ethernet0/0/1]port link-type access
[SW5-Ethernet0/0/1]port default vlan 20
[SW5-Ethernet0/0/1]int e0/0/2
[SW5-Ethernet0/0/2]port link-type trunk
[SW5-Ethernet0/0/2]port trunk allow-pass vlan 20 999
[SW5-Ethernet0/0/2]

汇聚SW2
<Huawei>sy
Enter system view, return user view with Ctrl+Z.
[Huawei]sy SW2
[SW2]un in en
Info: Information center is disabled.
[SW2]vlan batch 10 20 999
[SW2]port-group group-member gi0/0/1 to gi0/0/2 e0/0/2  //捆绑配置
[SW2-port-group]port link-type trunk   //配置一次,下面三个端口全部配置完成
[SW2-GigabitEthernet0/0/1]port link-type trunk
[SW2-GigabitEthernet0/0/2]port link-type trunk
[SW2-Ethernet0/0/2]port link-type trunk
[SW2-port-group]port trunk allow-pass vlan 10 20 999   //配置一次,下面三个端口全部配置完成
[SW2-GigabitEthernet0/0/1]port trunk allow-pass vlan 10 20 999
[SW2-GigabitEthernet0/0/2]port trunk allow-pass vlan 10 20 999
[SW2-Ethernet0/0/2]port trunk allow-pass vlan 10 20 999
[SW2-port-group]

汇聚SW3
[SW3]vlan batch 200 999
[SW3-vlan200]int e0/0/1
[SW3-Ethernet0/0/1]port link-type access
[SW3-Ethernet0/0/1]port default vlan 200
[SW3-Ethernet0/0/1]int gi0/0/1
[SW3-GigabitEthernet0/0/1]port link-type trunk
[SW3-GigabitEthernet0/0/1]port trunk allow-pass vlan 200 999
[SW3-GigabitEthernet0/0/1]

核心SW1
<Huawei>
<Huawei>sy
Enter system view, return user view with Ctrl+Z.
[Huawei]sy SW1
[SW1]un in en
Info: Information center is disabled.
[SW1]vlan batch 10 20 200 999
[SW1]int gi0/0/3
[SW1-GigabitEthernet0/0/3]port link-type trunk
[SW1-GigabitEthernet0/0/3]port trunk allow-pass vlan 10 20 999
[SW1-GigabitEthernet0/0/3]int gi0/0/2
[SW1-GigabitEthernet0/0/2]port link-type trunk
[SW1-GigabitEthernet0/0/2]port trunk allow-pass vlan 200 999
2.用户的网关配置在核心交换机
[SW1]int vlan 10
[SW1-Vlanif10]ip add 192.168.10.1 24
[SW1-Vlanif10]int vlan 20
[SW1-Vlanif20]ip add 192.168.20.1 24
[SW1-Vlanif20]int vlan 200
[SW1-Vlanif200]ip add 192.168.200.1 24
[SW1-Vlanif200]dis ip int b
*down: administratively down
^down: standby
(l): loopback
(s): spoofing
The number of interface that is UP in Physical is 5
The number of interface that is DOWN in Physical is 1
The number of interface that is UP in Protocol is 4
The number of interface that is DOWN in Protocol is 2

Interface                         IP Address/Mask      Physical   Protocol
MEth0/0/1                         unassigned           down       down
NULL0                             unassigned           up         up(s)
Vlanif1                           unassigned           up         down
Vlanif10                          192.168.10.1/24      up         up
Vlanif20                          192.168.20.1/24      up         up
Vlanif200                         192.168.200.1/24     up         up
测试能ping通网关,配置没有问题。遇见的问题主要有忘记配置vlan 或者忘记配置虚拟vlan接口的IP

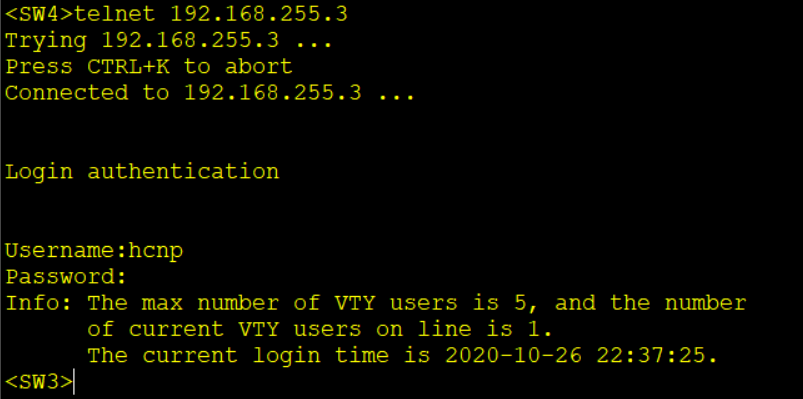
3.所有设备,在任何位置都可以被telnet远程管理
telnet三套件
SW1--->192.168.255.1
SW2--->192.168.255.2  //192.168.255.0网段划入vlan 999作为telnet管理网段
SW3--->192.168.255.3  //此地址就是telnet交换机的地址
SW4--->192.168.255.4
SW5--->192.168.255.5
<SW1>sy
Enter system view, return user view with Ctrl+Z.
[SWx]vlan 999
[SWx-vlan999]int vlan 999
[SWx-Vlanif999]ip add 192.168.255.x 255.255.255.0   //1.创vlan加地址
[SWx-Vlanif999]
[SW1]aaa
[SWx-aaa]local-user hcnp password cipher hcnp123 privilege level 3
Info: Add a new user.
[SWx-aaa]local-user hcnp service-type telnet 	//创账号选服务
[SWx]user-interface vty 0 4
[SWx-ui-vty0-4]authentication-mode aaa    //账号容量和认证
[SWx-ui-vty0-4]

路由器R1配置telnet
<Huawei>sy
Enter system view, return user view with Ctrl+Z.
[Huawei]sy R1
[R1]aaa
[R1-aaa]local-user hcnp password cipher hcnp123 privilege level 3
Info: Add a new user.
[R1]user-interface vty 0 4
[R1-ui-vty0-4]authentication-mode aaa
[R1]ip route-static 192.168.255.0 24 192.168.254.1

路由器R2配置telnet
[R2]aaa
[R2-aaa]local-user hcnp password cipher hcnp123 privilege level 3
Info: Add a new user.
[R2]user-interface vty 0 4
[R2-ui-vty0-4]authentication-mode aaa
[R2]ip route-static 192.168.255.0 24 192.168.253.1
汇聚层和接入层
SW2、SW3、SW4、SW5
ip route-static 0.0.0.0 0 192.168.255.1  //配置缺省路由给管理流量回包
配置结果
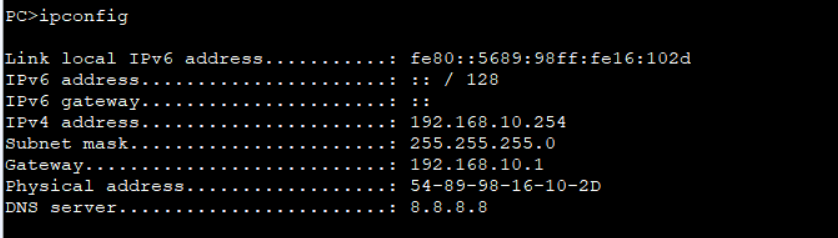
4.所有用户均为自动获取ip地址
[SW1]dhcp enable
Info: The operation may take a few seconds. Please wait for a moment.done.
[SW1]ip pool vlan_10
Info:It's successful to create an IP address pool.
[SW1-ip-pool-vlan_10]network 192.168.10.0 mask 24
[SW1-ip-pool-vlan_10]gateway-list 192.168.10.1
[SW1-ip-pool-vlan_10]dns-list 8.8.8.8
[SW1]ip pool vlan_20
Info:It's successful to create an IP address pool.
[SW1-ip-pool-vlan_20]network 192.168.20.0 mask 24
[SW1-ip-pool-vlan_20]gateway-list 192.168.20.1
[SW1-ip-pool-vlan_20]dns-list 8.8.8.8
[SW1]ip pool vlan_200
Info:It's successful to create an IP address pool.
[SW1-ip-pool-vlan_200]network 192.168.200.0 mask 24
[SW1-ip-pool-vlan_200]gateway-list 192.168.200.1
[SW1-ip-pool-vlan_200]dns-list 8.8.8.8

[SW1]int vlan 10
[SW1-Vlanif10]dhcp select global
[SW1-Vlanif10]int vlan 20
[SW1-Vlanif20]dhcp select global
[SW1-Vlanif20]int vlan 200
[SW1-Vlanif200]dhcp select global
[SW1-Vlanif200]
配置结果
5.基础配置
[SW1]vlan 800
[SW1-vlan800]description TO_ChuKouR1   //vlan描述
[SW1-vlan800]int gi0/0/1
[SW1-GigabitEthernet0/0/1]port link-type access
[SW1-GigabitEthernet0/0/1]port default vlan 800
[SW1-GigabitEthernet0/0/1]int vlan 800
[SW1-Vlanif800]ip add 192.168.254.1 24

出口R1
[R1]int gi0/0/1
[R1-GigabitEthernet0/0/1]ip add 192.168.254.2 24
[R1]int gi0/0/0
[R1-GigabitEthernet0/0/0]ip add 12.1.1.1 29
[R1]int s4/0/0
[R1-Serial4/0/0]ip add 192.168.253.1 24

上海分部R2
<Huawei>sy
Enter system view, return user view with Ctrl+Z.
[Huawei]sy R2
[R2]int s4/0/0
[R2-Serial4/0/0]ip add 192.168.253.2 24
[R2-Serial4/0/0]int gi0/0/1
[R2-GigabitEthernet0/0/1]ip add 192.168.100.1 24

运营商R3
<Huawei>sy
Enter system view, return user view with Ctrl+Z.
[Huawei]sy R3
[R3]int gi0/0/0
[R3-GigabitEthernet0/0/0]ip add 12.1.1.6 29
[R3]int LoopBack 9
[R3-LoopBack9]ip add 9.9.9.9 24
6.企业总部和分支采用ppp广域网链路连接。并采用CHAP对链路做认证。
注:客户端和服务端的接口只能使用s接口
出口R1(服务端)
[R1]aaa
[R1-aaa]local-user hcnp password cipher 123
[R1-aaa]local-user hcnp service-type ppp
[R1-aaa]int s4/0/0
[R1-Serial4/0/0]ppp authentication-mode chap

上海分部R2(客户端)
[R2]int s4/0/0
[R2-Serial4/0/0]ppp chap user hcnp
[R2-Serial4/0/0]ppp chap password simple 123
7.出口配置NAT
去包配置:
[SW1]ip route-static 0.0.0.0 0 192.168.254.2

[R1]ip route-s
[R1]ip route-static 0.0.0.0 0 12.1.1.6
[R1]acl 2000
[R1-acl-basic-2000]rule permit source 192.168.0.0 0.0.255.255
[R1-acl-basic-2000]int gi0/0/0  //此接口为公网接口
[R1-GigabitEthernet0/0/0]nat outbound 2000


回包配置:
8.企业总部和分支采用ospf路由协议连接。
创建ospf、划分area  加入设备相连的网段。
<SW1>sy
Enter system view, return user view with Ctrl+Z.
[SW1]ospf 1
[SW1-ospf-1]area
[SW1-ospf-1]area 0
[SW1-ospf-1-area-0.0.0.0]network 192.168.10.0 0.0.0.255
[SW1-ospf-1-area-0.0.0.0]network 192.168.20.0 0.0.0.255
[SW1-ospf-1-area-0.0.0.0]network 192.168.200.0 0.0.0.255
[SW1-ospf-1-area-0.0.0.0]network 192.168.254.0 0.0.0.255

<R1>sy
Enter system view, return user view with Ctrl+Z.
[R1]ospf 1
[R1-ospf-1]area 0
[R1-ospf-1-area-0.0.0.0]network 192.168.254.0 0.0.0.255
[R1-ospf-1-area-0.0.0.0]network 192.168.253.0 0.0.0.255

<R2>sy
Enter system view, return user view with Ctrl+Z.
[R2]ospf 1
[R2-ospf-1]area 0
[R2-ospf-1-area-0.0.0.0]network 192.168.253.0 0.0.0.255
[R2-ospf-1-area-0.0.0.0]network 192.168.100.0 0.0.0.255