1、前言
上一篇讲到第一个Spring项目的创建、以及bean的注入、当然、注入的方式一共有三种、本文将展开细说。
1、set注入:本质是通过set方法赋值
1、创建老师类和课程类

1、Course
package com.feng.entity;

public class Course {
    private String courseName;
    private int courseHour;
    private Teacher teacher;    // 授课老师、依赖于Teacher类

    public Course(String courseName, int courseHour, Teacher teacher) {
        this.courseName = courseName;
        this.courseHour = courseHour;
        this.teacher = teacher;
    }
    public Course() {
    }

    public String getCourseName() {
        return courseName;
    }

    public void setCourseName(String courseName) {
        this.courseName = courseName;
    }

    public int getCourseHour() {
        return courseHour;
    }

    public void setCourseHour(int courseHour) {
        this.courseHour = courseHour;
    }

    public Teacher getTeacher() {
        return teacher;
    }

    public void setTeacher(Teacher teacher) {
        this.teacher = teacher;
    }

    public void showInfo() {
        System.out.println(this.courseName + "," + this.courseHour + "," + this.teacher.getName());
    }
}
2、Teacher
package com.feng.entity;

public class Teacher {
    private String name;
    private int age;

    public Teacher(String name, int age) {
        this.name = name;
        this.age = age;
    }
    public Teacher() {
    }

    public String getName() {
        return name;
    }

    public void setName(String name) {
        this.name = name;
    }

    public int getAge() {
        return age;
    }

    public void setAge(int age) {
        this.age = age;
    }
}
2、配置applicationContext.xml
<?xml version="1.0" encoding="UTF-8"?>
<beans xmlns="http://www.springframework.org/schema/beans"
       xmlns:xsi="http://www.w3.org/2001/XMLSchema-instance"
       xsi:schemaLocation="http://www.springframework.org/schema/beans http://www.springframework.org/schema/beans/spring-beans.xsd">
    <bean id="teacher" class="com.feng.entity.Teacher">
        <property name="name" value="zs"></property>
        <property name="age" value="23"></property>
    </bean>
    <bean id="course" class="com.feng.entity.Course">
        <!--   1、set注入:通过set方法赋值     -->
        <!--本质就是调用setCourseName()方法
            CourseName -> setCourseName()借助反射进行查找
        -->
        <property name="courseName" value="java"></property>
        <property name="courseHour" value="200"></property>
        <!-- 将teacher对象注入到course对象中 -->
        <property name="teacher" ref="teacher"></property>
    </bean>
</beans>
3、测试类测试
package com.feng.test;

import com.feng.entity.Course;
import com.feng.entity.Student;
import org.springframework.context.ApplicationContext;
import org.springframework.context.support.ClassPathXmlApplicationContext;

public class Test {
    public static void testDI() {
        ApplicationContext context = new ClassPathXmlApplicationContext("applicationContext.xml");
        Course course = (Course)context.getBean("course");
        course.showInfo();
    }
    public static void main(String[] args) {
        testDI();
    }
}
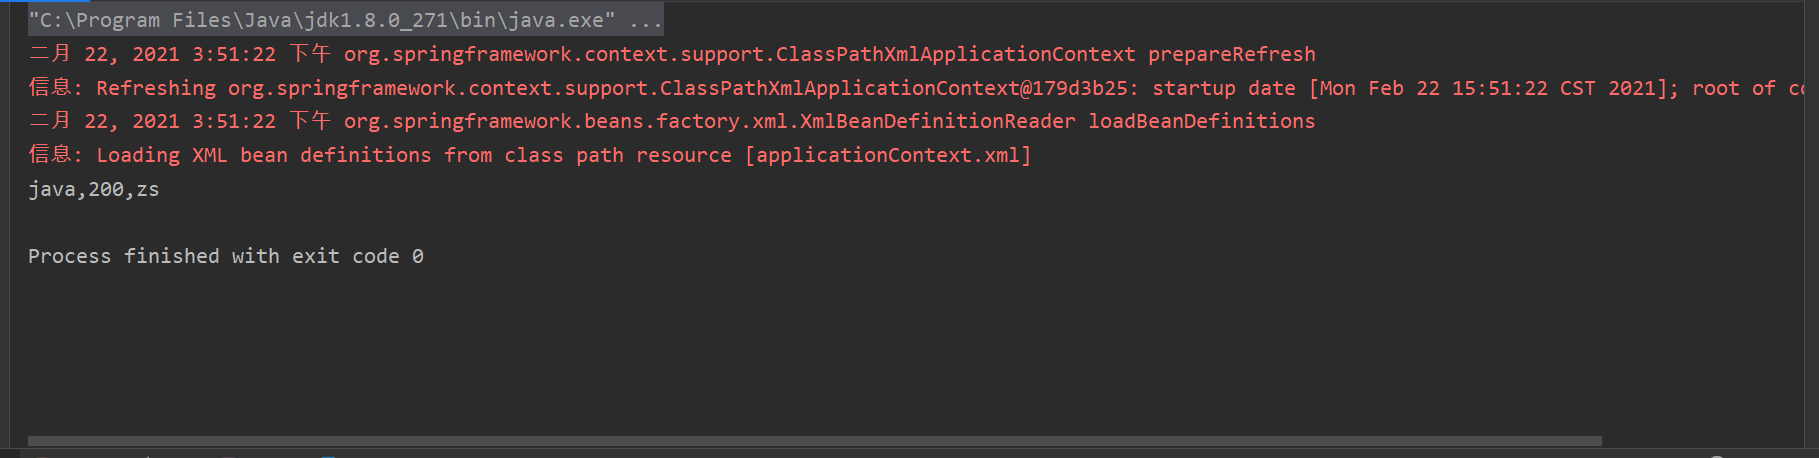
4、运行结果
5、注
这里只需要获得course对象即可、因为course对象中包含Teacher。这里注意不用value用ref、因为这里指向的是一个对象。
<property name="teacher" ref="teacher"></property>
2、构造器注入: 本质是通过构造方法赋值
1、改变applicationContext.xml即可、其他的无需变动
<?xml version="1.0" encoding="UTF-8"?>
<beans xmlns="http://www.springframework.org/schema/beans"
       xmlns:xsi="http://www.w3.org/2001/XMLSchema-instance"
       xsi:schemaLocation="http://www.springframework.org/schema/beans http://www.springframework.org/schema/beans/spring-beans.xsd">
    <bean id="teacher" class="com.feng.entity.Teacher">
           <!--2、构造器注入:通过构造方法赋值-->
            <constructor-arg value="24" name="age"></constructor-arg>
            <constructor-arg value="ls" name="name"></constructor-arg>
    </bean>
    <bean id="course" class="com.feng.entity.Course">
        <constructor-arg value="c" name="courseName"></constructor-arg>
        <constructor-arg value="100" name="courseHour"></constructor-arg>
        <constructor-arg ref="teacher" name="teacher"></constructor-arg>
    </bean>
</bean>
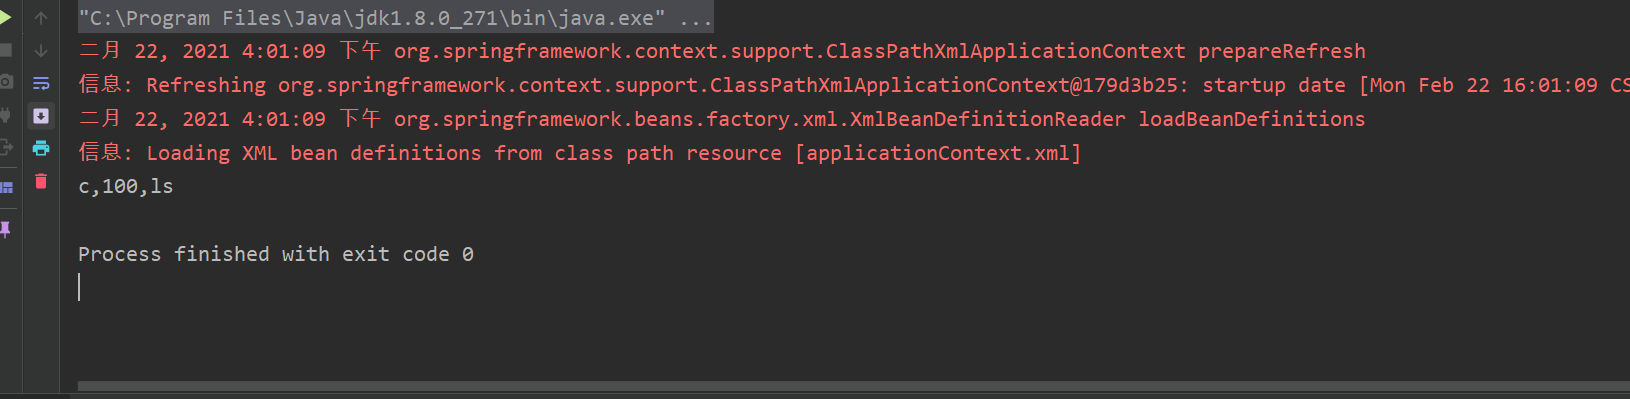
2、运行结果
3、注
这里注意使用构造器注入、原来的实体类中必须要有构造器方法、标签中最好指定name,不然会按构造方法中的顺序去检索参数,如果类型值出错就容易导致程序报错运行不起来。
3、增加p命名空间
1、改变applicationContext.xml即可、其他的无需变动
<?xml version="1.0" encoding="UTF-8"?>
<beans xmlns="http://www.springframework.org/schema/beans"
       xmlns:xsi="http://www.w3.org/2001/XMLSchema-instance"
      <!--使用p命名空间记得加这句话-->
       xmlns:p="http://www.springframework.org/schema/p"
       xsi:schemaLocation="http://www.springframework.org/schema/beans http://www.springframework.org/schema/beans/spring-beans.xsd">
    <bean id="teacher" class="com.feng.entity.Teacher" p:age="25" p:name="w5">
    </bean>
    <bean id="course" class="com.feng.entity.Course" p:courseHour="300" p:courseName="hadop" p:teacher-ref="teacher">
    </bean>
</bean>
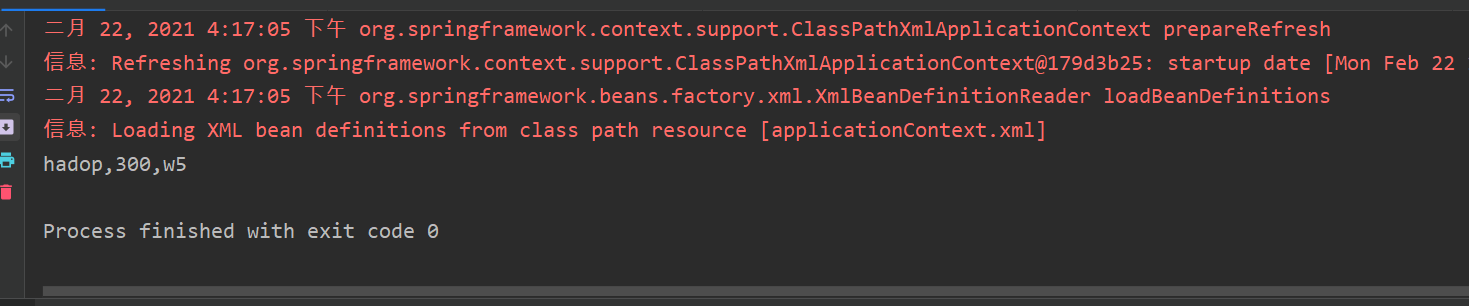
2、运行结果
2、总结
本文讲到了Spring框架中applicationContext.xml中bean依赖注入的三种方式、下一篇文章会围绕几种集合方式的注入进行讲解。