无论何种jdbc都需要引入mysql驱动依赖
<dependency>
    <groupId>mysql</groupId>
    <artifactId>mysql-connector-java</artifactId>
    <scope>runtime</scope>
</dependency>
一、整合jdbc
1-引入jdbc依赖jar
<dependency>
    <groupId>org.springframework.boot</groupId>
    <artifactId>spring-boot-starter-jdbc</artifactId>
</dependency>
2-配置文件添加数据源配置
spring:
  datasource:
    username: root
    password: root
    url: jdbc:mysql://localhost:3306/mydb?characterEncoding=UTF-8&&serverTimezone=GMT
    driver-class-name: com.mysql.jdbc.Driver
3-测试
@SpringBootTest
class SpringbootDataJdbcApplicationTests {
	@Autowired
    DataSource dataSource;

    @Test
    void contextLoads() throws SQLException {
        System.out.println(dataSource.getClass());
        Connection connection = dataSource.getConnection();
        System.out.println(connection);
        connection.close();
    }
}
配置使用druid数据源
druid可以在各种jdbc中使用,其是作为数据源,可以用也可以不用。不配置druid就会使用springboot默认数据源。
1-引入druid依赖
<!--引入自定义数据源druid-->
<!-- https://mvnrepository.com/artifact/com.alibaba/druid -->
<dependency>
    <groupId>com.alibaba</groupId>
    <artifactId>druid</artifactId>
    <version>1.1.8</version>
</dependency>
2-配置文件指定数据源类型
spring:
  datasource:
    username: root
    password: root
    url: jdbc:mysql://localhost:3306/mydb?characterEncoding=UTF-8&&serverTimezone=GMT
    driver-class-name: com.mysql.jdbc.Driver
    type: com.alibaba.druid.pool.DruidDataSource
- 修改druid配置
需要log4j日志支持
<!-- https://mvnrepository.com/artifact/log4j/log4j -->
<dependency>
    <groupId>log4j</groupId>
    <artifactId>log4j</artifactId>
    <version>1.2.17</version>
</dependency>
配置文件添加配置
spring:
  datasource:
    username: root
    password: root
    url: jdbc:mysql://localhost:3306/mydb?characterEncoding=UTF-8&&serverTimezone=GMT
    driver-class-name: com.mysql.jdbc.Driver
    type: com.alibaba.druid.pool.DruidDataSource
#   数据源其他配置
    initialSize: 5
    minIdle: 5
    maxActive: 20
    maxWait: 60000
    timeBetweenEvictionRunsMillis: 60000
    minEvictableIdleTimeMillis: 300000
    validationQuery: SELECT 1 FROM DUAL
    testWhileIdle: true
    testOnBorrow: false
    testOnReturn: false
    poolPreparedStatements: true
#   配置监控统计拦截的filters,去掉后监控界面sql无法统计,'wall'用于防火墙
    filters: stat,wall,log4j
    maxPoolPreparedStatementPerConnectionSize: 20
    useGlobalDataSourceStat: true
    connectionProperties: druid.stat.mergeSql=true;druid.stat.slowSqlMillis=500
手动配置返回DataSource类
@Configuration
public class DruidConfig {
    // 切换数据源,自定义dataSource类加载数据源为druid配置
    @ConfigurationProperties(prefix = "spring.datasource")
    @Bean
    public DataSource druid(){
        return new DruidDataSource();
    }
}
- 配置druid的监控
配置类中添加servlet和filter
@Configuration
public class DruidConfig {

    // 切换数据源,自定义dataSource类加载数据源为druid配置
    @ConfigurationProperties(prefix = "spring.datasource")
    @Bean
    public DataSource druid(){
        return new DruidDataSource();
    }

    // 配置druid的监控
    // 1-配置一个管理后台的servlet
    @Bean
    public ServletRegistrationBean statViewServlet(){
        ServletRegistrationBean servletRegistrationBean = new ServletRegistrationBean(new StatViewServlet(), "/druid/*");
        Map<String,String> initParams = new HashMap<>();
        initParams.put("loginUsername","admin"); // 监控登录名
        initParams.put("loginPassword","123456");// 监控登录密码
        initParams.put("allow","");  // 默认允许所有访问
        initParams.put("deny","192.168.121.1"); // 拒绝谁访问
        servletRegistrationBean.setInitParameters(initParams);

        return servletRegistrationBean;
    }

    // 2-配置一个web监控filter
    @Bean
    public FilterRegistrationBean webStatFilter(){

        FilterRegistrationBean bean = new FilterRegistrationBean();
        bean.setFilter(new WebStatFilter());
        Map<String,String> initParams = new HashMap<>();
        initParams.put("exclusions","*.js,*.css,/druid/*"); // 不拦截某些资源
        bean.setInitParameters(initParams);
        bean.setUrlPatterns(Arrays.asList("/*")); // 拦截哪些请求
        return bean;
    }
}
访问【http://localhost:8080/druid/index.html】查看druid监控器

二、整合mybatis
引入依赖
<dependency>
	<groupId>org.mybatis.spring.boot</groupId>
	<artifactId>mybatis-spring-boot-starter</artifactId>
	<version>2.1.4</version>
</dependency>

<dependency>
	<groupId>mysql</groupId>
	<artifactId>mysql-connector-java</artifactId>
	<scope>runtime</scope>
</dependency>

<!--引入数据源druid-->
<!-- https://mvnrepository.com/artifact/com.alibaba/druid -->
<dependency>
	<groupId>com.alibaba</groupId>
	<artifactId>druid</artifactId>
	<version>1.1.8</version>
</dependency>
<!-- https://mvnrepository.com/artifact/log4j/log4j -->
<dependency>
	<groupId>log4j</groupId>
	<artifactId>log4j</artifactId>
	<version>1.2.17</version>
</dependency>
配置文件设置配置
spring:
  datasource:
    username: root
    password: root
    url: jdbc:mysql://localhost:3306/test?characterEncoding=UTF-8&&serverTimezone=GMT
    driver-class-name: com.mysql.jdbc.Driver
    type: com.alibaba.druid.pool.DruidDataSource
#   数据源其他配置
    initialSize: 5
    minIdle: 5
    maxActive: 20
    maxWait: 60000
    timeBetweenEvictionRunsMillis: 60000
    minEvictableIdleTimeMillis: 300000
    validationQuery: SELECT 1 FROM DUAL
    testWhileIdle: true
    testOnBorrow: false
    testOnReturn: false
    poolPreparedStatements: true
#   配置监控统计拦截的filters,去掉后监控界面sql无法统计,'wall'用于防火墙
    filters: stat,wall,log4j
    maxPoolPreparedStatementPerConnectionSize: 20
    useGlobalDataSourceStat: true
    connectionProperties: druid.stat.mergeSql=true;druid.stat.slowSqlMillis=500
无论使用注解还是配置文件方式都需要通过@Mapper或者@Mapperscan将接口扫描装配到容器中
- 1-注解方式
编写实体类(需要注意字段映射,即实体类字段和数据库一致) 如不一致,需配置驼峰转换映射
----------实体类
public class Grade {

    private Integer gid;
    private String gradeName;

    public Integer getGid() { return gid; }
    public void setGid(Integer gid) {this.gid = gid;}
    public String getGradeName() {return gradeName;}
    public void setGradeName(String gradeName) {this.gradeName = gradeName; }
)

----------驼峰转换映射配置:添加配置类
@Configuration
public class MyBatisConfig {
    @Bean
    public ConfigurationCustomizer configurationCustomizer(){
        return new ConfigurationCustomizer() {
            @Override
            public void customize(org.apache.ibatis.session.Configuration configuration) {
                configuration.setMapUnderscoreToCamelCase(true);
            }
        };
    }
}
添加mapper类(需加注解@Mapper,这样mybatis才能自动装配上)
//指定这是一个操作数据库的mapper
@Mapper
public interface GradeMapper {

    @Select(value = "select * from grade where gid=#{id}")
    public Grade getGradeById(Integer id);

    @Delete(value = "delete from grade where gid=#{id}")
    public int deleteGradeById(Integer id);

    @Insert(value = "insert into grade(grade_name) value(#{gradeName})")
    @Options(useGeneratedKeys= true,keyProperty = "gid")
    public int insertGrade(Grade grade);

    @Update(value = "update grade set grade_name=gradeName where gid=#{id}")
    public int updataGrade(Grade grade);
}

--------------
如果mapper类上不加注解@Mapper,可以在启动类上加上mapper扫描注解
@SpringBootApplication
@MapperScan(value = "com.xiaoai.datamybatis.mapper") // 批量扫描mapper
public class SpringbootDataMybatisApplication {

	public static void main(String[] args) {
		SpringApplication.run(SpringbootDataMybatisApplication.class, args);
	}
}
测试:
@RestController
public class GradeController {
    @Autowired
    GradeMapper gradeMapper;

    @GetMapping("/grade/{id}")
    public Grade getGrade(@PathVariable(value = "id") Integer id){
        return gradeMapper.getGradeById(id);
    }
}

- 2-配置文件方式
编写实体类
public class User {
    private Integer id;
    private String name;
    private String age;
    private String sex;
    private Integer gradeId;

    public Integer getGradeId() {return gradeId; }
    public void setGradeId(Integer gradeId) {this.gradeId = gradeId;}
    public Integer getId() { return id; }
    public void setId(Integer id) {  this.id = id; }
    public String getName() { return name;}
    public void setName(String name) { this.name = name;}
    public String getAge() {return age; }
    public void setAge(String age) { this.age = age;}
    public String getSex() {return sex; }
    public void setSex(String sex) {this.sex = sex; }
}
编写mapper类:UserMapper.java
@Mapper
public interface UserMapper {
    public User getUserById(Integer id);
    public void insertUser(User user);
}
添加主配置文件和mapper映射配置文件
----------主配置
<?xml version="1.0" encoding="UTF-8"?>
<!DOCTYPE configuration
        PUBLIC "-//mybatis.org//DTD Config 3.0//EN"
        "http://mybatis.org/dtd/mybatis-3-config.dtd">
<configuration>
    <settings>
        <!--开启驼峰转换-->
        <setting name="mapUnderscoreToCamelCase" value="true"/>
    </settings>
</configuration>
---------映射配置
<?xml version="1.0" encoding="UTF-8" ?>
<!DOCTYPE mapper
        PUBLIC "-// mybatis.org//DTD Mapper 3.0//EN"
        "http://mybatis.org/dtd/mybatis-3-mapper.dtd">
<mapper namespace="com.xiaoai.datamybatis.mapper.UserMapper">
    <select id="getUserById" resultType="com.xiaoai.datamybatis.bean.User">
        SELECT * FROM testuser WHERE id=#{id}
    </select>
    <insert id="insertUser">
        INSERT INTO testuser(name,age,sex,grade) VALUES(#{name},#{age},#{sex},#{gId})
    </insert>
</mapper>
配置文件加载配置映射文件
mybatis:
  config-location: classpath:mybatis/mybatis-config.xml
  mapper-locations: classpath:mybatis/mapper/*.xml
测试:
@RestController
public class UserController {
@Autowired
UserMapper userMapper;
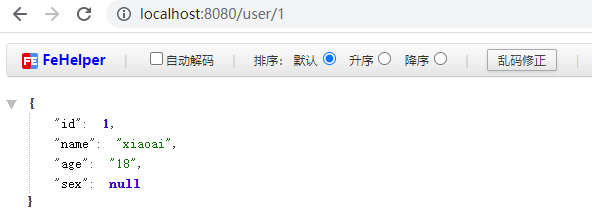
@GetMapping("/user/{id}")
public User getUser(@PathVariable(value = "id") Integer id){
return userMapper.getUserById(id);
}
}
配置文件和注解可以一起使用
三、整合jpa
1-引入spring-boot-starter-data-jpa
<dependency>
	<groupId>mysql</groupId>
	<artifactId>mysql-connector-java</artifactId>
	<scope>runtime</scope>
</dependency>
<dependency>
	<groupId>org.springframework.boot</groupId>
	<artifactId>spring-boot-starter-data-jpa</artifactId>
</dependency>
2-创建Entity实体类标注JPA注解
// 配置映射关系
@Entity // 告诉jpa这是一个实体类(和数据库表映射的类)
@Table(name = "jpa_user") // 标识数据库对应的表,如果省略,默认表名就是类名首字母小写
public class User {

    @Id //这是一个主键
    @GeneratedValue(strategy = GenerationType.IDENTITY)  // 主键生成策略 自增主键
    private Integer id;
    @Column(name = "name",length = 50) // 和数据库对应的一个列
    private String name;
    @Column // 属性省略,列名默认就是属性名
    private String age;
    @Column
    private String sex;

    public Integer getId() { return id;}
    public void setId(Integer id) { this.id = id;}
    public String getName() {return name;}
    public void setName(String name) {this.name = name;}
    public String getAge() {return age;}
    public void setAge(String age) { this.age = age; }
    public String getSex() { return sex; }
    public void setSex(String sex) { this.sex = sex;}
}
3、创建接口继承JpaRepository
// 继承jpa的JpaRepository来完成对数据库操作  泛型:1=操作的实体类,2=实体类中主键类型
public interface UserRepository extends JpaRepository<User,Integer>{
}
4、配置文件配置数据源 及可配置jpa相关基本配置
spring:
  datasource:
    username: root
    password: root
    url: jdbc:mysql://192.168.121.128:3306/test?characterEncoding=UTF-8&&serverTimezone=GMT
    driver-class-name: com.mysql.jdbc.Driver
  jpa:
    hibernate:
      # 更新或者出具数据库表结构
      ddl-auto: update
      # 控制台显示sql
      show-sql: true
5、测试方法
@RestController
public class UserController {
@Autowired
UserRepository userRepository;
// 通过id查询
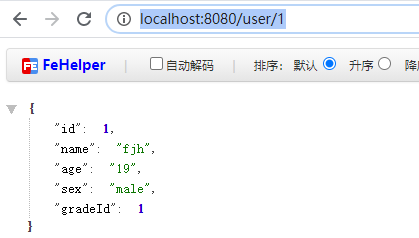
@GetMapping(value = "/user/{id}")
public User getUser(@PathVariable(value = "id") Integer id){
User user = userRepository.findById(id).orElse(null);
return user;
}
// 插入一条数据
@GetMapping(value = "/user")
public User insertUser(User user){
User saveUser = userRepository.save(user);
return saveUser;
}
}