Spring根本任务
Spring的根本任务就是简化Java开发。
目前许多框架如果要使用他们,就必须要继承或实现这些框架的各种类。这使得框架与我们的程序耦合度过高。由于在我们的程序中加入了过多的框架代码,使得我们的代码看起来非常臃肿。
但Spring不是这样,它不会强迫你去实现或继承任何Spring的类,这样你的代码会非常清晰,而且完全看不出有Spring加入的痕迹。当然,如果使用了Spring注解,你的代码会稍稍留有Spring的痕迹,但与其他框架相比,即使使用了注解,Spring与我们程序的耦合度依然很低。
IoC与DI(控制反转和依赖注入)
IoC和DI是Spring的两个核心概念,很多人都把它们视为相同的东西,但事实并非如此。
IoC(Inversion of Control):控制反转。
DI(Dependency Injection):依赖注入。
控制反转是目的,依赖注入是实现控制反转的手段。
控制反转是一种面向对象的思想,它是一种宽泛的概念,只要一个类将对它内部状态的控制权交由其他机制去完成即为『控制反转』。控制反转是为了降低类与类之间的耦合度。
而Spring采用依赖注入这一具体的手段来达到控制反转的目的。
1、依赖注入
一个类内部往往有很多成员变量,如:
class A {
    private Person chaimm;
}
上述代码在面向对象中可以描述为:
- A类和Person类之间存在依赖关系;(is a 是一个,继承关系;has a 有一个,依赖关系)
- A依赖于Person;
- A为依赖类;
- Perosn为被依赖类;
通常情况下,依赖类需要自己去创建并维护被依赖类的对象,如:
class A {
    private Person chaimm = new Person();
}
但依赖注入的做法是:将被依赖对象的创建与维护工作交由专门的机构,而依赖类中只需要声明所需要的成员变量。
也就是说,依赖类原本需要主动去获取对象,但采用依赖注入后对象由第三方机构提供,自己仅需声明需要什么对象即可。
这样做的目的就是为了降低两个类之间的耦合程度。
PS:在Spring中,那个创建、管理对象的机构就称为『IoC Service Provider』。
但此时还没体现出依赖注入能降低耦合度这一点,只有当依赖注入与面向接口编程结合起来,才能真正发挥依赖注入的优势。接下来先介绍一下『面向接口编程』。
2、面向接口编程
一个类依赖其他类的目的是为了获取其他类所提供的服务,可能这种服务有多种实现,我们可能需要根据不同的场景使用不同的实现。此时,我们可以使用多态,将同一功能的多种实现抽象出一个接口,并为所有实现定义一套相同的API。在使用时声明接口类型的变量而非实现类的变量,并将实现类的对象赋给接口变量,最后用接口变量去调用实现类的服务,如:
class A {
    private Super super = new SuperImpl_1();

    public static void main ( String[] args ) {
        // 使用Super提供的服务
        super.method_1();
        super.method_2();
        super.method_3();
    }
}
这样,当想使用SuperImpl_2提供的功能时,只需替换Super的实现类,其他地方不做任何变化:
private Super super = new SuperImpl_2();
上述过程就是面向接口编程的思想:若某一类服务有多种不同的实现,我们需要抽象出一个接口,并在接口中定义一套API。在使用时声明接口类型变量,并用实现类的对象赋值。接下来通过接口类型的变量调用服务即可。当功能发生变化时,仅需替换实现类即可。
3,在面向接口编程的基础上使用依赖注入的好处
上述过程如果要换一种实现,就必须要修改A类的代码,再重新编译。而使用了依赖注入后,由于依赖类不需要自己创建维护被依赖对象,该过程由IoC Service Provider完成。因此,当需要替换实现类时,只需在IoC Service Provider中修改,被依赖类、依赖类都不会受到影响,此时这两个类是松耦合的。
4,依赖注入的基本实现方式
Java中创建一个对象分两步:
1.通过关键字new创建一个对象
2.通过构造函数或setter函数为对象添加初始化参数 (参数可以是基本数据类型 也可以是引用数据类型(比如依赖的类))
当Spring出现后,对象的创建、成员变量的初始化、对象的销毁均由Spring完成。
那么,要让Spring帮助我们创建对象,我们首先需要将要创建的对象的类型、初始化的值告诉Spring,然后Spring会在程序启动的时候根据我们的要求创建对象。我们通过配置文件来告诉Spring要创建哪些对象,并告诉Spring如何创建这些对象。
4.1 Spring怎么定义一个Bean
在Spring中,让Spring创建的对象叫做Bean,每一个bean都有成员函数和成员变量,如果bean的某些成员变量需要初始值,那么在bean的配置文件中声明即可,否则Spring会给bean的成员们赋上默认的初始值。
如果已经有一个Person类,含有id和name两个属性:
class Person{
    private long id;
    private String name;

    public void setId(long id){
        this.id = id;
    }
    public long getId(){
        return this.id;
    }
    public void setName(String name){
        this.name = name;
    }
    public String getName(){
        return this.name;
    }
}
然后我们需要创建一个Spring的配置文件,在里面作如下定义:
<?xml version="1.0" encoding="UTF-8"?>
<beans xmlns="http://www.springframework.org/schema/beans"
    xmlns:xsi="http://www.w3.org/2001/XMLSchema-instance"
    xsi:schemaLocation="http://www.springframework.org/schema/beans
    http://www.springframework.org/schema/beans/spring-beans-4.5.xsd">

    <bean id="person" class="com.njupt.Person"></bean>

</beans>
Spring的配置文件由beans标签开始,beans标签下的bean标签内即可声明一个bean。
- id表示这个bean的名字,可以自定义,当我们需要使用这个对象时,通过这个id来获取对象。
- class表示这个类的完整路径。Spring通过class属性找到这个类。
到此为止,Person类的配置已经完成。当程序启动的时候,Spring会读取这个配置文件,根据class找到每个bean对应的类,并初始化它们。 (反射的典型应用)
当我们需要使用一个对象时,通过如下操作即可获得:
ApplicationContext context = new ClassPathXmlApplicationContext("xml的路径");
Person person = (Person)context.getBean(“bean的名字”)
4.2 Spring怎么给Bean注入初始值
在Java中,给一个对象赋上初始值的方法有两种:
1. 通过构造函数将初始值传递给对象
2. 在创建完对象后通过set函数为对象赋上初始值
Spring也采用了这两种方式,分别叫做:构造器注入和set方法注入(即属性注入)。
对应两个标签<constructor> 构造器;<property>属性
(1)构造器注入
(1.1)注入基本类型数据
我们首先为Person类添加一个构造函数:
class Person{
    private long id;
    private String name;

    //构造函数
    public Person(String name,long id){
        this.name = name;
        this.id = id;
    }
    //省略set、get方法
然后在bean标签中添加属性:
<bean id="person" class="com.njupt.Person">
        <constructor-arg value="柴毛毛"/>
        <constructor-arg value="21"/>
</bean>
关于constructor-arg有如下注意点:
- 属性constructor-arg的次序需要和构造函数中参数的顺序一致。
- value表示属性值。
- 属性constructor-arg中,无需指定属性名,只需填写属性值。
- 属性constructor-arg中,所有的属性值均是String类型,Spring会在赋值的时候自动进行类型转换。
(1.2)注入对象引用
假设Person类中有一个Father类型的属性,并且添加参数为Father的构造函数:
class Person{
    private long id;
    private String name;
    private Father father;

    public Person(Father father){
        this.father = father;
    }
    ……省略所有setter、getter函数……
}
此时,构造函数的参数是一个引用类型的变量,我们可以做如下处理:
 <!-- 首先创建Father类型的bean -->
    <bean id="father" class="com.njupt.Father">
        <constructor-arg value="柴毛毛的爸爸"/>
        <constructor-arg value="41"/>
    </bean>

    <!-- 通过ref引用father对象 -->
    <bean id="person" class="com.njupt.Person">
        <constructor-arg ref="father"/>
    </bean>
(1.3) 通过工厂创建bean
如果一个类是工厂类,它没有构造函数,因此我们没有办法通过构造器来初始化这个对象。但工厂模式会提供给我们一个静态函数,用来获取工厂对象,那么在配置bean的时候做如下操作:
<bean id="person" class="com.njupt.Person" factory-method="getIntance"/>
对于工厂类,我们需要调用getInstance来获取工厂对象,因此在配置bean的时候,我们需要通过factory-method属性告诉Spring,获取这个工厂对象的函数是getInstance。
(2)set方法注入
通过上面我们了解到,Spring通过bean标签下的constructor-arg标签为构造函数注入参数值,接下来介绍Spring通过property标签为成员变量注入初始值。
(2.1)注入基本类型的值
class Person{
   private long id;
    private String name;
   private Father father;

   public void setId(long id){
        this.id = id;
    }
    public long getId(){
        return this.id;
    }
    public void setName(String name){
        this.name = name;
    }
    public String getName(){
        return this.name;
    }
  public void setPerson(Father father){
        this.father = father;
    }
}
为Person对象的name属性注入一个初始值“chaiMaoMao”:
- name:属性名
- value:属性值
<bean id="person" class="com.njupt.Person">
        <property name="name" value="chaiMaoMao"/>
    </bean>
注意:在编写配置文件的时候,Spring中value的全是String类型,但Spring会在运行的时候自动将其转换为相应的类型。
(2.2) 注入对象引用
在bean中通过ref属性注入一个引用类型的变量。如:Person类中有一个Father类型的属性father,如果我们需要将一个father对象注入Person的father属性中,需要进行如下操作:
<!-- 引用name为father的bean注入给Person的father属性 -->
    <bean id="person" class="com.njupt.Person">
        <property name="father" ref="father"/>
    </bean>

    <!-- 定义name为father的bean -->
    <bean id="father" class="com.njupt.Father">
        <constructor-arg value="柴毛毛的爸爸"/>
        <constructor-arg value="1"/>
    </bean>
我们开发中常用的MVC例子如下
UserDao.java
public class UserDao{
 public void inserUser(User user){
  //具体逻辑省略
 }
}
UserService.java
public Interface UserService{
 void inserUser(User user);
}
UserServiceImpl.java
public class UserServiceImpl implements UserService{
   private UserDao userDao;
   public void setUserDao(UserDao userDao){
      this.userDao = userDao;
   }
   public void insertUser(User user){
    userDao.insert(user);
   }
}
Spring配置文件
<?xml version="1.0" encoding="UTF-8"?>
<beans xmlns="http://www.springframework.org/schema/beans"
 xmlns:xsi="http://www.w3.org/2001/XMLSchema-instance"
 xmlns:context="http://www.springframework.org/schema/context"
 xsi:schemaLocation="http://www.springframework.org/schema/beans
 http://www.springframework.org/schema/beans/spring-beans-2.5.xsd
 http://www.springframework.org/schema/context
 http://www.springframework.org/schema/context/spring-context-2.5.xsd ">
 <!--省略一些无关的配置书写-->
 <bean id="userDao" class="UserDao"></bean>
 <bean id="userService" class="UserServiceImpl">
   <property name="userDao" ref="userDao">
 </bean>
 </beans>
以上就可以把userDao注入到UserServiceImpl中.
3.注入内部bean
如果一个bean仅供某一个bean使用,那么可以将这个bean声明为内部bean。如:name为father的bean只允许注入给name为person的bean,那么就将father这个bean以放在person的内部,如下所示:
<bean id="person" class="com.njupt.Person">
        <property name="father">
            <bean class="com.njupt.Father" />
        </property>
    </bean>
注意:
1. 内部bean没有名字,只适应于一次性注入,不能被其他bean引用。
2. 注入内部bean不仅限于属性注入,也可用于构造器注入,如下所示:
<bean id="person" class="com.njupt.Person" init-method="createInstance" destory-method="destoryInstance">
        <constructor-arg>
            <bean class="com.njupt.Father" />
        </constructor-arg>
    </bean>
4.3 Bean的作用域
在Spring中,默认情况下bean都是单例。也就是说,当我们向Spring请求一个bean对象时,Spring总给我们返回同一个bean对象。
**注意:**Spring 中所说的“单例”与Java中的单例稍有不同。Spring中的单例是指:在同一个ApplicationContext中相同名字的bean对象是同一个;而Java中的单例是指:整个JVM中单例的对象只有一个。
当然,我们可以通过改变bean标签的scope参数来设置bean的作用域。常用的scope对应的值有:
- singleton:在同一个Spring Context中,一个bean只有一个实例对象。(默认)
- prototype:每次向Spring请求一个bean对象,Spring都会创建一个新的实例。
4.4 初始化和销毁Bean、
如果需要在bean对象初始化之后或销毁之前做一些额外的操作的话,可以作如下配置:
1. 首先需要在bean中定义函数,供Spring创建该类对象或销毁该对象的时候调用:
public void createInstance(){
        System.out.println("对象被创建啦!");
    }

    public void destoryInstance(){
        System.out.println("对象被销毁啦!");
    }
在XML中作如下配置:
告诉Spring,这个bean在被创建的时候调用这个类中哪个函数,这个类被销毁的时候调用这个类中的哪个函数。
<bean id="person" class="com.njupt.Person" init-method="createInstance" destory-method="destoryInstance">
        <constructor-arg ref="father"/>
</bean>
如果所有的bean在初始化或销毁的时候都需要调用函数,那么可以在beans标签中设置一个全局的参数:default-init-method和default-destroy-method。这样,这个beans标签下的所有bean在创建或销毁时都会调用createInstance()和destoryInstance()。
<beans xmlns="http://www.springframework.org/schema/beans"
    xmlns:xsi="http://www.w3.org/2001/XMLSchema-instance"
    xsi:schemaLocation="http://www.springframework.org/schema/beans
    http://www.springframework.org/schema/beans/spring-beans-4.5.xsd"

    default-init-method="createInstance"
    default-destory-method="destoryInstance">

</beans>
4.5 装配集合
到此为止,不管是装配基本类型还是装配对象的引用,都是在装配单个属性,那么该如果装配一个集合呢?

- 对于单个值的集合,如数组、List、Set,均可以用list标签来装配,list标签和set标签的不同之处仅仅是前者允许重复,而后者不允许重复。
- 对于键值对集合,可以使用set标签或props标签,两者的区别是:前者的key和value可以是任何类型,而后者的key和value只能是String类型。
1.装配List:


<bean id="person" class="com.njupt.Person">
        <property name="list">
            <list>
                <ref bean="a"/>
                <ref bean="b"/>
                <ref bean="c"/>
            </list>
        </property>
    </bean>
2.装配Map:
<bean id="person" class="com.njupt.Person">
        <property name="map">
            <map>
                <entry key="key_a" value-ref="a"/>
                <entry key="key_b" value-ref="b"/>
                <entry key="key_c" value-ref="c"/>
            </map>
        </property>
    </bean>
3.装配props:
<bean id="person" class="com.njupt.Person">
        <property name="map">
            <props>
                <prop key="key_a">value_a</prop>
                <prop key="key_b">value_b</prop>
                <prop key="key_c">value_c</prop>
            </props>
        </property>
    </bean>
4.6 SpEL表达式
SpEL=Spring Express Language
这种表达式用在Spring的配置文件中,可以直接获取某个bean的某一个属性值或获得一个函数的执行结果,相当屌!
SpEL表达式不难,下面举几个例子相信聪明的你就能理解了。
引用一个bean的属性值
<bean id="person" class="com.njupt.Person">
        <property name="name" value="#{father.name}" />
    </bean>
引用一个bean的函数的运行结果
 <bean id="person" class="com.njupt.Person">
        <property name="name" value="#{father.getName()}" />
    </bean>
引用Java中某个静态函数的运行结果
<bean id="person" class="com.njupt.Person">
        <property name="name" value="#{T(java.lang.Math).random()}" />
    </bean>
数值运算
<bean id="person" class="com.njupt.Person">
        <property name="id" value="#{count.id + 100}" />
    </bean>
字符连接
<bean id="person" class="com.njupt.Person">
        <property name="name" value="#{father.name +' '+ mother.name}" />
    </bean>
比较运算
 <bean id="person" class="com.njupt.Person">
        <property name="equal" value="#{father.name == mother.name}" />
    </bean>
访问集合成员
<bean id="person" class="com.njupt.Person">
        <property name="name" value="#{list['chaiMaoMao']}" />
    </bean>
查询集合成员
<bean id="person" class="com.njupt.Person">
        <property name="name" value="#{list.?[age gt 20]}" />
    </bean>
投影集合
<bean id="person" class="com.njupt.Person">
        <property name="names" value="#{list.![name]}" />
    </bean>
5,自动装配与自动扫描
通过前面的学习,我们会感觉到对于一个有较多Bean的大项目,Spring的配置会比较复杂。那么接下来我们就介绍如何简化Spring的配置。
简化Spring的配置主要分为两类:
1. 自动装配
2. 自动扫描
下面就详细介绍这两种简化配置的方式。
自动装配
自动装配的种类
- byName:根据属性的名字自动装配
- byType:根据属性的类型自动装配
- constructor:根据构造器的参数类型自动装配
- autodetect:最佳自动装配。首先采用constructor自动装配,若没有发现与构造器相匹配的Bean时,采用byType进行自动装配。
使用XML实现自动装配
byName:根据属性的名字装配
在bean标签中添加属性autowire=”byName”。当Spring启动时,会寻找与person中成员变量名字相同的bean,并将该bean注给person的成员变量。
 <bean id="person" class="com.njupt.Person" autowire="byName">
    </bean>
byType:根据属性的类型装配
在bean标签中添加属性autowire=”byName”。当Spring启动时,会寻找与person中成员变量类型相同的bean,并将该bean注给person的成员变量。
<bean id="person" class="com.njupt.Person" autowire="byType">
    </bean>
byType的缺点:如果某一类型的bean有多个,那Spring在通过byType为属性寻找同类型的bean时就会抛出异常。
解决方案:
- 为相同类型的bean设置是否首选
在需要被首选的bean中作如下设置:
<bean id="person" class="com.njupt.Person" primary="true">
    </bean>
在不需要被首选的bean中作如下设置:
<bean id="person" class="com.njupt.Person" primary="false">
    </bean>
取消某一些相同类型bean的候选资格
使用auto-candidate属性取消某些bean的候选资格,Spring在为属性寻找同类型的bean时直接排除这些bean。
<bean id="person" class="com.njupt.Person" default-candidate="false">
    </bean>
constructor:根据构造器的参数的类型装配
autowire设置为constructor后,Spring会寻找与构造函数的参数类型相同的bean,并注入给这个构造函数。
<bean id="person" class="com.njupt.Person" autowire="constructor">
    </bean>
构造器的自动装配本质上仍是通过byType进行装配,只不过autowire=”constructor”时,Spring会对构造器的参数进行自动装配,而autowire=”byType”时,Spring会对bean的成员变量进行自动装配。
构造器的自动装配和byType自动装配具有相同的缺点:当某一类型的bean有多个时,Spring无法确定究竟选择哪个bean,就直接抛出异常。
此外,构造器的自动装配还有个独特的缺点:当构造器有多个时,Spring也无法选择究竟初始化哪个构造器,因此也直接跑出异常。
autodetect:最佳自动装配。Spring要初始化一个设置了autowire=”autodetect”的bean时,首先采用构造器装配,若没有发现与构造器相匹配的Bean或构造器有多个时,就采用byType对属性进行装配。
使用默认自动装配
上述自动装配的方法都是针对单个bean,如果要让beans下的所有bean均使用某种自动装配策略,那么在beans标签中增加如下配置:
default-autowire="byType"
- 注意1:在beans中设置了default-autowire后,这个参数仅对当前beans标签之间的bean有效。
- 注意2:采用默认自动装配后,仍然可以在bean中设置特有的自动装配策略,bean中的自动装配策略会覆盖默认策略。
- 注意3:使用了自动装配后,我们仍然可以在bean中通过constructor-arg属性和property属性对bean进行显示装配。
这种混合使用显示装配和自动装配的方式能够成功地解决byType出现的不确定性问题。 - 注意4:如果使用了constructor来实现构造器参数的自动装配,那么就不能混合使用autowire=”constructor”属性和constructor-arg标签。
使用注解实现自动装配
使用注解装配其实就是把原本XML中bean中的autowire=”xxx”属性搬到了Bean类的Java代码中了。功能上没啥差别。
下面就来介绍如何使用注解实现自动装配。
1. 开启注解自动装配
在beans中作如下配置:
<beans xmlns="http://www.springframework.org/schema/beans"
    xmlns:xsi="http://www.w3.org/2001/XMLSchema-instance"
    xsi:schemaLocation="http://www.springframework.org/schema/beans
    http://www.springframework.org/schema/beans/spring-beans-4.5.xsd">

    <context:annotation-config>

</beans>
2. 使用@Autowired标注需要自动装配的函数或属性
当Bean中的属性、函数被标记@Autowired后,Spring在创建这个bean的对象时,会通过byType寻找与属性、函数参数相同类型的bean进行自动装配。
用@Autowired标注构造函数
@Autowired
    public Person(String name,long id){
        this.name = name;
        this.id = id;
    }
用@Autowired标注普通函数
@Autowired
    public void createInstance(){
        System.out.println("对象被创建啦!");
    }
用@Autowired标注属性
@Autowired
    private Father father;
@Autowired本质上采用byType进行自动装配,因此也存在与byType一样的问题:若同一类型的bean有多个时,或找不到该类型的bean,Spring就会抛出异常。
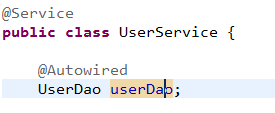
我们平时开发中最常用的就是这种注入方式
例如:controller层类中注入各种service层的类的实例对象
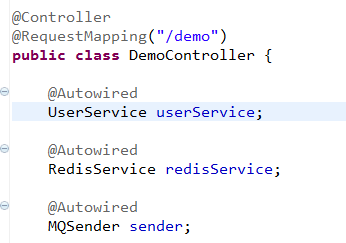
service层类中注入dao层的类的实例对象
@Autowired弊端的应对策略
若同一类型的bean有多个
若采用xml设置bean的自动装配,则可以使用显示装配的方式,手动设置需要注入的参数,而使用注解自动装配时,可以使用@Qualifier缩小候选bean的范围,具体操作如下:
@Autowired
    @Qualifier("father")
    private Father father;
@Qualifier(“ID”)会根据bean的id为father装配。
若找不到某一类型的bean
如果bean中的某些属性、参数不需要初始化值也能接受的话,那就为该属性或参数的@Autowired添加required属性:
@Autowired(required="false")
    public Person(String name,long id){
        this.name = name;
        this.id = id;
    }
此时,如果Spring找不到与构造函数的参数相同类型的bean的话,就赋上null。
注意:若一个bean有多个构造函数时,只有一个构造函数可以设为@Autowired(required=true),其余的构造函数都只能设为@Autowired(required=false)
在注解中使用SpEL表达式
通过前面学习我们知道,在Spring的XML配置中,可以使用SpEL表达式来实现手动装配。同样,在注解中也可以使用SpEL表达式实现手动装配。
- 将名为father的bean注入给构造函数:
 @Value("#{father}")
    public Person(Father father){
        this.father = father;
    }
将father对象中的id注入给id:
@Value("#{father.id}")
    public void setId(long id){
        this.id = id;
    }
自动检测
自动装配能够减少bean标签下property标签和constructor-arg标签的数量,而自动检测能降低bean标签的数量。
1. 开启Spring的自动检测
腰开启自动检测功能,需要在XML的beans标签中作如下配置:
- base-package: 表示要扫描的包
<beans xmlns="http://www.springframework.org/schema/beans"
    xmlns:xsi="http://www.w3.org/2001/XMLSchema-instance"
    xsi:schemaLocation="http://www.springframework.org/schema/beans
    http://www.springframework.org/schema/beans/spring-beans-4.5.xsd">

    <context:component-scan base-package="com.xxx"></context:component-scan>

</beans>
2. 为需要自动减的bean添加@Component注解
要让一个Java类变成一个Bean,需要在类上加上@Component注解。Spring在启动的时候会到base-package指定的包下寻找被@Component标记的类,把他们初始化为bean,保存在SpringContext中。
-将类型的小写作为bean的名字:
@Component
    class Person{
}
指定bean的名字:
@Component("person")
    class Person{
}
3. 过滤被扫描的bean
使用Java代替XML配置
虽然使用注解已经大大减少Spring中的XML配置,但仍然需要少量的XML配置,我们可以将XML配置用Java代码实现,从而完全避免了XML配置。
1. 定义一个Spring配置类
用@Configuration标签标注一个类,表示这个类是Spring的配置类:
@Comfiguration
class Person{
    ……
}
2. 声明一个bean
在Spring的配置类中,使用@Bean标签标注一个bean。
- 函数名:bean的id
- 返回值:bean的类型
- 函数体:初始化这个bean
@Comfiguration
class Person{
    @Bean
    public Person person(){
        //构造器注入
        Person person = new Person("柴毛毛");
        //属性注入
        person.setAge(22);
        return person;
    }
}
3. 使用Java进行注入
在采用Java进行Spring的配置中,对bean属性和构造器的注入非常简单,只需在函数中操作即可:
@Comfiguration
class Person{
    @Bean
    public Person person(){
        return new Person();
    }
}
采用Java代替XML配置的好处
在XML配置中,bean的类型是用String表示的,因此只有在运行结点才能发现bean的类型是否写错;而在Java配置中,在编译阶段就能发现bean的类型是否出错,从而能够尽早地发现错误。
https://blog.csdn.net/u010425776/article/details/51027559
https://blog.csdn.net/u010425776/article/details/51039105
https://www.jb51.net/article/93302.htm