延迟加载图片
延迟加载也称为惰性加载,即在长网页中延迟加载图像。用户滚动到它们之前,视口外的图像不会加载。这与图像预加载相反,在长网页上使用延迟加载将使网页加载更快。在某些情况下,它还可以帮助减少服务器负载。
举个例子来说明,当打开淘宝首页的时候,只有在浏览器窗口里的图片才会被加载,当你滚动首页向下滑的时候,进入视口内的图片才会被加载,而其它从未进入视口的图像不会也不会加载。
好处
- 首先它能提升用户的体验,试想一下,如果打开页面的时候就将页面上所有的图片全部获取加载,如果图片数量较大,对于用户来说简直就是灾难,会出现卡顿现象,影响用户体验。
- 有选择性地请求图片,这样能明显减少了服务器的压力和流量,也能够减小浏览器的负担。
方法
第一种
首先将页面上的图片的 src 属性设为 loading.gif,而图片的真实路径则设置在 data-src 属性中,页面滚动的时候计算图片的位置与滚动的位置,当图片出现在浏览器视口内时,将图片的 src 属性设置为 data-src 的值,这样,就可以实现延迟加载。
        <style>
        img
        {
          height:600px;
        }
        </style>

        <body>
        <img src="images/loading.gif" data-src="images/1.jpg">
        <img src="images/loading.gif" data-src="images/7.jpg">
        <img src="images/loading.gif" data-src="images/8.jpg">
        <img src="images/loading.gif" data-src="images/9.jpg">
        <img src="images/loading.gif" data-src="images/10.jpg">
        </body>

        <script>
            function lazyload() {
                var images = document.getElementsByTagName('img');
                var len = images.length;
                var n = 0;      //存储图片加载到的位置,避免每次都从第一张图片开始遍历
                return function () {
                    var seeHeight = document.body.clientHeight;
                    console.log('seeHeight:' + seeHeight);
                    var scrollTop = document.documentElement.scrollTop || document.body.scrollTop;
                    console.log('scrollTop:' + scrollTop);

                    for (var i = n; i < len; i++) {
                        if (images[i].offsetTop < seeHeight + scrollTop) {
                            if (images[i].getAttribute('src') === 'images/loading.gif') {
                                images[i].src = images[i].getAttribute('data-src');
                            }
                            n = n + 1;
                        }
                    }
                }
            }
            var loadImages = lazyload();
            loadImages();          //初始化首页的页面图片
            window.addEventListener('scroll', loadImages, false);
        </script>
            //jQuery版

        var n = 0,
            imgNum = $("img").length,
            img = $('img');
        lazyload();
        $(window).scroll(lazyload);
        function lazyload(event) {
            for (var i = n; i < imgNum; i++) {
                if (img.eq(i).offset().top < parseInt($(window).height()) + parseInt($(window).scrollTop())) {
                    if (img.eq(i).attr("src") == "default.jpg") {
                        var src = img.eq(i).attr("data-src");
                        img.eq(i).attr("src", src);
                        n = i + 1;
                    }
                }
            }
        }
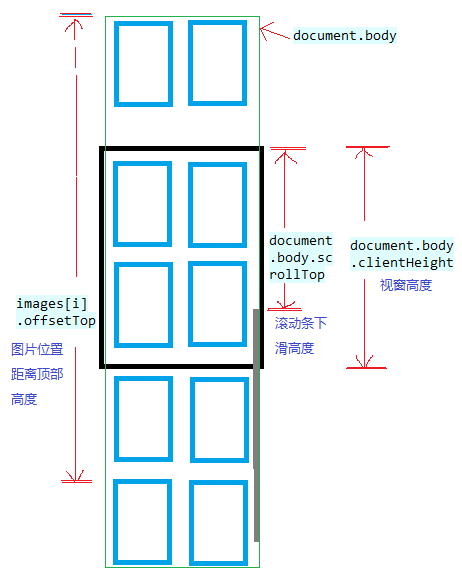
比较 image 的 offsetTop 与 seeHeight + scrollTop 的大小,当小于时则说明图片已经出现过在视口中,这时候继续判断图片是否已经替换过,如果没有替换过,则进行替换。
第二种
第一种方法有个局限性,就是图片的高度必须是是个定值,即高度需设定好,不然在images[i].offsetTop获取图片距离顶部的位置会出现差错。
还有一点就是性能差,函数直接绑定在 scroll 事件上,当页面滚动时,函数会被高频触发,这非常影响浏览器的性能。有个解决方案是在做事件绑定的时候,可以对 lazyload 函数进行函数节流(throttle)与函数去抖(debounce)处理,限制触发频率,来优化性能。。debounce类似于一部电梯停在某一个楼层,当有一个人进来后,20秒后自动关门,这20秒的等待期间,又一个人按了电梯进来,这20秒又重新计算,直到电梯关门那一刻才算是响应了事件。而Throttle好比一台自动的饮料机,按拿铁按钮,在出饮料的过程中,不管按多少这个按钮,都不会连续出饮料,中间按钮的响应会被忽略,必须要等这一杯的容量全部出完之后,再按拿铁按钮才会出下一杯。
throttle和debounce均是通过减少实际逻辑处理过程的执行来提高事件处理函数运行性能的手段,并没有实质上减少事件的触发次数。
去抖:就是说当调用动作n毫秒后,才会执行该动作,若在这n毫秒内又调用此动作则将重新计算执行时间。
        // debounce函数用来包裹我们的事件
        function debounce(fn, delay) {
          // 持久化一个定时器 timer
          var timer = null;
          // 闭包函数可以访问 timer
          return function() {
            // 通过 'this' 和 'arguments'
            // 获得函数的作用域和参数
            var context = this;
            var args = arguments;
            // 如果事件被触发,清除 timer 并重新开始计时
            clearTimeout(timer);
            timer = setTimeout(function() {
              fn.apply(context, args);
            }, delay);
          }
        }
        // 实际想绑定在 scroll 事件上的 handler
        function lazyload(event) {}
        // 采用了去抖函数
        window.addEventListener('scroll',throttle(lazyload,500));
节流函数:就是会说预先设定一个执行周期,当调用动作的时刻大于等于执行周期则执行该动作,然后进入下一个新周期。只允许一个函数在N秒内执行一次。去抖相比较节流函数要稍微简单一点,去抖是让函数延迟执行,而节流比去抖多了一个在一定时间内必须要执行一次。
        // 简单的节流函数
        //fun 要执行的函数
        //delay 延迟
        //time  在time时间内必须执行一次
        function throttle(fun, delay, time) {
            var timeout,
                startTime = new Date();
            return function() {
                var context = this,
                    args = arguments,
                    curTime = new Date();
                clearTimeout(timeout);
                // 如果达到了规定的触发时间间隔,触发 handler
                if (curTime - startTime >= time) {
                    fun.apply(context, args);
                    startTime = curTime;
                    // 没达到触发间隔,重新设定定时器
                } else {
                    timeout = setTimeout(function(){
        	            fun.apply(context, args);
                    }, delay);
                }
            };
        };
        function throttle(fn, delay, atleast) {
	        var timeout = null,
	    	startTime = new Date();
	        return function() {
	    	var curTime = new Date();
	    	clearTimeout(timeout);
	    	if(curTime - startTime >= atleast) {
	    	    fn();
	    	    startTime = curTime;
	    	}else {
	    	    timeout = setTimeout(fn, delay);
	    	}
	        }
	    }

        window.addEventListener('scroll', throttle(loadImages, 500, 1000), false);
设置了 500ms 的延迟,和 1000ms 的间隔,当超过 1000ms 未触发该函数,则立即执行该函数,不然则延迟 500ms 执行该函数。
下面是underscore中的源码
        _.debounce = function(func, wait, immediate) {
            // immediate默认为false
            var timeout, args, context, timestamp, result;

            var later = function() {
              // 当wait指定的时间间隔期间多次调用_.debounce返回的函数,则会不断更新timestamp的值,导致last < wait && last >= 0一直为true,从而不断启动新的计时   器  延时执行func
              var last = _.now() - timestamp;

              if (last < wait && last >= 0) {
                timeout = setTimeout(later, wait - last);
              } else {
                timeout = null;
                if (!immediate) {
                  result = func.apply(context, args);
                  if (!timeout) context = args = null;
                }
              }
            };

            return function() {
              context = this;
              args = arguments;
              timestamp = _.now();
              // 第一次调用该方法时,且immediate为true,则调用func函数
              var callNow = immediate && !timeout;
              // 在wait指定的时间间隔内首次调用该方法,则启动计时器定时调用func函数
              if (!timeout) timeout = setTimeout(later, wait);
              if (callNow) {
                result = func.apply(context, args);
                context = args = null;
              }

              return result;
            };
          };
        _.throttle = function(func, wait, options) {
            /* options的默认值
             *  表示首次调用返回值方法时,会马上调用func;否则仅会记录当前时刻,当第二次调用的时间间隔超过wait时,才调用func。
             *  options.leading = true;
             * 表示当调用方法时,未到达wait指定的时间间隔,则启动计时器延迟调用func函数,若后续在既未达到wait指定的时间间隔和func函数又未被调用的情况下调用返回        方法,则被调用请求将被丢弃。
             *  options.trailing = true;
             * 注意:当options.trailing = false时,效果与上面的简单实现效果相同
             */
            var context, args, result;
            var timeout = null;
            var previous = 0;
            if (!options) options = {};
            var later = function() {
              previous = options.leading === false ? 0 : _.now();
              timeout = null;
              result = func.apply(context, args);
              if (!timeout) context = args = null;
            };
            return function() {
              var now = _.now();
              if (!previous && options.leading === false) previous = now;
              // 计算剩余时间
              var remaining = wait - (now - previous);
              context = this;
              args = arguments;
              // 当到达wait指定的时间间隔,则调用func函数
              // 精彩之处:按理来说remaining <= 0已经足够证明已经到达wait的时间间隔,但这里还考虑到假如客户端修改了系统时间则马上执行func函数。
              if (remaining <= 0 || remaining > wait) {
                // 由于setTimeout存在最小时间精度问题,因此会存在到达wait的时间间隔,但之前设置的setTimeout操作还没被执行,因此为保险起见,这里先清理setT        ut操 作
                if (timeout) {
                  clearTimeout(timeout);
                  timeout = null;
                }
                previous = now;
                result = func.apply(context, args);
                if (!timeout) context = args = null;
              } else if (!timeout && options.trailing !== false) {
                // options.trailing=true时,延时执行func函数
                timeout = setTimeout(later, remaining);
              }
              return result;
            };
          };
利用交叉观察器IntersectionObserver实现惰性加载
IntersectionObserver是浏览器原生提供的构造函数,接受两个参数:callback是可见性变化时的回调函数,option是配置对象(该参数可选)。
构造函数的返回值是一个观察器实例。实例的observe方法可以指定观察哪个 DOM 节点。
        var io = new IntersectionObserver(callback, option);

        // 开始观察
        io.observe(document.getElementById('example'));

        // 停止观察
        io.unobserve(element);

        // 关闭观察器
        io.disconnect();
observe的参数是一个 DOM 节点对象。如果要观察多个节点,就要多次调用这个方法。
callback一般会触发两次。一次是目标元素刚刚进入视口(开始可见),另一次是完全离开视口(开始不可见)。callback函数的参数是一个数组,每个成员都是一个IntersectionObserverEntry对象。IntersectionObserverEntry 对象提供目标元素的信息,一共有六个属性。
- time: 可见性发生变化的时间,是一个高精度时间戳,单位为毫秒
- target:被观察的目标元素,是一个 DOM 节点对象
- rootBounds:根元素的矩形区域的信息,getBoundingClientRect()方法的返回值,如果没有根元素(即直接相对于视口滚动),则返回null
- boundingClientRect:目标元素的矩形区域的信息
- intersectionRect:目标元素与视口(或根元素)的交叉区域的信息
- intersectionRatio:目标元素的可见比例,即intersectionRect占boundingClientRect的比例,完全可见时为1,完全不可见时小于等于0
        var intersectionObserver = new IntersectionObserver(
          function (entries) {
            // 如果不可见,就返回
            if (entries[0].intersectionRatio <= 0) return;
            loadItems(10);
            console.log('Loaded new items');
          });

        // 开始观察
        intersectionObserver.observe(
          document.querySelector('.scrollerFooter')
        );
延迟加载Js
延迟加载javascript,也就是页面加载完成之后再加载javascript,也叫on demand(按需)加载,一般有一下几个方法
1.head追加script标签
        window.onload = function () {
            setTimeout(function () {

                var head = document.getElementsByTagName('head')[0];

                // a new CSS
                var css = document.createElement('link');
                css.type = "text/css";
                css.rel = "stylesheet";
                css.href = "new.css";

                // a new JS
                var js = document.createElement("script");
                js.type = "text/javascript";
                js.src = "new.js";

                // preload JS and CSS
                head.appendChild(css);
                head.appendChild(js);

                // preload image
                new Image().src = "new.png";

            }, 1000);
        };
2.和第一种类似,但是script标签是放到iframe的document里面。
                window.onload = function () {
        setTimeout(function () {

            // create new iframe
            var iframe = document.createElement('iframe');
            iframe.setAttribute("width", "0");
            iframe.setAttribute("height", "0");
            iframe.setAttribute("frameborder", "0");
            iframe.setAttribute("name", "preload");
            iframe.id = "preload";
            iframe.src = "about:blank";
            document.body.appendChild(iframe);

            // gymnastics to get reference to the iframe document
            iframe = document.all ? document.all.preload.contentWindow : window.frames.preload;
            var doc = iframe.document;
            doc.open(); doc.writeln("<html><body></body></html>"); doc.close();

            // create CSS
            var css = doc.createElement('link');
            css.type = "text/css";
            css.rel = "stylesheet";
            css.href = "new.css";

            // create JS
            var js = doc.createElement("script");
            js.type = "text/javascript";
            js.src = "new.js";

            // preload CSS and JS
            doc.body.appendChild(css);
            doc.body.appendChild(js);

            // preload IMG
            new Image().src = "new.png";

        }, 1000);
    };
3.利用document.write
        <script language="javascript" type="text/javascript">
                    function include(script_filename) {
                        document.write('<' + 'script');
                        document.write(' language="javascript"');
                        document.write(' type="text/javascript"');
                        document.write(' src="' + script_filename + '">');
                        document.write('</' + 'script' + '>');
                    }

                    var which_script = '1.js';
                    include(which_script);  //可以控制引入时刻
         </script>
4.直接把需要加载东西放到另一个页面中
        window.onload = function () {
        setTimeout(function () {

            // create a new frame and point to the URL of the static
            // page that has all components to preload
            var iframe = document.createElement('iframe');
            iframe.setAttribute("width", "0");
            iframe.setAttribute("height", "0");
            iframe.setAttribute("frameborder", "0");
            iframe.src = "preloader.html";
            document.body.appendChild(iframe);

        }, 1000);
    };