环境:centos7.6、kubernet1.17.2
离线包下载:链接: https://pan.baidu.com/s/1SDdwYQg0pefMI-IFA_j0QQ 提取码: hfhi
kubernet1.17.2安装可见:https://www.cnblogs.com/wukc/p/13280685.html
流程:安装helm->storge安装使用nfs模式-> 安装kubesphere
1、安装helm
将文件/helm/helm 放到/usr/local/bin 目录下
将/helm/tiller.tar 进行docker load -i tiller.tar ,并推送到harbor仓库(如果没有harbor仓库可以参考https://www.cnblogs.com/wukc/p/13273488.html进行安装)
命令创建harbor项目
curl -u "admin:harborpasswd" -X POST -H "Content-Type: application/json" "172.21.210.20/api/projects" -d "{ \"project_name\": \"tiller\", \"public\": 1}"  #harbor密码
将index.yaml 放到一个http://172.21.210.19上    172.21.210.20/tiller/tiller:v2.16.3
生成认证文件kubectl apply -f helm-rbac.yml
安装helm-server
helm init --service-account tiller --tiller-image=172.21.210.20/tiller/tiller:v2.16.3 --stable-repo-url http://172.21.210.19
验证 helm version 、 helm ls  # http://172.21.210.19/这个是我用apache http做的,这儿下面放了一个文件index.yaml文件,可以从这儿下载到 https://kubernetes.oss-cn-hangzhou.aliyuncs.com/charts/index.yaml
yum -y install socat
[root@master1 ~]# helm version
Client: &version.Version{SemVer:"v2.16.3", GitCommit:"1ee0254c86d4ed6887327dabed7aa7da29d7eb0d", GitTreeState:"clean"}
Server: &version.Version{SemVer:"v2.16.3", GitCommit:"1ee0254c86d4ed6887327dabed7aa7da29d7eb0d", GitTreeState:"clean"}
2、storge安装使用nfs模式
配置nfs服务器
yum install -y nfs-utils rpcbind   #自己选择一个服务器作为nfs服务器,不一定用master,下面操作都在nfs服务器上操作
systemctl start nfs && systemctl enable nfs
systemctl start rpcbind
创建磁盘并挂载到目录data1  #有磁盘空间就不需要进行挂载盘操作,可以跳过
pvcreate /dev/vdb
vgcreate vg_data /dev/vdb
lvcreate -l 100%VG -n lv_nfs vg_data
mkdir /data1
mkfs.xfs /dev/mapper/vg_data-lv_nfs
echo "UUID=`lsblk -f|grep vg_data-lv_nfs|awk '{print $3}'` /data xfs defaults  0 2" >> /etc/fstab
more /etc/fstab
mount -a
配置k8s使用的nfs存储目录
mkdir -p /data/k8s
chmod 755 /data/k8s
vim /etc/exports
/data/k8s *(rw,sync,no_root_squash)
systemctl restart nfs
3、k8s配置storge
加载镜像 docker load -i nfs-client.tar 并上传harbor
172.21.210.20/nfs/nfs-client-provisioner:latest
curl -u "admin:harborpasswd" -X POST -H "Content-Type: application/json" "172.21.210.20/api/projects" -d "{ \"project_name\": \"nfs\", \"public\": 1}"
加载class.yaml rbac.yaml   kubectl apply -f .
修改deployment.yaml镜像 和nfs ip 并启动  #这儿注意要修改的
标记一个默认的 StorageClass
#kubectl patch storageclass (stor名字) -p '{"metadata": {"annotations":{"storageclass.kubernetes.io/is-default-class":"true"}}}'
kubectl patch storageclass es-data-db -p '{"metadata": {"annotations":{"storageclass.kubernetes.io/is-default-class":"true"}}}'
验证 kubectl get storageclass
[root@master1 nfs]# kubectl get storageclass
NAME                   PROVISIONER      RECLAIMPOLICY   VOLUMEBINDINGMODE   ALLOWVOLUMEEXPANSION   AGE
es-data-db (default)   fuseim.pri/ifs   Delete          Immediate           false                  5m26s
4、下载kubesphere的离线包并还原images


执行以下命令,下载7.2G映像包。
curl -L https://kubesphere.io/download/images/latest > kubesphere-all-images-v2.1.1.tar.gz \
&& tar -zxf kubesphere-all-images-v2.1.1.tar.gz && cd kubesphere-images-v2.1.1
将映像包加载到docker中。如果您只想设置默认的最小安装,只需加载ks_minimal_images。具有所有可选组件和示例的安装都需要按以下方式加载所有映像。
docker load < ks_minimal_images.tar
docker load < openpitrix_images.tar
docker load < ks_logging_images.tar
docker load < ks_devops_images.tar
docker load < istio_images.tar
docker load < ks_notification_images.tar
docker load < example_images.tar
5、下载项目,创建harbor项目,推送images到harbor
将项目克隆ks-installer到本地,然后进入scripts文件夹。
git clone https://github.com/kubesphere/ks-installer.git
cd ks-installer/scripts
由于我们必须将一批images推送到Harbor的不同项目,因此我们可以使用以下脚本来创建相应的项目。
vi create_project_harbor.sh
....
url="http://172.21.210.20"  #替换自己的harbor仓库
user="admin"
passwd="Harbor12345"
....
chmod u+x create_project_harbor.sh && ./create_project_harbor.sh
执行以下脚本,将我们上面已加载的图像批量推送到Harbor注册表。
chmod u+x push-image-list.sh && ./push-image-list.sh 172.21.210.20
6、修改配置文件进行安装
编辑kubesphere-minimal.yaml(最小化安装)或kubesphere-complete-setup.yaml(全安装)
     ···
      etcd:
        monitoring: False
        endpointIps: 172.21.210.4,172.21.210.5,172.21.210.6   #改成自己的etcd地址
        port: 2379
      ............
      tlsEnable: True
         alerting:
           enabled: true

         local_registry: 172.21.210.20:80   #这儿添加一行 Add a new field of Harbor address to this line.

        kind: ConfigMap
       ···..............
      containers:
      - name: installer
        image: 172.21.210.20/kubesphere/ks-installer:v2.1.1  #修改成仓库镜像
        imagePullPolicy: "Always"
7、安装、查看日志
 下面进行执行安装
 kubectl apply -f kubesphere-complete-setup.yaml
 验证安装
 kubectl logs -n kubesphere-system $(kubectl get pod -n kubesphere-system -l app=ks-install -o jsonpath='{.items[0].metadata.name}') -f
8、问题处理
问题一:安装完成后发现pod 没正常
kubectl describe pods uc-jenkins-update-center-59f5b6c65d-dkd2w -n=kubesphere-devops-system  #查看pod日志
发现报错是没有找到镜像,进行推送镜像
docker tag kubesphere/jenkins-uc:v2.1.1 172.21.210.20/kubesphere/jenkins-uc:v2.1.1
docker push 172.21.210.20/kubesphere/jenkins-uc:v2.1.1
pods节点等一会儿自动ok
----------------------------------------------------------------------------------------------------------------
问题二:第一次失败进行kubectl delete -f kubesphere-complete-setup.yaml ,再次执行创建失败报错:
rror from server (Forbidden): error when creating "kubesphere-complete-setup.yaml": configmaps "ks-installer" is forbidden: unable to create new content in namespace kubesphere-system because it is being terminated
Error from server (Forbidden): error when creating "kubesphere-complete-setup.yaml": serviceaccounts "ks-installer" is forbidden: unable to create new content in namespace kubesphere-system because it is being terminated
Error from server (Forbidden): error when creating "kubesphere-complete-setup.yaml": deployments.apps "ks-installer" is forbidden: unable to create new content in namespace kubesphere-system because it is being terminated
原因是:namespaces没有删除到,进行强制删除命名空间
查看命名空间
# kubectl  get ns
NAME                STATUS        AGE
default             Active        15h
kube-node-lease     Active        15h
kube-public         Active        15h
kube-system         Active        15h
kubesphere-system   Terminating   28m
发现kubesphere-system一直处于Terminating 状态。无法删除命名空间!!

解决方法
kubectl get ns kubesphere-system  -o json > kubesphere-system.json
将

"spec": {
        "finalizers": [
            "kubernetes"
        ]
    },
更改为:

"spec": {

  },

新开一个窗口运行kubectl proxy跑一个API代理在本地的8081端口
# kubectl proxy --port=8081
最后运行curl命令进行删除
curl -k -H "Content-Type:application/json" -X PUT --data-binary @kubesphere-system.json http://127.0.0.1:8081/api/v1/namespaces/kubesphere-system/finalize
# kubectl  get ns
------------------------------------------------------------------------------------------------------------------------------------------------------------
问题三:
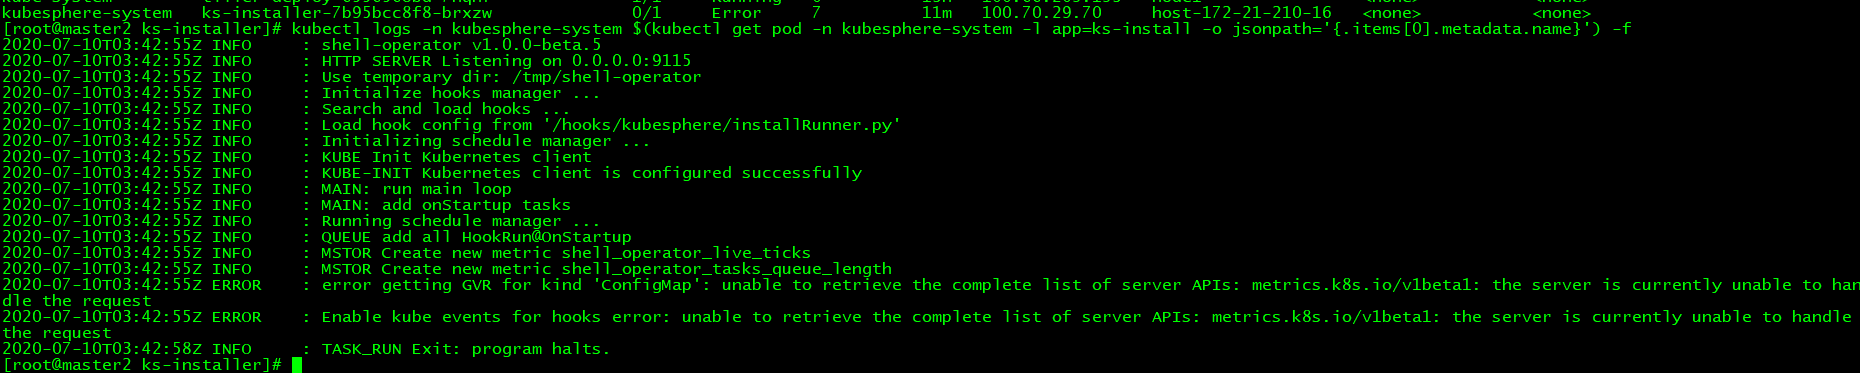
这个错误是集群里的metrics-server不正常造成的,可以把集群里的metrics-server删掉,如果metrics-server是helm安装的用helm del --purge xxx删除
helm list #进行查看
helm del --purge metrics-server
9、kubesphere安装完成后提示:
**************************************************
#####################################################
###              Welcome to KubeSphere!           ###
#####################################################

Console: http://172.21.210.4:30880
Account: admin
Password: P@88w0rd

NOTES:
  1. After logging into the console, please check the
     monitoring status of service components in
     the "Cluster Status". If the service is not
     ready, please wait patiently. You can start
     to use when all components are ready.
  2. Please modify the default password after login.

#####################################################