glusterfs,GNU cluster file system,创始人Anand Babu Periasamy,目标:代替开源Lustre和商业产品GPFS,glusterfs是什么:
cloud storage;
分布式文件系统(POSIX兼容);
elasticity(flexibility adapt to growth/reduction,add,delete volumes&users without disruption);
无中心架构(无元数据server),eliminate metadata(improve file access speed);
scale out横向扩展(容量、性能)、高性能、高可用,scale linearly(multiple dimentions(performance;capacity);aggregated resources);
集群式NAS存储系统;
采用异构的标准商业硬件、infiniband;
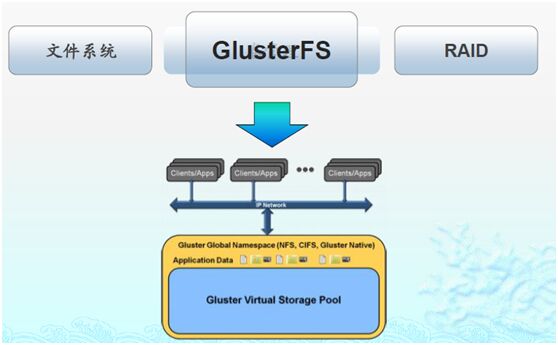
资源池(聚合存储和内存);
全局统一命名空间;
自动复制和自动修复;
易于部署和使用,simplicity(ease of management,no complex kernel pathces,run in user space);
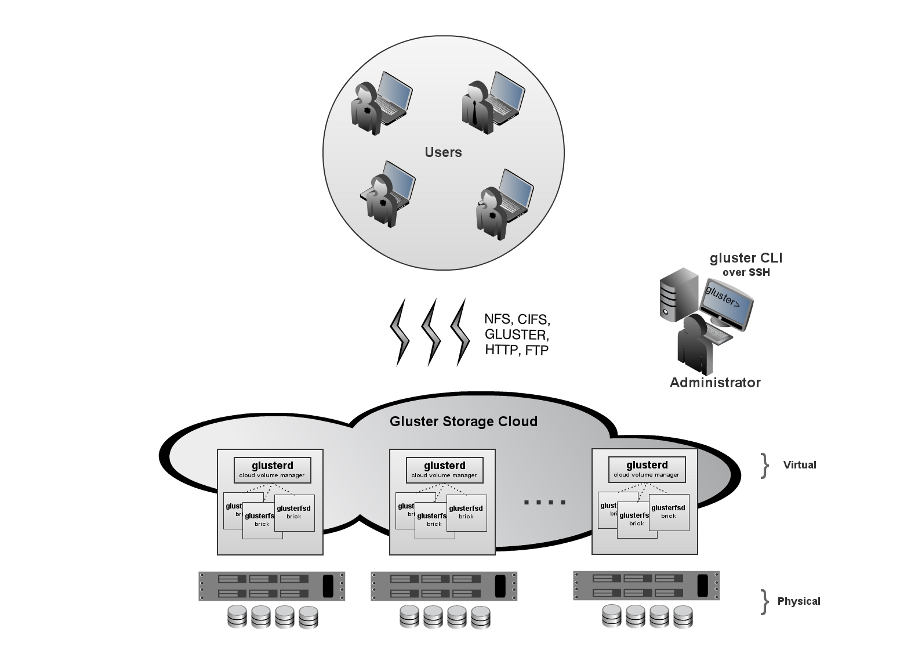
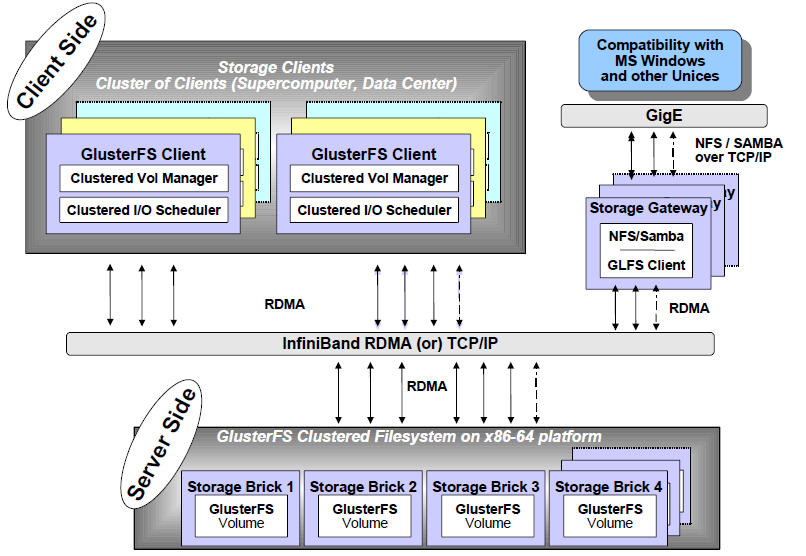
glusterfs是开源的分布式FS,具有强大的横向扩展能力,支持数PB级存储容量和处理数千客户端,借助tcp/ip或infiniband RDMA将物理分布的存储资源聚焦在一起,使用单一全局命名空间管理数据,基于可堆叠的用户空间设计,可为各种不同的数据负载提供优异的性能;
优点(无元数据据服务设计,弹性hash,scale out;高性能,PB级容量,GB级吞吐量,数百集群规模;用户空间模块化堆栈设计;高可用性,支持自动复制和自动修复;适合大文件存储);
不足(小文件性能表现差;系统OPS表现差;复制存储利用率低(HA和纠删码方案))
2006年有此项目:
06-09年,glusterfs v1.0-3.0(分布式FS、自修复、同步副本、条带、弹性hash算法);
10年,glusterfs v3.1(弹性云能力);
11年,glusterfs v3.2(远程复制、监控、quota、redhat 1.36亿$收购);
12年,glusterfs v3.3(对象存储、HDFS兼容、主动自修复、细粒度锁、复制优化);
13年,glusterfs v3.4(libfapi、quorum机制、虚拟机存储优化、同步复制优化、POSIX ACL支持);
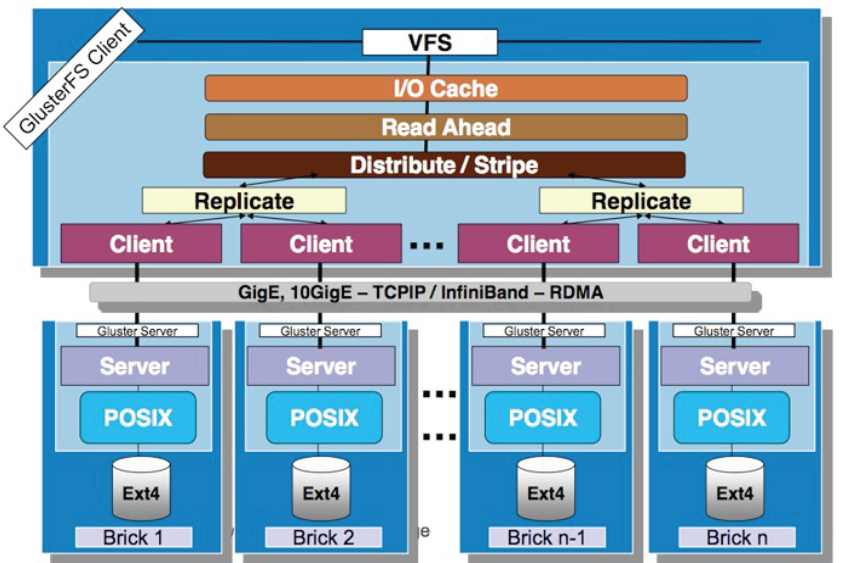
glusterfs架构优势:软件定义、无中心架构、全局统一命名空间、高性能、高可用、堆栈式用户空间设计、弹性横向扩展、高速网络通信、数据自动修复
glusterfs高性能记录32GBs(server-side,64 bricks with ib-verbs transport;client-side,cluster of 220 servers)
http://blog.csdn.net/liuaigui/
应用场景:
结构化和半结构化数据;非结构化数据存储(文件);归档、容灾;虚拟机存储;云存储;内容云;大数据;
解决方案:
媒体/cdn;备份、归档、容灾;海量数据共享;用户home目录;高性能计算;云存储
glusterfs弹性卷管理:
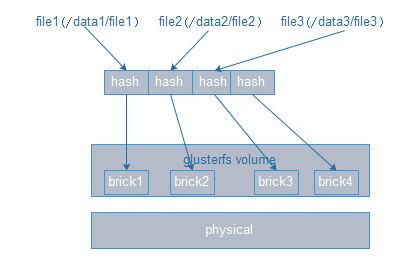
弹性hash算法(无集中式元数据服务(消除性能瓶颈、提高可靠性);使用davies-meyer算法计算32bit hash值,输入参数为文件名;根据hash值在集群中选择子卷(存储服务器),进行文件定位;对所选的子卷进行数据访问;例如brick1(00000000-3FFFFFFF),brick2(4FFFFFFF-7FFFFFFF),brick3(8FFFFFFF-BFFFFFFF));
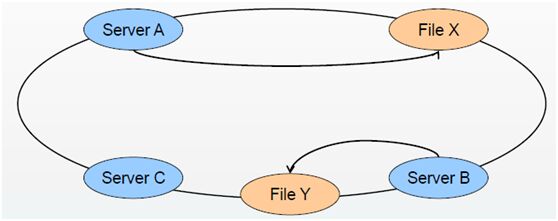
采用hash算法定位文件(基于路径和文件名;DHT,distributed hash table,一致性hash);
弹性卷管理(文件存储在逻辑卷中;逻辑卷从物理存储池中划分;逻辑卷可在线进行扩容和缩减);
DHT(glusterfs弹性扩展的基础;确定目标hash和brick之间的映射关系):
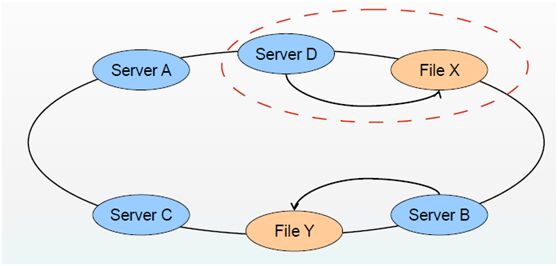
添加node后(最小化数据重分配;老数据分配模式不变,新数据分布到所有node上;执行rebalance(在非访问高峰时段操作),数据重新分布)
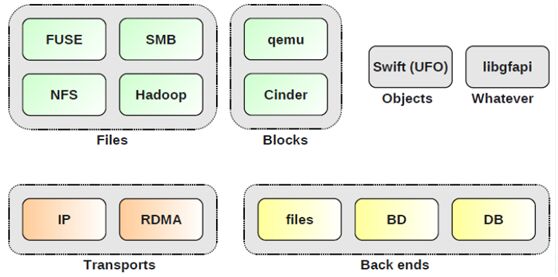
glusterfs总体架构:
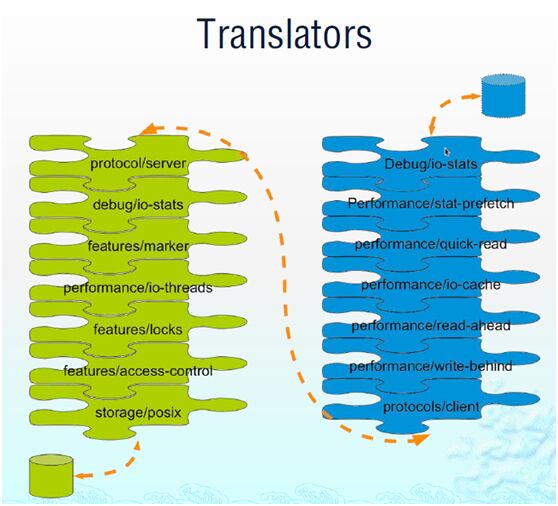
堆栈式软件架构:
全局统一命名空间(通过分布式FS将物理分散的存储资源虚拟化成统一的存储池):
无集中元数据服务:
基本概念:
brick(a file system mountpoint; a unit of storage used as a glusterfs building block);
translator(logic between the bits and the global namespace; layered to provide glusterfs functionality);
volume(bricks combined and passed through translators);
node/peer(server running the gluster daemon and sharing volumes);
glusterfs卷类型(基本卷、复合卷):
基本卷:
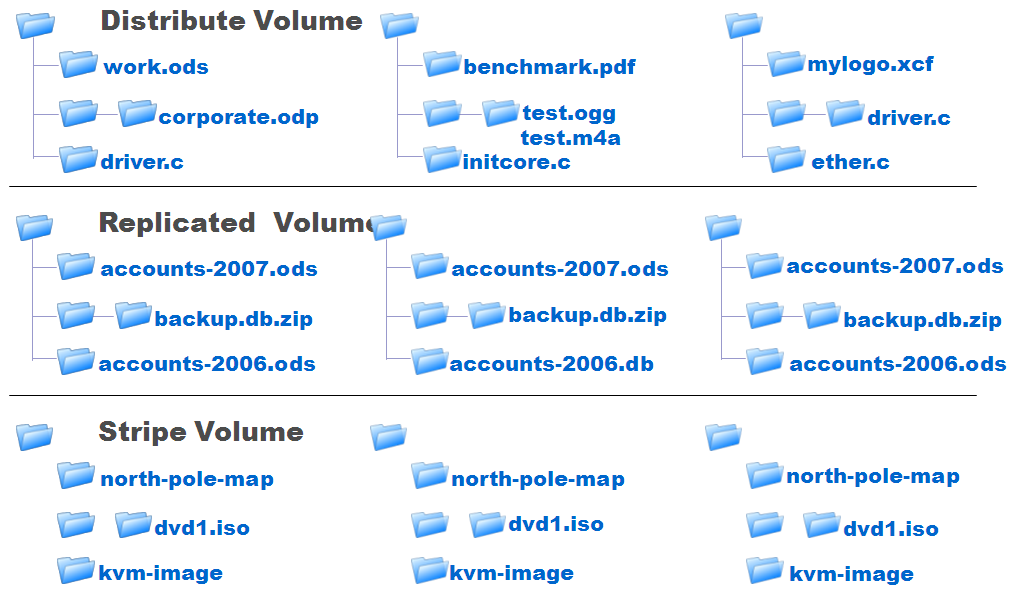
哈希卷(distributed volume,文件通过hash算法在所有brick上分布,文件级raid0,不具有容错能力);
复制卷(replicated volume,生产常用,文件同步复制到多个brick上,文件级raid1,具有容错能力,w性能下降r性能提升);
条带卷(striped volume,不建议使用,单个文件分布到多个brick上,支持超大文件,类似raid0,rr方式round-robin,通常用于HPC(high performance compute)中的超大文件(>10G的单个文件)及高并发环境(多人同时访问同一个文件));
复合卷:
哈希复制卷(distributed replicated volume,生产常用,同时具有哈希卷和复制卷的特点);
哈希条带卷(distributed striped volume);
复制条带卷(replicated striped vlume);
哈希复制条带卷(distributed replicated striped volume);
glusterfs访问接口:
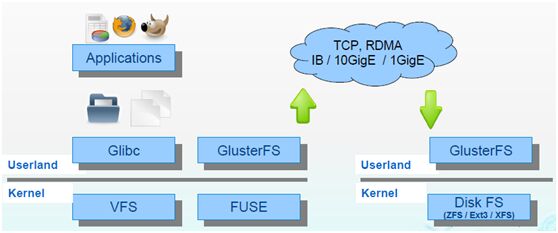
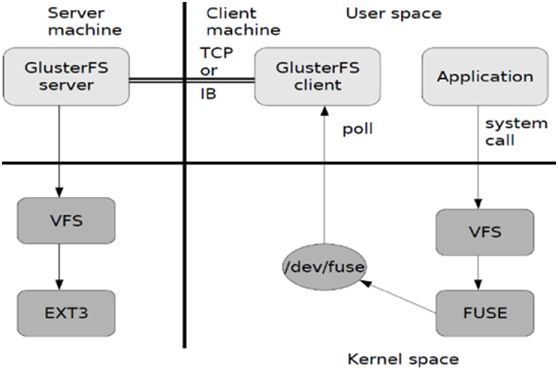
fuse architecture:
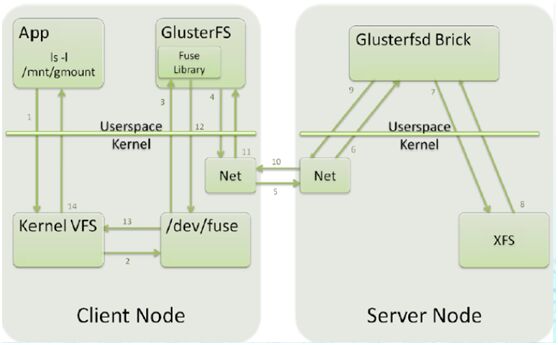
gluster数据流:
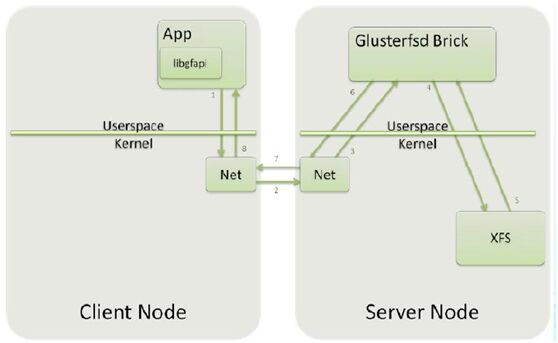
fuse w,libgfapi访问:
libgfapi访问:
数据自修复:
按需同步进行-->完全人工扫描-->并发自动修复-->基于日志
镜像文件副本保持一致性;
触发时机(访问文件目录时);
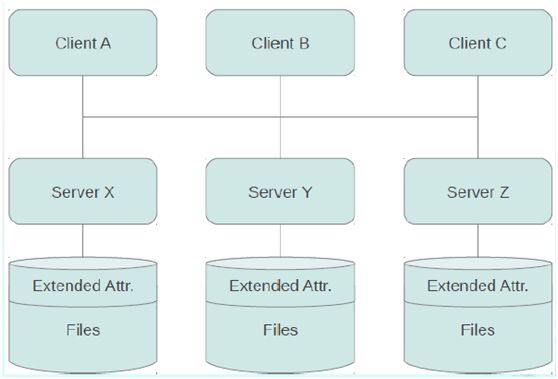
判断依据(扩展属性);
脑残问题(报错或按规则处理);
容量LB:
rebalance后hash范围均衡分布,如添加一node会全局都变动;
目标(优化数据分布,最小化数据迁移);
数据迁移自动化、智能化、并行化
文件更名:
fileA-->fileB,原先的hash映射关系失效,大文件难以实时迁移;
大量采用文件符号链接,访问时解析重定向;
容量负载优先:
设置容量阈值,优先选择可用容量充足的brick;
hash目标brick上创建文件符号链接,访问时重定向
glusterfs测试方法(功能性测试(广义&狭义)、数据一致性测试、POSIX语义兼容性测试、部署方式测试、可用性测试、扩展性测试、稳定性测试、压力测试、性能测试):
功能性测试(手动或测试脚本;glusterfs(创建、启动、停止、删除卷操作,设置等);FS的功能性测试(fstest文件控制与操作;系统API调用LTP;锁应用locktest);
数据一致性测试(测试存入与读出的数据是否一致,方法:md5加密、diff、编译内核等)
POSIX语义测试(PCTS、LTP);
部署方式测试(测试不同场景下的系统部署方式,自动安装配置,集群规模,网络、存储等配置);
可用性测试(测试系统的高可用性,集群中某些server或disk、network等错误情况下系统是否可用,管理是否简单可靠,覆盖功能点(副本、自修复、管理服务));
扩展性测试(测试系统的弹性扩展功能;扩展系统后的性能影响;线性扩展能力);
稳定性测试(验证系统在长时间运行下,是否正常,功能是否正常,使用LTP、iozone、postmark进行自动化测试);
压力测试(验证在大压力下,系统运行及资源消耗情况,iozone、postmark工具进行自动化测试;top、iostat、sar等进行系统监控);
性能测试(系统在不同负载情况下的性能,iozone(带宽)、postmark(ops)、fio(iops)、dd工具进行自动化测试;关键点(顺序rw、随机rw、目录操作(创建、删除、查找、更新)、大量小文件rw、大文件rw);主要衡量指标(iops随机小文件随机rw能力、带宽、大文件连续rw能力);其它衡量指标(cpu利用率、iowait));
dd(大文件,顺序rw,带宽,单进程,临时文件,手动记录结果,无法重定向):
#dd if=/dev/zero of=/mnt/mountpoint/filebs=1M count=100 #(w)
#dd if=/mnt/mountpoint/file of=/dev/nullbs=1M #(r)
iozone(顺序/随机rw,带宽,多进程,临时文件可选留存,可自动生成excel表记录结果值):
#iozone -t 1 -s 1g -r 128k -i 0 -i 1 -i 2-R -b /result.xls -F /mnt/mountpoint/file
-t(进程数);
-s(测试的文件大小);
-r(文件块大小);
-i #(用来指定测试内容);
-R(产生excel格式的输出日志);
-b(产生二进制的excel日志);
-F(指定测试的临时文件组);
-g(指定最大测试文件大小);
postmark(ops,元数据操作(创建、r、w、附加、删除),小文件,单进程,可重定向结果,无遗留临时文件,使用方法(配置文件或CLI)):
常用参数:
set size min_size max_size(设置文件大小的上下限)
set number XXX(设置并发文件数)
set seed XXX(设置随机数种子)
set transactions XXX(设置事务数)
set location(设置工作目录,要是已有目录,默认当前目录)
set subdirectory n n(为每个工作目录下的子目录个数)
set read n(设置rw块大小)
set write n
fio(iops,元数据操作(创建、r、w、附加、删除),小文件,多进程,可重定向结果,无遗留临时文件,使用方法(配置文件或CLI)):
参数:
filename=/tmp/file(测试文件名)
direct=1(测试过程绕过机器自带的buffer)
rw=randrw(测试随机r和w的io)
bs=16k(单次io的块文件大小为16k)
bsrange=512-2048(同上,指定数据块的大小范围)
size=5g(测试文件大小为5g)
numjobs=30(测试线程数)
runtime=1000(测试时间1000s,若不写则写完为止)
ioengine=sync(io引擎使用sync方式)
rwmixwrite=30(在混合rw的模式下,写占30%)
其它性能测试:
FS(make、mount、umount、remount);
copy、recopy、remove(大文件,>=4g);
extract、tar(linux内核源码树);
copy、recopy、remove(linux内核源码树);
list、find(linux内核源码树);
编译linux内核;
create、copy、remove(海量文件目录,>=1000000)
FS分类:
分布式FS(c/s架构或网络FS;数据不是本地直连方式);
集群FS(分布式FS的一个子集;多node协同服务,不存在单点);
并行FS(支持MPI等并行应用;并发rw,所有node可同时rw同一个文件);
产品:
商业:EMC的isilon;IBM的sonas;HP的X9000;huawei的oceanstor9000;blue whale的BWFS;loongcun的LoongStore;
开源:Lustre;glusterfs;ceph;moosefs;HDFS;fastDFS;TFS
moosefs:
moosefs是一个高容错性的分布式FS,它能够将资源分布存储在几台不同的物理介质,对外只提供给用户一个访问接口;高可靠性(数据可被存储于几个不同的地方);可扩展性(可动态的添加server或disk来增加容量);高可控性(系统能设置删除文件的时间间隔);可追溯性(能根据文件的不同操作,r or w,生成文件快照;
lustreFS:
LustreFS是一个基于对象存储的开源分布式FS,提供与POSIX兼容的FS接口;目前lustreFS最多可支持10w个client,1K个oss和2个MDS节点;实验与应用已证明,lustreFS的性能和可扩展性都不错;还拥有基于对象的智能化存储、安全的认证机制、完善的容错机制,而且实现了文件锁功能;SUN说lustre是目前全球具有最佳可扩展性的并行FS,现全球十大超级计算机中的6个以及top100中的40%的超级计算机都采用了这个系统;
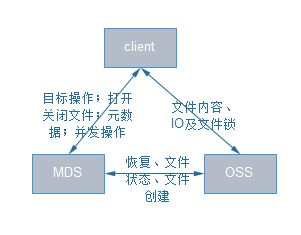
lustre组成:
元数据存储管理(MDS负责管理元数据,提供一个全局的命名空间,client可通过MDS读取到保存于MDT之上的元数据,在lustre中MDS可有2个,采用了active-standby的容错机制,当其中一个MDS故障另一个MDS启动服务接替,MDT只能有1个,不同MDS之间共享访问同一个MDT);
文件数据存储与管理(OSS负责提供i/o服务,接受并服务来自网络的请求,通过OSS,可访问到保存在OST上的文件数据,一个OSS对应2-8个OST,OST上的文件数据是以分条的形式保存的,文件的分条可在一个OSS之中,也可保存在多个OSS中,lustre的特色之一是其数据是基于对象的职能存储的,与传统的基于块的存储方式有所不同);
lustre系统访问入口(通过client来访问系统,client为挂载了lustreFS的任意node,client提供了linux下VFS与lustre系统之间的接口,通过client用户可访问操作lustre系统中的文件);
ceph:
ceph是一个开源的分布式块、对象和文件统一存储平台,sage weil专为其博士论文设计的新一代自由软件分布式FS,2010年,linus torvalds将ceph client合并到2.6.34的kernel中;优点:元数据集群、动态元数据分区、智能对象存储系统、支持PB级存储、高可靠性、支持复制、自动故障探测与修改、自适应满足不同应用负载、大文件和小文件均表现好;不足:数据可用性更多依赖底层FS,btrfs,复制存储利用率低,设计和实现太过复杂,管理也复杂,目前仍不成熟,不建议用于生产环境
开源并行FS比较(glusterfs VS moosefs VS lustre VS ceph):
|
比较维度 |
Glusterfs |
Moosefs |
Lustre |
Ceph |
|
成熟度 |
2005年发布第一个GA版1.2.3,2013年GA版3.3.2,具有成熟的系统架构和完整的工程代码 |
2008年发布第一个开源版本v1.5,13年发布GA版v1.6.27,稳定,比较成熟的开源DFS |
2003发布第一个版本lustre1.0,2013年发布v2.4.0,相当成熟,在HPC领域占有绝大比例 |
2013年发布v0.71,并已添加到linux kernel中作实验内核,目前不成熟有较多bug,更新稳定都是实验版 |
|
稳定性 |
较稳定,无重大bug,已有较多组织或机构应用于生产环境 |
较稳定,无重大bug |
很稳定,在HPC领域应用很多 |
核心组件RADOS较稳定,每3个月更新一次稳定版,有部分企业用于生产环境 |
|
复杂度 |
简单,无元数据服务,用户空间实现,架构清晰,xlator树形结构 |
简单,用户空间实现,代码规模较小,高度模块化 |
复杂度较高,依赖内核实现 |
较复杂,c++实现,功能较多 |
|
高性能 |
解除元数据瓶颈,并行化数据访问 |
元数据单点瓶颈 |
高性能,HPC领域表现卓越 |
数据分布均衡,并行化度高 |
|
扩展性 |
弹性hash代替元数据服务,线性扩展,可轻松扩展到数百PB量级,支持动态扩容 |
可增加存储server,不能增加MDS |
高扩展性,容量可达数百PB,可在不打断任何操作的情况下,通过增加新的OSS来实现动态扩展 |
高扩展性,支持10-1000台server,支持TB到PB的扩展,当组件发生变化时(添加或删除),自动进行数据的重分布 |
|
可用性 |
多元数据服务设计,数据分布提供三种方式的分割:AFR、DHT、stripe,支持自动复制和自动修复 |
元数据+日志服务器,保障元数据server,运行时元数据放内存,可设置副本 |
元数据集群,可部署主备切换工作方式,无副本设计,OSS之间可利用共享存储实现自动故障恢复 |
元数据集群,没有单点故障,多数据副本,自动管理、自动修复,monitor监控集群中所有节点状态,且可有多个monitor保证可靠性 |
|
可管理性 |
部署简单,易于管理和维护,使用底层FS,ext3/zfs,客户端负载增加;提供管理工具,如卷的扩容、数据LB、目录配额及相关监控等 |
部署简单,提供web gui监控界面,元数据恢复,文件恢复,回收站功能,快照 |
部署复杂,需升级kernel等,提供管理工具,如设置目录stripe |
部署较复杂,提供工具对集群进行监控管理,包括集群状态,各组件状态等 |
|
研发成本 |
用户空间实现,模块化堆栈式架构 |
用户空间实现,小规模 |
高,内核空间实现,且代码规模大 |
较高,代码规模大,功能多 |
|
适用性 |
适用以文件为对象的存储体系,适合大文件存储 |
小规模集群,元数据瓶颈,内存消耗大 |
大文件,HPC领域 |
|
|
NAS兼容 |
支持NFS、CIFS、HTTP、FTP、gluster原生协议,与POSIX标准兼容 |
支持CIFS、NFS,支持标准POSIX接口 |
支持CIFS、NFS,支持标准POSIX接口 |
支持CIFS、NFS,支持标准POSIX接口 |
|
采用指数 |
☆☆☆☆ |
☆☆☆ |
☆☆☆ |
☆☆ |
##########################################################################################
操作:
准备三台虚拟机:
client(10.96.20.118/24,测试挂载使用)
server1(eth0:10.96.20.113/24,eth1:192.168.10.113/24,/dev/sdb(5G))
server2(eth0:10.96.20.114/24,eth1:192.168.10.114/24,/dev/sdb(5G))
/etc/hosts内容:
10.96.20.113 server1
10.96.20.114 server2
10.96.20.118 client
准备安装软件包的yum源:
http://download.gluster.org/pub/gluster/glusterfs/3.6/LATEST/CentOS/glusterfs-epel.repo
软件包位置:
http://download.gluster.org/pub/gluster/glusterfs/版本号/
准备测试工具:
atop-1.27-2.el6.x86_64.rpm
fio-2.0.13-2.el6.x86_64.rpm
iperf-2.0.5-11.el6.x86_64.rpm
iozone-3-465.i386.rpm
[root@server1 ~]# cat /etc/redhat-release
Red Hat Enterprise Linux Server release 6.5(Santiago)
[root@server1 ~]# uname -rm
2.6.32-431.el6.x86_64 x86_64
[root@server1 ~]# cat /proc/sys/net/ipv4/ip_forward
1
[root@server1 ~]# mount | grep brick1
/dev/sdb on /brick1 type ext4 (rw)
[root@server1 ~]# df -h | grep brick1
/dev/sdb 5.0G 138M 4.6G 3% /brick1
[root@server2 ~]# mount | grep brick1
/dev/sdb on /brick1 type ext4 (rw)
[root@server2 ~]# df -h | grep brick1
/dev/sdb 5.0G 138M 4.6G 3% /brick1
server1和server2均执行:
[root@server1 ~]# wget -O /etc/yum.repos.d/CentOS-Base.repo http://mirrors.aliyun.com/repo/Centos-6.repo
[root@server1 ~]# vim /etc/yum.repos.d/CentOS-Base.repo
:%s/$releasever/6/g
[root@server1 ~]# yum -y install rpcbind libaio lvm2-devel (用centos或epel或aliyum的yum源安装依赖的包,这些源仅能安装用于client的glusterfs包,没有glusterfs-server包)
[root@server1 ~]# wget -P /etc/yum.repos.d/ http://download.gluster.org/pub/gluster/glusterfs/3.6/LATEST/CentOS/glusterfs-epel.repo
[root@server1 ~]# yum -y install glusterfs-server
Installing:
glusterfs-server x86_64 3.6.9-1.el6 glusterfs-epel 720 k
Installing for dependencies:
glusterfs x86_64 3.6.9-1.el6 glusterfs-epel 1.4 M
glusterfs-api x86_64 3.6.9-1.el6 glusterfs-epel 64 k
glusterfs-cli x86_64 3.6.9-1.el6 glusterfs-epel 143 k
glusterfs-fuse x86_64 3.6.9-1.el6 glusterfs-epel 93 k
glusterfs-libs x86_64 3.6.9-1.el6 glusterfs-epel 282 k
……
[root@server1 ~]# cd glusterfs/
[root@server1 glusterfs]# ll
total 1208
-rw-r--r--. 1 root root 108908 Jan 17 2014 atop-1.27-2.el6.x86_64.rpm
-rw-r--r--. 1 root root 232912 Dec 22 2015 fio-2.0.13-2.el6.x86_64.rpm
-rw-r--r--. 1 root root 833112 Sep 11 18:41iozone-3-465.i386.rpm
-rw-r--r--. 1 root root 54380 Jan 3 2014iperf-2.0.5-11.el6.x86_64.rpm
[root@server1 glusterfs]# rpm -ivh atop-1.27-2.el6.x86_64.rpm
[root@server1 glusterfs]# rpm -ivh fio-2.0.13-2.el6.x86_64.rpm
[root@server1 glusterfs]# rpm -ivh iozone-3-465.i386.rpm
[root@server1 glusterfs]# rpm -ivh iperf-2.0.5-11.el6.x86_64.rpm
[root@server1 ~]# service glusterd start
Starting glusterd: [ OK ]
server2:
[root@server2 ~]# service glusterd start
Starting glusterd: [ OK ]
server1:
[root@server1 ~]# gluster help #(gluster命令有交互模式)
peer probe<HOSTNAME> - probe peer specified by<HOSTNAME> #(增加node,组建集群,主机名或IP均可)
peer detach <HOSTNAME> [force] -detach peer specified by <HOSTNAME> #(删除node)
peer status - list status of peers
volume info [all|<VOLNAME>] - list informationof all volumes (查看卷信息)
volume create <NEW-VOLNAME> [stripe <COUNT>] [replica <COUNT>] [disperse[<COUNT>]] [redundancy <COUNT>] [transport<tcp|rdma|tcp,rdma>] <NEW-BRICK>?<vg_name>... [force] - create a new volume of specified type with mentioned bricks #(创建卷)
volume delete <VOLNAME> - deletevolume specified by <VOLNAME>
volume start<VOLNAME> [force] - start volume specified by<VOLNAME> #(启动卷)
volume stop <VOLNAME> [force] - stopvolume specified by <VOLNAME>
volume add-brick <VOLNAME> [<stripe|replica> <COUNT>] <NEW-BRICK> ...[force] - add brick to volume <VOLNAME> (增加brick)
volume remove-brick <VOLNAME>[replica <COUNT>] <BRICK> ...<start|stop|status|commit|force> - remove brick from volume<VOLNAME>
volume rebalance <VOLNAME> {{fix-layout start} | {start [force]|stop|status}} - rebalance operations
[root@server1 ~]# gluster peer probe server2
peer probe: success.
[root@server1 ~]# gluster peer status
Number of Peers: 1
Hostname: server2
Uuid: 4762db74-3ddc-483a-a510-5756d7402afb
State: Peer in Cluster (Connected)
server2:
[root@server2 ~]# gluster peer status
Number of Peers: 1
Hostname: server1
Uuid: b38bd899-6667-4253-9313-7538fcb5153f
State: Peer in Cluster (Connected)
server1:
[root@server1 ~]# gluster volume create testvol server1:/brick1/b1 server2:/brick1/b1 #(默认创建的是hash卷;此步也可分开执行,先执行#gluster volume create testvol server1:/brick1/b1,再执行#glustervolume create testvol server2:/brick1/b1)
volume create: testvol: success: pleasestart the volume to access data
[root@server1 ~]# gluster volume start testvol
volume start: testvol: success
[root@server1 ~]# gluster volume info
Volume Name: testvol
Type: Distribute
Volume ID:095708cc-3520-49f7-89f8-070687c28245
Status: Started
Number of Bricks: 2
Transport-type: tcp
Bricks:
Brick1: server1:/brick1/b1
Brick2: server2:/brick1/b1
client(挂载使用):
[root@client ~]# wget -P /etc/yum.repos.d/http://download.gluster.org/pub/gluster/glusterfs/3.6/LATEST/CentOS/glusterfs-epel.repo
[root@client ~]# yum -y install glusterfs glusterfs-fuse #(客户端仅需安装glusterfs、glusterfs-libs、glusterfs-fuse)
Installing:
glusterfs x86_64 3.6.9-1.el6 glusterfs-epel 1.4 M
glusterfs-fuse x86_64 3.6.9-1.el6 glusterfs-epel 93 k
Installing for dependencies:
glusterfs-api x86_64 3.6.9-1.el6 glusterfs-epel 64 k
glusterfs-libs x86_64 3.6.9-1.el6 glusterfs-epel 282 k
……
[root@client ~]# mount -t glusterfs server1:/testvol /mnt/glusterfs/
[root@client ~]# mount | grep gluster
server1:/testvol on /mnt/glusterfs typefuse.glusterfs (rw,default_permissions,allow_other,max_read=131072)
[root@client ~]# df -h | grep glusterfs #(总容量是server1和server2的和)
server1:/testvol 9.9G 277M 9.1G 3% /mnt/glusterfs
[root@client ~]# cd /mnt/glusterfs/
[root@client glusterfs]# for i in `seq 150` ; do touch test$i.txt ; done
server1:
[root@server1 ~]# ls /brick1/b1
test10.txt test17.txt test1.txt test24.txt test27.txt test30.txt test32.txt test35.txt test38.txt test43.txt test4.txt
test16.txt test18.txt test22.txt test26.txt test29.txt test31.txt test34.txt test37.txt test3.txt test46.txt test7.txt
[root@server1 ~]# ll /brick1/b1 | wc -l
23
server2:
[root@server2 ~]# ls /brick1/b1
test11.txt test14.txt test20.txt test25.txt test33.txt test40.txt test44.txt test48.txt test5.txt test9.txt
test12.txt test15.txt test21.txt test28.txt test36.txt test41.txt test45.txt test49.txt test6.txt
test13.txt test19.txt test23.txt test2.txt test39.txt test42.txt test47.txt test50.txt test8.txt
[root@server2 mnt]# ll /brick1/b1/ | wc -l
29
总结:
配置信息(/etc/glusterd/*);日志信息(/var/log/gluster/*;I,info;E,error);
#gluster peer probe server2 #(组建集群,在一个node上操作即可,若是添加一个新node要在已组成集群中的任意一个node上操作;可以是主机名或IP,若是主机名要有/etc/hosts解析)
#gluster peer probe server3
#gluster peer status
#gluster volume create testvol server1:/brick1/b1 server2:/brick1/b1 #(创建卷,仅在一个node上操作,默认是hash卷;也可用此种方式创建复制卷#gluster volume create testvol replica 2 server1:/brick1/b2 server2:/brick1/b2;创建条带卷用stripe 2)
#gluster volume start testvol
#gluster volume info
#mount -t glusterfs server1:/testvol/mnt/glusterfs
删除卷:
#gluster volume stop testvol
#gluster volume delete testvol #(卷删除后底层的内容还在)
#gluster volume info
#rm -rf /brick1/b1
#rm -rf /brick1/b2
#rm -rf /brick1/b3
将机器移除集群:
#gluster peer detach IP|HOSTNAME
增加集群机器:
#gluster peer probe server11
#gluster peer probe server12
#gluster peer status
#gluster volume add-brick testvol server11:/brick1/b1server12:/brick1/b1
#gluster volume rebalance testvol start #(重新LB,此操作要在非访问高峰时做,分两步,先fix-layout将hash算法重分配,再将数据重分配;#gluster volume rebalance <VOLNAME> {{fix-layout start} |{start [force]|stop|status}} - rebalance operations)
#gluster volume rebalance testvol status
卷信息同步(在复制卷上操作):
#gluster volume sync server1 [all|VOLUME] #(若server2的数据故障,指定与server1数据同步;all表示同步所有的卷;若只是某个卷的数据有问题指定VOLNAME即可)
修复磁盘数据(在使用server1时宕机,使用server2替换,执行数据同步):
#gluster volume replace-brick testvol server1:/brick1/b1 server2:/brick1/b1 commit force
#gluster volume heal testvol full
当复制卷数据不一致时(解决办法:遍历并访问文件,触发自修复):
#find /mnt/glusterfs -type f -print0 |xargs -0 head -c 1
复制卷中一个brick损坏,解决办法:
#getfattr -d -m -e hex /brick1/b1 #(在正常的一个node上查看扩展属性;查看如下三个属性信息,并paste到省略号位置处)
#setfattr -n trusted.gfid -v 0x000…… /brick1/b1
#setfattr -n trusted.glusterfs.dht -v 0x000…… /brick1/b1
#setfattr -n trusted.glusterfs.volume-id -v0x000…… /brick1/b1
#getfattr -d -m . -e hex /brick1/b1
#service glusterd restart #(仅在出问题的node上重启)
#ps aux | grep gluster
卷参数配置(#gluster volume set <VOLNAME> <KEY> <VALUE> - set options for volume <VOLNAME>):
<KEY> <VALUE>有如下:
auth.reject <IP> #(IP访问授权,默认allowall)
auth.allow <IP>
cluster.min-free-disk <百分比> #(剩余磁盘空间阈值,默认10%)
cluster.strip-block-size <NUM> #(条带大小,默认128KB)
network.frame-timeout <0-1800> #(请求等待时间,默认1800s)
network.ping-timeout <0-42> #(客户端等待时间,默认42s)
nfs.disabled <off|on> #(关闭nfs服务,默认off为开启)
performance.io-thread-count<0-65> #(IO线程数,默认16)
performance.cache-refresh-timeout<0-61> #(缓存校验周期,默认1s)
performance.cache-size <NUM> #(读缓存大小,默认32MB)
网络配置测试:
IP检测(#ip addr;#ifconfig);
网关测试(#ip route show;#route -n);
DNS测试(#cat/etc/resolv.conf;#nslookup);
连通性(#ping IP);
网络性能(在server-side执行#iperf -s;在client-side执行#iperf -c SERVER_IP [-P #],-P,--parallel指定线程数);
gluster自身配置测试:
#gluster peer status #(集群状态)
#gluster volume info #(卷配置)
#gluster volume status #(卷状态)
#gluster volume profile testvol start|info
性能测试(基本性能、带宽测试、iops测试、ops测试、系统监控):
基本性能:
#dd if=/dev/zero of=dd.dat bs=1M count=1k
#dd if=dd.dat of=/dev/null bs=1M count=1k
带宽测试:
iozone是目前应用非常广泛的文件系统测试标准工具,它能够产生并测量各种的操作性能,包括read, write, re-read, re-write, read backwards, read strided, fread,fwrite, random read, pread ,mmap, aio_read, aio_write等操作;Iozone目前已经被移植到各种体系结构计算机和操作系统上,广泛用于文件系统性能测试、分析与评估的标准工具
[root@server1 ~]# /opt/iozone/bin/iozone -h
-r # record size in Kb
or -r #k .. size in kB
or -r #m .. size in MB
or -r #g .. size in GB
-s # file size in Kb
or -s #k .. size in kB
or -s #m .. size in MB
or -s #g .. size in GB
-t # Number of threads or processes to use inthroughput test
-i # Test to run(0=write/rewrite, 1=read/re-read, 2=random-read/write
3=Read-backwards,4=Re-write-record, 5=stride-read, 6=fwrite/re-fwrite
7=fread/Re-fread,8=random_mix, 9=pwrite/Re-pwrite, 10=pread/Re-pread
11=pwritev/Re-pwritev,12=preadv/Re-preadv)
[root@server1 ~]# /opt/iozone/bin/iozone -r 1m -s 128m -t 4 -i 0 -i 1
……
RecordSize 1024 kB
Filesize set to 131072 kB
Commandline used: /opt/iozone/bin/iozone -r 1m -s 128m -t 4 -i 0 -i 1
Outputis in kBytes/sec
TimeResolution = 0.000001 seconds.
Processorcache size set to 1024 kBytes.
Processorcache line size set to 32 bytes.
Filestride size set to 17 * record size.
Throughputtest with 4 processes
Eachprocess writes a 131072 kByte file in 1024 kByte records
Childrensee throughput for 4 initial writers = 49269.04 kB/sec
Parentsees throughput for 4 initial writers = 41259.88 kB/sec
Minthroughput per process = 9069.08 kB/sec
Maxthroughput per process = 14695.71 kB/sec
Avgthroughput per process = 12317.26 kB/sec
Minxfer = 80896.00 kB
……
iops测试:
fio是一个I/O标准测试和硬件压力验证工具,它支持13种不同类型的I/O引擎(sync, mmap, libaio, posixaio, SG v3, splice, null, network, syslet,guasi, solarisaio等),I/O priorities (for newer Linux kernels), rate I/O, forked orthreaded jobs等等;fio可以支持块设备和文件系统测试,广泛用于标准测试、QA、验证测试等,支持Linux, FreeBSD, NetBSD, OS X, OpenSolaris, AIX, HP-UX, Windows等操作系统
sata盘一般iops80
[root@server1 ~]# vim fio.conf
[global]
ioengine=libaio
direct=1
thread=1
norandommap=1
randrepeat=0
filename=/mnt/fio.dat
size=100m
[rr]
stonewall
group_reporting
bs=4k
rw=randread
numjobs=8
iodepth=4
[root@server1 ~]# fio fio.conf
rr: (g=0): rw=randread,bs=4K-4K/4K-4K/4K-4K, ioengine=libaio, iodepth=4
...
rr: (g=0): rw=randread,bs=4K-4K/4K-4K/4K-4K, ioengine=libaio, iodepth=4
fio-2.0.13
Starting 8 threads
rr: Laying out IO file(s) (1 file(s) /100MB)
Jobs: 1 (f=1): [_____r__] [99.9% done][721K/0K/0K /s] [180 /0 /0 iops] [eta00m:01s]
rr: (groupid=0, jobs=8): err= 0: pid=11470:Tue Sep 13 00:44:36 2016
read : io=819296KB, bw=1082.4KB/s, iops=270 , runt=756956msec
slat (usec): min=1 , max=35298 , avg=39.61, stdev=169.88
clat (usec): min=2 , max=990254 , avg=117927.97, stdev=92945.30
lat (usec): min=277 , max=990259 , avg=117967.87, stdev=92940.88
clat percentiles (msec):
| 1.00th=[ 5], 5.00th=[ 13], 10.00th=[ 20], 20.00th=[ 32],
| 30.00th=[ 48], 40.00th=[ 72], 50.00th=[ 98], 60.00th=[ 126],
| 70.00th=[ 159], 80.00th=[ 198],90.00th=[ 251], 95.00th=[ 293],
| 99.00th=[ 379], 99.50th=[ 416], 99.90th=[ 545], 99.95th=[ 603],
| 99.99th=[ 750]
bw (KB/s) : min= 46, max= 625, per=12.53%, avg=135.60, stdev=28.57
lat (usec) : 4=0.01%, 10=0.01%, 20=0.01%, 100=0.01%, 250=0.01%
lat (usec) : 500=0.03%, 750=0.02%, 1000=0.02%
lat (msec) : 2=0.10%, 4=0.67%, 10=2.56%, 20=6.94%, 50=20.90%
lat (msec) : 100=19.70%, 250=39.06%, 500=9.84%, 750=0.16%, 1000=0.01%
cpu : usr=0.00%, sys=0.10%, ctx=175327,majf=18446744073709551560, minf=18446744073709449653
IOdepths : 1=0.1%, 2=0.1%, 4=100.0%,8=0.0%, 16=0.0%, 32=0.0%, >=64=0.0%
submit : 0=0.0%, 4=100.0%,8=0.0%, 16=0.0%, 32=0.0%, 64=0.0%, >=64=0.0%
complete : 0=0.0%, 4=100.0%, 8=0.0%, 16=0.0%, 32=0.0%, 64=0.0%, >=64=0.0%
issued :total=r=204824/w=0/d=0, short=r=0/w=0/d=0
Run status group 0 (all jobs):
READ: io=819296KB, aggrb=1082KB/s, minb=1082KB/s, maxb=1082KB/s,mint=756956msec, maxt=756956msec
Disk stats (read/write):
sda: ios=204915/36, merge=35/13, ticks=24169476/9352004,in_queue=33521518, util=100.00%
ops测试:
#yum -y install gcc
#gcc -o postmark postmark-1.52.c #(postmark软件包是.c的文件,要使用gcc编译)
#cp postmark /usr/bin/
postmark 是由著名的 NAS 提供商 NetApp 开发,用来测试其产品的后端存储性能,主要用于测试文件系统在邮件系统或电子商务系统中性能,这类应用的特点是:需要频繁、大量地存取小文件;Postmark 的测试原理是创建一个测试文件池;文件的数量和最大、最小长度可以设定,数据总量是一定的,创建完成后,postmark 对文件池进行一系列的transaction操作,根据从实际应用中统计的结果,设定每一个事务包括一次创建或删除操作和一次读或添加操作,在有些情况下,文件系统的缓存策略可能对性能造成影响,postmark 可以通过对创建/删除以及读/添加操作的比例进行修改来抵消这种影响;事务操作进行完毕后,post 对文件池进行删除操作,并结束测试,输出结果;postmark是用随机数来产生所操作文件的序号,从而使测试更加贴近于现实应用,输出结果中比较重要的输出数据包括测试总时间、每秒钟平均完成的事务数、在事务处理中平均每秒创建和删除的文件数,以及读和写的平均传输速度
#vim postmark.conf #(此例10000个文件,100个目录每个目录下100个文件,默认会在当前路径下生成报告文件)
set size 1k
set number 10000
set location /mnt/
set subdirectories 100
set read 1k
set write 1k
run 60
show
quit
#postmark postmark.conf #(postmark有交互模式)
系统监控:
[root@server1 ~]# atop
[root@server1 ~]# iostat 1 10
