一. Vagrant概要
Vagrant是一款用于构建及配置虚拟开发环境的软件,主要使用Oracle的开源VirtualBox虚拟化系统,
二. Vagrant的下载以及安装
1.去官网下载Vagrant安装包
https://www.vagrantup.com/downloads
2.安装
默认安装即可
3.检验是否安装成功
- 打开ternimal窗口
- 输入命令
vagrant - 若出现如下信息说明安装成功
~ vagrant
Usage: vagrant [options] <command> [<args>]

    -h, --help                       Print this help.

Common commands:
    autocomplete    manages autocomplete installation on host
    box             manages boxes: installation, removal, etc.
    cloud           manages everything related to Vagrant Cloud
    destroy         stops and deletes all traces of the vagrant machine
    global-status   outputs status Vagrant environments for this user
    halt            stops the vagrant machine
    help            shows the help for a subcommand
    init            initializes a new Vagrant environment by creating a Vagrantfile
    login
    package         packages a running vagrant environment into a box
    plugin          manages plugins: install, uninstall, update, etc.
    port            displays information about guest port mappings
    powershell      connects to machine via powershell remoting
    provision       provisions the vagrant machine
    push            deploys code in this environment to a configured destination
    rdp             connects to machine via RDP
    reload          restarts vagrant machine, loads new Vagrantfile configuration
    resume          resume a suspended vagrant machine
    snapshot        manages snapshots: saving, restoring, etc.
    ssh             connects to machine via SSH
    ssh-config      outputs OpenSSH valid configuration to connect to the machine
    status          outputs status of the vagrant machine
    suspend         suspends the machine
    up              starts and provisions the vagrant environment
    upload          upload to machine via communicator
    validate        validates the Vagrantfile
    version         prints current and latest Vagrant version
    winrm           executes commands on a machine via WinRM
    winrm-config    outputs WinRM configuration to connect to the machine

For help on any individual command run `vagrant COMMAND -h`

Additional subcommands are available, but are either more advanced
or not commonly used. To see all subcommands, run the command
`vagrant list-commands`.
        --[no-]color                 Enable or disable color output
        --machine-readable           Enable machine readable output
    -v, --version                    Display Vagrant version
        --debug                      Enable debug output
        --timestamp                  Enable timestamps on log output
        --debug-timestamp            Enable debug output with timestamps
        --no-tty                     Enable non-interactive output

➜  ~
三. 创建Linux环境
由于Vagrant官方已经把Linux的一下版本打包成镜像文件,我们只要通过vagrant命令即可创建出Linux环境。
官方镜像仓库:
https://app.vagrantup.com/boxes/search
1.初始化linux
打开Ternimal窗口,切换到自己喜欢的文件夹下。创建的文件夹下执行命令(初次创建linux时候执行)
执行命令:vagrant init centos/7
执行完结果如下
vagrant init centos/7
A `Vagrantfile` has been placed in this directory. You are now
ready to `vagrant up` your first virtual environment! Please read
the comments in the Vagrantfile as well as documentation on
`vagrantup.com` for more information on using Vagrant.
➜  vagrant_centos7
2.启动Linux
执行命令:vagrant up
执行结果如下
vagrant up
Bringing machine 'default' up with 'virtualbox' provider...
==> default: Box 'centos/7' could not be found. Attempting to find and install...
    default: Box Provider: virtualbox
    default: Box Version: >= 0
==> default: Loading metadata for box 'centos/7'
    default: URL: https://vagrantcloud.com/centos/7
==> default: Adding box 'centos/7' (v2004.01) for provider: virtualbox
    default: Downloading: https://vagrantcloud.com/centos/boxes/7/versions/2004.01/providers/virtualbox.box
Download redirected to host: cloud.centos.org
    default: Calculating and comparing box checksum...
==> default: Successfully added box 'centos/7' (v2004.01) for 'virtualbox'!
==> default: Importing base box 'centos/7'...
==> default: Matching MAC address for NAT networking...
==> default: Checking if box 'centos/7' version '2004.01' is up to date...
==> default: Setting the name of the VM: vagrant_centos7_default_1615905340171_64018
==> default: Vagrant has detected a configuration issue which exposes a
==> default: vulnerability with the installed version of VirtualBox. The
==> default: current guest is configured to use an E1000 NIC type for a
==> default: network adapter which is vulnerable in this version of VirtualBox.
==> default: Ensure the guest is trusted to use this configuration or update
==> default: the NIC type using one of the methods below:
==> default:
==> default:   https://www.vagrantup.com/docs/virtualbox/configuration.html#default-nic-type
==> default:   https://www.vagrantup.com/docs/virtualbox/networking.html#virtualbox-nic-type
==> default: Clearing any previously set network interfaces...
==> default: Preparing network interfaces based on configuration...
    default: Adapter 1: nat
==> default: Forwarding ports...
    default: 22 (guest) => 2222 (host) (adapter 1)
==> default: Booting VM...
==> default: Waiting for machine to boot. This may take a few minutes...
    default: SSH address: 127.0.0.1:2222
    default: **SSH username: vagrant**
    default: SSH auth method: private key
    default:
    default: Vagrant insecure key detected. Vagrant will automatically replace
    default: this with a newly generated keypair for better security.
    default:
    default: Inserting generated public key within guest...
    default: Removing insecure key from the guest if it's present...
    default: Key inserted! Disconnecting and reconnecting using new SSH key...
==> default: Machine booted and ready!
==> default: Checking for guest additions in VM...
    default: No guest additions were detected on the base box for this VM! Guest
    default: additions are required for forwarded ports, shared folders, host only
    default: networking, and more. If SSH fails on this machine, please install
    default: the guest additions and repackage the box to continue.
    default:
    default: This is not an error message; everything may continue to work properly,
    default: in which case you may ignore this message.
==> default: Rsyncing folder: /Users/zcf/VirtualBox VMs/vagrant_centos7/ => /vagrant
➜  vagrant_centos7
3.连接登录linux
vagrant默认创建账户vagrant
默认root账户:root
密码:vagrant
使用命令登录vagrant用户:vagrant ssh
执行完大概如下
vagrant ssh
-bash: warning: setlocale: LC_CTYPE: cannot change locale (UTF-8): No such file or directory
[vagrant@localhost ~]$ pwd
/home/vagrant
[vagrant@localhost ~]$
4.退出
命令:exit
执行退出后结果
vagrant@localhost ~]$ exit
logout
Connection to 127.0.0.1 closed.
➜  vagrant_centos7
5.修改虚拟机的网络配置
由于端口转发的形式需要对主机和虚拟机的端口进行映射的配置,而且当我们在linux中安装一个软件接得配置一次映射,所以我们不采用这种形式。在这里我们采用Host-Only的形式。
-
1> 准备工作
查看本机的ip地址
我的是:192.168.10.103 -
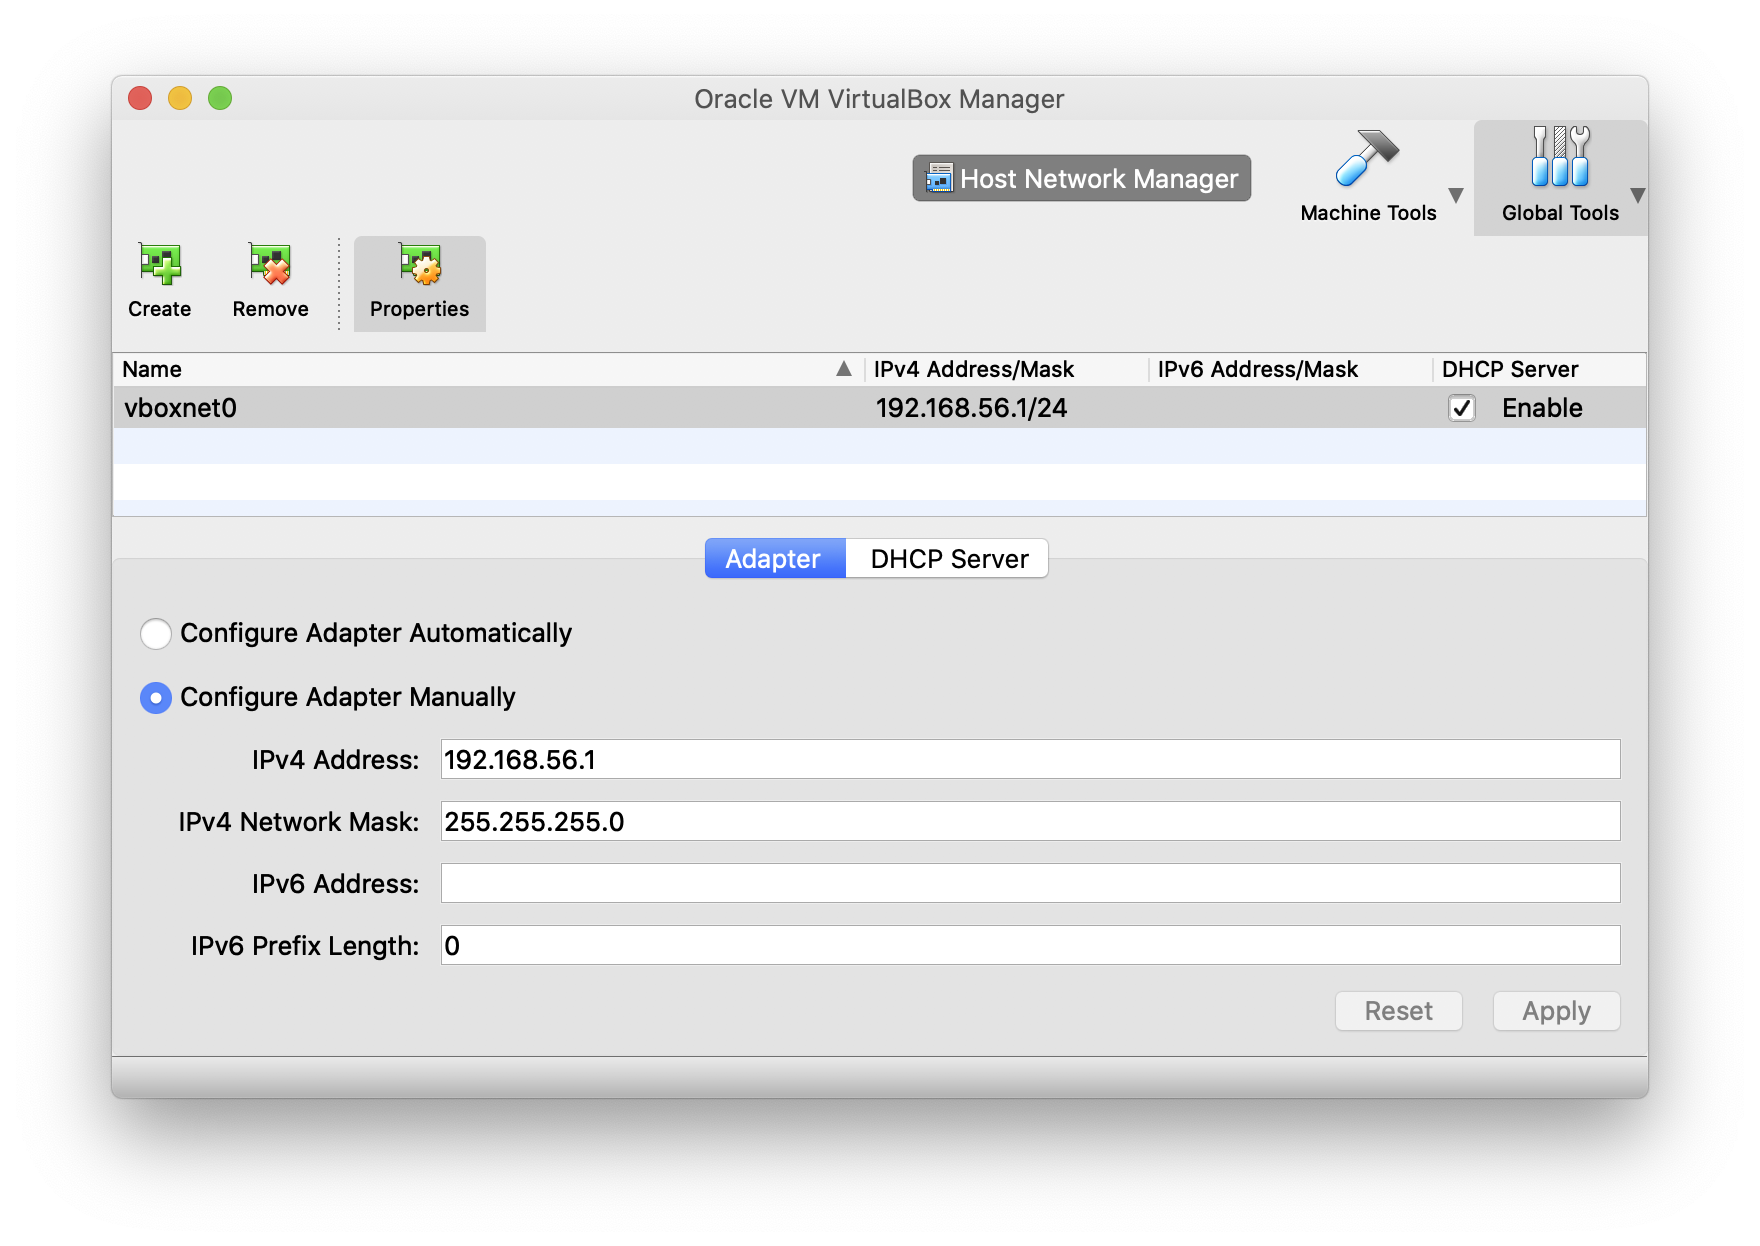
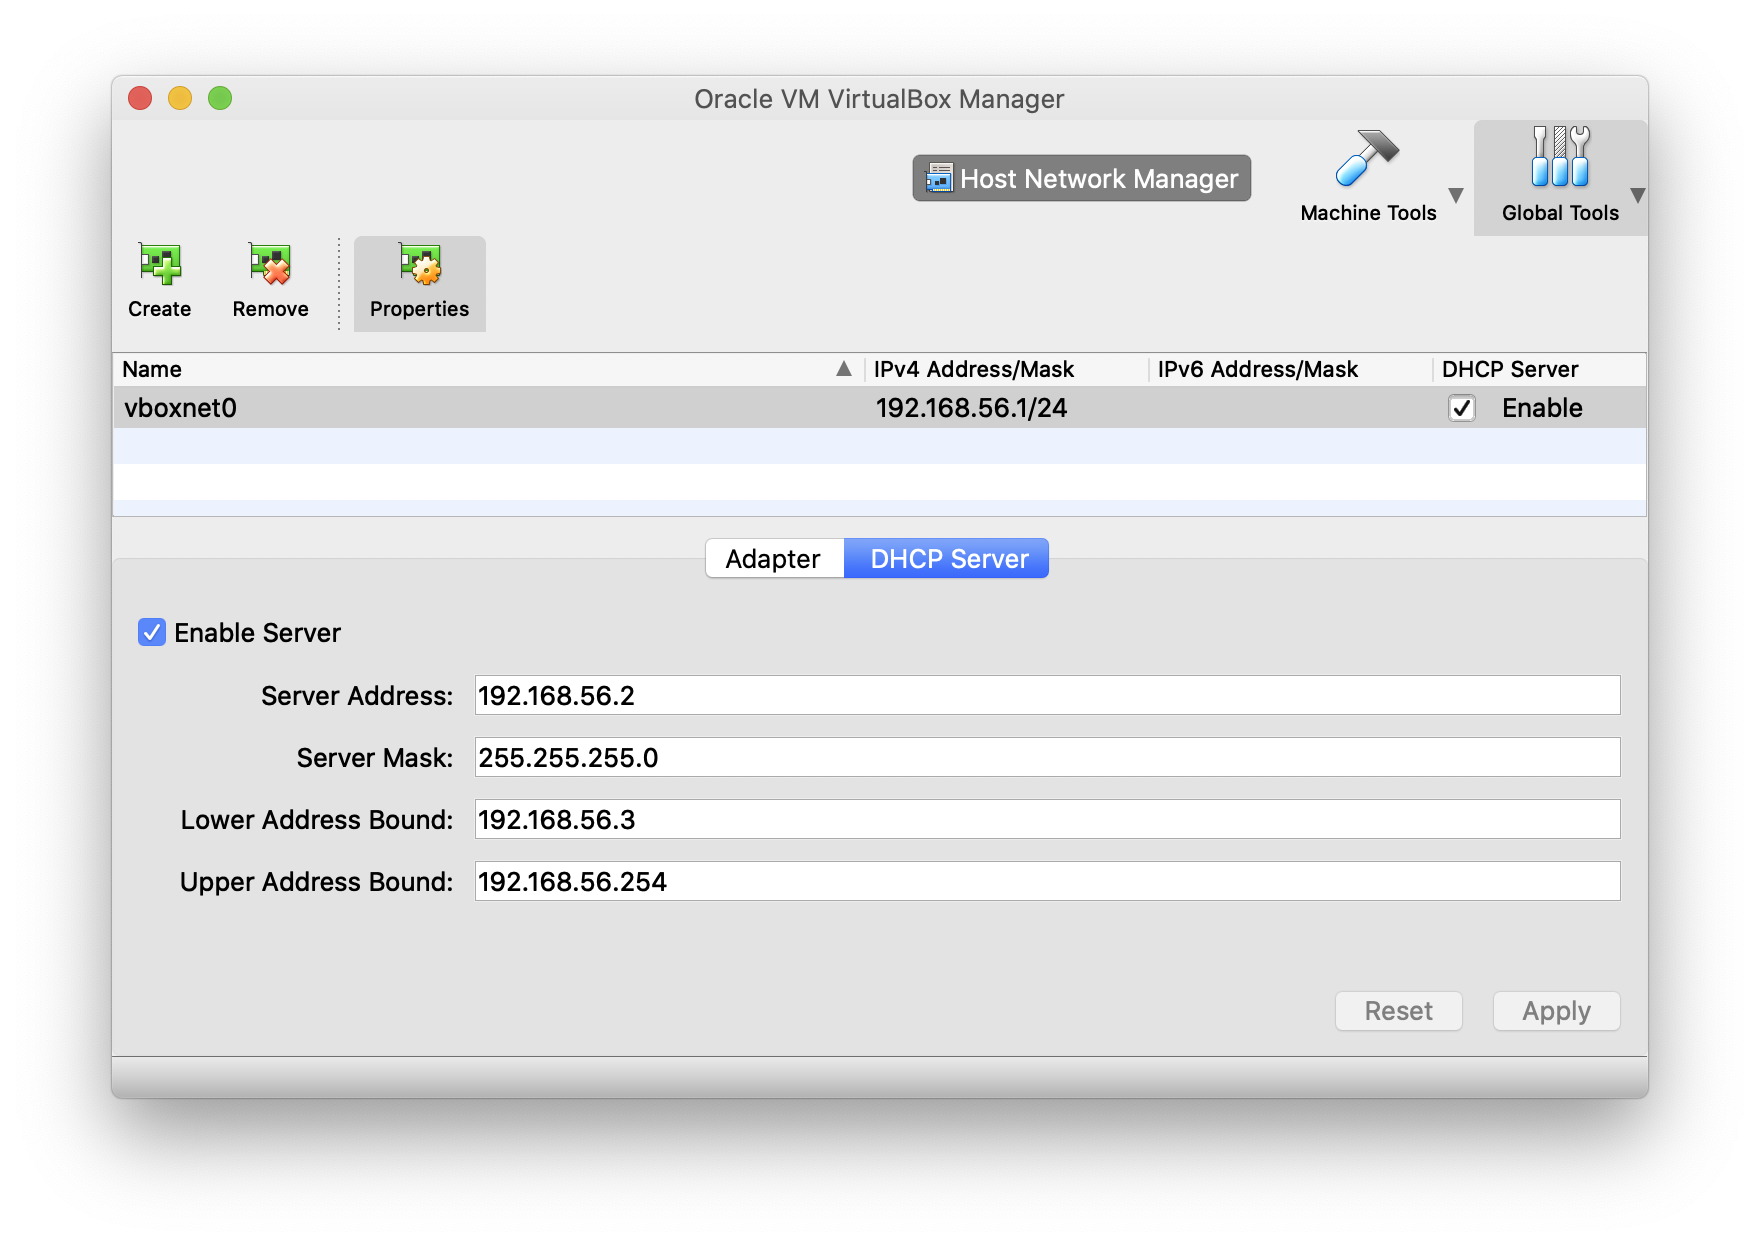
2> 配置VisualBox的虚拟网卡
global tools -> create -> propertites
配置好后如下- ip-adapter配置

- DHCP-Server配置

- Host-Only-Net-Adapter配置
- Host-Only-Net-DHCP-Server配置
- ip-adapter配置
-
3> 修改以下路径下的文件(就是执行linux初始化时候的目录)
/Users/zcf/VirtualBox VMs/vagrant_centos7/Vagrantfile
56根据visualbox的虚拟网卡得来。
修改内容如下config.vm.network "private_network", ip: "192.168.**56**.10" -
4> 重新导入vagrant
执行命令:vagrant reload -
5> 登录linux
vagrant ssh -
6> 从本地电脑(宿主机)ping linux机器
执行命令:ping 192.168.56.10
执行结果:丢包率为0则说明OKping 192.168.56.10 PING 192.168.56.10 (192.168.56.10): 56 data bytes 64 bytes from 192.168.56.10: icmp_seq=0 ttl=64 time=0.303 ms 64 bytes from 192.168.56.10: icmp_seq=1 ttl=64 time=0.418 ms 64 bytes from 192.168.56.10: icmp_seq=2 ttl=64 time=0.358 ms 64 bytes from 192.168.56.10: icmp_seq=3 ttl=64 time=0.584 ms 64 bytes from 192.168.56.10: icmp_seq=4 ttl=64 time=0.350 ms 64 bytes from 192.168.56.10: icmp_seq=5 ttl=64 time=0.343 ms ^C --- 192.168.56.10 ping statistics --- 6 packets transmitted, 6 packets received, **0.0% packet loss** -
7> 从linux机器 ping本地电脑(宿主机)
执行命令:ping 192.168.10.103
执行结果:丢包率为0则说明OK。[vagrant@localhost ~]$ ping 192.168.10.103 PING 192.168.10.103 (192.168.10.103) 56(84) bytes of data. 64 bytes from 192.168.10.103: icmp_seq=1 ttl=63 time=0.447 ms 64 bytes from 192.168.10.103: icmp_seq=2 ttl=63 time=0.478 ms 64 bytes from 192.168.10.103: icmp_seq=3 ttl=63 time=0.352 ms 64 bytes from 192.168.10.103: icmp_seq=4 ttl=63 time=0.655 ms ^C --- 192.168.10.103 ping statistics --- 4 packets transmitted, 4 received, **0% packet loss**, time 3011ms rtt min/avg/max/mdev = 0.352/0.483/0.655/0.109 ms [vagrant@localhost ~]$ -
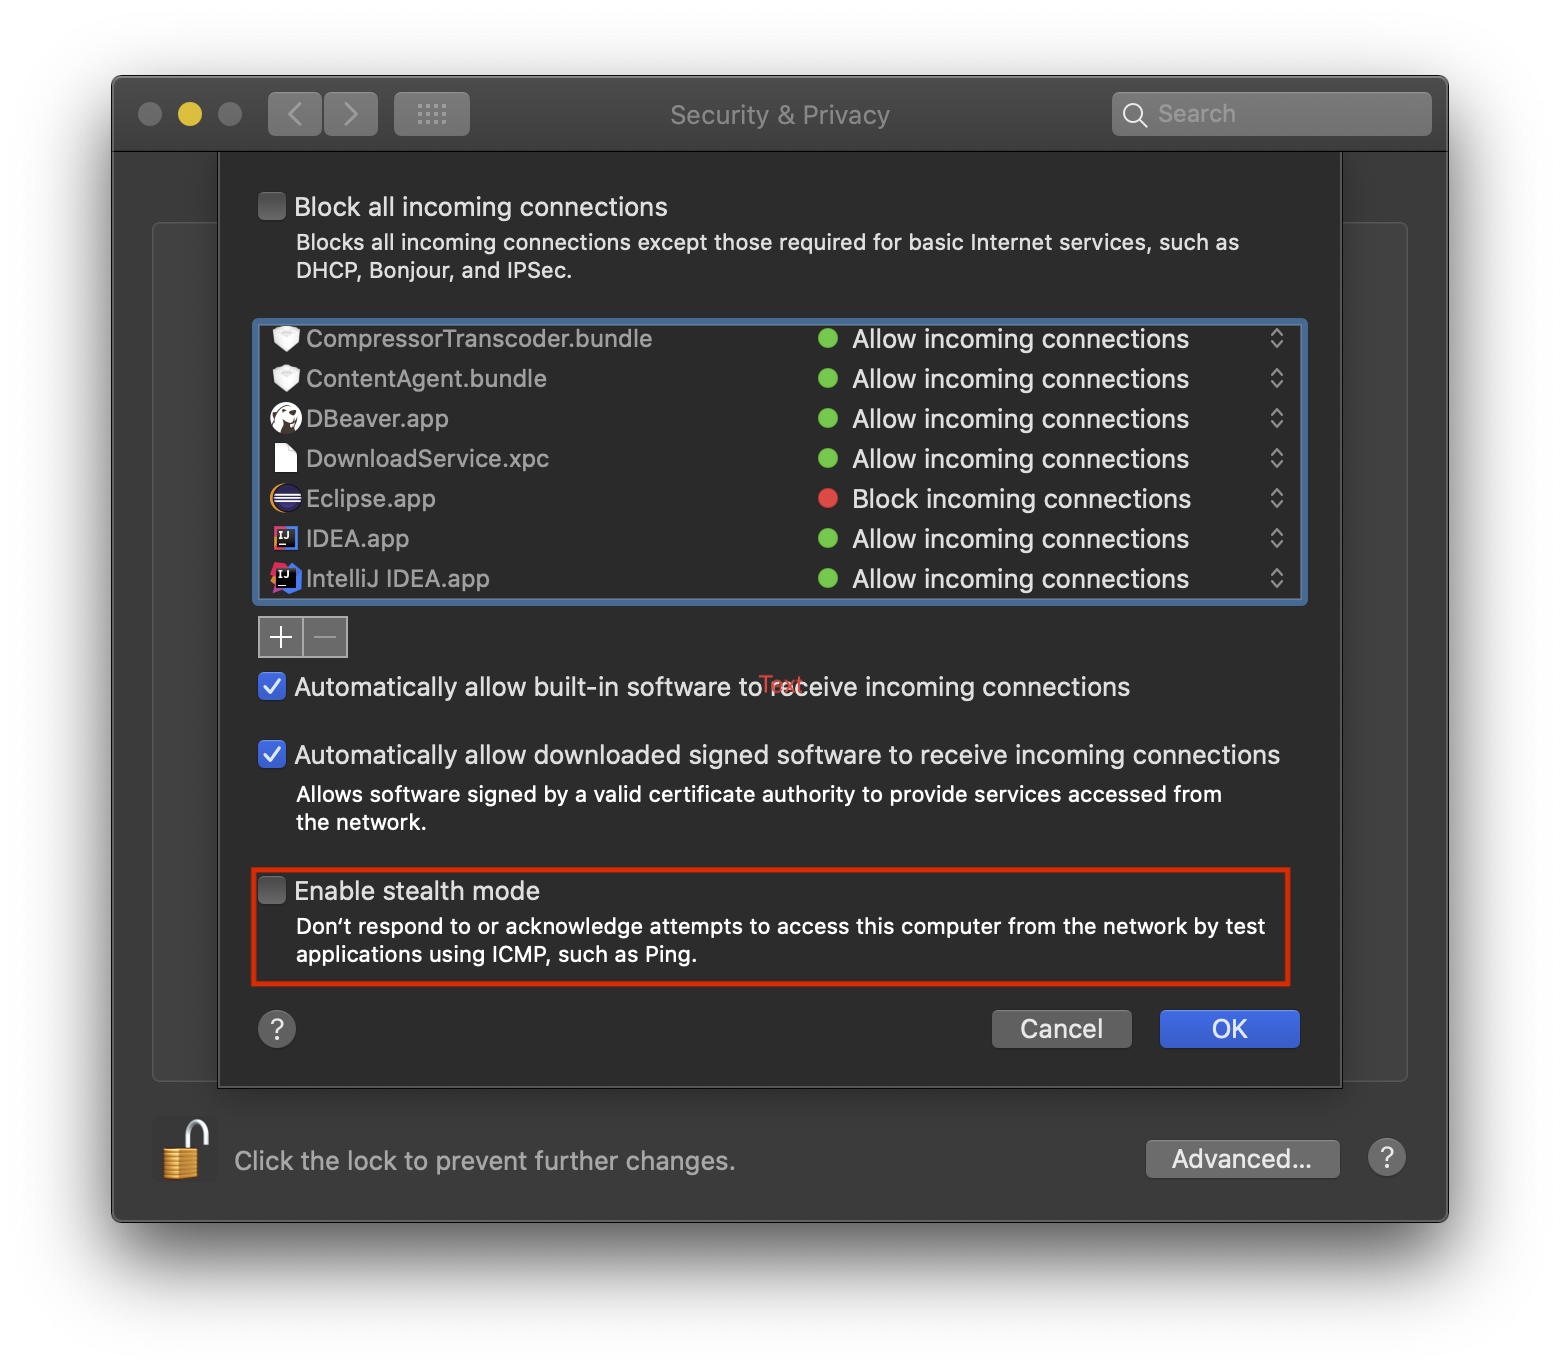
8>注意事项
如果宿主机防火墙是打开的,会出现虚拟机不能ping通主机,但是主机可以ping通虚拟机的情况。解决方案有两个
1.关闭防火墙
这种方式比较简单粗暴,往往我们并不希望防火墙一直处于关闭的状态,毕竟还是有安全隐患的么。所以我们不 推荐这种方式,而是推荐下面的这种方式。2.开启防火墙,关闭隐身模式
由于MacOS下默认开启隐身模式,会过滤掉ICMP(ping等)操作。所以我们在打开防火墙的同时,关闭隐身模式即可。关闭隐身模式设置如下