模块
在计算机程序的开发过程中,随着程序代码越写越多,在一个文件里代码就会越来越长,越来越不容易维护。
为了编写可维护的代码,我们把很多函数分组,分别放到不同的文件里,这样,每个文件包含的代码就相对较少,很多编程语言都采用这种组织代码的方式。在Python中,一个.py文件就称之为一个模块(Module)。
使用模块的好处:
- 最大的好处是大大提高了代码的可维护性。其次,编写代码不必从零开始。当一个模块编写完毕,就可以被其他地方引用。我们在编写程序的时候,也经常引用其他模块,包括Python内置的模块和来自第三方的模块。
- 使用模块还可以避免函数名和变量名冲突。每个模块有独立的命名空间,因此相同名字的函数和变量完全可以分别存在不同的模块中,所以,我们自己在编写模块时,不必考虑名字会与其他模块冲突
模块分为三类:
内置模块:又称为标准库模块,python自带的模块
第三方开源模块:从网络上导入安装的模块
自定义模块:用户自己定义的模块
模块调用方式:
import module

from module import xx

from module.xx.xx import xx as rename

from module.xx.xx import *
一旦调用模块直接执行.py里的代码
这里涉及到路径问题:
sys.path 可以返回当前模块的可以调用的路径列表
['', '/Library/Frameworks/Python.framework/Versions/3.6/lib/python36.zip', '/Library/Frameworks/Python.framework/Versions/3.6/lib/python3.6', '/Library/Frameworks/Python.framework/Versions/3.6/lib/python3.6/lib-dynload', '/Library/Frameworks/Python.framework/Versions/3.6/lib/python3.6/site-packages']第一个为空表示当前程序所在的路径,程序会从左到右依次尝试调用模块
第三方模块的安装方法分为两种:
1.下载源码安装
登录https://pypi.python.org/pypi下载后,解压并进入目录,执行以下命令完成安装
python setup.py build  # 编译
python setup.py install  # 安装
2.通过pip安装
pip3 install paramiko #paramiko 是模块名
软件一般会被自动安装你python安装目录的这个子目录里
/your_python_install_path/3.6/lib/python3.6/site-packages

切换模块源
pip命令默认会连接在国外的python官方服务器下载,速度比较慢,你还可以使用国内的豆瓣源,数据会定期同步国外官网,速度快好多
sudo pip install -i http://pypi.douban.com/simple/ alex_sayhi --trusted-host pypi.douban.com
包(package)
包就是包含_init_.py的文件夹,导入模块时必须是以包为路径导入,文件夹内的模块是找不到模块的
跨模块导入的问题:当需要导入的模块不在一个层级目录时,需要导入模块就要在环境变量中添加路径
目录结构如下
.
├── __init__.py
├── crm
│   ├── __init__.py
│   ├── admin.py
│   ├── apps.py
│   ├── models.py
│   ├── tests.py
│   ├── views.py
├── manage.py
└── proj
    ├── __init__.py
    ├── settings.py
    ├── urls.py
    └── wsgi.py
根据上面的结构,如何实现在crm/views.py里导入proj/settings.py模块?
直接导入的话,会报错,说找到不模块
$ python3 views.py
Traceback (most recent call last):
  File "views.py", line 2, in <module>
    from proj import settings
ModuleNotFoundError: No module named 'proj'
是因为路径找不到,proj/settings.py 相当于是crm/views.py的父亲(crm)的兄弟(proj)的儿子(settings.py),settings.py算是views.py的表弟啦,在views.py里只能导入同级别兄弟模块代码,或者子级别包里的模块,根本不知道表弟表哥的存在。这可怎么办呢?
答案是添加环境变量,把父亲级的路径添加到sys.path中,就可以了,这样导入 就相当于从父亲级开始找模块了。
crm/views.py中添加环境变量
import sys ,os

BASE_DIR = os.path.dirname(os.path.dirname(os.path.abspath(__file__))) #__file__的是打印当前被执行的模块.py文件相对路径,注意是相对路径
print(BASE_DIR)

sys.path.append(BASE_DIR)

from proj import settings

def sayhi():
    print('hello world!')

print(settings.DATABASES)
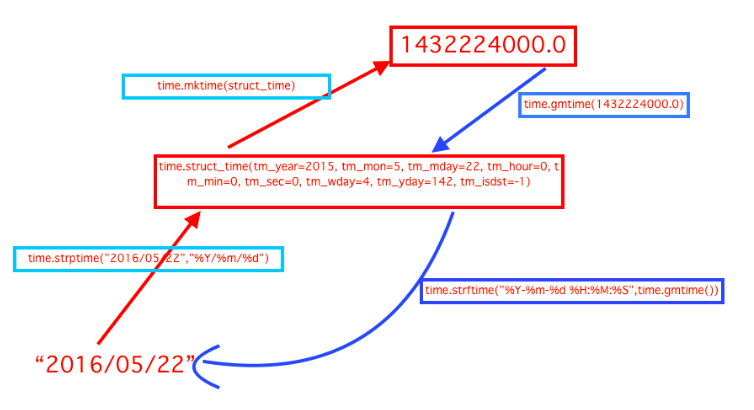
time/datetime模块
time模块的方法
- time.localtime([secs]):将一个时间戳转换为本地时间。
- time.gmtime([secs]):和localtime()方法类似,gmtime()方法是将一个时间戳转换为UTC时区(0时区)的struct_time。
- time.time():返回当前时间的时间戳。
- time.mktime(t):将一个struct_time转化为时间戳。
- time.sleep(secs):线程推迟指定的时间运行。单位为秒。
- time.asctime([t]):把一个表示时间的元组或者struct_time表示为这种形式:'Sun Oct 1 12:04:38 2017'。如果没有参数,将会将time.localtime()作为参数传入。
- time.ctime([secs]):把一个时间戳(按秒计算的浮点数)转化为time.asctime()的形式。如果参数未给或者为None的时候,将会默认time.time()为参数。它的作用相当于time.asctime(time.localtime(secs))。
-
time.strftime(format[, t]):把一个代表时间的元组或者struct_time(如由time.localtime()和time.gmtime()返回)转化为格式化的时间字符串。如果t未指定,将传入time.localtime()。
- 举例:time.strftime("%Y-%m-%d %X", time.localtime()) #输出'2017-10-01 12:14:23'
-
time.strptime(string[, format]):把一个格式化时间字符串转化为struct_time。实际上它和strftime()是逆操作。
- 举例:time.strptime('2017-10-3 17:54',"%Y-%m-%d %H:%M") #输出 time.struct_time(tm_year=2017, tm_mon=10, tm_mday=3, tm_hour=17, tm_min=54, tm_sec=0, tm_wday=1, tm_yday=276, tm_isdst=-1)
time方法转换图:
datetime模块方法:
- datetime.date:表示日期的类。常用的属性有year, month, day;
- datetime.time:表示时间的类。常用的属性有hour, minute, second, microsecond;
- datetime.datetime:表示日期时间。
- datetime.timedelta:表示时间间隔,即两个时间点之间的长度。
- datetime.tzinfo:与时区有关的相关信息。
random模块
>>> random.randrange(1,10) #返回1-10之间的一个随机数,不包括10
>>> random.randint(1,10) #返回1-10之间的一个随机数,包括10

>>> random.randrange(0, 100, 2) #随机选取0到100间的偶数

>>> random.random()  #返回一个随机浮点数
>>> random.choice('abce3#$@1') #返回一个给定数据集合中的随机字符
'#'

>>> random.sample('abcdefghij',3)  #从多个字符中选取特定数量的字符
['a', 'd', 'b']

#生成随机字符串(验证码)
>>> import string
>>> ''.join(random.sample(string.ascii_lowercase + string.digits, 6))
'4fvda1'

#洗牌
>>> a
[0, 1, 2, 3, 4, 5, 6, 7, 8, 9]
>>> random.shuffle(a)
>>> a
[3, 0, 7, 2, 1, 6, 5, 8, 9, 4]
os模块
提供与操作系统直接进行交互的功能
os.path.*:
os.path.abspath() 返回绝对路径
os.path.dirname() 返回路径名
os.path.basename() 返回文件名
os.path.isfile() 判断指定对象是否为文件
os.path.isdir() 判断是否为路径
os.path.exists() 判断对象是否存在
os.path.getsize() 获得文件大小,若为目录,返回为0
os.path.split() 分割目录名与文件名并返回
os.path.join() 拼接目录名与文件名
os.*:
os.name() 返回当前正在使用的平台
os.listdir() 返回指定目录下的文件名与目录名
os.getcwd() 获得当前工作目录
os.mkdir() 创建目录
os.rmdir() 删除目录
os.remove() 删除指定文件
os.chdir() 改变目录到指定目录
os.system() 执行shell命令
sys模块
sys.argv 命令行参数List,第一个元素是程序本身路径
sys.exit(n) 退出程序,正常退出时exit(0)
sys.version 获取Python解释程序的版本信息
sys.maxint 最大的Int值
sys.path 返回模块的搜索路径,初始化时使用PYTHONPATH环境变量的值
sys.platform 返回操作系统平台名称
sys.stdout.write('please:') 标准输出
val = sys.stdin.readline()[:-1] 标准输入
sys.getrecursionlimit() 获取最大递归层数
sys.setrecursionlimit(1200) 设置最大递归层数
sys.getdefaultencoding() 获取解释器默认编码
sys.getfilesystemencoding 获取内存数据存到文件里的默认编码
shutil模块
高级的文件处理,压缩、解压操作
shutil.copyfileobj(fsrc, fdst[, length]) 复制文件内容到另一个文件中
shutil.copyfileobj(open('oldfile','r),open('newfile','w')) length为每次复制的字节长度
shutil.copyflie(src,dst) 复制文件(不管目标是否存在)
shutil.copyfile('old.log','new.log')
shutil.copymode(src,dst) 拷贝权限,内容,组 ,用户不变 (文件必须存在)
shutil.copymode('old.log','new.log')
shutil.copystat(src,dst) 拷贝文件状态 包括:mode bits, atime, mtime, flags (文件必须存在)
shutil.copystat('old.log','new.log')
shutil.copy(src,dst) 拷贝文件和权限
shutil.copy2(src,dst) 拷贝文件和状态
shutil.ignore_patterns(*patterns)
shutil.copytree(src, dst, symlinks=False, ignore=None) 递归的拷贝
shutil.copytree('folder1', 'folder2', ignore=shutil.ignore_patterns('*.pyc', 'tmp*')) 忽略.pyc,tmp文件
shutil.rmtree(path[, ignore_errors[, onerror]]) 递归的去删除文件
import shutil
shutil.rmtree('folder1')
shutil.move(src, dst) 递归的去移动文件,它类似mv命令,其实就是重命名。
import shutil
shutil.move('folder1', 'folder3')
shutil.make_archive(base_name, format,...) 创建压缩包并返回文件路径,例如:zip、tar
base_name: 压缩包的文件名,也可以是压缩包的路径。只是文件名时,则保存至当前目录,否则保存至指定路径,
如 data_bak =>保存至当前路径
如:/tmp/data_bak =>保存至/tmp/
format: 压缩包种类,“zip”, “tar”, “bztar”,“gztar”
root_dir: 要压缩的文件夹路径(默认当前目录)
owner: 用户,默认当前用户
group: 组,默认当前组
logger: 用于记录日志,通常是logging.Logger对象
#将 /data 下的文件打包放置当前程序目录
import shutil
ret = shutil.make_archive("data_bak", 'gztar', root_dir='/data')
#将 /data下的文件打包放置 /tmp/目录
import shutil
ret = shutil.make_archive("/tmp/data_bak", 'gztar', root_dir='/data')
shutil 对压缩包的处理是调用 ZipFile 和 TarFile 两个模块来进行的,详细:
zipfile、tarfile压缩&解压缩
import zipfile

# 压缩
z = zipfile.ZipFile('laxi.zip', 'w')
z.write('a.log')
z.write('data.data')
z.close()

# 解压
z = zipfile.ZipFile('laxi.zip', 'r')
z.extractall(path='.')
z.close()import tarfile

# 压缩
>>> t=tarfile.open('/tmp/egon.tar','w')
>>> t.add('/test1/a.py',arcname='a.bak')
>>> t.add('/test1/b.py',arcname='b.bak')
>>> t.close()

# 解压
>>> t=tarfile.open('/tmp/egon.tar','r')
>>> t.extractall('/egon')
>>> t.close()
json/pickle模块
json,用于字符串 和 python数据类型间进行转换
pickle,用于python特有的类型 和 python的数据类型间进行转换
Json模块提供了四个功能:dumps、dump、loads、load
pickle模块提供了四个功能:dumps、dump、loads、load
import pickle
data = {'k1':123,'k2':'Hello'}

# pickle.dumps 将数据通过特殊的形式转换位只有python语言认识的字符串
p_str = pickle.dumps(data)
print(p_str)

#pickle.dump 将数据通过特殊的形式转换位只有python语言认识的字符串,并写入文件
with open('D:/result.pk','wb',encoding='utf8') as fp:
pickle.dump(data,fp)

import json
# json.dumps 将数据通过特殊的形式转换位所有程序语言都认识的字符串
j_str = json.dumps(data)
print(j_str)

#pickle.dump 将数据通过特殊的形式转换位只有python语言认识的字符串,并写入文件
with open('D:/result.json','wb',encoding='utf8') as fp:
json.dump(data,fp)
json vs pickle:
JSON:
优点:跨语言、体积小
缺点:只能支持intstrlist upledict
Pickle:
优点:专为python设计,支持python所有的数据类型
缺点:只能在python中使用,存储数据占空间大
shelve模块
shelve模块可以以k-v形式序列化数据,可以序列化所有pickle支持的数据类型
序列化:
import shelve

f = shelve.open('f1')
name = ['aaa','bbb','ccc']
dic = {'a':1,'b':2,'c':3}
f['name'] = name
f['dic'] =dic
反序列化:
import shelve

f = shelve.open('f1')  # 打开一个文件
print(f['names'])
print(f['info_dic'])

del f['test']
xml模块
xml是实现不同语言或程序之间进行数据交换的协议,跟json差不多,但json使用起来更简单,不过,古时候,在json还没诞生的黑暗年代,大家只能选择用xml呀,至今很多传统公司如金融行业的很多系统的接口还主要是xml。
xml的格式如下,就是通过<>节点来区别数据结构的:
<?xml version="1.0"?>
<data>
<country name="Liechtenstein">
<rank updated="yes">2</rank>
<year>2008</year>
<gdppc>141100</gdppc>
<neighbor name="Austria" direction="E"/>
<neighbor name="Switzerland" direction="W"/>
</country>
<country name="Singapore">
<rank updated="yes">5</rank>
<year>2011</year>
<gdppc>59900</gdppc>
<neighbor name="Malaysia" direction="N"/>
</country>
<country name="Panama">
<rank updated="yes">69</rank>
<year>2011</year>
<gdppc>13600</gdppc>
<neighbor name="Costa Rica" direction="W"/>
<neighbor name="Colombia" direction="E"/>
</country>
</data>
xml协议在各个语言里的都 是支持的,在python中可以用以下模块操作xml
import xml.etree.ElementTree as ET

tree = ET.parse("xmltest.xml")
root = tree.getroot()
print(root.tag)

#遍历xml文档
for child in root:
print(child.tag, child.attrib)
for i in child:
print(i.tag,i.text)

#只遍历year 节点
for node in root.iter('year'):
print(node.tag,node.text)
修改和删除xml文档内容
import xml.etree.ElementTree as ET

tree = ET.parse("xmltest.xml")
root = tree.getroot()

#修改
for node in root.iter('year'):
new_year = int(node.text) + 1
node.text = str(new_year)
node.set("updated","yes")

tree.write("xmltest.xml")


#删除node
for country in root.findall('country'):
rank = int(country.find('rank').text)
if rank > 50:
root.remove(country)

tree.write('output.xml')
自己创建xml文档
import xml.etree.ElementTree as ET


new_xml = ET.Element("namelist")
name = ET.SubElement(new_xml,"name",attrib={"enrolled":"yes"})
age = ET.SubElement(name,"age",attrib={"checked":"no"})
sex = ET.SubElement(name,"sex")
sex.text = '33'
name2 = ET.SubElement(new_xml,"name",attrib={"enrolled":"no"})
age = ET.SubElement(name2,"age")
age.text = '19'

et = ET.ElementTree(new_xml) #生成文档对象
et.write("test.xml", encoding="utf-8",xml_declaration=True)

ET.dump(new_xml) #打印生成的格式
configparser模块
此模块用于生成和修改常见配置文档
常见的配置文件格式如下
[DEFAULT]
ServerAliveInterval = 45
Compression = yes
CompressionLevel = 9
ForwardX11 = yes

[bitbucket.org]
User = hg

[topsecret.server.com]
Port = 50022
ForwardX11 = no
configparser模块用来处理上面格式的配置文件
>>> import configparser # 导入模块
>>> config = configparser.ConfigParser()  #实例化(生成对象)
>>> config.sections()  #调用sections方法
[]
>>> config.read('example.ini')  # 读配置文件(注意文件路径)
['example.ini']
>>> config.sections() #调用sections方法(默认不会读取default)
['bitbucket.org', 'topsecret.server.com']
>>> 'bitbucket.org' in config #判断元素是否在sections列表内
True
>>> 'bytebong.com' in config
False
>>> config['bitbucket.org']['User'] # 通过字典的形式取值
'hg'
>>> config['DEFAULT']['Compression']
'yes'
>>> topsecret = config['topsecret.server.com']
>>> topsecret['ForwardX11']
'no'
>>> topsecret['Port']
'50022'
>>> for key in config['bitbucket.org']: print(key) # for循环 bitbucket.org 字典的key
...
user
compressionlevel
serveraliveinterval
compression
forwardx11
>>> config['bitbucket.org']['ForwardX11']
'yes'
其他增删改查的方法:
[group1] # 支持的两种分隔符“=”, “:”
k1 = v1
k2:v2

[group2]
k1 = v1

import ConfigParser

config = ConfigParser.ConfigParser()
config.read('i.cfg')

# ########## 读 ##########
#secs = config.sections()
#print(secs)
#options = config.options('group2') # 获取指定section的keys
#print(options)

#item_list = config.items('group2') # 获取指定 section 的 keys & values ,key value 以元组的形式
#print(item_list)

#val = config.get('group1','key') # 获取指定的key 的value
#val = config.getint('group1','key')

# ########## 改写 ##########
#sec = config.remove_section('group1') # 删除section 并返回状态(true, false)
#config.write(open('i.cfg', "w")) # 对应的删除操作要写入文件才会生效

#sec = config.has_section('wupeiqi')
#sec = config.add_section('wupeiqi')
#config.write(open('i.cfg', "w")) #


#config.set('group2','k1',11111)
#config.write(open('i.cfg', "w"))

#config.remove_option('group2','age')
#config.write(open('i.cfg', "w"))
hashlib模块
用于加密相关操作的模块