顾问
通知(advice)
是Spring中的一种比较简单的切面,只能将切面织入到目标类的所有方法中,而无法对指定方法进行增强
顾问(advisor)
是Spring提供的另外一种切面,可以织入到指定的方法中 接口 PointcutAdvisor
实现类
NameMatchMethodPointcutAdvisor(基于方法名称的增强顾问)
RegexpMethodPointcutAdvice(基于正则表达式的增强顾问)
小案例NameMatchMethodPointcutAdvisor(基于方法名称的增强顾问)
步骤一:定义一个接口
public interface IService {
    public void doSome();
}
步骤二:接口实现类
public class IServiceimpl implements IService{
    @Override
    public void doSome() {
        System.out.println("真实业务doSome");
    }
}
步骤三:增强类
public class MyAdcisor implements MethodBeforeAdvice, AfterReturningAdvice {
    @Override
    public void afterReturning(Object o, Method method, Object[] objects, Object o1) throws Throwable {
        System.out.println("前置增强");
    }

    @Override
    public void before(Method method, Object[] objects, Object o) throws Throwable {
        System.out.println("后置增强");
    }
}
步骤四:大配置文件
<?xml version="1.0" encoding="UTF-8"?>
<beans xmlns="http://www.springframework.org/schema/beans"
       xmlns:xsi="http://www.w3.org/2001/XMLSchema-instance"
       xmlns:context="http://www.springframework.org/schema/context"
       xsi:schemaLocation="http://www.springframework.org/schema/beans
       http://www.springframework.org/schema/beans/spring-beans.xsd http://www.springframework.org/schema/context http://www.springframework.org/schema/context/spring-context.xsd">


    <!--顾问-->
    <!--注入业务-->
    <bean id="iServiceimpl" class="com.advice.IServiceimpl"></bean>
    <!--切面-->
    <bean id="myAdcisor" class="com.advice.MyAdcisor"></bean>
    <!--顾问包装通知-->
    <bean id="advisor" class="org.springframework.aop.support.NameMatchMethodPointcutAdvisor">
        <property name="advice" ref="myAdcisor"></property>
     <!--这里限制值增强doSome方法-->
        <property name="mappedNames" value="doSome"></property>
    </bean>

    <!--代理工厂-->
    <bean id="proxyFactory" class="org.springframework.aop.framework.ProxyFactoryBean">
        <property name="target" ref="iServiceimpl"></property>
        <property name="interceptorNames" value="advisor"></property>
    </bean>
</beans>
步骤五:测试
    @Test
    public void Guwen01(){
        ApplicationContext atc=new ClassPathXmlApplicationContext("applicationContext.xml");
        IService sss = (IService)atc.getBean("proxyFactory");
        sss.doSome();
        sss.say();
    }

小案例RegexpMethodPointcutAdvice(基于正则表达式的增强顾问)
步骤一:
public interface IService {
    public void doSome();
    public void say();
}
步骤二:
public class IServiceimpl implements IService{
    @Override
    public void doSome() {
        System.out.println("真实业务doSome");
    }

    @Override
    public void say() {
        System.out.println("真实业务say");
    }
}
步骤三:
public class MyAdcisor implements MethodBeforeAdvice, AfterReturningAdvice {
    @Override
    public void afterReturning(Object o, Method method, Object[] objects, Object o1) throws Throwable {
        System.out.println("前置增强");
    }

    @Override
    public void before(Method method, Object[] objects, Object o) throws Throwable {
        System.out.println("后置增强");
    }
}
步骤四:
<?xml version="1.0" encoding="UTF-8"?>
<beans xmlns="http://www.springframework.org/schema/beans"
       xmlns:xsi="http://www.w3.org/2001/XMLSchema-instance"
       xmlns:context="http://www.springframework.org/schema/context"
       xmlns:aop="http://www.springframework.org/schema/aop"
       xsi:schemaLocation="http://www.springframework.org/schema/beans
       http://www.springframework.org/schema/beans/spring-beans.xsd http://www.springframework.org/schema/context http://www.springframework.org/schema/context/spring-context.xsd http://www.springframework.org/schema/aop http://www.springframework.org/schema/aop/spring-aop.xsd">


    <!--顾问正则-->
    <!--注入业务-->
    <bean id="iServiceimpl" class="com.advice.IServiceimpl"></bean>
    <!--切面-->
    <bean id="myAdcisor" class="com.advice.MyAdcisor"></bean>
    <!--顾问包装通知-->
    <bean id="advisor" class="org.springframework.aop.support.RegexpMethodPointcutAdvisor">
        <property name="advice" ref="myAdcisor"></property>
     <!--这里限制值增强包含do的方法-->
        <property name="pattern" value=".*do.*"></property>
    </bean>

    <!--代理工厂-->
    <bean id="proxyFactory" class="org.springframework.aop.framework.ProxyFactoryBean">
        <property name="target" ref="iServiceimpl"></property>
        <property name="interceptorNames" value="advisor"></property>
    </bean>
</beans>
步骤五:
    @Test
    public void Guwen01(){
        ApplicationContext atc=new ClassPathXmlApplicationContext("applicationContext.xml");
        IService sss = (IService)atc.getBean("proxyFactory");
        sss.doSome();
        sss.say();
    }

默认顾问自动代理
步骤一:
public interface IService {
    public void doSome();
    public void say();
}
步骤二:
public class IServiceimpl implements IService{
    @Override
    public void doSome() {
        System.out.println("真实业务doSome");
    }

    @Override
    public void say() {
        System.out.println("真实业务say");
    }
}
步骤三:
public class MyAdcisor implements MethodBeforeAdvice, AfterReturningAdvice {
    @Override
    public void afterReturning(Object o, Method method, Object[] objects, Object o1) throws Throwable {
        System.out.println("前置增强");
    }

    @Override
    public void before(Method method, Object[] objects, Object o) throws Throwable {
        System.out.println("后置增强");
    }
}
步骤四:
<?xml version="1.0" encoding="UTF-8"?>
<beans xmlns="http://www.springframework.org/schema/beans"
       xmlns:xsi="http://www.w3.org/2001/XMLSchema-instance"
       xmlns:context="http://www.springframework.org/schema/context"
       xmlns:aop="http://www.springframework.org/schema/aop"
       xsi:schemaLocation="http://www.springframework.org/schema/beans
       http://www.springframework.org/schema/beans/spring-beans.xsd http://www.springframework.org/schema/context http://www.springframework.org/schema/context/spring-context.xsd http://www.springframework.org/schema/aop http://www.springframework.org/schema/aop/spring-aop.xsd">


    <!--顾问默认-->
    <!--注入业务-->
    <bean id="iServiceimpl" class="com.advice.IServiceimpl"></bean>
    <!--切面-->
    <bean id="myAdcisor" class="com.advice.MyAdcisor"></bean>
    <!--顾问包装通知-->
    <bean id="advisor" class="org.springframework.aop.support.RegexpMethodPointcutAdvisor">
        <property name="advice" ref="myAdcisor"></property>
        <property name="pattern" value=".*do.*"></property>
    </bean>

    <!--默认顾问自动代理生成器-->
    <bean class="org.springframework.aop.framework.autoproxy.DefaultAdvisorAutoProxyCreator"></bean>
</beans>
步骤五:
@Test
    public void Guwen02(){
        ApplicationContext atc=new ClassPathXmlApplicationContext("applicationContext.xml");
        IService sss = (IService)atc.getBean("iServiceimpl");
        sss.doSome();
        sss.say();

        Beantest bean =(Beantest) atc.getBean("beantest");
        bean.testBean();

    }
顾问BeanName
步骤一:
public interface IService {
    public void doSome();
    public void say();
}
步骤二:
public class IServiceimpl implements IService{
    @Override
    public void doSome() {
        System.out.println("真实业务doSome");
    }

    @Override
    public void say() {
        System.out.println("真实业务say");
    }
}
public void testBean(){
    System.out.println("1234567890");
}
步骤三:
public class MyAdcisor implements MethodBeforeAdvice, AfterReturningAdvice {
    @Override
    public void afterReturning(Object o, Method method, Object[] objects, Object o1) throws Throwable {
        System.out.println("前置增强");
    }

    @Override
    public void before(Method method, Object[] objects, Object o) throws Throwable {
        System.out.println("后置增强");
    }
}
步骤四:
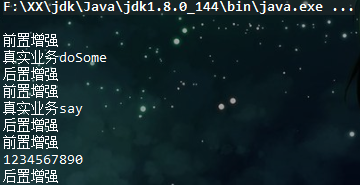
<?xml version="1.0" encoding="UTF-8"?>
<beans xmlns="http://www.springframework.org/schema/beans"
       xmlns:xsi="http://www.w3.org/2001/XMLSchema-instance"
       xmlns:context="http://www.springframework.org/schema/context"
       xmlns:aop="http://www.springframework.org/schema/aop"
       xsi:schemaLocation="http://www.springframework.org/schema/beans
       http://www.springframework.org/schema/beans/spring-beans.xsd http://www.springframework.org/schema/context http://www.springframework.org/schema/context/spring-context.xsd http://www.springframework.org/schema/aop http://www.springframework.org/schema/aop/spring-aop.xsd">


<!--注入业务-->
        <bean id="iServiceimpl" class="com.advice.IServiceimpl"></bean>
        <bean id="beantest" class="com.advice.Beantest"></bean>
        <!--切面-->
        <bean id="myAdcisor" class="com.advice.MyAdcisor"></bean>
        <!--顾问包装通知-->
        <bean id="advisor" class="org.springframework.aop.support.RegexpMethodPointcutAdvisor">
            <property name="advice" ref="myAdcisor"></property>
            <property name="pattern" value=".*.*"></property>
        </bean>

        <!--BeanName自动代理生成器-->
        <bean class="org.springframework.aop.framework.autoproxy.BeanNameAutoProxyCreator">
            <!--配置BeanName-->
            <property name="beanNames" value="iServiceimpl,beantest"></property>
            <!--拦截顾问-->
            <property name="interceptorNames" value="advisor"></property>
        </bean>
</beans>
步骤五:
@Test
    public void Guwen02(){
        ApplicationContext atc=new ClassPathXmlApplicationContext("applicationContext.xml");
        IService sss = (IService)atc.getBean("iServiceimpl");
        sss.doSome();
        sss.say();

        Beantest bean =(Beantest) atc.getBean("beantest");
        bean.testBean();
    }
注释(1)
IOC注解
@Component:实现Bean组件的定义
@Repository:用于标注DAO类,功能与@Component作用相当
@Service:用于标注业务类
@Controller:用于标注控制器
使用注解方式是心啊Spring AOP
@Aspect 声明切面
@Ponitcut 声明公共的切点表达式
@Before 前置增强
@AfterReturning 后置增强
@Around 环绕增强
@AfterThrowing 异常抛出增强
@After 最终增强
注释小案例:
步骤一:
<?xml version="1.0" encoding="UTF-8"?>
<beans xmlns="http://www.springframework.org/schema/beans"
       xmlns:xsi="http://www.w3.org/2001/XMLSchema-instance"
       xmlns:context="http://www.springframework.org/schema/context"
       xmlns:aop="http://www.springframework.org/schema/aop"
       xsi:schemaLocation="http://www.springframework.org/schema/beans
       http://www.springframework.org/schema/beans/spring-beans.xsd http://www.springframework.org/schema/context http://www.springframework.org/schema/context/spring-context.xsd http://www.springframework.org/schema/aop http://www.springframework.org/schema/aop/spring-aop.xsd">


    <!--扫描包中注解标注的类-->
    <context:component-scan base-package="com.advice3"></context:component-scan>
</beans>
步骤二:
public class User {
    private Integer uid;
    private String uname;

    public Integer getUid() {
        return uid;
    }

    public void setUid(Integer uid) {
        this.uid = uid;
    }

    public String getUname() {
        return uname;
    }

    public void setUname(String uname) {
        this.uname = uname;
    }
}
public interface IUserDao {
    public int addUser(User user);
}
@Repository    //用于标注DAO类,功能与@Component作用相当
public class IUserDaoimpl implements IUserDao{
    @Override
    public int addUser(User user) {
        System.out.println("成功添加!!!");
        return 1;
    }
}
public interface IUserservice {
    public int addUser(User user);
}
@Service("iUserserviceimpl")
public class IUserserviceimpl implements IUserservice{

    @Autowired
    private IUserDao iUserDao;
    @Override
    public int addUser(User user) {
        return iUserDao.addUser(user);
    }
}
测试:
@Test
    public void asdfg(){
        ApplicationContext atc=new ClassPathXmlApplicationContext("applicationContext.xml");
        IUserservice bean = (IUserservice)atc.getBean("iUserserviceimpl");
        bean.addUser(new User());
    }

注释实现前置后置增强
步骤一:
<?xml version="1.0" encoding="UTF-8"?>
<beans xmlns="http://www.springframework.org/schema/beans"
       xmlns:xsi="http://www.w3.org/2001/XMLSchema-instance"
       xmlns:context="http://www.springframework.org/schema/context"
       xmlns:aop="http://www.springframework.org/schema/aop"
       xsi:schemaLocation="http://www.springframework.org/schema/beans
       http://www.springframework.org/schema/beans/spring-beans.xsd http://www.springframework.org/schema/context http://www.springframework.org/schema/context/spring-context.xsd http://www.springframework.org/schema/aop http://www.springframework.org/schema/aop/spring-aop.xsd">


    <!--扫描包中注解标注的类-->
<context:component-scan base-package="com.advice3"></context:component-scan>
  <!--启动对注解的支持-->
  <aop:aspectj-autoproxy/>
</beans>
步骤二:
public interface IdoSomeService {
    public void doSome();
    public void say();
}
步骤三:
@Service("idoSomeServiceimpl") //用于标注DAO类,功能与@Component作用相当
public class IdoSomeServiceimpl implements IdoSomeService{
    @Override
    public void doSome() {
      System.out.println("===========doSome===========");
    }
    @Override
    public void say() {
      System.out.println("===========say==========="); }
    }
步骤四:
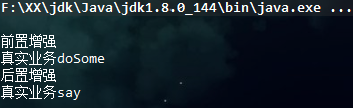
/**
 * 增强类
 */
@Component          //向Spring容器中注入bean
@Aspect             //声明切面
public class MyAdvice {
    //声明一个方法定义增强范围
    @Pointcut("execution(* *..advice3.*.*(..))")
    public void pointCat(){}


    @Before("pointCat()")       //前置增强
    public void before(){
        System.out.println("前置增强");
    }

    @AfterReturning("pointCat()")       //后置增强
    public void after(){
        System.out.println("后置增强");
    }
}
步骤五:
@Test
    public void asd(){
        ApplicationContext atc=new ClassPathXmlApplicationContext("applicationContext.xml");
        IdoSomeService idoSome = (IdoSomeService)atc.getBean("idoSomeServiceimpl");
        idoSome.doSome();
        idoSome.say();
    }

注释实现环绕增强
步骤一:
<?xml version="1.0" encoding="UTF-8"?>
<beans xmlns="http://www.springframework.org/schema/beans"
       xmlns:xsi="http://www.w3.org/2001/XMLSchema-instance"
       xmlns:context="http://www.springframework.org/schema/context"
       xmlns:aop="http://www.springframework.org/schema/aop"
       xsi:schemaLocation="http://www.springframework.org/schema/beans
       http://www.springframework.org/schema/beans/spring-beans.xsd http://www.springframework.org/schema/context http://www.springframework.org/schema/context/spring-context.xsd http://www.springframework.org/schema/aop http://www.springframework.org/schema/aop/spring-aop.xsd">
    <!--环绕-->
    <context:component-scan base-package="com.huanrao"></context:component-scan>
     <!--启动对注解的支持-->
    <aop:aspectj-autoproxy/>
</beans>
步骤二:
public interface IdoSomeService {
    public void doSome();
    public void say();
}
步骤三:
@Service("idoSomeServiceimpl") //用于标注DAO类,功能与@Component作用相当
public class IdoSomeServiceimpl implements IdoSomeService{
    @Override
    public void doSome() {
      System.out.println("===========doSome===========");
    }
    @Override
    public void say() {
      System.out.println("===========say==========="); }
    }
步骤四:
@Aspect     //声明切面
@Component  //向Spring容器中注入bean
public class Huanrao {
    //声明一个方法定义增强范围
    @Pointcut("execution(* *..huanrao.*.*(..))")
    public void pointCat(){}


    @Around("pointCat()")
    public void huan(ProceedingJoinPoint pj) throws Throwable {
        System.out.println("环绕前");
        pj.proceed();
        System.out.println("环绕后");
    }
}
步骤五:
public class huanrao {
    @Test
    public void huanrao(){
        ApplicationContext atc=new ClassPathXmlApplicationContext("applicationContext.xml");
        IdoSomeService idoSome = (IdoSomeService)atc.getBean("idoSomeServiceimpl");
        idoSome.doSome();
        idoSome.say();
    }
}

注释实现异常增强
步骤一:
<?xml version="1.0" encoding="UTF-8"?>
<beans xmlns="http://www.springframework.org/schema/beans"
       xmlns:xsi="http://www.w3.org/2001/XMLSchema-instance"
       xmlns:context="http://www.springframework.org/schema/context"
       xmlns:aop="http://www.springframework.org/schema/aop"
       xsi:schemaLocation="http://www.springframework.org/schema/beans
       http://www.springframework.org/schema/beans/spring-beans.xsd http://www.springframework.org/schema/context http://www.springframework.org/schema/context/spring-context.xsd http://www.springframework.org/schema/aop http://www.springframework.org/schema/aop/spring-aop.xsd">


    <!--异常-->
    <context:component-scan base-package="com.yichang"></context:component-scan>

    <!--启动对注解的支持-->
    <aop:aspectj-autoproxy/>


</beans>
步骤二:
public interface IdoSomeService {
    public void doSome() throws Exception;
    public void say();
}
步骤三:(这里定义一个错误(int sum=5/0))
@Service("idoSomeServiceimpl")
public class IdoSomeServiceimpl implements IdoSomeService {

    @Override
    public void doSome() throws Exception{
        int sum=5/0;
        System.out.println("===========doSome===========");
    }

    @Override
    public void say() {
        System.out.println("===========say===========");
    }
}
步骤四:
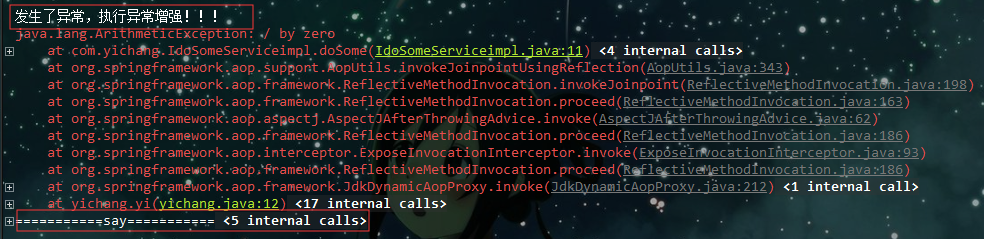
@Aspect         //切面
@Component      //向Spring中注入bean
public class yichangzeng {
    //声明一个方法定义增强范围
    @Pointcut("execution(* *..yichang.*.*(..))")
    public void pointCat(){}

    @AfterThrowing(pointcut="pointCat()",throwing="ex")
    public void afterThrowing(Exception ex){
        System.out.println("发生了异常,执行异常增强!!!");
    }
}
步骤五:
@Test
    public void yi(){
        ApplicationContext atc=new ClassPathXmlApplicationContext("applicationContext.xml");
        IdoSomeService idoSome = (IdoSomeService)atc.getBean("idoSomeServiceimpl");
        try {
            idoSome.doSome();
        } catch (Exception e) {
            e.printStackTrace();
        }
        idoSome.say();
    }