Docker技术里最为基础的两大概念:镜像和容器。镜像的获取方式:从registry拉取,从Dockerfile构建;容器的基本操作
1 Docker架构和底层技术简介
Docker Platform
- Docker提供了一个开发,打包,运行app的平台
- 把app和底层infrastructure隔离开来

Docker Engine
- 后台进程(dockerd)
- REST API Server
- CLI接口(docker)
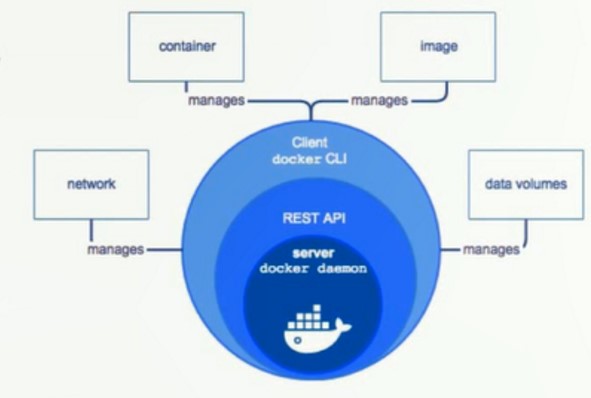
Docker Architecture
底层技术支持
- Namespaces:做隔离pid,net,ipc,mnt,uts
- Control groups:做资源限制
- Union file systems:Container和image的分层
2 Docker Image
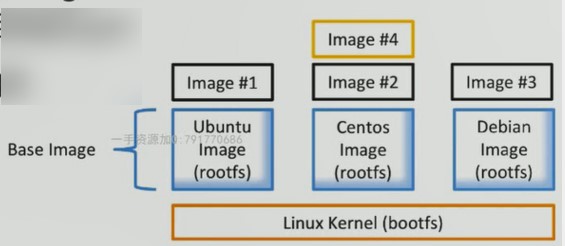
Image 是文件和 meta data的集合(root filesystem)
分层的,并且每一层都可以添加改变删除文件,成为一个新的image
不同的image可以共享相同的layer
Image本身是read-only的
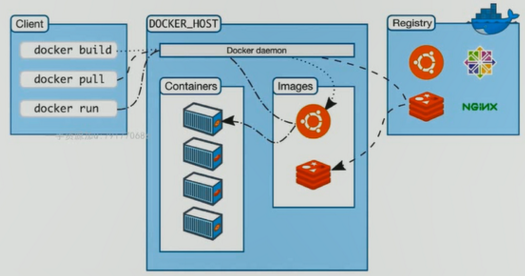
Image的获取
- Build from Dockerfile
- Pull from Registry
3 Container
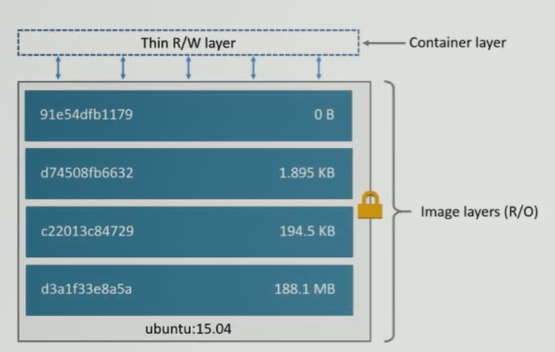
通过Image创建(copy)
在Image layer之上建立一个container layer(可读写)
类比面向对象:类和实例
Image负责app的存储和分发,Container负责运行app


[root@localhost ~]# docker ps -aq
41085d1b95c0
abb8db5ee1c5
b1b0babbe76a
c1b9dbf8fc48
d5c6d17741c0


批量删除
[vagrant@localhost ~]$ docker rm $(docker container ls -aq)
4e540bbeeeb7
5f1c4f401024
6d3466972716
06db5785577c
32f005c8b20b
[vagrant@localhost ~]$ docker container ls -a
CONTAINER ID IMAGE COMMAND CREATED NAMES

删除已经退出的容器
[root@localhost ~]# docker rm $(docker ps -f "status=exited" -q)
41085d1b95c0
abb8db5ee1c5
b1b0babbe76a
c1b9dbf8fc48
d5c6d17741c0


构建自己的Docker镜像
docker container commit  # 提交修改后的容器为镜像
docker image build = docker build
4 Dockerfile 语法
FROM
FROM scratch    #制作base image
FROM centos    #使用base image
FROM ubuntu:14.04

FROM尽量使用官方的image作为base image!
LABEL
LABEL maintainer="fadewalk"
LABEL version="1.0"
LABEL description="This is description"

LABEL Metadata不可少!
RUN
RUN yum update && yum install-y vim
    python-dev#反斜线换行
RUN apt-get update && apt-get install-y perl
    pwgen --no-install -recommends && rm -rf
    /var/lib/apt/lists/* #注意清理cache
RUN /bin/bash -c 'source $HOME/.bashrc;echo $HOME'

RUN为了美观,复杂的RUN用反斜线换行
避免无用分层,合并多条命令成一行
WORKDIR
WORKDIR /root
WORKDIR /test  #如果没有会自动创建test目录
WORKDIR demo
RUN pwd      #输出结果应该是/test/demo


用WORKDIR,不要用RUN cd!
尽量使用绝对目录!
ADD and COPY
ADD hello /
ADD test.tar.gz /     #添加到根目录并解压
WORKDIR /root
ADD hello test/        #/root/test/hello
WORKDIR /root
COPY hello test/

ADD or COPY 大部分情况,COPY优于ADD!
ADD 除了COPY还有额外功能(解压)
添加远程文件/目录使用curl或者wget
ENV
ENV MYSQL_VERSION 5.6    #设置常量
RUN apt-get install-y mysql-server= "${MYSQL_VERSION} "
    && rm -rf /var/lib/apt/lists/*    #引用常量

尽量使用ENV增加可维护性
VOLUME and EXPOSE
(存储和网络)
https:/docs.docker.com/engine/reference/builder/#cmd
RUN:执行命令并创建新的 Image Layer
CMD:设置容器启动后默认执行的命令和参数
ENTRYPOINT:设置容器启动时运行的命令
Shell和Exec格式
Shell格式

RUN apt-get install -y vim
CMD echo "hello docker"
ENTRYPOINT echo "hello docker"


Exec格式

RUN ["apt-get","install","-y","vim"]
CMD ["/bin/echo","hello docker"]
ENTRYPOINT ["/bin/echo","hello docker"]
CMD and ENTRYPOINT
CMD
◆容器启动时默认执行的命令
◆如果docker run指定了其它命令,CMD命令被忽略
◆如果定义了多个CMD,只有最后一个会执行
ENTRYPOINT
◆让容器以应用程序或者服务的形式运行
◆不会被忽略,一定会执行
◆实践:写一个shell脚本作为entrypoint
COPY docker-entrypoint.sh /usr/local/bin/
ENTRYPOINT ["docker-entrypoint.sh"]
EXPOSE 27017
CMD [“mongod"]
5 镜像的发布
登录发布到docker hub
[vagrant@ localhost hello-world]$ docker login
Login with your Docker ID to push and pull images from Docker Hub. If you don't have a Docker ID, head over to https://hub.docker.com to create one.
Username:
Password:

[ vagrant@ localhost hello-world]$ docker push fadewalk/hello-world:latest
The push refers to repository [ docker. io/fadewalk/hello-worl]
e9b1612d382b: Pushed latest: digest: sha256: db345c850b25406fb24a0d7151e73155d9d1489f22bd8b182b0c010de2d4c5d7 size:527

https://github.com/smartbgp/dockerfiles
私有仓库搭建
参考官方文档
Docker Registry
This image contains an implementation of the Docker Registry HTTP API V2 for use with Docker 1.6+.Se github.com/docker/distribution for more details about what it is.

$docker run-d-p 5000:5000 --restart always --name registry registry:2

Now,use it from within Docker:
拉取私有仓库镜像
[vagrant@localhost hello-world]$ docker build -t 10.75.xx.222:5000/hello-world.
Sending build context to Docker daemon 847.9kB Step 1/3:FROM scratch Step 2/3:ADD hello/
--->8ff0b72f198c Step 3/3:CMD["/hello]
-->Running in df848216f04a Removing intermediate container df848216f04a
--->e97f8b5f0981
Successfully built e97f8b5f0981
Successfully tagged 10.75.44.222:5000/hello-world:latest

push到私有仓库
[vagrant@localhost hello-world]$ docker push 10.75.xx.222:5000/hello-world
[vagrant@localhost hello-world]$ sudo more /etc/docker/daemon.json
|"insecure-registries":["10.75.xx.222:5000]}
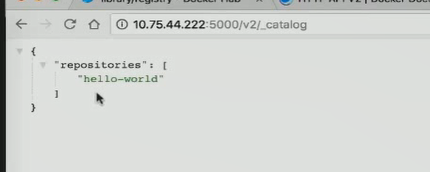
验证api
练习
Dockerfile 练习1
code
from flask import Flask
app = Flask(__name__)
@app.route('/')
def hello():
    return "hello docker"
if __name__ == '__main__':
    app.run(host="0.0.0.0", port=5000)
dockerfile
FROM python:2.7
LABEL maintainer="fade"
RUN pip install flask
COPY app.py /app/
WORKDIR /app
EXPOSE 5000
CMD ["python", "app.py"]
docker build -t kevin/flask-hello-world .
# build 一个容器
在创建容器过程中(失败的时候),可以通过中间态的容器id,查看中间态的容器
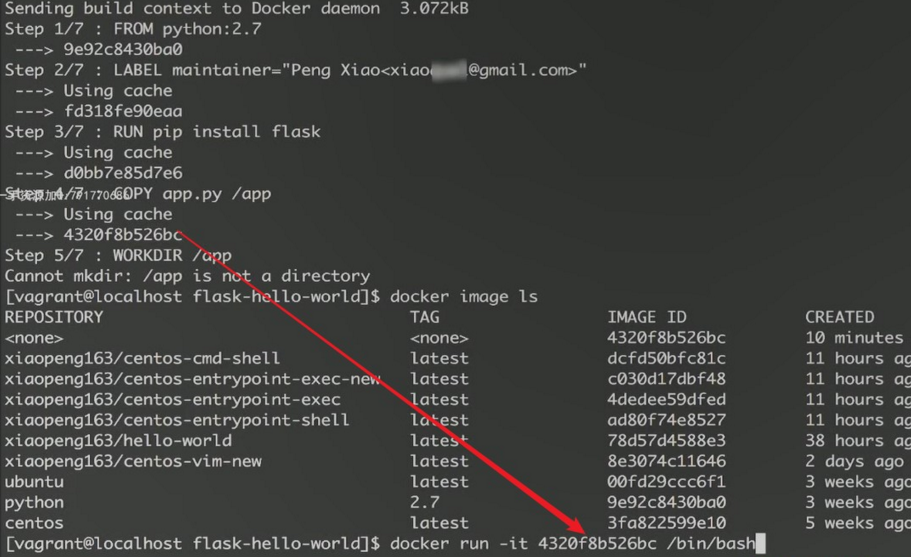
docker exec -it 11a767d3a588 python
#                中间态容器id

docker inspect 5f6ab6f95518    # 查看容器
docker logs 5f6ab6f95518  # 查看 执行日志
Dockerfile 练习2
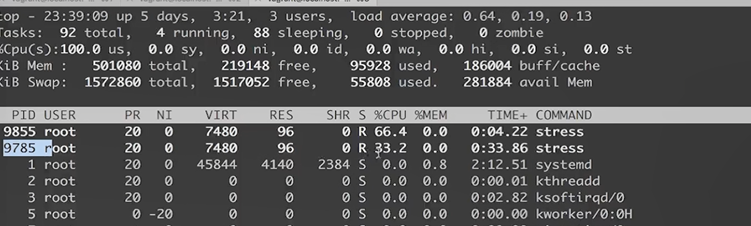
压力测试软件
stress --vm 1 --vm-bytes 500000M --verbose

创建压力测试image

FROM ubuntu
RUN apt-get update && apt-get install -y stress
ENTRYPOINT ["/usr/bin/stress"]  # 创建容器就会执行 类似init
CMD []   # 创建好后执行的命令,类似 rc.local
# 传入的参数


分配内存。
当只设置内存时,虚拟内存跟前者一样
docker run --memory=200M kevin/ubuntu-stress --vm 1 --verbose
#                                                         显示过程

设置  --cpu-shares 为占CPU资源的(%)相对权重
docker run --cpu-shares=10 --name=test1 xiaopeng163/ubuntu-stress --cpu 1
stress:info:[1] dispatching hogs:1 cpu,0io,0 vm,0 hdd