页面的设计基本完成后,开始一些模块化的设计。
一、登录及注册界面:这里的登录界面采用简单的后台判断,在后续的过程中会用文件读写的方式判断用户是否存在。通过点击注册进入到注册界面,然后通过按钮点击事件判断是否含有为空的项目。注册完成后将用户名返回到登录界面中。
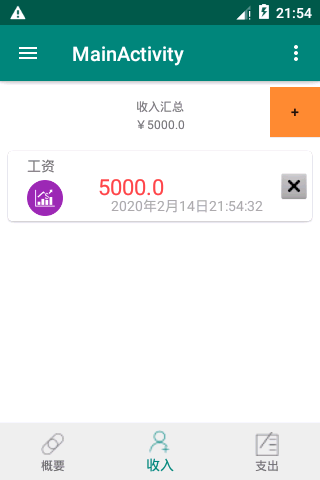
二、添加收入或支出功能:通过点击加号按钮跳转到填写收入或支出界面,类型采用网格自动排列的格式呈现,点击不同的类型显示不同的类型名称。
三、显示收入或支出明细:将收入或支出明细用RecyclerView列表的形式实现,并实现简单的删除功能。(用RecyclerView+自定义adapter实现)
四、删除一笔具体的支出或收入
这里将主要的功能代码附上:
添加收入或支出布局文件
<LinearLayout xmlns:android="http://schemas.android.com/apk/res/android"
    xmlns:tools="http://schemas.android.com/tools"
    android:layout_width="match_parent"
    android:layout_height="match_parent"
    android:paddingBottom="@dimen/activity_vertical_margin"
    android:paddingLeft="@dimen/activity_horizontal_margin"
    android:paddingRight="@dimen/activity_horizontal_margin"
    android:paddingTop="@dimen/activity_vertical_margin"
    android:orientation="vertical">

    <RelativeLayout
        android:layout_width="match_parent"
        android:layout_height="wrap_content" >

        <TextView
            android:id="@+id/textViewRemark"
            android:layout_width="wrap_content"
            android:layout_height="wrap_content"
            android:text="类别" />

        <TextView
            android:id="@+id/textViewSelectedType"
            android:layout_width="wrap_content"
            android:layout_height="wrap_content"
            android:layout_alignParentTop="true"
            android:layout_marginLeft="15dp"
            android:layout_toRightOf="@+id/textViewRemark"
            android:text="TextView" />

    </RelativeLayout>

    <GridView
        android:id="@+id/gridView1"
        android:layout_width="match_parent"
        android:layout_height="93dp"
        android:layout_marginBottom="10dp"
        android:numColumns="5"></GridView>

    <TextView
        android:id="@+id/textView2"
        android:layout_width="wrap_content"
        android:layout_height="wrap_content"
        android:text="备注" />

    <EditText
        android:id="@+id/editTextRemark"
        android:layout_width="match_parent"
        android:layout_height="wrap_content"
        android:ems="10"
        android:layout_marginBottom="10dp" >

        <requestFocus />
    </EditText>

    <TextView
        android:id="@+id/textView3"
        android:layout_width="wrap_content"
        android:layout_height="wrap_content"
        android:text="金额" />

    <EditText
        android:id="@+id/editTextMoney"
        android:layout_width="match_parent"
        android:layout_height="wrap_content"
        android:ems="10"/>


    <Button
        android:id="@+id/buttonOk"
        android:layout_width="match_parent"
        android:layout_marginTop="20dp"
        android:layout_height="45dp"
        android:background="@drawable/login_button_shape"
        android:text="确定" />

</LinearLayout>
添加收入或支出Java文件加载布局:
public class AccountEditActivity extends AppCompatActivity {

   private List<AccountCategory> categoryList;
    private TextView textViewSelectedType;
    private EditText editTextMoney;
    private EditText editTextRemark;
    private boolean isIncome;
    @Override
    protected void onCreate(Bundle savedInstanceState) {
        super.onCreate(savedInstanceState);
        setContentView(R.layout.activity_account_edit);

        isIncome = this.getIntent().getBooleanExtra("isIncome", true);
        textViewSelectedType = (TextView)this.findViewById(R.id.textViewSelectedType);
        editTextMoney = (EditText)this.findViewById(R.id.editTextMoney);
        editTextRemark = (EditText)this.findViewById(R.id.editTextRemark);

        if(isIncome)
            textViewSelectedType.setText("工资");
        else
            textViewSelectedType.setText("交通");
        editTextMoney.setText("100");
        initView();
        Button buttonOk = (Button)this.findViewById(R.id.buttonOk);
        buttonOk.setOnClickListener(new View.OnClickListener(){

            @Override
            public void onClick(View v) {
                buttonOkOnClick();

            }

        });

        editTextMoney.requestFocus();
    }

    private void initView() {

        if(isIncome)
            getTestDataIncome();

        else
            getTestDataOutlay();

        //显示到界面
        GridView gridView = (GridView)this.findViewById(R.id.gridView1);
        //Adapter
        ArrayAdapter adapter = new ArrayAdapter(this,
                android.R.layout.simple_list_item_1,categoryList);
        gridView.setAdapter(adapter);
        gridView.setOnItemClickListener(new AdapterView.OnItemClickListener(){

            @Override
            public void onItemClick(AdapterView<?> parent, View view,
                                    int position, long id) {
                gridViewOnItemClick(position);

            }

        });
    }
    private List<AccountCategory> getTestDataIncome() {
        categoryList = new ArrayList<>();
        categoryList.add(new AccountCategory(1,"工资",R.drawable.fund_icon));
        categoryList.add(new AccountCategory(2,"奖金",R.drawable.insurance_icon));
        categoryList.add(new AccountCategory(3,"兼职收入",R.drawable.baby_icon));
        return categoryList;
    }

    private List<AccountCategory> getTestDataOutlay() {
        categoryList = new ArrayList<>();
        categoryList.add(new AccountCategory(1,"交通",R.drawable.traffic_icon));
        categoryList.add(new AccountCategory(2,"食物",R.drawable.breakfast_icon));
        categoryList.add(new AccountCategory(3,"图书",R.drawable.book_icon));
        categoryList.add(new AccountCategory(3,"电影",R.drawable.film_icon));
        return categoryList;
    }

    protected void gridViewOnItemClick(int position) {
        textViewSelectedType.setText(this.categoryList.get(position).toString());

    }

    protected void buttonOkOnClick() {
        AccountItem item = new AccountItem();

        item.setCategory(textViewSelectedType.getText().toString());
        item.setRemark(editTextRemark.getText().toString());
        item.setMoney(Double.parseDouble(editTextMoney.getText().toString()));
        SimpleDateFormat sdf = new SimpleDateFormat("yyyy-MM-dd HH:mm:ss");
        item.setDate(sdf.format(new Date()));

        AccountDao dbManager= new AccountDao(this);
        if (isIncome){
            dbManager.addIncome(item);
        }
        else{
            dbManager.addOutlay(item);
        }
        this.setResult(1);
        this.finish();
    }
}
adapter可以根据实际的需要自定义创建,这里只附上删除列表项代码:
 private void deleteRecord(int id){
        for(int i =mItem.size()-1;i>=0;i--){
            if(mItem.get(i).getId()==id){
                mItem.remove(i);
                break;
            }
        }
        this.notifyDataSetChanged();
    }
运行截图:(说明上述数据是自己后台添加上去的,并不是数据库读取的数据。只是模拟下效果)