前言: 这些天由于一直在设计新系统的数据库表,导致了activiti的迟迟更新,原本之前是打算先分享下监听器的。结果被工作耽搁了,期间正好了解到新系统有这样的一个功能,流程的动态创建,即用户在前端界面选择任务节点,后台生成流程实例。参考了下网上的资料,再改了改,最终也实现了,觉得可用性还是挺大的,所以先来分享一下吧。
先附上参考链接吧,毕竟也得尊重下别人的成果:https://my.oschina.net/u/3053883/blog/1628393
其实核心也就两点,一个是节点任务,即userTask;另一个就是节点任务的流向,即SequenceFlow。网关的话,根据需求决定加不加,一般来说都会用到排他网关,话不多说开始核心代码演示。
1.先看几个里面通用的方法
  /**
     * 开始任务节点
     * @return
     */
    protected StartEvent createStartEvent() {
        StartEvent startEvent = new StartEvent();
        startEvent.setId("start");
        return startEvent;
    }

  /**
     * 结束任务节点
     * @return
     */
    protected EndEvent createEndEvent() {
        EndEvent endEvent = new EndEvent();
        endEvent.setId("end");
        return endEvent;
    }

  /**
     *
     * @param id  对应我们画流程图中节点任务id
     * @param name 节点任务名称
     * @param assignee 任务的执行者(这一块自行决定是否添加每一环节的执行者,若是动态分配的话,可以不用传值)
     * @return
     */
    protected UserTask createUserTask(String id, String name, String assignee) {
        UserTask userTask = new UserTask();
        userTask.setName(name);
        userTask.setId(id);
        userTask.setAssignee(assignee);
        return userTask;
    }

  /**
     *
     * @param id  网关id
     * @return
     */
    protected static ExclusiveGateway createExclusiveGateway(String id) {
        ExclusiveGateway exclusiveGateway = new ExclusiveGateway();
        exclusiveGateway.setId(id);
        return exclusiveGateway;
    }

  /**
     *
     * @param from         连线来源节点
     * @param to        连线目标节点
     * @param name          连线名称(可不填)
     * @param conditionExpression  网关每一种线路走向的条件表达式
     * @return
     */
    protected SequenceFlow createSequenceFlow(String from, String to, String name, String conditionExpression) {
        SequenceFlow flow = new SequenceFlow();
        flow.setSourceRef(from);
        flow.setTargetRef(to);
        flow.setName(name);
        if (StringUtils.isNotEmpty(conditionExpression)) {
            flow.setConditionExpression(conditionExpression);
        }
        return flow;
    }
现在开始搭建每一步
1.实例化BpmnModel 对象
BpmnModel model = new BpmnModel();
2.构造process对象
Process process = new Process();
        model.addProcess(process);
        process.setId("multiple-process3");

        // 判断是否仅为一个节点任务
        List<String> taskList = new ArrayList<String>();
        taskList.add("报销申请");
        taskList.add("主管审批");
        taskList.add("经理审批");
        taskList.add("总经理审批 ");
        //单节点任务
        if (taskList.size() == 1) {
            process.addFlowElement(createStartEvent());
            process.addFlowElement(createUserTask("task1", taskList.get(0), null));
            process.addFlowElement(createEndEvent());
            process.addFlowElement(createSequenceFlow("start", "task1", "", ""));
            process.addFlowElement(createSequenceFlow("task1", "end", "", ""));

        } else {
            // 多节点任务
            // 构造开始节点任务
            process.addFlowElement(createStartEvent());
            // 构造首个节点任务
            process.addFlowElement(createUserTask("task1", taskList.get(0), null));
            // 构造除去首尾节点的任务
            for (int i = 1; i < taskList.size() - 1; i++) {
                process.addFlowElement(createExclusiveGateway("createExclusiveGateway" + i));
                process.addFlowElement(createUserTask("task" + (i + 1), taskList.get(i), null));
            }
            // 构造尾节点任务
            process.addFlowElement(createExclusiveGateway("createExclusiveGateway" + (taskList.size() - 1)));
            process.addFlowElement(createUserTask("task" + taskList.size(), taskList.get(taskList.size() - 1), null));
            // 构造结束节点任务
            process.addFlowElement(createEndEvent());

            // 构造连线(加网关)
            process.addFlowElement(createSequenceFlow("start", "task1", "", ""));
            // 第一个节点任务到第二个百分百通过的,因此不存在网关
            process.addFlowElement(createSequenceFlow("task1", "task2", "", ""));
            for (int i = 1; i < taskList.size(); i++) {
                process.addFlowElement(createSequenceFlow("task" + (i + 1), "createExclusiveGateway" + i, "", ""));
                // 判断网关走向(同意则直接到下一节点即可,不同意需要判断回退层级,决定回退到哪个节点,returnLevel等于0,即回退到task1)
                // i等于几,即意味着回退的线路有几种可能,例如i等于1,即是task2,那么只能回退 到task1
                // 如果i等于2,即是task3,那么此时可以回退到task1和task2;returnLevel =1 ,即回退到task1,所以这里我是扩展了可以驳回到任意阶段节点任务
                for (int j = 1; j <= i; j++) {
                    process.addFlowElement(createSequenceFlow("createExclusiveGateway" + i, "task" + j, "不通过",
                            "${result == '0' && returnLevel== '" + j + "'}"));
                }
        // 操作结果为通过时,需要判断是否为最后一个节点任务,若是则直接到end
                if (i == taskList.size() - 1) {
                    process.addFlowElement(
                            createSequenceFlow("createExclusiveGateway" + i, "end", "通过", "${result == '1'} "));

                } else {
                    process.addFlowElement(createSequenceFlow("createExclusiveGateway" + i, "task" + (i + 2), "通过",
                            "${result == '1'}"));
                }

            }

        }
备注: (1)这里我判断了是否为单节点任务,防止存在用户就选择了一个节点任务。
(2)其实核心就这两步,第一步:构造任务节点以及该任务节点下面的网关(首节点通常一般不存在网关,直接到下一节点)
第二步: 构造连线+网关的流向(这里网关流向问题需要对每一种流向的可能性进行条件表达式的添加),案例中我设置了可以驳回到任意阶段节点。
个人建议:在我刚看到网上针对动态创建流程时,只是测试了确实可以用,但是里面的执行逻辑还是不是很懂,平常也只是直接画图,生成流程。随后我打开bpmn的xml文件,
再结合网上的,瞬间明白不少。所以个人建议大家可以打开xml文件一起看看,可能会事半功倍。
顺带提一点,驳回到任意阶段的场景也是挺常见的,若是已画好的流程图,也可以在如下图所示的地方配置条件表达式,原理都是一样的,在网关流向配置。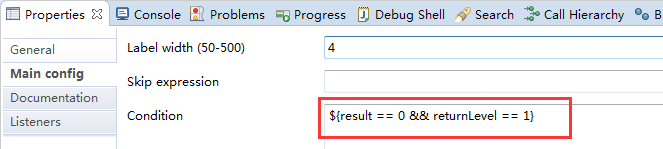
3.生成图像信息
new BpmnAutoLayout(model).execute();
4.部署流程
Deployment deployment = repositoryService.createDeployment().addBpmnModel("dynamic-model.bpmn", model)
                .name("multiple process deployment").deploy();
5.启动流程
ProcessInstance processInstance = runtimeService.startProcessInstanceByKey("multiple-process3");
        System.out.println("流程实例ID---》》》" + processInstance.getId());
6.保存png图片和xml文件(这一步可做可不做)
// 6. Save process diagram to a file
InputStream processDiagram = repositoryService.getProcessDiagram(processInstance.getProcessDefinitionId());
FileUtils.copyInputStreamToFile(processDiagram, new File("target/multiple-process3-diagram.png"));

// 7. Save resulting BPMN xml to a file
InputStream processBpmn = repositoryService.getResourceAsStream(deployment.getId(), "dynamic-model.bpmn");
FileUtils.copyInputStreamToFile(processBpmn, new File("target/multiple-process3.bpmn20.xml"));
至此动态创建流程就已经完成了。具体代码我已上传到github:https://github.com/wcyzxs/activiti(我是在电脑中现有项目上直接进行测试的,所以拉下来的话,可能存在jar缺失,可以私聊找我要jar或者自己maven上面找也行)