在上一次https://www.cnblogs.com/webor2006/p/11839103.html中对于UI的整体绘制流程有了一个全面的了解,对于我们自定义ViewGroup时都知道会涉及到onMeasure()和onLayout()这两个很重要的流程,所以这一次则集中对这两块的细节给吃透了,还是参考大神的这两篇博客来学习:
https://www.jianshu.com/p/4e3e25092015
https://www.jianshu.com/p/82f23acbc1c2
onMeasure测量流程:
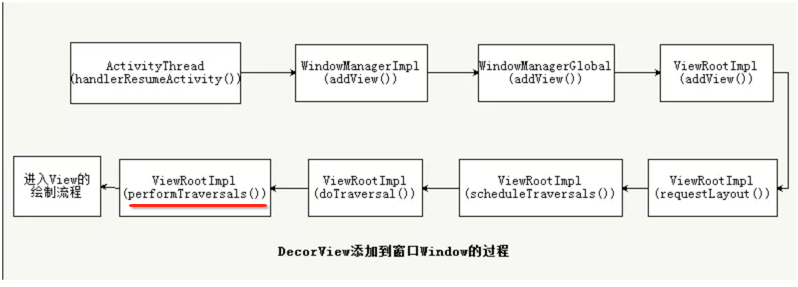
首先还是从上一次的总体绘制流程中来一点点分析测量流程,先来回顾一下整体绘制进入View的流程图:
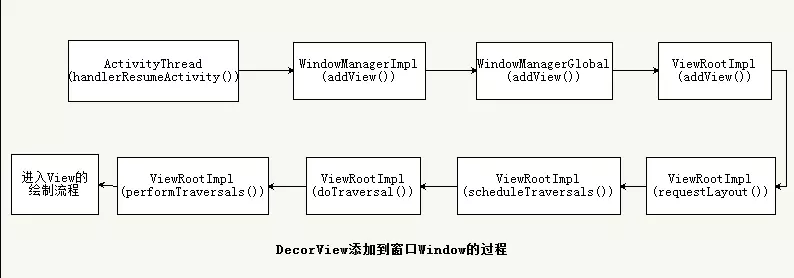
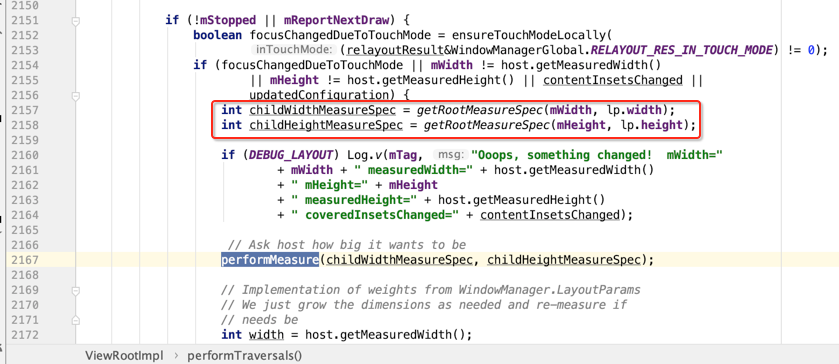
所以咱们从ViewRootImpl.performTraversals()方法里面找到开始测量的位置:

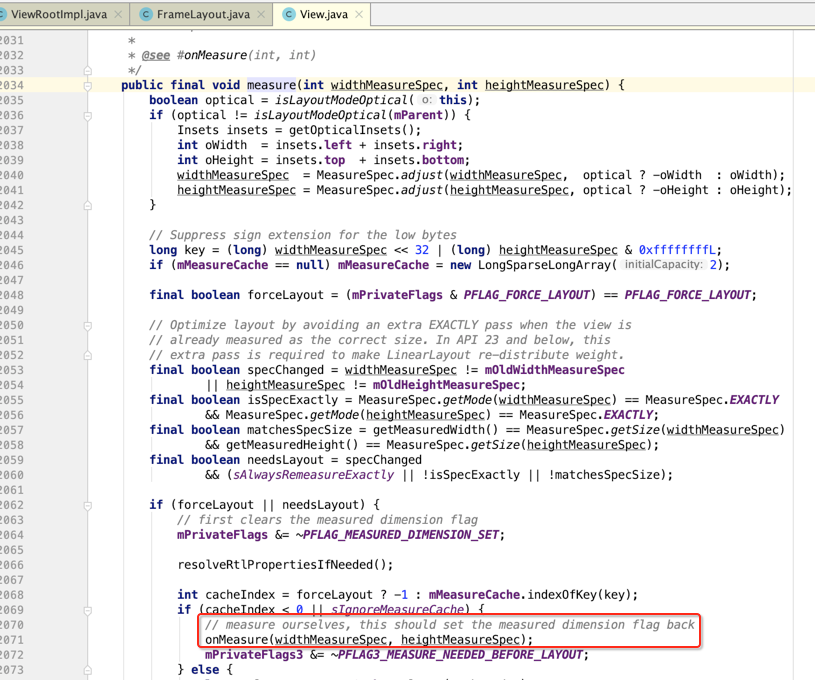
而它里面则会调用到View.measure()方法:

而mView其实就是DecorView,在进行进一步分析之前,先来对传进来的两个参数进行了解:childWidthMeasureSpec、childHeightMeasureSpec:
关于这块的东东我在之前https://www.cnblogs.com/webor2006/p/7525979.html的UI学习中也已经详细剖析过,其实这个整型里面包含了布局的规格信息了,一个整型是有32位,而用前二位表示一个mode,而剩下的30位表示具体的值,咱们点击看一下getRootMeasureSpec():
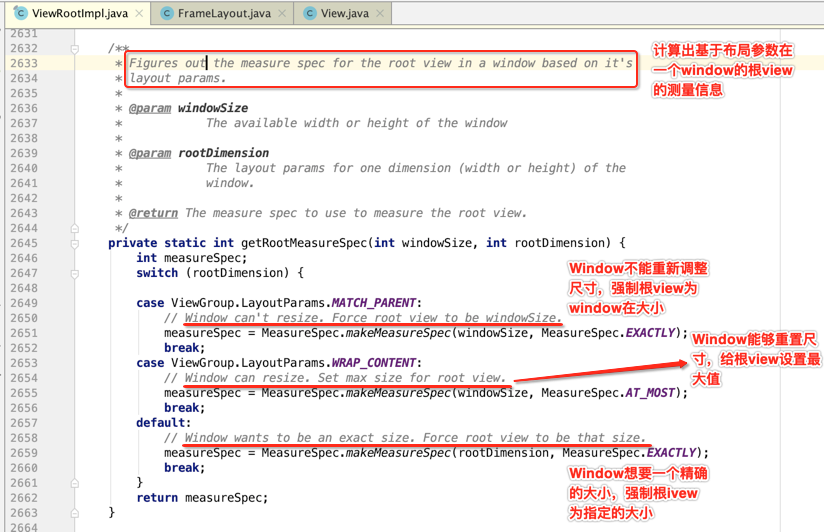
其中MeasureSpec的作用是在Measure流程中,系统将View的LayoutParams根据父容器所施加的规则转换成对应的MeasureSpec(规格),然后在onMeasure中根据这个MeasureSpec来确定view的测量宽高。关于这个细节可以看一下博主对于MeasureSpec核心代码的说明:
   public static class MeasureSpec {
    private static final int MODE_SHIFT = 30;
    private static final int MODE_MASK  = 0x3 << MODE_SHIFT;
     /**
      * UNSPECIFIED 模式:
      * 父View不对子View有任何限制,子View需要多大就多大
      */
    public static final int UNSPECIFIED = 0 << MODE_SHIFT;

    /**
      * EXACTYLY 模式:
      * 父View已经测量出子View所需要的精确大小,这时候View的最终大小
      * 就是SpecSize所指定的值。对应于match_parent和精确数值这两种模式
      */
    public static final int EXACTLY     = 1 << MODE_SHIFT;

    /**
      * AT_MOST 模式:
      * 子View的最终大小是父View指定的SpecSize值,并且子View的大小不能大于这个值,
      * 即对应wrap_content这种模式
      */
    public static final int AT_MOST     = 2 << MODE_SHIFT;

    //将size和mode打包成一个32位的int型数值
    //高2位表示SpecMode,测量模式,低30位表示SpecSize,某种测量模式下的规格大小
    public static int makeMeasureSpec(int size, int mode) {
        if (sUseBrokenMakeMeasureSpec) {
            return size + mode;
        } else {
            return (size & ~MODE_MASK) | (mode & MODE_MASK);
        }
    }

    //将32位的MeasureSpec解包,返回SpecMode,测量模式
    public static int getMode(int measureSpec) {
        return (measureSpec & MODE_MASK);
    }

    //将32位的MeasureSpec解包,返回SpecSize,某种测量模式下的规格大小
    public static int getSize(int measureSpec) {
        return (measureSpec & ~MODE_MASK);
    }
    //...
}

测量模式
    EXACTLY :父容器已经测量出所需要的精确大小,这也是childview的最终大小
            ------match_parent,精确值是爸爸的

    ATMOST : child view最终的大小不能超过父容器的给的
            ------wrap_content 精确值不超过爸爸

    UNSPECIFIED: 不确定,源码内部使用
            -------一般在ScrollView,ListView
好,对于getMode()和getSize()实现的细节其实也比较好理解,用博主的图来说明一下:
getMode解析用了measureSpec & MODE_MASK(解析只要前2位):

getSize解析用了measureSpec & ~MODE_MASK(不要前两位):

好,对于MeasureSpec的细节已经清楚了,接下来回到主流程继续:

而回到咱们的DecorView,我们都知道它是一个FrameLayout,所以此时就转到它里面的onMeasure大概来瞅一下,这里贴一下博主所分析过的:
protected void onMeasure(int widthMeasureSpec, int heightMeasureSpec) {
//获取当前布局内的子View数量
int count = getChildCount();

//判断当前布局的宽高是否是match_parent模式或者指定一个精确的大小,如果是则置measureMatchParent为false.
final boolean measureMatchParentChildren =
        MeasureSpec.getMode(widthMeasureSpec) != MeasureSpec.EXACTLY ||
        MeasureSpec.getMode(heightMeasureSpec) != MeasureSpec.EXACTLY;
mMatchParentChildren.clear();

int maxHeight = 0;
int maxWidth = 0;
int childState = 0;

//遍历所有类型不为GONE的子View
for (int i = 0; i < count; i++) {
    final View child = getChildAt(i);
    if (mMeasureAllChildren || child.getVisibility() != GONE) {
        //对每一个子View进行测量
        measureChildWithMargins(child, widthMeasureSpec, 0, heightMeasureSpec, 0);
        final LayoutParams lp = (LayoutParams) child.getLayoutParams();
        //寻找子View中宽高的最大者,因为如果FrameLayout是wrap_content属性
        //那么它的大小取决于子View中的最大者
        maxWidth = Math.max(maxWidth,
                child.getMeasuredWidth() + lp.leftMargin + lp.rightMargin);
        maxHeight = Math.max(maxHeight,
                child.getMeasuredHeight() + lp.topMargin + lp.bottomMargin);
        childState = combineMeasuredStates(childState, child.getMeasuredState());
        //如果FrameLayout是wrap_content模式,那么往mMatchParentChildren中添加
        //宽或者高为match_parent的子View,因为该子View的最终测量大小会受到FrameLayout的最终测量大小影响
        if (measureMatchParentChildren) {
            if (lp.width == LayoutParams.MATCH_PARENT ||
                    lp.height == LayoutParams.MATCH_PARENT) {
                mMatchParentChildren.add(child);
            }
        }
    }
}

// Account for padding too
maxWidth += getPaddingLeftWithForeground() + getPaddingRightWithForeground();
maxHeight += getPaddingTopWithForeground() + getPaddingBottomWithForeground();

// Check against our minimum height and width
maxHeight = Math.max(maxHeight, getSuggestedMinimumHeight());
maxWidth = Math.max(maxWidth, getSuggestedMinimumWidth());

// Check against our foreground's minimum height and width
final Drawable drawable = getForeground();
if (drawable != null) {
    maxHeight = Math.max(maxHeight, drawable.getMinimumHeight());
    maxWidth = Math.max(maxWidth, drawable.getMinimumWidth());
}

//保存测量结果
setMeasuredDimension(resolveSizeAndState(maxWidth, widthMeasureSpec, childState),
        resolveSizeAndState(maxHeight, heightMeasureSpec,
                childState << MEASURED_HEIGHT_STATE_SHIFT));

//子View中设置为match_parent的个数
count = mMatchParentChildren.size();
//只有FrameLayout的模式为wrap_content的时候才会执行下列语句
if (count > 1) {
    for (int i = 0; i < count; i++) {
        final View child = mMatchParentChildren.get(i);
        final MarginLayoutParams lp = (MarginLayoutParams) child.getLayoutParams();

        //对FrameLayout的宽度规格设置,因为这会影响子View的测量
        final int childWidthMeasureSpec;

        /**
          * 如果子View的宽度是match_parent属性,那么对当前FrameLayout的MeasureSpec修改:
          * 把widthMeasureSpec的宽度规格修改为:总宽度 - padding - margin,这样做的意思是:
          * 对于子Viw来说,如果要match_parent,那么它可以覆盖的范围是FrameLayout的测量宽度
          * 减去padding和margin后剩下的空间。
          *
          * 以下两点的结论,可以查看getChildMeasureSpec()方法:
          *
          * 如果子View的宽度是一个确定的值,比如50dp,那么FrameLayout的widthMeasureSpec的宽度规格修改为:
          * SpecSize为子View的宽度,即50dp,SpecMode为EXACTLY模式
          *
          * 如果子View的宽度是wrap_content属性,那么FrameLayout的widthMeasureSpec的宽度规格修改为:
          * SpecSize为子View的宽度减去padding减去margin,SpecMode为AT_MOST模式
          */
        if (lp.width == LayoutParams.MATCH_PARENT) {
            final int width = Math.max(0, getMeasuredWidth()
                    - getPaddingLeftWithForeground() - getPaddingRightWithForeground()
                    - lp.leftMargin - lp.rightMargin);
            childWidthMeasureSpec = MeasureSpec.makeMeasureSpec(
                    width, MeasureSpec.EXACTLY);
        } else {
            childWidthMeasureSpec = getChildMeasureSpec(widthMeasureSpec,
                    getPaddingLeftWithForeground() + getPaddingRightWithForeground() +
                    lp.leftMargin + lp.rightMargin,
                    lp.width);
        }
        //同理对高度进行相同的处理,这里省略...

        //对于这部分的子View需要重新进行measure过程
        child.measure(childWidthMeasureSpec, childHeightMeasureSpec);
    }
}
具体细节就不细细揣摩了,但是要明白它其实就是遍历了子View然后进行子View的测量,而不像View.onMeasure默认的实现只测量了自身,最后引用博主对于这块测量的一个总结:

onLayout布局流程:
好,接下来则到了布局测量阶段了,还是找入口处:

其中跟进去看主流程:
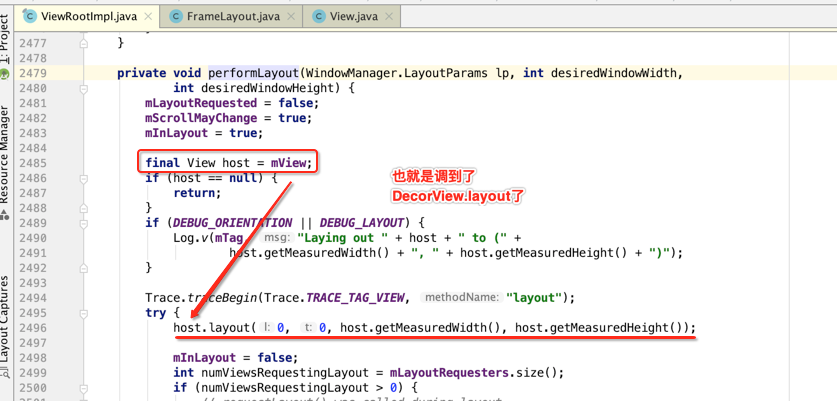
而此时会调用View.layout()方法,跟进去:

而对于setFrame在进行初始化的时候会对比上一次是否一致,若一致则不会在此进行,若是一致,则会使我们旧的信息直接失效invalidate(sizeChanged);

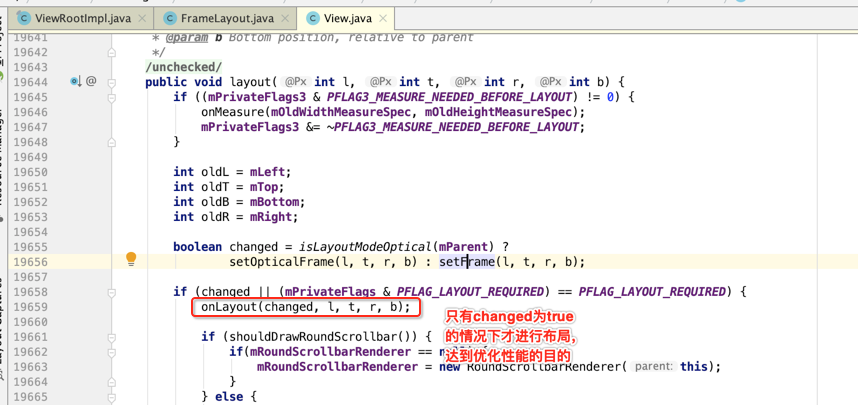
而这个onLayout()则是一个空实现:

所以对于DecorView来说就得看它具体onLayout是如何摆放元素的了:

然后它里面具体的实现则是遍历它所有的子View,一个个进行子View的摆放:
    void layoutChildren(int left, int top, int right, int bottom, boolean forceLeftGravity) {
        final int count = getChildCount();

        final int parentLeft = getPaddingLeftWithForeground();
        final int parentRight = right - left - getPaddingRightWithForeground();

        final int parentTop = getPaddingTopWithForeground();
        final int parentBottom = bottom - top - getPaddingBottomWithForeground();

        for (int i = 0; i < count; i++) {
            final View child = getChildAt(i);
            if (child.getVisibility() != GONE) {
                final LayoutParams lp = (LayoutParams) child.getLayoutParams();

                final int width = child.getMeasuredWidth();
                final int height = child.getMeasuredHeight();

                int childLeft;
                int childTop;

                int gravity = lp.gravity;
                if (gravity == -1) {
                    gravity = DEFAULT_CHILD_GRAVITY;
                }

                final int layoutDirection = getLayoutDirection();
                final int absoluteGravity = Gravity.getAbsoluteGravity(gravity, layoutDirection);
                final int verticalGravity = gravity & Gravity.VERTICAL_GRAVITY_MASK;

                switch (absoluteGravity & Gravity.HORIZONTAL_GRAVITY_MASK) {
                    case Gravity.CENTER_HORIZONTAL:
                        childLeft = parentLeft + (parentRight - parentLeft - width) / 2 +
                        lp.leftMargin - lp.rightMargin;
                        break;
                    case Gravity.RIGHT:
                        if (!forceLeftGravity) {
                            childLeft = parentRight - width - lp.rightMargin;
                            break;
                        }
                    case Gravity.LEFT:
                    default:
                        childLeft = parentLeft + lp.leftMargin;
                }

                switch (verticalGravity) {
                    case Gravity.TOP:
                        childTop = parentTop + lp.topMargin;
                        break;
                    case Gravity.CENTER_VERTICAL:
                        childTop = parentTop + (parentBottom - parentTop - height) / 2 +
                        lp.topMargin - lp.bottomMargin;
                        break;
                    case Gravity.BOTTOM:
                        childTop = parentBottom - height - lp.bottomMargin;
                        break;
                    default:
                        childTop = parentTop + lp.topMargin;
                }

                child.layout(childLeft, childTop, childLeft + width, childTop + height);
            }
        }
    }
至此,整个跟咱们自定义相关的绘制流程的细节就分析完了,接下来则咱们以一个自定义的小案例来进行实践一下。
实践:
onMeasure处理:
这个案例的最终样子长这样:
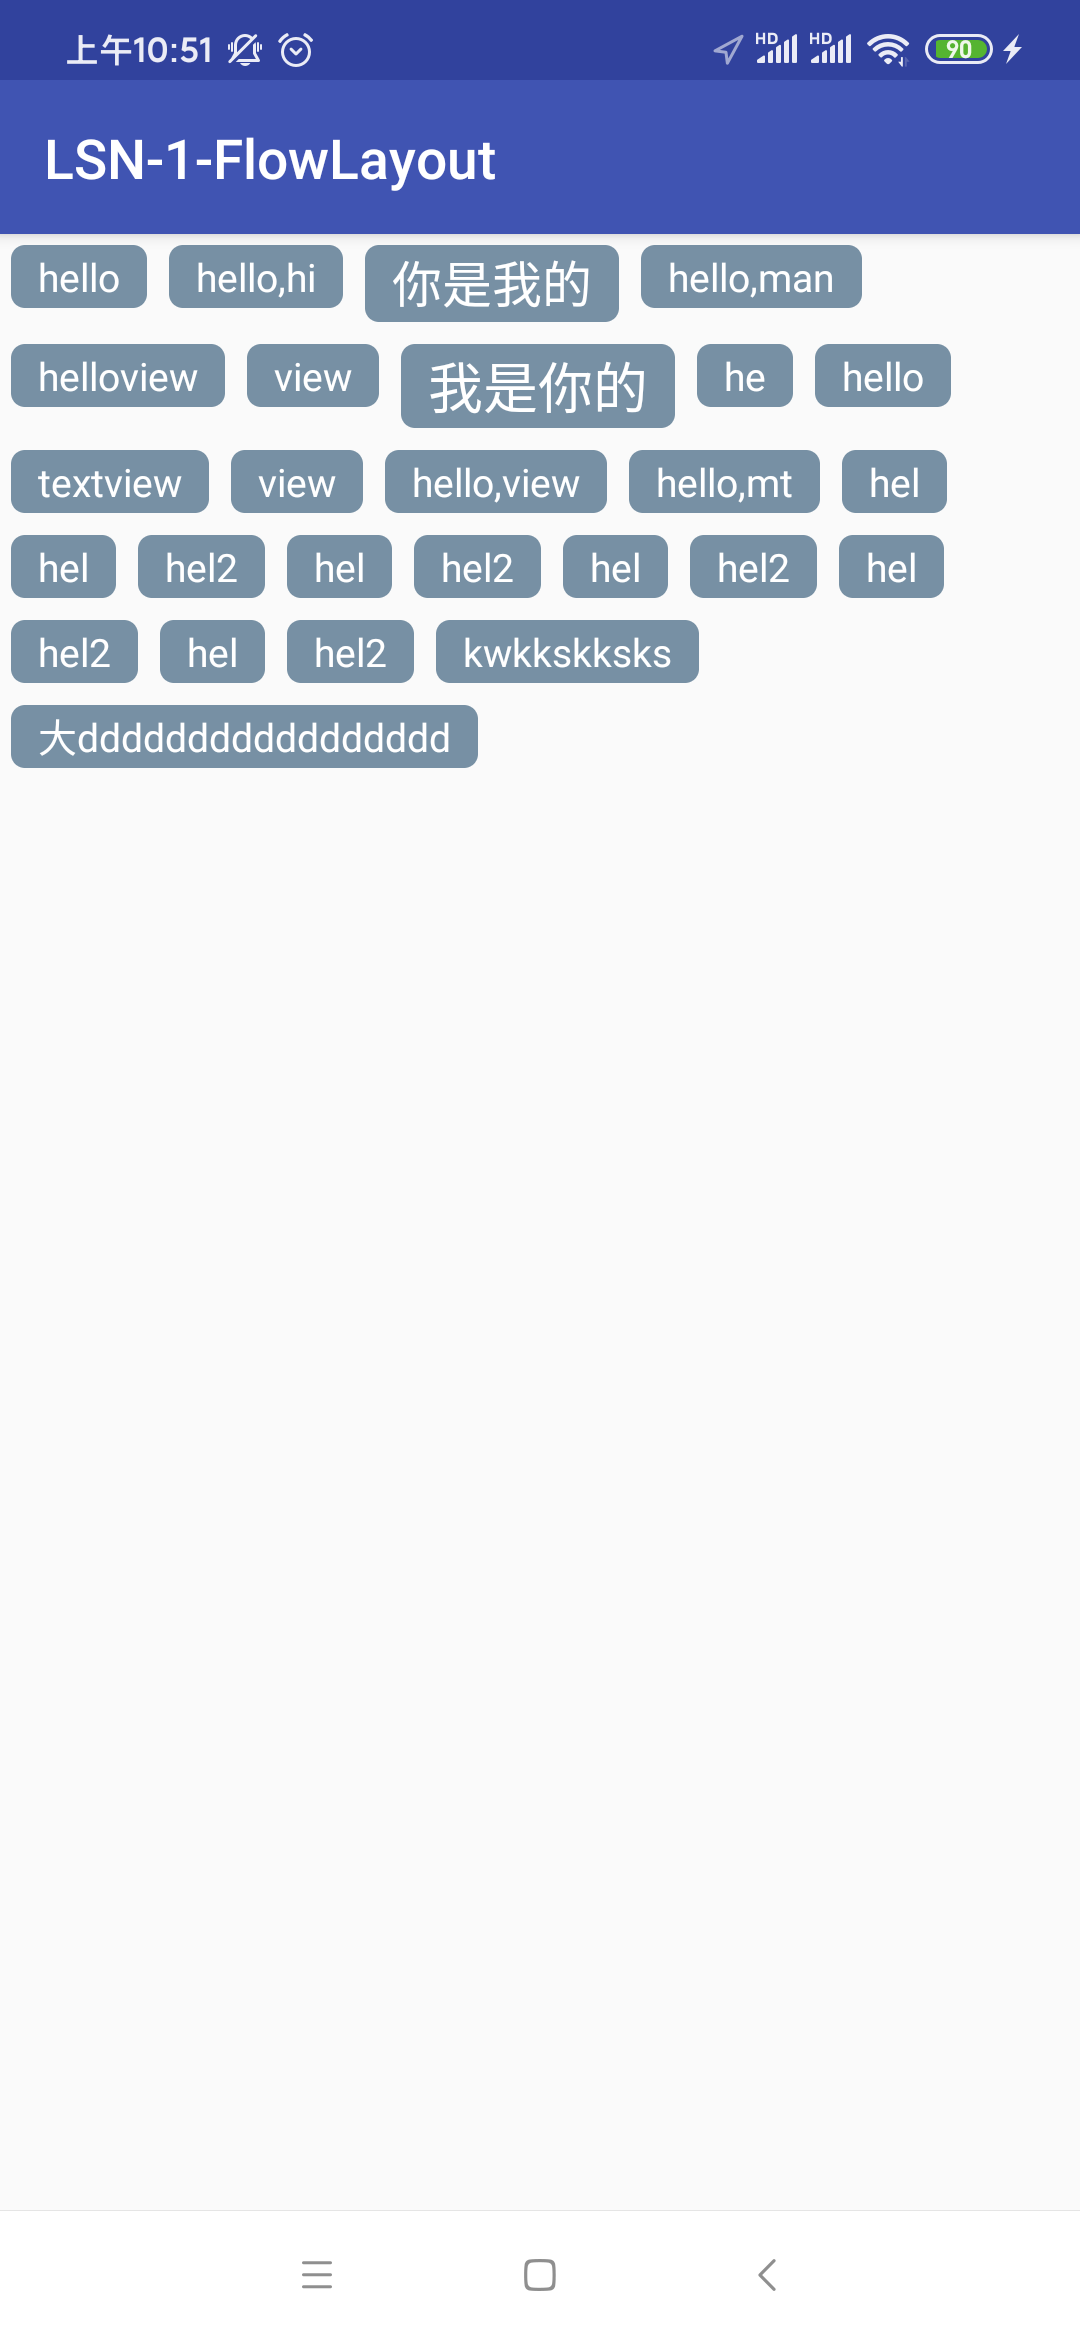
也就是大家很熟悉的瀑布流式布局控件的效果,这个在实际显示各种标签时用得比较普遍,当然这个DEMO只是为了巩固咱们的绘制基础,不可能做成商业那么完善,重点是体会在自定控件时对于onMeasure和onLayout对于自定义控件的意义。下面则开始一点点来实现这个效果:
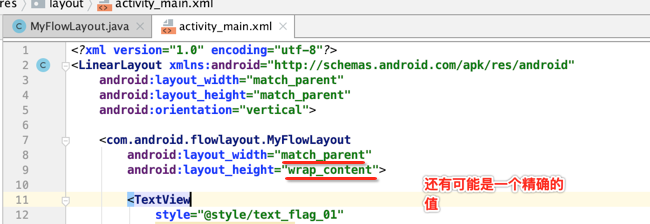
首先新建一个自定义View,然后声明在xml中,里面整一些卡片子元素,比较简单,直接将代码贴出来了:

<?xml version="1.0" encoding="utf-8"?>
<LinearLayout xmlns:android="http://schemas.android.com/apk/res/android"
    android:layout_width="match_parent"
    android:layout_height="match_parent"
    android:orientation="vertical">

    <com.android.flowlayout.MyFlowLayout
        android:layout_width="match_parent"
        android:layout_height="wrap_content">

        <TextView
            style="@style/text_flag_01"
            android:text="hello" />

        <TextView
            style="@style/text_flag_01"
            android:text="hello,hi" />

        <TextView
            style="@style/text_flag_01"
            android:text="你是我的"
            android:textSize="18sp" />

        <TextView
            style="@style/text_flag_01"
            android:text="hello,man" />

        <TextView
            style="@style/text_flag_01"
            android:text="helloview" />

        <TextView
            style="@style/text_flag_01"
            android:text="view" />

        <TextView
            style="@style/text_flag_01"
            android:text="我是你的"
            android:textSize="20sp" />

        <TextView
            style="@style/text_flag_01"
            android:text="he" />

        <TextView
            style="@style/text_flag_01"
            android:text="hello" />

        <TextView
            style="@style/text_flag_01"
            android:text="textview" />

        <TextView
            style="@style/text_flag_01"
            android:text="view" />

        <TextView
            style="@style/text_flag_01"
            android:text="hello,view" />

        <TextView
            style="@style/text_flag_01"
            android:text="hello,mt" />

        <TextView
            style="@style/text_flag_01"
            android:text="hel" />

        <TextView
            style="@style/text_flag_01"
            android:text="hel" />

        <TextView
            style="@style/text_flag_01"
            android:text="hel2" />

        <TextView
            style="@style/text_flag_01"
            android:text="hel" />

        <TextView
            style="@style/text_flag_01"
            android:text="hel2" />

        <TextView
            style="@style/text_flag_01"
            android:text="hel" />

        <TextView
            style="@style/text_flag_01"
            android:text="hel2" />

        <TextView
            style="@style/text_flag_01"
            android:text="hel" />

        <TextView
            style="@style/text_flag_01"
            android:text="hel2" />

        <TextView
            style="@style/text_flag_01"
            android:text="hel" />

        <TextView
            style="@style/text_flag_01"
            android:text="hel2" />

        <TextView
            style="@style/text_flag_01"
            android:text="kwkkskksks" />

        <TextView
            style="@style/text_flag_01"
            android:text="大ddddddddddddddddd" />

    </com.android.flowlayout.MyFlowLayout>


</LinearLayout>
其中用到一个样式和一个背景资源:
    <style name="text_flag_01">
        <item name="android:layout_width">wrap_content</item>
        <item name="android:layout_height">wrap_content</item>
        <item name="android:layout_margin">4dp</item>
        <item name="android:background">@drawable/flag_01</item>
        <item name="android:textColor">#ffffff</item>
    </style>
flag_01.xml:
<?xml version="1.0" encoding="utf-8"?>
<shape xmlns:android="http://schemas.android.com/apk/res/android" >

    <solid android:color="#7690A5" >
    </solid>

    <corners android:radius="5dp"/>
    <padding
        android:bottom="2dp"
        android:left="10dp"
        android:right="10dp"
        android:top="2dp" />

</shape>
好,此时运行肯定一片空白,这个在之前关于这块的UI学习中也演示过了,因为需要咱们自己来测量及摆放布局:

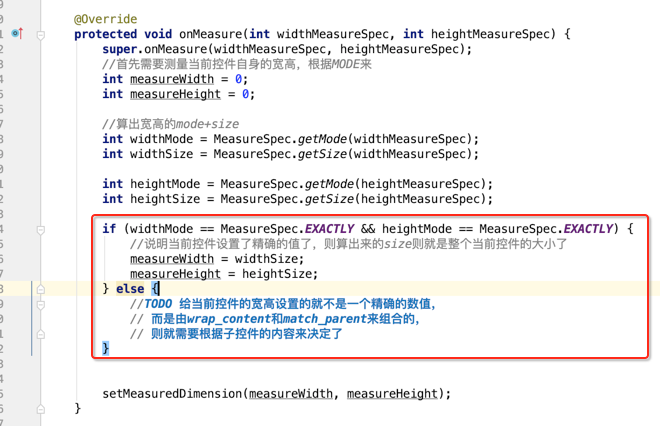
好,接下来开始聚集MyFlowLayout的实现,对于绘制流程来说,首先会调用onMeasure()方法,默认它只会测量自身,不会测量它里面的子View的,所以接下来需要重写一个onMeasure方法,来具体实现咱们的测量逻辑:
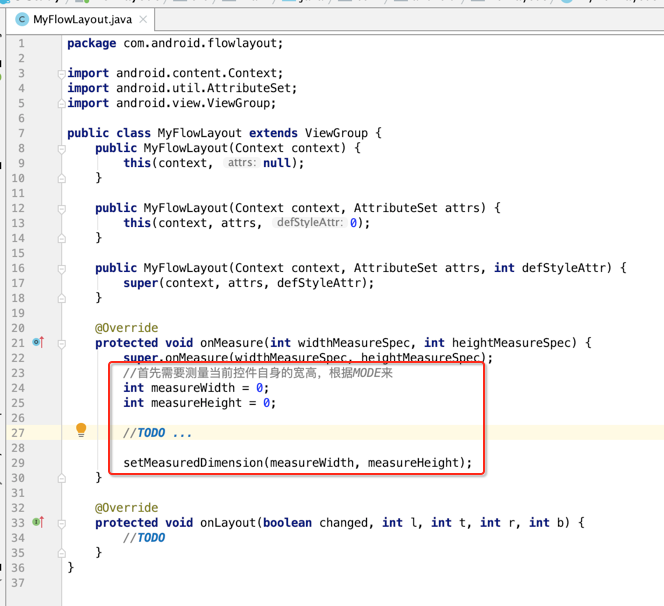
那接下来怎么来决定当前控件的宽高呢?很明显需要根据Mode来了,因为我们在布局中对于控件的尺寸可以声明为:
所以:

接下来则开启判断:
好,针对else的情况接下来则要开启子元素的遍历了:
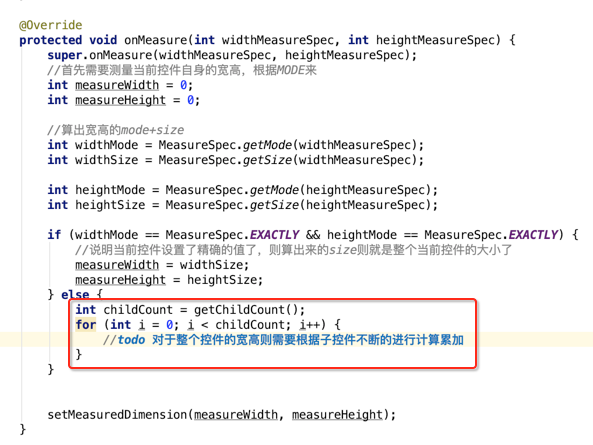
所以先定义累加宽高的变量:

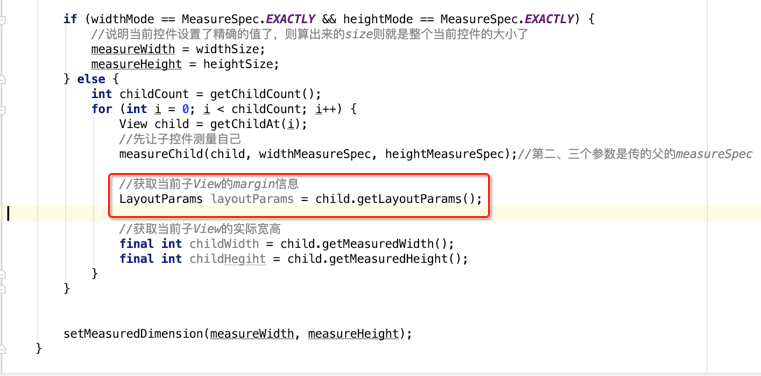
好,下面则开启具体的遍历计算,当然在遍历时要对具体的每个子View也需要进行一次测量的:

那这样做完之后是不是就可以得到每个子View的宽高信息了?

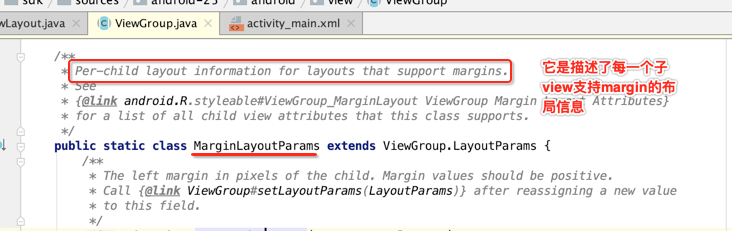
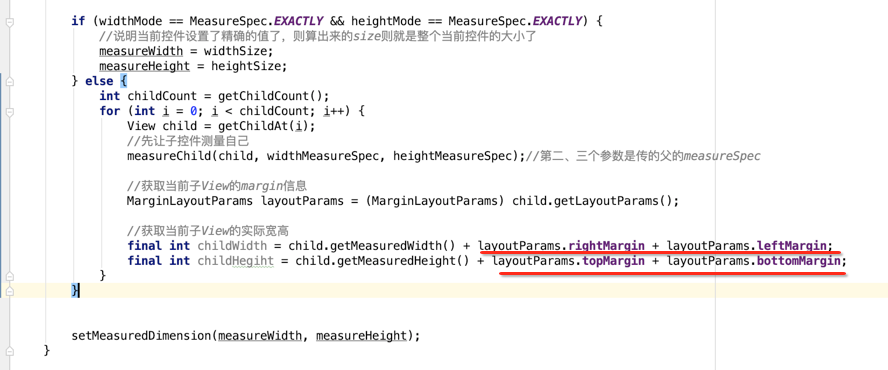
其实这里需要考虑一个细节,就是每个子View都可以设置margin信息的,所以对于子View的宽高是需要额外加上这个margin才行的,所以下面咱们来获取每个子View的margin,如何获取呢?
但是它只有宽高信息:
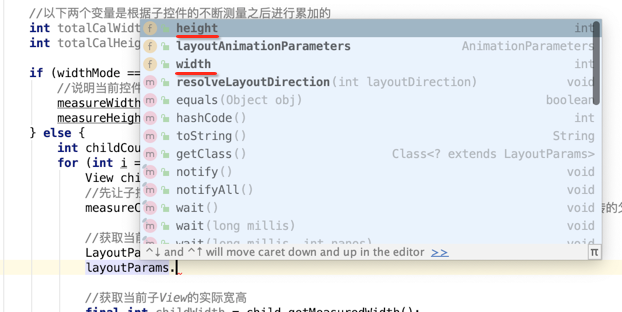
那怎么办?此时需要MarginLayoutParams进行转一下:
它是LayoutParams的子类,能不能直接这样写呢?
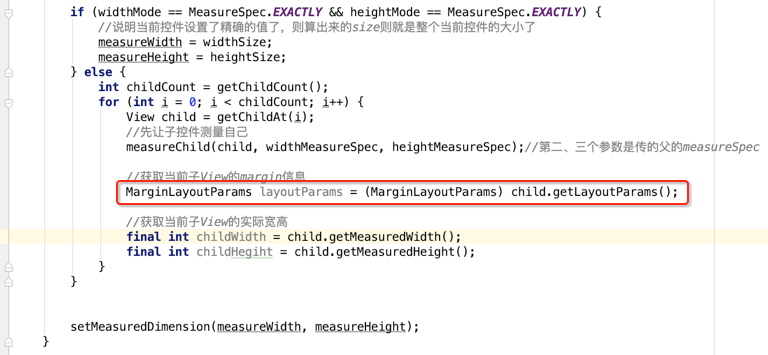
咱们运行一下就知道行不行了:
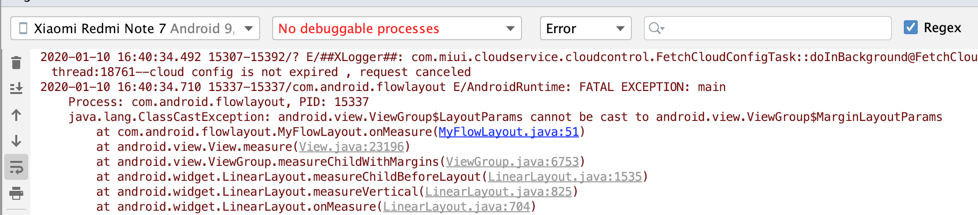
抛异常了。。那要怎么整呢?其实这里需要重写一个方法,貌似平常没怎么用了:
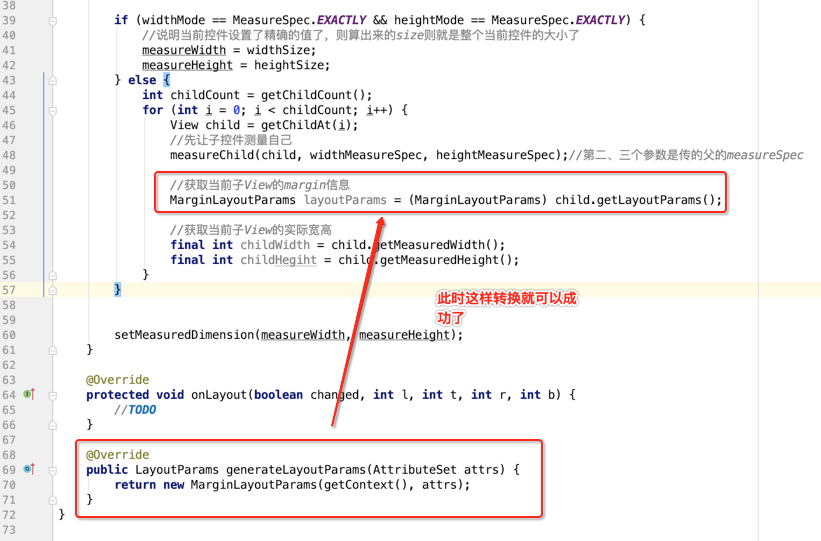
好,接下来咱们就可以正常的获取子View的margin信息了,所以咱们就可以来累加了:
但是此时还是有一个问题,当遇到换行的话其整个控件的高度和宽度肯定也会发生变化,所以接下来则需要将换行的逻辑给处理了才行:
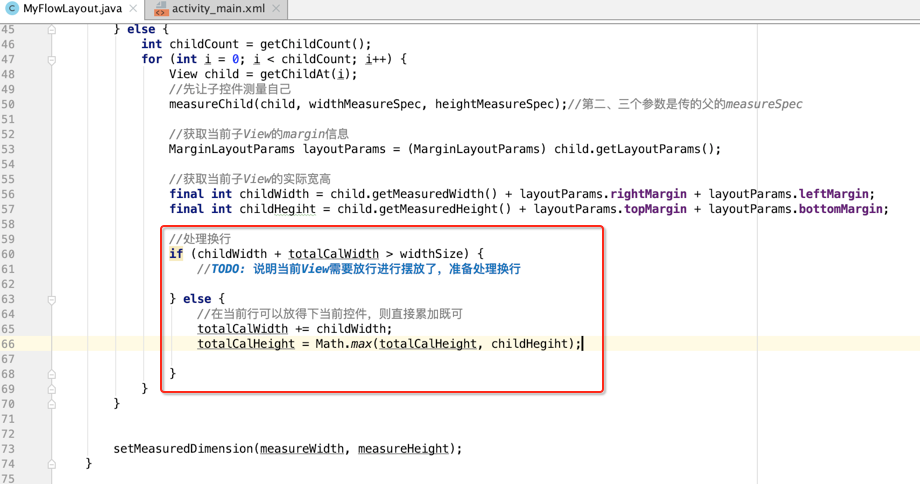
那核心就是如何来换行了,下面来做一下:

貌似这个totalCalWidth和totalCalHeight这俩变量的名称取得不够见名之义,应该代表是当前的行信息,所以改一下名称:
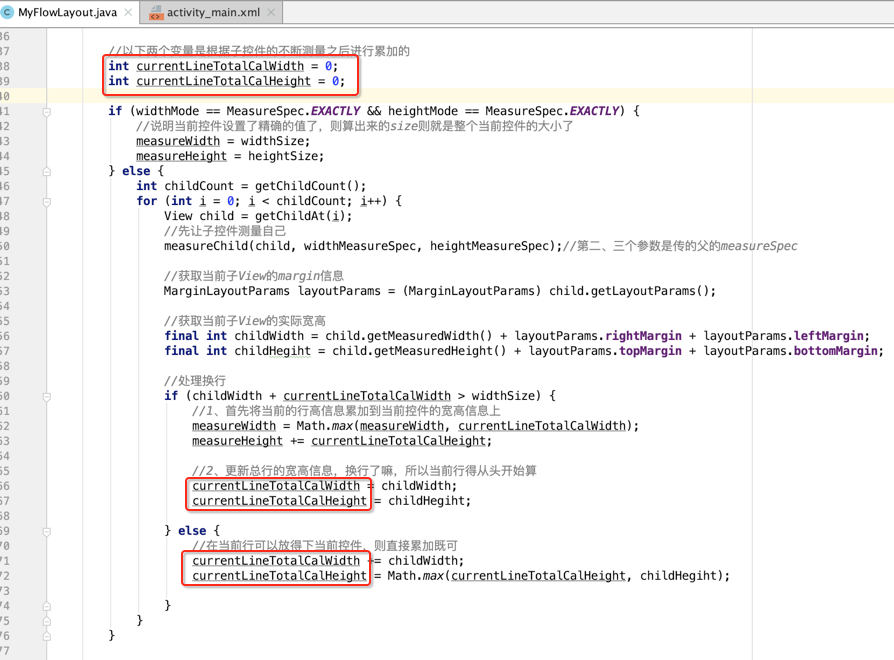
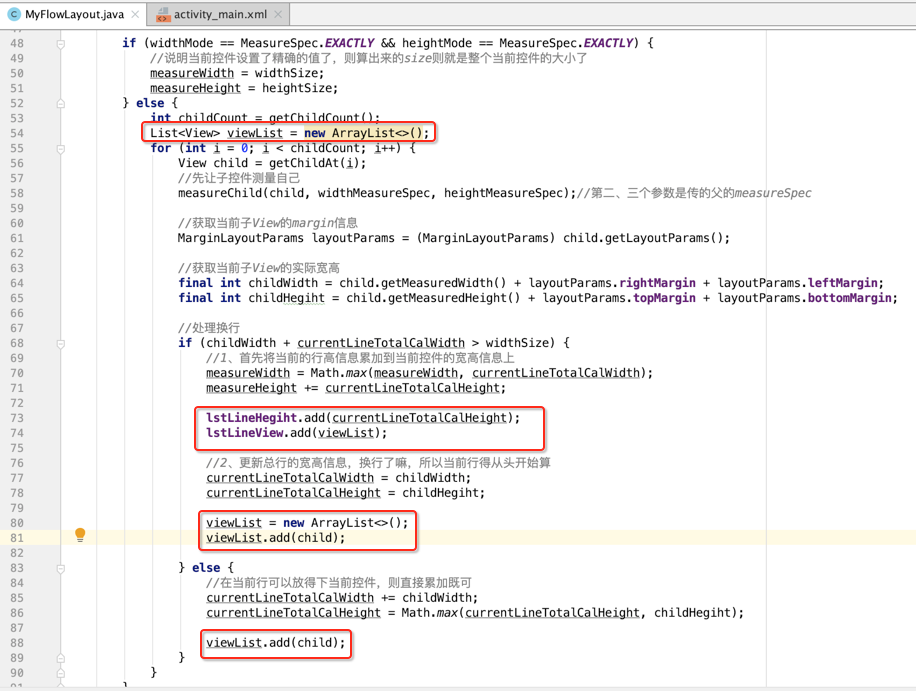
貌似整个View的宽高也计算完了,接下来则可以走onLayout布局流程了,但是!!!目前还缺布局的元素,哪些元素该摆放在哪,是摆到第一行,还是第二行?这些信息都没有,很明显这些应该在测量时就应该产出的,所以接下来咱们再来定义两个产生的变量,之后在onLayout时只需要根据产生的这俩变量进行布局既可,如下:

我们在每次换行处理时进行这俩变量的数据更新,如下:
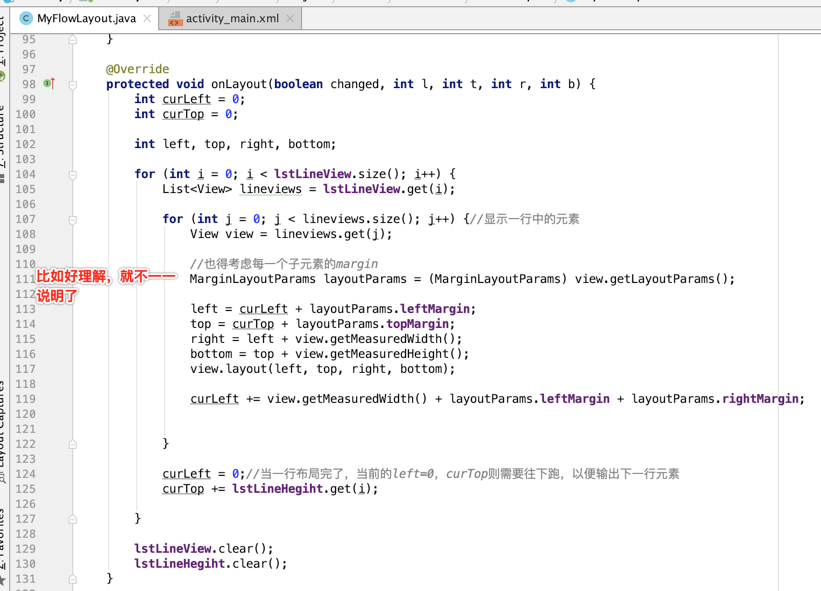
好,一切就绪,接下来则直接进行布局摆放既可。
onLayout处理:
接下来运行试一下,发现界面一片空白,啥也木有显示。。debug发现原来是由于onMeasure执行了两遍,咱们打个日志确认一下:
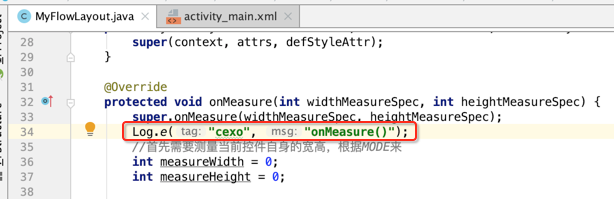
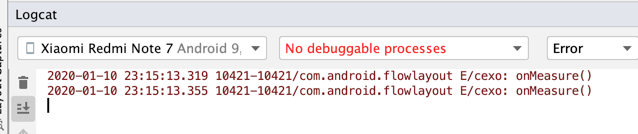
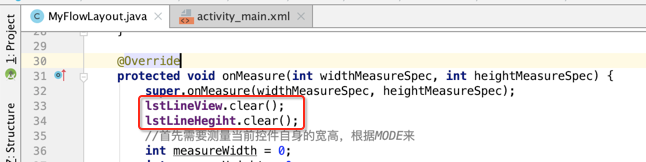
确实是执行了2遍。。很明显布局需要的那俩变量数据就会有重复了,所以解决办法就是在每一次onMeasure()触发时清除一下,如下:
再运行一下:

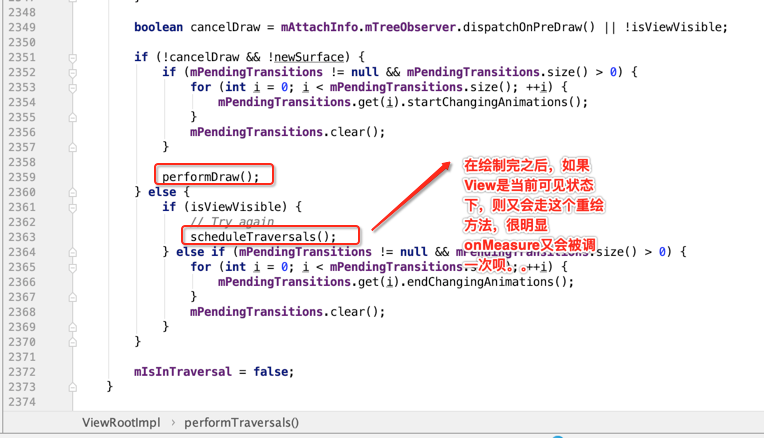
那为啥onMeasure会调用两次?这里还是从绘制流程来找原因:
在这个方法里面有一个真正开始绘的代码,其中可以找到答案:
貌似目前的效果完美了,其实这里面显示不全,最后一行没有显示出来:
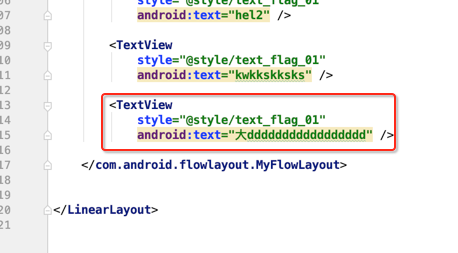
最后一行的元素是它,很明显它木有出现在目前运行的效果图中,那是为啥呢?很明显是程序有bug,这里直接来修复一下:
好,最后再来运行一下:

ok,完美了!!其实还是不完美的,咱们来修改一下这个view的宽高信息:

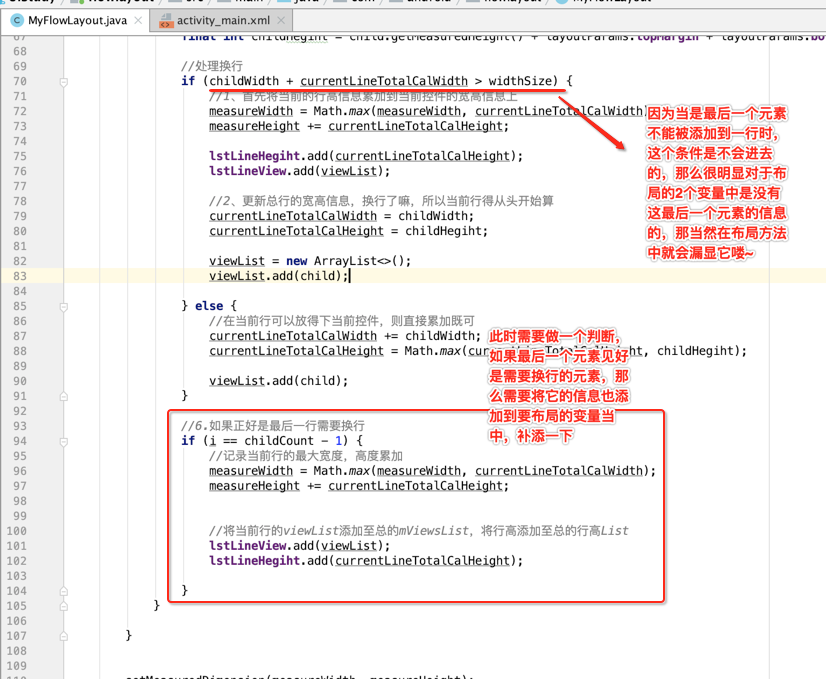
此时再运行又出现一片空白了。。咱们最后来解决一下它,其实还是代码写得有bug的原因,咱们简单分析一下:

很明显,此时会进入这个条件,但是很明显我们只确定了当前控件的宽高,但是对于子元素完全没有主动测量嘛,所以。。咱们得把else中的代码挪过来才行,修改如下:

最后整个View的代码如下:
package com.android.flowlayout;

import android.content.Context;
import android.util.AttributeSet;
import android.view.View;
import android.view.ViewGroup;

import java.util.ArrayList;
import java.util.List;

public class MyFlowLayout extends ViewGroup {

    /* 代表每一行的高度 */
    List<Integer> lstLineHegiht = new ArrayList<>();
    /* 每一行里面显示具体的子控件 */
    List<List<View>> lstLineView = new ArrayList<>();

    public MyFlowLayout(Context context) {
        this(context, null);
    }

    public MyFlowLayout(Context context, AttributeSet attrs) {
        this(context, attrs, 0);
    }

    public MyFlowLayout(Context context, AttributeSet attrs, int defStyleAttr) {
        super(context, attrs, defStyleAttr);
    }

    @Override
    protected void onMeasure(int widthMeasureSpec, int heightMeasureSpec) {
        super.onMeasure(widthMeasureSpec, heightMeasureSpec);
        lstLineView.clear();
        lstLineHegiht.clear();
        //首先需要测量当前控件自身的宽高,根据MODE来
        int measureWidth = 0;
        int measureHeight = 0;

        //算出宽高的mode+size
        int widthMode = MeasureSpec.getMode(widthMeasureSpec);
        int widthSize = MeasureSpec.getSize(widthMeasureSpec);

        int heightMode = MeasureSpec.getMode(heightMeasureSpec);
        int heightSize = MeasureSpec.getSize(heightMeasureSpec);

        //以下两个变量是根据子控件的不断测量之后进行累加的
        int currentLineTotalCalWidth = 0;
        int currentLineTotalCalHeight = 0;

        if (widthMode == MeasureSpec.EXACTLY && heightMode == MeasureSpec.EXACTLY) {
            //说明当前控件设置了精确的值了,则算出来的size则就是整个当前控件的大小了
            measureWidth = widthSize;
            measureHeight = heightSize;

            //此时则还需要测量子View的宽高
            int childCount = getChildCount();
            List<View> viewList = new ArrayList<>();
            for (int i = 0; i < childCount; i++) {
                View child = getChildAt(i);
                //先让子控件测量自己
                measureChild(child, widthMeasureSpec, heightMeasureSpec);//第二、三个参数是传的父的measureSpec

                //获取当前子View的margin信息
                MarginLayoutParams layoutParams = (MarginLayoutParams) child.getLayoutParams();

                //获取当前子View的实际宽高
                final int childWidth = child.getMeasuredWidth() + layoutParams.rightMargin + layoutParams.leftMargin;
                final int childHegiht = child.getMeasuredHeight() + layoutParams.topMargin + layoutParams.bottomMargin;

                //处理换行
                if (childWidth + currentLineTotalCalWidth > widthSize) {
                    //1、首先将当前的行高信息累加到当前控件的宽高信息上

                    lstLineHegiht.add(currentLineTotalCalHeight);
                    lstLineView.add(viewList);

                    //2、更新总行的宽高信息,换行了嘛,所以当前行得从头开始算
                    currentLineTotalCalWidth = childWidth;
                    currentLineTotalCalHeight = childHegiht;

                    viewList = new ArrayList<>();
                    viewList.add(child);

                } else {
                    //在当前行可以放得下当前控件,则直接累加既可
                    currentLineTotalCalWidth += childWidth;
                    currentLineTotalCalHeight = Math.max(currentLineTotalCalHeight, childHegiht);

                    viewList.add(child);
                }

                //6.如果正好是最后一行需要换行
                if (i == childCount - 1) {
                    //记录当前行的最大宽度,高度累加

                    //将当前行的viewList添加至总的mViewsList,将行高添加至总的行高List
                    lstLineView.add(viewList);
                    lstLineHegiht.add(currentLineTotalCalHeight);

                }
            }
        } else {
            int childCount = getChildCount();
            List<View> viewList = new ArrayList<>();
            for (int i = 0; i < childCount; i++) {
                View child = getChildAt(i);
                //先让子控件测量自己
                measureChild(child, widthMeasureSpec, heightMeasureSpec);//第二、三个参数是传的父的measureSpec

                //获取当前子View的margin信息
                MarginLayoutParams layoutParams = (MarginLayoutParams) child.getLayoutParams();

                //获取当前子View的实际宽高
                final int childWidth = child.getMeasuredWidth() + layoutParams.rightMargin + layoutParams.leftMargin;
                final int childHegiht = child.getMeasuredHeight() + layoutParams.topMargin + layoutParams.bottomMargin;

                //处理换行
                if (childWidth + currentLineTotalCalWidth > widthSize) {
                    //1、首先将当前的行高信息累加到当前控件的宽高信息上
                    measureWidth = Math.max(measureWidth, currentLineTotalCalWidth);
                    measureHeight += currentLineTotalCalHeight;

                    lstLineHegiht.add(currentLineTotalCalHeight);
                    lstLineView.add(viewList);

                    //2、更新总行的宽高信息,换行了嘛,所以当前行得从头开始算
                    currentLineTotalCalWidth = childWidth;
                    currentLineTotalCalHeight = childHegiht;

                    viewList = new ArrayList<>();
                    viewList.add(child);

                } else {
                    //在当前行可以放得下当前控件,则直接累加既可
                    currentLineTotalCalWidth += childWidth;
                    currentLineTotalCalHeight = Math.max(currentLineTotalCalHeight, childHegiht);

                    viewList.add(child);
                }

                //6.如果正好是最后一行需要换行
                if (i == childCount - 1) {
                    //记录当前行的最大宽度,高度累加
                    measureWidth = Math.max(measureWidth, currentLineTotalCalWidth);
                    measureHeight += currentLineTotalCalHeight;


                    //将当前行的viewList添加至总的mViewsList,将行高添加至总的行高List
                    lstLineView.add(viewList);
                    lstLineHegiht.add(currentLineTotalCalHeight);

                }
            }

        }


        setMeasuredDimension(measureWidth, measureHeight);
    }

    @Override
    protected void onLayout(boolean changed, int l, int t, int r, int b) {
        int curLeft = 0;
        int curTop = 0;

        int left, top, right, bottom;

        for (int i = 0; i < lstLineView.size(); i++) {
            List<View> lineviews = lstLineView.get(i);

            for (int j = 0; j < lineviews.size(); j++) {//显示一行中的元素
                View view = lineviews.get(j);

                //也得考虑每一个子元素的margin
                MarginLayoutParams layoutParams = (MarginLayoutParams) view.getLayoutParams();

                left = curLeft + layoutParams.leftMargin;
                top = curTop + layoutParams.topMargin;
                right = left + view.getMeasuredWidth();
                bottom = top + view.getMeasuredHeight();
                view.layout(left, top, right, bottom);

                curLeft += view.getMeasuredWidth() + layoutParams.leftMargin + layoutParams.rightMargin;


            }

            curLeft = 0;//当一行布局完了,当前的left=0,curTop则需要往下跑,以便输出下一行元素
            curTop += lstLineHegiht.get(i);

        }

        lstLineView.clear();
        lstLineHegiht.clear();
    }

    @Override
    public LayoutParams generateLayoutParams(AttributeSet attrs) {
        return new MarginLayoutParams(getContext(), attrs);
    }
}