业务需求
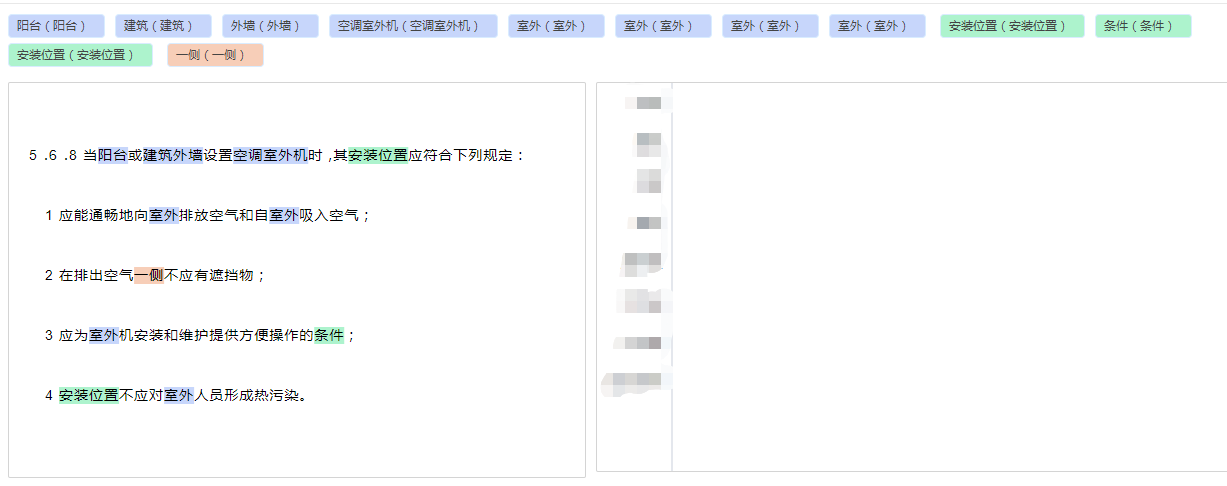
给出一段文本,自动识别出文本中包含的关键字信息,关键字是库里已知的数据,根据类型的不同显示出不同的颜色
业务分析
1)采用css:文本识别出来后,根据识别出的文本更改对应文本的dom,通过更改css来实现
缺点:比较麻烦,只能标注颜色,不易于维护和拓展
2)采用svg:使用svg绘制文本,绘制颜色标注
优点:比较灵活,便于后续拓展
实现效果
实现难点
想象很美好,实现很骨感,代码实现的过程中遇到了不少问题,这里记录下解决方法。本文主要粘贴核心代码,不是全部的业务代码哦~
1、svg的换行显示
svg是不支持换行显示的
设计思路:需要自动识别字典文本,使用到文本的下标,根据下标位置来进行保存和标注。因此将每个文本都单独设置成一个tspan,由于识别的文字包含汉字,英文字母,符号等,所以相应的文字给予对应的长度。获取svg的最大显示宽度,当文本的宽度>svg宽度的时候实行自动换行。
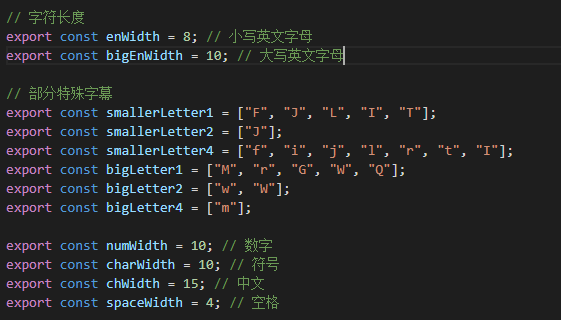
1.1 文本宽度的设定
不同的文本的宽度不一样,汉字、符号还好可以给个统一的设置,但是英文字母,有的宽,有的窄,如果设置成一样的,显示会很怪,这里经过测试,获取了一个正常显示的范围值。(本文项目代码基于vue.js)
定义常量如下:
   // 获取文本的宽度
    getTxtWidth(text) {
      let smallEnglishRegx = /^[a-z]+$/; // 小写
      let bigEnglishRegx = /^[A-Z]+$/; // 大写
      let numberRegx = /^[0-9]$/; // 数字
      let chinaRegx = /[u4E00-u9FA5uF900-uFA2D]/; // 中文
      let unitWidth;

      if (chinaRegx.test(text)) {
        unitWidth = this.chWidth;
      } else if (/s/.test(text)) {
        unitWidth = this.spaceWidth;
      } else if (smallEnglishRegx.test(text)) {
        unitWidth = this.enWidth;
      } else if (bigEnglishRegx.test(text)) {
        unitWidth = this.bigEnWidth;
      } else if (numberRegx.test(text)) {
        unitWidth = this.numWidth;
      } else {
        unitWidth = this.charWidth;
      }
      // 特殊文本的特殊处理
      if (this.smallerLetter1.includes(text)) {
        unitWidth = unitWidth - 1;
      }
      if (this.smallerLetter2.includes(text)) {
        unitWidth = unitWidth - 2;
      }
      if (this.smallerLetter4.includes(text)) {
        unitWidth = unitWidth - 4;
      }
      if (this.bigLetter1.includes(text)) {
        unitWidth = unitWidth + 1;
      }
      if (this.bigLetter2.includes(text)) {
        unitWidth = unitWidth + 2;
      }
      if (this.bigLetter4.includes(text)) {
        unitWidth = unitWidth + 4;
      }
      return unitWidth;
    }
1.2 文本的拆分
默认的换行,需要显示。超出svg区域的,手动换行。具体实现看代码,这里使用的是svg.js库用于绘制svg图形。
chunkWords() {
      this.dataChunk = [];
      let text = this.words;

      // 按换行符号换行
      text = text.replace("↵↵", "
");
      text = text.replace("↵", "
");
      let sentenceArr = text.split("
");

      for (let i = 0, len = sentenceArr.length; i < len; i++) {
        // 先按空格分开
        let wordsArr = sentenceArr[i].split(" ");

        // 再把每个字都分了
        let wordsArrCopy = [];
        for (let j = 0, len2 = wordsArr.length; j < len2; j++) {
          // 判断是否包含中文,如果包含中文再继续拆分
          let unit = wordsArr[j];
          for (let k = 0, len3 = unit.length; k < len3; k++) {
            let firstword = unit.slice(k, k + 1);

            // 插入
            wordsArrCopy.push(firstword);
          }

          // 空格也要加上
          wordsArrCopy.push(" ");
        }
        sentenceArr[i] = wordsArrCopy;
      }

      // 再加上换行符,用于后面的换行,SVG文本不支持自己换行
      for (let i = 0, len = sentenceArr.length; i < len; i++) {
        let item = sentenceArr[i];
        let length = item.length;
        // 判断最后一个是不是有字
        let lastWord = item[length - 1].trim();
        // 有字则新增个
        if (lastWord) {
          item[length] = "↵↵";
        } else {
          item[length - 1] = "↵↵";
        }
      }

      // 对每行再进行拆分,如果大于svg的宽度后再进行换行
      // this.dataChunk = [[],[]]
      this.chunkIndex = 0;
      for (let i = 0, len = sentenceArr.length; i < len; i++) {
        // 获取当前this.dataChunk[index]的总长度,大于等于this.svgX+currentWidth的时候加行;
        // 每个span是一个对象,包含一些字段信息。一个对象对应一个tspan
        let sentence = sentenceArr[i];

        // 需要换行的情况
        if (this.chunkIndex > 0 && this.dataChunk[this.chunkIndex].length) {
          this.chunkIndex++;
        }

        for (let j = 0, len2 = sentence.length; j < len2; j++) {
          let unit2 = sentence[j];
          let unitWidth = this.getTxtWidth(unit2);
          this.insertDataChunk(unit2, unitWidth);
        }
      }

      this.drawText();
    },

    // 根据分片绘制文本
    drawText() {
      this.textGroup.clear();
      let that = this;
      for (let i = 0, len = this.dataChunk.length; i < len; i++) {
        let item = this.dataChunk[i];

        this.textGroup
          .text(function(add) {
            for (let j = 0, len2 = item.length; j < len2; j++) {
              let unit = item[j];
              if (i === 0) {
                item[j].offset = j;
                item.allOffset = j;
              } else {
                let pos = that.dataChunk[i - 1].allOffset + j + 1;
                item[j].offset = pos;
                item.allOffset = pos;
              }

              item[j].row = i;
              item[j].index = j;

              // 记录下来
              that.textDom[item[j].offset] = add
                .tspan(unit.text)
                .attr("x", unit.dx)
                .attr("y", unit.dy)
                .data("offset", item[j].offset);
            }
          })
          .data("row", i);
      }
    }
实现出来的效果:
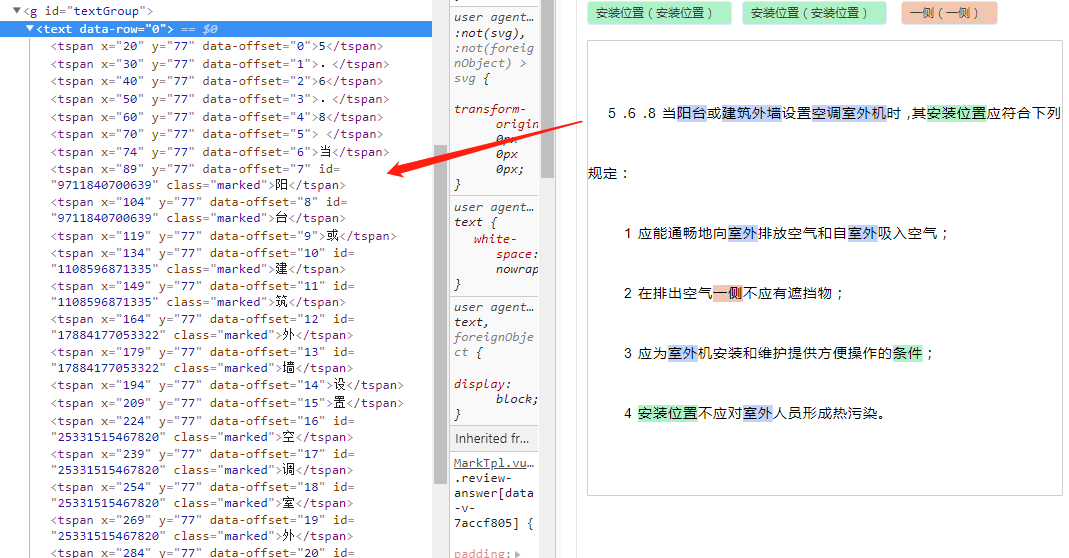
这样,每个文字都被拆成一个tspan并包含对应的data-offset属性了。
2、识别库中数据
库里的数据分不同的类型,以数组形式显示,类似这样:
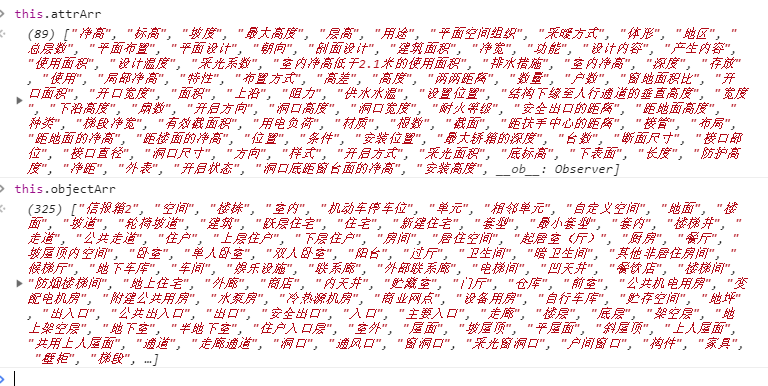
根据给的文本,如果包括了数组中的数据,则高亮显示:
// check语句,将句子中已有的实体/关系/操作/属性识别出来
    checkWord() {
      // 对换行符号进行相同的处理
      let words = this.words;
      words = words.replace("↵↵", "
");
      words = words.replace("↵", "
");
      words = words.split("
");
      this.words = words.join("");

      // 识别关系
      for (let i = 0, len = this.relationArr.length; i < len; i++) {
        this.setKnownData(this.relationArr[i], "relation");
      }

      // 识别操作
      for (let i = 0, len = this.operateArr.length; i < len; i++) {
        this.setKnownData(this.operateArr[i], "operate");
      }

      // 识别实体
      for (let i = 0, len = this.objectArr.length; i < len; i++) {
        this.setKnownData(this.objectArr[i], "object");
      }

      // 识别属性
      for (let i = 0, len = this.attrArr.length; i < len; i++) {
        this.setKnownData(this.attrArr[i], "attr");
      }

      // 根据获取的数据来渲染高亮片段
      ...
    },

    // 设置已知数据,获取的数据放到this.result中
    setKnownData(item, type, pwords, pindex) {
      let words = pwords ? pwords : this.words;
      let index = words.indexOf(item);
      let stringLen = item.length;

      pindex = pindex ? pindex : 0;

      if (index > -1) {
        // 构造标注需要的数据
        let data = {
          type,
          word: item,
          name: item,
          offset: [index + pindex, index + pindex + stringLen - 1],
          id: Math.ceil(new Date().getTime() * Math.random() * (index + 1))
        };

        // 添加到数据中,根据位置信息来判断
        if (this.result[type].length === 0) {
          this.result[type].push(data);
        } else {
          let insertIndex = -1;
          this.result[type].find((unit, index) => {
            if (data.offset[0] <= unit.offset[1]) {
              insertIndex = index;
              return true;
            }
          });
          if (insertIndex > -1) {
            this.result[type].splice(insertIndex, 0, data);
          } else {
            this.result[type].push(data);
          }
        }

        // 继续遍历,可能会包含多个
        let word2 = words.substr(index + stringLen);
        this.setKnownData(item, type, word2, pindex + index + stringLen);
      }
    }
3、绘制不同颜色的矩形
svg.js绘制矩形的方法很简单,需要确定的是绘制的矩形的宽高,位置即可,而这些信息根据字符的offset就可以算出来。在上面的数据中,我们在result中存了一些识别出来的数据。根据这些数据即可绘制不同颜色的矩形来了。
3.1 以数据为导向绘制图形
 ...
 for (let i in this.result) {
   this.result[i].forEach(item => {
     this.sureMarkWord(item);
   });
 }
  // 确定标注数据,高亮文本,标注实体
   sureMarkWord(data) {
      // 根据坐标获取字的信息
      let start = this.findWord(data.offset[0]);
      let end = this.findWord(data.offset[1]);
      if (!start || !end) {
        return;
      }

      let startRow = start.row;
      let endRow = end.row;
      let startIndex = start.index;
      let endIndex = end.index;

      // 同一行
      if (startRow == endRow) {
        this.singleRowMark(start, end, data, endRow);
      } else {
        //1,endRow从起始开始标注
        let start_endrow = this.dataChunk[endRow][0];
        this.singleRowMark(start_endrow, end, data, endRow);

        // endRow前面的行全部标注上
        for (let i = startRow; i < endRow; i++) {
          let len = this.dataChunk[i].length;
          let end_i = this.dataChunk[i][len - 1];
          if (i === startRow) {
            this.singleRowMark(start, end_i, data, startRow, true);
          } else {
            // 整行标注
            this.singleRowMark(
              this.dataChunk[i][0],
              end_i,
              data,
              i
            );
          }
        }
      }
    },

// 根据位置选择文字
    findWord(offset) {
      let result = null;
      for (let i = 0, len = this.dataChunk.length; i < len; i++) {
        let item = this.dataChunk[i];
        for (let j = 0, len2 = item.length; j < len2; j++) {
          let unit = item[j];
          if (unit.offset === offset) {
            result = unit;
            break;
          }
        }

        if (result) {
          break;
        }
      }
      return result;
    },

    singleRowMark(start, end, data, row) {
      // 回调绘制chunk的矩形
      let width = end.dx + end.width - start.dx;
      let x = start.dx;
      let y = start.dy - this.wordHeight + 4;
      let height = this.wordHeight; // wordHeight是文本的高度,根据字体的大小设置,14px的定义为17
      let { name, type, word, id} = data;

      // 数据记录
      let obj = {
        width,
        height,
        x,
        y,
        type,
        word,
        name,
        id,
        row,
        ry: y
      };

      this.drawMarkGroups(obj);
    },

    // 文字底层颜色
    drawChunkRect(obj) {
      let { width, height, x, y, type, id, row, word} = obj;
      let color;
      color = this.wordColors[type]; // 根据类型的不同设置不同的颜色

      let obj = {};
      // 记录dom
      obj.rect = this.rectRows[row]
      .group()
      .rect(width, height)
      .move(x, y)
      .fill(isTemp ? "none" : color)
      .attr("id", id)
      .data("type", obj.type)
      .data("word", obj.word);
       this.wordRectDom[id].push(obj);
    }
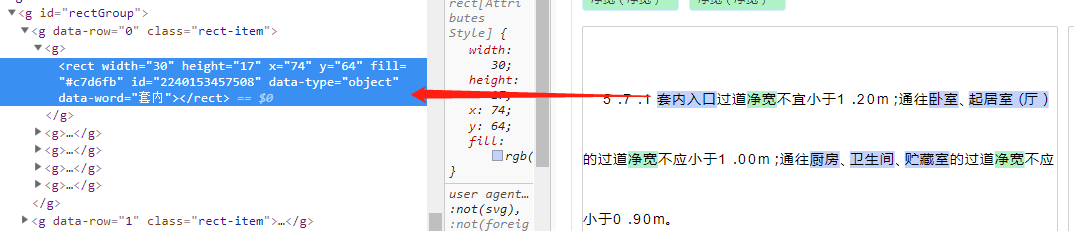
至此,实现了划词标注的显示部分