现在使用NIO的场景越来越多,很多网上的技术框架或多或少的使用NIO技术,譬如Tomcat,Jetty。学习和掌握NIO技术已经不是一个JAVA攻城狮的加分技能,而是一个必备技能。在前面2篇文章《什么是Zero-Copy?》和《NIO相关基础篇》中我们学习了NIO的相关理论知识,而在本篇中我们一起来学习一下Java NIO的实战知识。全文较长,建议先马后看(记得关注不迷路)。
一、概述
NIO主要有三大核心部分:Channel(通道),Buffer(缓冲区), Selector。传统IO基于字节流和字符流进行操作,而NIO基于Channel和Buffer(缓冲区)进行操作,数据总是从通道读取到缓冲区中,或者从缓冲区写入到通道中。Selector(选择区)用于监听多个通道的事件(比如:连接打开,数据到达)。因此,单个线程可以监听多个数据通道。
NIO和传统IO(一下简称IO)之间第一个最大的区别是,IO是面向流的,NIO是面向缓冲区的。 Java IO面向流意味着每次从流中读一个或多个字节,直至读取所有字节,它们没有被缓存在任何地方。此外,它不能前后移动流中的数据。如果需要前后移动从流中读取的数据,需要先将它缓存到一个缓冲区。NIO的缓冲导向方法略有不同。数据读取到一个它稍后处理的缓冲区,需要时可在缓冲区中前后移动。这就增加了处理过程中的灵活性。但是,还需要检查是否该缓冲区中包含所有您需要处理的数据。而且,需确保当更多的数据读入缓冲区时,不要覆盖缓冲区里尚未处理的数据。
IO的各种流是阻塞的。这意味着,当一个线程调用read() 或 write()时,该线程被阻塞,直到有一些数据被读取,或数据完全写入。该线程在此期间不能再干任何事情了。 NIO的非阻塞模式,使一个线程从某通道发送请求读取数据,但是它仅能得到目前可用的数据,如果目前没有数据可用时,就什么都不会获取。而不是保持线程阻塞,所以直至数据变得可以读取之前,该线程可以继续做其他的事情。 非阻塞写也是如此。一个线程请求写入一些数据到某通道,但不需要等待它完全写入,这个线程同时可以去做别的事情。 线程通常将非阻塞IO的空闲时间用于在其它通道上执行IO操作,所以一个单独的线程现在可以管理多个输入和输出通道(channel)。
Channel
首先说一下Channel,国内大多翻译成“通道”。Channel和IO中的Stream(流)是差不多一个等级的。只不过Stream是单向的,譬如:InputStream, OutputStream.而Channel是双向的,既可以用来进行读操作,又可以用来进行写操作。
NIO中的Channel的主要实现有:
-
FileChannel
-
DatagramChannel
-
SocketChannel
-
ServerSocketChannel
这里看名字就可以猜出个所以然来:分别可以对应文件IO、UDP和TCP(Server和Client)。下面演示的案例基本上就是围绕这4个类型的Channel进行陈述的。
Buffer
NIO中的关键Buffer实现有:ByteBuffer, CharBuffer, DoubleBuffer, FloatBuffer, IntBuffer, LongBuffer, ShortBuffer,分别对应基本数据类型: byte, char, double, float, int, long, short。当然NIO中还有MappedByteBuffer, HeapByteBuffer, DirectByteBuffer等这里先不进行陈述。
Selector
Selector运行单线程处理多个Channel,如果你的应用打开了多个通道,但每个连接的流量都很低,使用Selector就会很方便。例如在一个聊天服务器中。要使用Selector, 得向Selector注册Channel,然后调用它的select()方法。这个方法会一直阻塞到某个注册的通道有事件就绪。一旦这个方法返回,线程就可以处理这些事件,事件的例子有如新的连接进来、数据接收等。
二、FileChannel
看完上面的陈述,对于第一次接触NIO的同学来说云里雾里,只说了一些概念,也没记住什么,更别说怎么用了。这里开始通过传统IO以及更改后的NIO来做对比,以更形象的突出NIO的用法,进而使你对NIO有一点点的了解。
传统IO vs NIO
首先,案例1是采用FileInputStream读取文件内容的:
   public static void method2(){

       InputStream in = null;

       try{

           in = new BufferedInputStream(new FileInputStream("src/nomal_io.txt"));

           byte [] buf = new byte[1024];

           int bytesRead = in.read(buf);

           while(bytesRead != -1)

           {

               for(int i=0;i<bytesRead;i++)

                   System.out.print((char)buf[i]);

               bytesRead = in.read(buf);

           }

       }catch (IOException e)

       {

           e.printStackTrace();

       }finally{

           try{

               if(in != null){

                   in.close();

               }

           }catch (IOException e){

               e.printStackTrace();

           }

       }

   }
输出结果:(略)
案例是对应的NIO(这里通过RandomAccessFile进行操作,当然也可以通过FileInputStream.getChannel()进行操作):
   public static void method1(){

       RandomAccessFile aFile = null;

       try{

           aFile = new RandomAccessFile("src/nio.txt","rw");

           FileChannel fileChannel = aFile.getChannel();

           ByteBuffer buf = ByteBuffer.allocate(1024);

           int bytesRead = fileChannel.read(buf);

           System.out.println(bytesRead);

           while(bytesRead != -1)

           {

               buf.flip();

               while(buf.hasRemaining())

               {

                   System.out.print((char)buf.get());

               }

               buf.compact();

               bytesRead = fileChannel.read(buf);

           }

       }catch (IOException e){

           e.printStackTrace();

       }finally{

           try{

               if(aFile != null){

                   aFile.close();

               }

           }catch (IOException e){

               e.printStackTrace();

           }

       }

   }
输出结果:(略)
通过仔细对比案例1和案例2,应该能看出个大概,最起码能发现NIO的实现方式比叫复杂。有了一个大概的印象可以进入下一步了。
Buffer的使用
从案例2中可以总结出使用Buffer一般遵循下面几个步骤:
-
分配空间(ByteBuffer buf = ByteBuffer.allocate(1024); 还有一种allocateDirector后面再陈述)
-
写入数据到Buffer(int bytesRead = fileChannel.read(buf);)
-
调用filp()方法( buf.flip();)
-
从Buffer中读取数据(System.out.print((char)buf.get());)
-
调用clear()方法或者compact()方法
Buffer顾名思义:缓冲区,实际上是一个容器,一个连续数组。Channel提供从文件、网络读取数据的渠道,但是读写的数据都必须经过Buffer。如下图:

向Buffer中写数据:
-
从Channel写到Buffer (fileChannel.read(buf))
-
通过Buffer的put()方法 (buf.put(…))
从Buffer中读取数据:
-
从Buffer读取到Channel (channel.write(buf))
-
使用get()方法从Buffer中读取数据 (buf.get())
可以把Buffer简单地理解为一组基本数据类型的元素列表,它通过几个变量来保存这个数据的当前位置状态:capacity, position, limit, mark:
|
索引 |
说明 |
|
capacity |
缓冲区数组的总长度 |
|
position |
下一个要操作的数据元素的位置 |
|
limit |
缓冲区数组中不可操作的下一个元素的位置:limit<=capacity |
|
mark |
用于记录当前position的前一个位置或者默认是-1 |
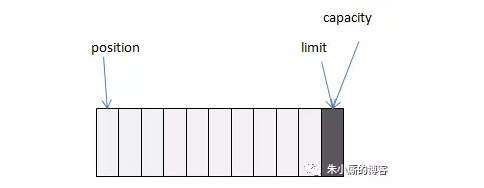
无图无真相,举例:我们通过ByteBuffer.allocate(11)方法创建了一个11个byte的数组的缓冲区,初始状态如上图,position的位置为0,capacity和limit默认都是数组长度。当我们写入5个字节时,变化如下图:
这时我们需要将缓冲区中的5个字节数据写入Channel的通信信道,所以我们调用ByteBuffer.flip()方法,变化如下图所示(position设回0,并将limit设成之前的position的值):

这时底层操作系统就可以从缓冲区中正确读取这个5个字节数据并发送出去了。在下一次写数据之前我们再调用clear()方法,缓冲区的索引位置又回到了初始位置。
调用clear()方法:position将被设回0,limit设置成capacity,换句话说,Buffer被清空了,其实Buffer中的数据并未被清除,只是这些标记告诉我们可以从哪里开始往Buffer里写数据。如果Buffer中有一些未读的数据,调用clear()方法,数据将“被遗忘”,意味着不再有任何标记会告诉你哪些数据被读过,哪些还没有。如果Buffer中仍有未读的数据,且后续还需要这些数据,但是此时想要先写些数据,那么使用compact()方法。compact()方法将所有未读的数据拷贝到Buffer起始处。然后将position设到最后一个未读元素正后面。limit属性依然像clear()方法一样,设置成capacity。现在Buffer准备好写数据了,但是不会覆盖未读的数据。
通过调用Buffer.mark()方法,可以标记Buffer中的一个特定的position,之后可以通过调用Buffer.reset()方法恢复到这个position。Buffer.rewind()方法将position设回0,所以你可以重读Buffer中的所有数据。limit保持不变,仍然表示能从Buffer中读取多少个元素。
三、SocketChannel
说完了FileChannel和Buffer, 大家应该对Buffer的用法比较了解了,这里使用SocketChannel来继续探讨NIO。NIO的强大功能部分来自于Channel的非阻塞特性,套接字的某些操作可能会无限期地阻塞。例如,对accept()方法的调用可能会因为等待一个客户端连接而阻塞;对read()方法的调用可能会因为没有数据可读而阻塞,直到连接的另一端传来新的数据。总的来说,创建/接收连接或读写数据等I/O调用,都可能无限期地阻塞等待,直到底层的网络实现发生了什么。慢速的,有损耗的网络,或仅仅是简单的网络故障都可能导致任意时间的延迟。然而不幸的是,在调用一个方法之前无法知道其是否阻塞。NIO的channel抽象的一个重要特征就是可以通过配置它的阻塞行为,以实现非阻塞式的信道。
channel.configureBlocking(false)
在非阻塞式信道上调用一个方法总是会立即返回。这种调用的返回值指示了所请求的操作完成的程度。例如,在一个非阻塞式ServerSocketChannel上调用accept()方法,如果有连接请求来了,则返回客户端SocketChannel,否则返回null。
这里先举一个TCP应用案例,客户端采用NIO实现,而服务端依旧使用BIO实现。
客户端代码(案例3):
   public static void client(){

       ByteBuffer buffer = ByteBuffer.allocate(1024);

       SocketChannel socketChannel = null;

       try

       {

           socketChannel = SocketChannel.open();

           socketChannel.configureBlocking(false);

           socketChannel.connect(new InetSocketAddress("10.10.195.115",8080));

           if(socketChannel.finishConnect())

           {

               int i=0;

               while(true)

               {

                   TimeUnit.SECONDS.sleep(1);

                   String info = "I'm "+i+++"-th information from client";

                   buffer.clear();

                   buffer.put(info.getBytes());

                   buffer.flip();

                   while(buffer.hasRemaining()){

                       System.out.println(buffer);

                       socketChannel.write(buffer);

                   }

               }

           }

       }

       catch (IOException | InterruptedException e)

       {

           e.printStackTrace();

       }

       finally{

           try{

               if(socketChannel!=null){

                   socketChannel.close();

               }

           }catch(IOException e){

               e.printStackTrace();

           }

       }

   }
服务端代码(案例4):
   public static void server(){

       ServerSocket serverSocket = null;

       InputStream in = null;

       try

       {

           serverSocket = new ServerSocket(8080);

           int recvMsgSize = 0;

           byte[] recvBuf = new byte[1024];

           while(true){

               Socket clntSocket = serverSocket.accept();

               SocketAddress clientAddress = clntSocket.getRemoteSocketAddress();

               System.out.println("Handling client at "+clientAddress);

               in = clntSocket.getInputStream();

               while((recvMsgSize=in.read(recvBuf))!=-1){

                   byte[] temp = new byte[recvMsgSize];

                   System.arraycopy(recvBuf, 0, temp, 0, recvMsgSize);

                   System.out.println(new String(temp));

               }

           }

       }

       catch (IOException e)

       {

           e.printStackTrace();

       }

       finally{

           try{

               if(serverSocket!=null){

                   serverSocket.close();

               }

               if(in!=null){

                   in.close();

               }

           }catch(IOException e){

               e.printStackTrace();

           }

       }

   }
输出结果:(略)
根据案例分析,总结一下SocketChannel的用法。
打开SocketChannel:
           socketChannel = SocketChannel.open();

           socketChannel.connect(new InetSocketAddress("10.10.195.115",8080));
关闭:
socketChannel.close();
读取数据:
-
    String info = "I'm "+i+++"-th information from client";

                   buffer.clear();

                   buffer.put(info.getBytes());

                   buffer.flip();

                   while(buffer.hasRemaining()){

                       System.out.println(buffer);

                       socketChannel.write(buffer);

                   }
注意SocketChannel.write()方法的调用是在一个while循环中的。write()方法无法保证能写多少字节到SocketChannel。所以,我们重复调用write()直到Buffer没有要写的字节为止。
非阻塞模式下,read()方法在尚未读取到任何数据时可能就返回了。所以需要关注它的int返回值,它会告诉你读取了多少字节。
四、TCP服务端的NIO写法
到目前为止,所举的案例中都没有涉及Selector。不要急,好东西要慢慢来。Selector类可以用于避免使用阻塞式客户端中很浪费资源的“忙等”方法。例如,考虑一个IM服务器。像QQ或者旺旺这样的,可能有几万甚至几千万个客户端同时连接到了服务器,但在任何时刻都只是非常少量的消息。
需要读取和分发。这就需要一种方法阻塞等待,直到至少有一个信道可以进行I/O操作,并指出是哪个信道。NIO的选择器就实现了这样的功能。一个Selector实例可以同时检查一组信道的I/O状态。用专业术语来说,选择器就是一个多路开关选择器,因为一个选择器能够管理多个信道上的I/O操作。然而如果用传统的方式来处理这么多客户端,使用的方法是循环地一个一个地去检查所有的客户端是否有I/O操作,如果当前客户端有I/O操作,则可能把当前客户端扔给一个线程池去处理,如果没有I/O操作则进行下一个轮询,当所有的客户端都轮询过了又接着从头开始轮询;这种方法是非常笨而且也非常浪费资源,因为大部分客户端是没有I/O操作,我们也要去检查;而Selector就不一样了,它在内部可以同时管理多个I/O,当一个信道有I/O操作的时候,他会通知Selector,Selector就是记住这个信道有I/O操作,并且知道是何种I/O操作,是读呢?是写呢?还是接受新的连接;所以如果使用Selector,它返回的结果只有两种结果,一种是0,即在你调用的时刻没有任何客户端需要I/O操作,另一种结果是一组需要I/O操作的客户端,这时你就根本不需要再检查了,因为它返回给你的肯定是你想要的。这样一种通知的方式比那种主动轮询的方式要高效得多!
要使用选择器(Selector),需要创建一个Selector实例(使用静态工厂方法open())并将其注册(register)到想要监控的信道上(注意,这要通过channel的方法实现,而不是使用selector的方法)。最后,调用选择器的select()方法。该方法会阻塞等待,直到有一个或更多的信道准备好了I/O操作或等待超时。select()方法将返回可进行I/O操作的信道数量。现在,在一个单独的线程中,通过调用select()方法就能检查多个信道是否准备好进行I/O操作。如果经过一段时间后仍然没有信道准备好,select()方法就会返回0,并允许程序继续执行其他任务。
下面将上面的TCP服务端代码改写成NIO的方式(案例5):
public class ServerConnect

{

   private static final int BUF_SIZE=1024;

   private static final int PORT = 8080;

   private static final int TIMEOUT = 3000;

   public static void main(String[] args)

   {

       selector();

   }

   public static void handleAccept(SelectionKey key) throws IOException{

       ServerSocketChannel ssChannel = (ServerSocketChannel)key.channel();

       SocketChannel sc = ssChannel.accept();

       sc.configureBlocking(false);

       sc.register(key.selector(), SelectionKey.OP_READ,ByteBuffer.allocateDirect(BUF_SIZE));

   }

   public static void handleRead(SelectionKey key) throws IOException{

       SocketChannel sc = (SocketChannel)key.channel();

       ByteBuffer buf = (ByteBuffer)key.attachment();

       long bytesRead = sc.read(buf);

       while(bytesRead>0){

           buf.flip();

           while(buf.hasRemaining()){

               System.out.print((char)buf.get());

           }

           System.out.println();

           buf.clear();

           bytesRead = sc.read(buf);

       }

       if(bytesRead == -1){

           sc.close();

       }

   }

   public static void handleWrite(SelectionKey key) throws IOException{

       ByteBuffer buf = (ByteBuffer)key.attachment();

       buf.flip();

       SocketChannel sc = (SocketChannel) key.channel();

       while(buf.hasRemaining()){

           sc.write(buf);

       }

       buf.compact();

   }

   public static void selector() {

       Selector selector = null;

       ServerSocketChannel ssc = null;

       try{

           selector = Selector.open();

           ssc= ServerSocketChannel.open();

           ssc.socket().bind(new InetSocketAddress(PORT));

           ssc.configureBlocking(false);

           ssc.register(selector, SelectionKey.OP_ACCEPT);

           while(true){

               if(selector.select(TIMEOUT) == 0){

                   System.out.println("==");

                   continue;

               }

               Iterator<SelectionKey> iter = selector.selectedKeys().iterator();

               while(iter.hasNext()){

                   SelectionKey key = iter.next();

                   if(key.isAcceptable()){

                       handleAccept(key);

                   }

                   if(key.isReadable()){

                       handleRead(key);

                   }

                   if(key.isWritable() && key.isValid()){

                       handleWrite(key);

                   }

                   if(key.isConnectable()){

                       System.out.println("isConnectable = true");

                   }

                   iter.remove();

               }

           }

       }catch(IOException e){

           e.printStackTrace();

       }finally{

           try{

               if(selector!=null){

                   selector.close();

               }

               if(ssc!=null){

                   ssc.close();

               }

           }catch(IOException e){

               e.printStackTrace();

           }

       }

   }

}
下面来慢慢讲解这段代码。
ServerSocketChannel
打开ServerSocketChannel:
ServerSocketChannel serverSocketChannel = ServerSocketChannel.open();
关闭ServerSocketChannel:
serverSocketChannel.close();
监听新进来的连接:
-
while(true){
-
SocketChannel socketChannel = serverSocketChannel.accept();
-
}
ServerSocketChannel可以设置成非阻塞模式。在非阻塞模式下,accept() 方法会立刻返回,如果还没有新进来的连接,返回的将是null。 因此,需要检查返回的SocketChannel是否是null.如:
-
ServerSocketChannel serverSocketChannel = ServerSocketChannel.open();
-
serverSocketChannel.socket().bind(new InetSocketAddress(9999));
-
serverSocketChannel.configureBlocking(false);
-
while (true)
-
{
-
SocketChannel socketChannel = serverSocketChannel.accept();
-
if (socketChannel != null)
-
{
-
// do something with socketChannel...
-
}
-
}
Selector
Selector的创建:Selector selector = Selector.open();
为了将Channel和Selector配合使用,必须将Channel注册到Selector上,通过SelectableChannel.register()方法来实现,沿用案例5中的部分代码:
-
ssc= ServerSocketChannel.open();
-
ssc.socket().bind(new InetSocketAddress(PORT));
-
ssc.configureBlocking(false);
-
ssc.register(selector, SelectionKey.OP_ACCEPT);
与Selector一起使用时,Channel必须处于非阻塞模式下。这意味着不能将FileChannel与Selector一起使用,因为FileChannel不能切换到非阻塞模式。而套接字通道都可以。
注意register()方法的第二个参数。这是一个“interest集合”,意思是在通过Selector监听Channel时对什么事件感兴趣。可以监听四种不同类型的事件:
-
1. Connect
-
2. Accept
-
3. Read
-
4. Write
通道触发了一个事件意思是该事件已经就绪。所以,某个channel成功连接到另一个服务器称为“连接就绪”。一个server socket channel准备好接收新进入的连接称为“接收就绪”。一个有数据可读的通道可以说是“读就绪”。等待写数据的通道可以说是“写就绪”。
这四种事件用SelectionKey的四个常量来表示:
-
1. SelectionKey.OP_CONNECT
-
2. SelectionKey.OP_ACCEPT
-
3. SelectionKey.OP_READ
-
4. SelectionKey.OP_WRITE
SelectionKey
当向Selector注册Channel时,register()方法会返回一个SelectionKey对象。这个对象包含了一些你感兴趣的属性:
-
interest集合
-
ready集合
-
Channel
-
Selector
-
附加的对象(可选)
interest集合:就像向Selector注册通道一节中所描述的,interest集合是你所选择的感兴趣的事件集合。可以通过SelectionKey读写interest集合。
ready 集合是通道已经准备就绪的操作的集合。在一次选择(Selection)之后,你会首先访问这个ready set。Selection将在下一小节进行解释。可以这样访问ready集合:
int readySet = selectionKey.readyOps();
可以用像检测interest集合那样的方法,来检测channel中什么事件或操作已经就绪。但是,也可以使用以下四个方法,它们都会返回一个布尔类型:
-
selectionKey.isAcceptable();
-
selectionKey.isConnectable();
-
selectionKey.isReadable();
-
selectionKey.isWritable();
从SelectionKey访问Channel和Selector很简单。如下:
-
Channel channel = selectionKey.channel();
-
Selector selector = selectionKey.selector();
可以将一个对象或者更多信息附着到SelectionKey上,这样就能方便的识别某个给定的通道。例如,可以附加 与通道一起使用的Buffer,或是包含聚集数据的某个对象。使用方法如下:
-
selectionKey.attach(theObject);
-
Object attachedObj = selectionKey.attachment();
还可以在用register()方法向Selector注册Channel的时候附加对象。如:
SelectionKey key = channel.register(selector, SelectionKey.OP_READ, theObject);
通过Selector选择通道
一旦向Selector注册了一或多个通道,就可以调用几个重载的select()方法。这些方法返回你所感兴趣的事件(如连接、接受、读或写)已经准备就绪的那些通道。换句话说,如果你对“读就绪”的通道感兴趣,select()方法会返回读事件已经就绪的那些通道。
下面是select()方法:
-
int select()
-
int select(long timeout)
-
int selectNow()
select()阻塞到至少有一个通道在你注册的事件上就绪了。
select(long timeout)和select()一样,除了最长会阻塞timeout毫秒(参数)。
selectNow()不会阻塞,不管什么通道就绪都立刻返回(译者注:此方法执行非阻塞的选择操作。如果自从前一次选择操作后,没有通道变成可选择的,则此方法直接返回零。)。
select()方法返回的int值表示有多少通道已经就绪。亦即,自上次调用select()方法后有多少通道变成就绪状态。如果调用select()方法,因为有一个通道变成就绪状态,返回了1,若再次调用select()方法,如果另一个通道就绪了,它会再次返回1。如果对第一个就绪的channel没有做任何操作,现在就有两个就绪的通道,但在每次select()方法调用之间,只有一个通道就绪了。
一旦调用了select()方法,并且返回值表明有一个或更多个通道就绪了,然后可以通过调用selector的selectedKeys()方法,访问“已选择键集(selected key set)”中的就绪通道。如下所示:
Set selectedKeys = selector.selectedKeys();
当向Selector注册Channel时,Channel.register()方法会返回一个SelectionKey 对象。这个对象代表了注册到该Selector的通道。
注意每次迭代末尾的keyIterator.remove()调用。Selector不会自己从已选择键集中移除SelectionKey实例。必须在处理完通道时自己移除。下次该通道变成就绪时,Selector会再次将其放入已选择键集中。
SelectionKey.channel()方法返回的通道需要转型成你要处理的类型,如ServerSocketChannel或SocketChannel等。
一个完整的使用Selector和ServerSocketChannel的案例可以参考案例5的selector()方法。
五、内存映射文件
JAVA处理大文件,一般用BufferedReader,BufferedInputStream这类带缓冲的IO类,不过如果文件超大的话,更快的方式是采用MappedByteBuffer。
MappedByteBuffer是NIO引入的文件内存映射方案,读写性能极高。NIO最主要的就是实现了对异步操作的支持。其中一种通过把一个套接字通道(SocketChannel)注册到一个选择器(Selector)中,不时调用后者的选择(select)方法就能返回满足的选择键(SelectionKey),键中包含了SOCKET事件信息。这就是select模型。
SocketChannel的读写是通过一个类叫ByteBuffer来操作的.这个类本身的设计是不错的,比直接操作byte[]方便多了. ByteBuffer有两种模式:直接/间接.间接模式最典型(也只有这么一种)的就是HeapByteBuffer,即操作堆内存 (byte[]).但是内存毕竟有限,如果我要发送一个1G的文件怎么办?不可能真的去分配1G的内存.这时就必须使用"直接"模式,即 MappedByteBuffer,文件映射.
先中断一下,谈谈操作系统的内存管理.一般操作系统的内存分两部分:物理内存;虚拟内存.虚拟内存一般使用的是页面映像文件,即硬盘中的某个(某些)特殊的文件.操作系统负责页面文件内容的读写,这个过程叫"页面中断/切换". MappedByteBuffer也是类似的,你可以把整个文件(不管文件有多大)看成是一个ByteBuffer.MappedByteBuffer 只是一种特殊的ByteBuffer,即是ByteBuffer的子类。 MappedByteBuffer 将文件直接映射到内存(这里的内存指的是虚拟内存,并不是物理内存)。通常,可以映射整个文件,如果文件比较大的话可以分段进行映射,只要指定文件的那个部分就可以。
概念
FileChannel提供了map方法来把文件影射为内存映像文件: MappedByteBuffer map(int mode,long position,long size); 可以把文件的从position开始的size大小的区域映射为内存映像文件,mode指出了 可访问该内存映像文件的方式:
-
READ_ONLY,(只读): 试图修改得到的缓冲区将导致抛出 ReadOnlyBufferException.(MapMode.READ_ONLY)
-
READ_WRITE(读/写): 对得到的缓冲区的更改最终将传播到文件;该更改对映射到同一文件的其他程序不一定是可见的。 (MapMode.READ_WRITE)
-
PRIVATE(专用): 对得到的缓冲区的更改不会传播到文件,并且该更改对映射到同一文件的其他程序也不是可见的;相反,会创建缓冲区已修改部分的专用副本。 (MapMode.PRIVATE)
MappedByteBuffer是ByteBuffer的子类,其扩充了三个方法:
-
force():缓冲区是READ_WRITE模式下,此方法对缓冲区内容的修改强行写入文件;
-
load():将缓冲区的内容载入内存,并返回该缓冲区的引用;
-
isLoaded():如果缓冲区的内容在物理内存中,则返回真,否则返回假;
案例对比
这里通过采用ByteBuffer和MappedByteBuffer分别读取大小约为5M的文件"src/1.ppt"来比较两者之间的区别,method3()是采用MappedByteBuffer读取的,method4()对应的是ByteBuffer。
-
public static void method4(){
-
RandomAccessFile aFile = null;
-
FileChannel fc = null;
-
try{
-
aFile = new RandomAccessFile("src/1.ppt","rw");
-
fc = aFile.getChannel();
-
long timeBegin = System.currentTimeMillis();
-
ByteBuffer buff = ByteBuffer.allocate((int) aFile.length());
-
buff.clear();
-
fc.read(buff);
-
//System.out.println((char)buff.get((int)(aFile.length()/2-1)));
-
//System.out.println((char)buff.get((int)(aFile.length()/2)));
-
//System.out.println((char)buff.get((int)(aFile.length()/2)+1));
-
long timeEnd = System.currentTimeMillis();
-
System.out.println("Read time: "+(timeEnd-timeBegin)+"ms");
-
}catch(IOException e){
-
e.printStackTrace();
-
}finally{
-
try{
-
if(aFile!=null){
-
aFile.close();
-
}
-
if(fc!=null){
-
fc.close();
-
}
-
}catch(IOException e){
-
e.printStackTrace();
-
}
-
}
-
}
-
public static void method3(){
-
RandomAccessFile aFile = null;
-
FileChannel fc = null;
-
try{
-
aFile = new RandomAccessFile("src/1.ppt","rw");
-
fc = aFile.getChannel();
-
long timeBegin = System.currentTimeMillis();
-
MappedByteBuffer mbb = fc.map(FileChannel.MapMode.READ_ONLY, 0, aFile.length());
-
// System.out.println((char)mbb.get((int)(aFile.length()/2-1)));
-
// System.out.println((char)mbb.get((int)(aFile.length()/2)));
-
//System.out.println((char)mbb.get((int)(aFile.length()/2)+1));
-
long timeEnd = System.currentTimeMillis();
-
System.out.println("Read time: "+(timeEnd-timeBegin)+"ms");
-
}catch(IOException e){
-
e.printStackTrace();
-
}finally{
-
try{
-
if(aFile!=null){
-
aFile.close();
-
}
-
if(fc!=null){
-
fc.close();
-
}
-
}catch(IOException e){
-
e.printStackTrace();
-
}
-
}
-
}
通过在入口函数main()中运行:
-
method3();
-
System.out.println("=============");
-
method4();
输出结果(运行在普通PC机上):
-
Read time: 2ms
-
=============
-
Read time: 12ms
通过输出结果可以看出彼此的差别,一个例子也许是偶然,那么下面把5M大小的文件替换为200M的文件,输出结果:
-
Read time: 1ms
-
=============
-
Read time: 407ms
可以看到差距拉大。
注:MappedByteBuffer有资源释放的问题:被MappedByteBuffer打开的文件只有在垃圾收集时才会被关闭,而这个点是不确定的。在Javadoc中这里描述:A mapped byte buffer and the file mapping that it represents remian valid until the buffer itself is garbage-collected。详细可以翻阅参考资料5和6.
六、其余功能介绍
看完以上陈述,详细大家对NIO有了一定的了解,下面主要通过几个案例,来说明NIO的其余功能,下面代码量偏多,功能性讲述偏少。
Scatter/Gatter
分散(scatter)从Channel中读取是指在读操作时将读取的数据写入多个buffer中。因此,Channel将从Channel中读取的数据“分散(scatter)”到多个Buffer中。
聚集(gather)写入Channel是指在写操作时将多个buffer的数据写入同一个Channel,因此,Channel 将多个Buffer中的数据“聚集(gather)”后发送到Channel。
scatter / gather经常用于需要将传输的数据分开处理的场合,例如传输一个由消息头和消息体组成的消息,你可能会将消息体和消息头分散到不同的buffer中,这样你可以方便的处理消息头和消息体。
案例:
-
import java.io.File;
-
import java.io.FileNotFoundException;
-
import java.io.FileOutputStream;
-
import java.io.IOException;
-
import java.io.OutputStream;
-
import java.nio.ByteBuffer;
-
import java.nio.channels.Channel;
-
import java.nio.channels.FileChannel;
-
public class ScattingAndGather
-
{
-
public static void main(String args[]){
-
gather();
-
}
-
public static void gather()
-
{
-
ByteBuffer header = ByteBuffer.allocate(10);
-
ByteBuffer body = ByteBuffer.allocate(10);
-
byte [] b1 = {'0', '1'};
-
byte [] b2 = {'2', '3'};
-
header.put(b1);
-
body.put(b2);
-
ByteBuffer [] buffs = {header, body};
-
try
-
{
-
FileOutputStream os = new FileOutputStream("src/scattingAndGather.txt");
-
FileChannel channel = os.getChannel();
-
channel.write(buffs);
-
}
-
catch (IOException e)
-
{
-
e.printStackTrace();
-
}
-
}
-
}
transferFrom & transferTo
FileChannel的transferFrom()方法可以将数据从源通道传输到FileChannel中。
-
public static void method1(){
-
RandomAccessFile fromFile = null;
-
RandomAccessFile toFile = null;
-
try
-
{
-
fromFile = new RandomAccessFile("src/fromFile.xml","rw");
-
FileChannel fromChannel = fromFile.getChannel();
-
toFile = new RandomAccessFile("src/toFile.txt","rw");
-
FileChannel toChannel = toFile.getChannel();
-
long position = 0;
-
long count = fromChannel.size();
-
System.out.println(count);
-
toChannel.transferFrom(fromChannel, position, count);
-
}
-
catch (IOException e)
-
{
-
e.printStackTrace();
-
}
-
finally{
-
try{
-
if(fromFile != null){
-
fromFile.close();
-
}
-
if(toFile != null){
-
toFile.close();
-
}
-
}
-
catch(IOException e){
-
e.printStackTrace();
-
}
-
}
-
}
方法的输入参数position表示从position处开始向目标文件写入数据,count表示最多传输的字节数。如果源通道的剩余空间小于 count 个字节,则所传输的字节数要小于请求的字节数。此外要注意,在SoketChannel的实现中,SocketChannel只会传输此刻准备好的数据(可能不足count字节)。因此,SocketChannel可能不会将请求的所有数据(count个字节)全部传输到FileChannel中。
transferTo()方法将数据从FileChannel传输到其他的channel中。
-
public static void method2()
-
{
-
RandomAccessFile fromFile = null;
-
RandomAccessFile toFile = null;
-
try
-
{
-
fromFile = new RandomAccessFile("src/fromFile.txt","rw");
-
FileChannel fromChannel = fromFile.getChannel();
-
toFile = new RandomAccessFile("src/toFile.txt","rw");
-
FileChannel toChannel = toFile.getChannel();
-
long position = 0;
-
long count = fromChannel.size();
-
System.out.println(count);
-
fromChannel.transferTo(position, count,toChannel);
-
}
-
catch (IOException e)
-
{
-
e.printStackTrace();
-
}
-
finally{
-
try{
-
if(fromFile != null){
-
fromFile.close();
-
}
-
if(toFile != null){
-
toFile.close();
-
}
-
}
-
catch(IOException e){
-
e.printStackTrace();
-
}
-
}
-
}
上面所说的关于SocketChannel的问题在transferTo()方法中同样存在。SocketChannel会一直传输数据直到目标buffer被填满。
Pipe
Java NIO 管道是2个线程之间的单向数据连接。Pipe有一个source通道和一个sink通道。数据会被写到sink通道,从source通道读取。
-
public static void method1(){
-
Pipe pipe = null;
-
ExecutorService exec = Executors.newFixedThreadPool(2);
-
try{
-
pipe = Pipe.open();
-
final Pipe pipeTemp = pipe;
-
exec.submit(new Callable<Object>(){
-
-
public Object call() throws Exception
-
{
-
Pipe.SinkChannel sinkChannel = pipeTemp.sink();//向通道中写数据
-
while(true){
-
TimeUnit.SECONDS.sleep(1);
-
String newData = "Pipe Test At Time "+System.currentTimeMillis();
-
ByteBuffer buf = ByteBuffer.allocate(1024);
-
buf.clear();
-
buf.put(newData.getBytes());
-
buf.flip();
-
while(buf.hasRemaining()){
-
System.out.println(buf);
-
sinkChannel.write(buf);
-
}
-
}
-
}
-
});
-
exec.submit(new Callable<Object>(){
-
-
public Object call() throws Exception
-
{
-
Pipe.SourceChannel sourceChannel = pipeTemp.source();//向通道中读数据
-
while(true){
-
TimeUnit.SECONDS.sleep(1);
-
ByteBuffer buf = ByteBuffer.allocate(1024);
-
buf.clear();
-
int bytesRead = sourceChannel.read(buf);
-
System.out.println("bytesRead="+bytesRead);
-
while(bytesRead >0 ){
-
buf.flip();
-
byte b[] = new byte[bytesRead];
-
int i=0;
-
while(buf.hasRemaining()){
-
b[i]=buf.get();
-
System.out.printf("%X",b[i]);
-
i++;
-
}
-
String s = new String(b);
-
System.out.println("=================||"+s);
-
bytesRead = sourceChannel.read(buf);
-
}
-
}
-
}
-
});
-
}catch(IOException e){
-
e.printStackTrace();
-
}finally{
-
exec.shutdown();
-
}
-
}
DatagramChannel
Java NIO中的DatagramChannel是一个能收发UDP包的通道。因为UDP是无连接的网络协议,所以不能像其它通道那样读取和写入。它发送和接收的是数据包。
-
public static void reveive(){
-
DatagramChannel channel = null;
-
try{
-
channel = DatagramChannel.open();
-
channel.socket().bind(new InetSocketAddress(8888));
-
ByteBuffer buf = ByteBuffer.allocate(1024);
-
buf.clear();
-
channel.receive(buf);
-
buf.flip();
-
while(buf.hasRemaining()){
-
System.out.print((char)buf.get());
-
}
-
System.out.println();
-
}catch(IOException e){
-
e.printStackTrace();
-
}finally{
-
try{
-
if(channel!=null){
-
channel.close();
-
}
-
}catch(IOException e){
-
e.printStackTrace();
-
}
-
}
-
}
-
public static void send(){
-
DatagramChannel channel = null;
-
try{
-
channel = DatagramChannel.open();
-
String info = "I'm the Sender!";
-
ByteBuffer buf = ByteBuffer.allocate(1024);
-
buf.clear();
-
buf.put(info.getBytes());
-
buf.flip();
-
int bytesSent = channel.send(buf, new InetSocketAddress("10.10.195.115",8888));
-
System.out.println(bytesSent);
-
}catch(IOException e){
-
e.printStackTrace();
-
}finally{
-
try{
-
if(channel!=null){
-
channel.close();
-
}
-
}catch(IOException e){
-
e.printStackTrace();
-
}
-
}
-
}