@
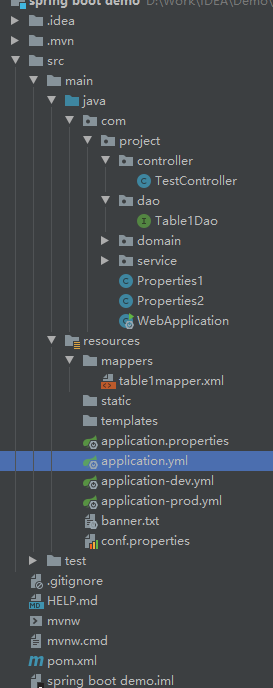
目录
1、pom.xml
<?xml version="1.0" encoding="UTF-8"?>
<project xmlns="http://maven.apache.org/POM/4.0.0" xmlns:xsi="http://www.w3.org/2001/XMLSchema-instance"
         xsi:schemaLocation="http://maven.apache.org/POM/4.0.0 https://maven.apache.org/xsd/maven-4.0.0.xsd">
    <modelVersion>4.0.0</modelVersion>

    <groupId>z.project.springboot</groupId>
    <artifactId>spring boot demo</artifactId>
    <version>0.0.1-SNAPSHOT</version>
    <packaging>jar</packaging>
    <name>spring boot demo</name>
    <description>Demo project for Spring Boot</description>

    <properties>
        <project.build.sourceEncoding>UTF-8</project.build.sourceEncoding>
        <project.reporting.outputEncoding>UTF-8</project.reporting.outputEncoding>
        <java.version>1.8</java.version>
    </properties>

    <!-- 一个特殊的starter,它用来提供相关的Maven默认依赖。使用它之后,常用的包依赖可以省去version标签 -->
    <parent>
        <groupId>org.springframework.boot</groupId>
        <artifactId>spring-boot-starter-parent</artifactId>
        <version>2.3.0.RELEASE</version>
        <relativePath/> <!-- lookup parent from repository -->
    </parent>

    <dependencies>
        <!-- 核心Spring Boot starter,包括自动配置支持,日志和YAML -->
        <dependency>
            <groupId>org.springframework.boot</groupId>
            <artifactId>spring-boot-starter</artifactId>
        </dependency>
        <!-- 对全栈web开发的支持, 包括Tomcat和spring-webmvc -->
		<dependency>
			<groupId>org.springframework.boot</groupId>
			<artifactId>spring-boot-starter-web</artifactId>
		</dependency>
        <!-- 对常用测试依赖的支持,包括JUnit, Hamcrest和Mockito,还有spring-test模块 -->
        <dependency>
            <groupId>org.springframework.boot</groupId>
            <artifactId>spring-boot-starter-test</artifactId>
            <scope>test</scope>
            <!-- 排除依赖 -->
            <exclusions>
                <exclusion>
                    <groupId>org.junit.vintage</groupId>
                    <artifactId>junit-vintage-engine</artifactId>
                </exclusion>
            </exclusions>
        </dependency>
        <!-- spring boot热部署 -->
        <dependency>
            <groupId>org.springframework.boot</groupId>
            <artifactId>spring-boot-devtools</artifactId>
            <!-- 可选依赖,其他项目引入该项目不会引入该包 -->
            <optional>true</optional>
        </dependency>

        <!-- mybatis -->
        <dependency>
            <groupId>org.mybatis.spring.boot</groupId>
            <artifactId>mybatis-spring-boot-starter</artifactId>
            <version>2.1.2</version>
        </dependency>
        <dependency>
            <groupId>mysql</groupId>
            <artifactId>mysql-connector-java</artifactId>
        </dependency>
    </dependencies>

    <build>
        <plugins>
            <plugin>
                <groupId>org.springframework.boot</groupId>
                <artifactId>spring-boot-maven-plugin</artifactId>
            </plugin>
        </plugins>
    </build>

</project>
2、application.yml
application.properties和application.yml
yml会先执行,而后被同名的properties覆盖,而指定了spring.profiles.active:则properties无效
spring:
  profiles:
    active: dev
2、application-dev.yml
server:
  port: 80
spring:
  devtools:
    restart:
#      热部署
      enabled: true
#      更新目录
      additional-paths: src/main/java
#  页面不加缓存
  freemarker:
    cache: false
  datasource:
    driver-class-name: com.mysql.jdbc.Driver
    url: jdbc:mysql://localhost:3306/db?useSSL=false&useUnicode=true&characterEncoding=utf8&serverTimezone=UTC
    username: root
    password: 123456
mybatis:
#  扫描mapper
  mapper-locations: classpath:mappers/*.xml
  configuration:
#    开启驼峰命名
    map-underscore-to-camel-case: true
3、WebApplication.java
Spring boot 启动核心
package com.project;

import org.mybatis.spring.annotation.MapperScan;
import org.springframework.boot.SpringApplication;
import org.springframework.boot.autoconfigure.SpringBootApplication;

@MapperScan("com.project.dao")//mybatis必需配置扫描的接口
@SpringBootApplication
public class WebApplication {
	public static void main(String[] args) {
		SpringApplication.run(WebApplication.class, args);
	}
}
4、Table1Dao.java
实体自行添加
package com.project.dao;

import com.project.domain.Table1;
import org.apache.ibatis.annotations.Mapper;

import java.util.List;

@Mapper
public interface Table1Dao {
    List<Table1> findAll();
}
5、Table1Mapper.xml
mybatis的动态代理
<?xml version="1.0" encoding="UTF-8" ?>
<!DOCTYPE mapper
        PUBLIC "-//mybatis.org//DTD Mapper 3.0//EN"
        "http://mybatis.org/dtd/mybatis-3-mapper.dtd">
<mapper namespace="com.project.dao.Table1Dao">
    <select id="findAll" resultType="com.project.domain.Table1">
        select * from table1 where 100 > id
    </select>
</mapper>
到这里会 spring mvc 的就已经知道怎么用了
其他
application.properties
#自定义属性
com.ccw.attribute1=value1
com.ccw.attribute2=value2
com.ccw.attribute3=${com.ccw.attribute1} and ${com.ccw.attribute2}
#随机生成
com.ccw.rand=${random.value}


#spring boot 配置文件配置

#修改端口
server.port=8080

#将所有资源重定位到/resources/**路径
#spring.mvc.static-path-pattern=/resources/**
获取application.properties属性
package com.project;

import org.springframework.beans.factory.annotation.Value;
import org.springframework.stereotype.Component;

@Component
public class Properties1 {
    //获取配置文件自定义属性
    @Value("${com.ccw.attribute1}")
    private String attribute1;
    @Value("${com.ccw.attribute2}")
    private String attribute2;
    @Value("${com.ccw.attribute3}")
    private String attribute3;
    @Value("${com.ccw.rand}")
    private String rand;

    public void show() {
        System.out.println(attribute1 + "," + attribute2 + "," + attribute3);
        System.out.println(rand);
    }
}
自定义配置文件属性
#自定义属性
com.ccw1.attribute1=value1
com.ccw1.attribute2=value2
com.ccw1.attribute3=${com.ccw1.attribute1} and ${com.ccw1.attribute2}
获取自定义配置文件属性
package com.project;

import org.springframework.boot.context.properties.ConfigurationProperties;
import org.springframework.context.annotation.PropertySource;
import org.springframework.stereotype.Component;

@Component
@ConfigurationProperties(prefix = "com.ccw1")
@PropertySource("classpath:conf.properties")
public class Properties2 {
    //获取配置文件自定义属性
    private String attribute1;
    private String attribute2;
    private String attribute3;

    public String getAttribute1() {
        return attribute1;
    }

    public void setAttribute1(String attribute1) {
        this.attribute1 = attribute1;
    }

    public String getAttribute2() {
        return attribute2;
    }

    public void setAttribute2(String attribute2) {
        this.attribute2 = attribute2;
    }

    public String getAttribute3() {
        return attribute3;
    }

    public void setAttribute3(String attribute3) {
        this.attribute3 = attribute3;
    }
}
项目目录