1.安装 yum install git
2.增加用户 useradd git -d /home/git -g git
3.查看公钥鉴权文件是否存在 cat /home/git/.ssh/authorized_keys
4.不存在的话,新建
cd /home/git/
mkdir .ssh
chmod 755 .ssh
touch .ssh/authorized_keys
chmod 644 .ssh/authorized_keys
5.生成一个密钥对
ssh-keygen -t rsa -C "fallshum"是否输入密码,默认,一路Enter往下走就行
Generating public/private rsa key pair.
Enter file in which to save the key (/root/.ssh/id_rsa):
Enter passphrase (empty for no passphrase):
Enter same passphrase again:
Your identification has been saved in /root/.ssh/id_rsa.
Your public key has been saved in /root/.ssh/id_rsa.pub.
The key fingerprint is:
1d:f1:b6:c9:42:2b:ab:1d:43:5a:72:fc:31:aa:38:9d fallshum
The key's randomart image is:
+--[ RSA 2048]----+
|          .      |
|           o     |
|          o o    |
|       . o = o   |
|      . S * +    |
|       * = +     |
|     ...= .      |
|    ..E+ o       |
|    ..o .        |
+-----------------+
5.1 把生成的公钥写入/home/git/.ssh/authorized_keys,
cat /root/.ssh/id_rsa.pub >> /home/git/.ssh/authorized_keys
查看 cat /home/git/.ssh/authorized_keys
5.2
把私钥放到客户端的.ssh目录下,先获取刚才生成的私钥
cat /root/.ssh/id_rsa复制出来放到本地客户端
6.初始化Git仓库 修改所有者
cd /home/git/
git init --bare fallshum.git
chown -R git:git fallshum.git/
5 客户端克隆仓库
客户端打开Git Bash,clone服务端仓库
git clone git@192.168.1.1:/home/git/fallshum.git只要看到Checking connectivity... done就说明OK了
------------------------------------------------------------------------
6.免密登录
进入sshd配置文件 vim /etc/ssh/sshd_config
修改为以下配置
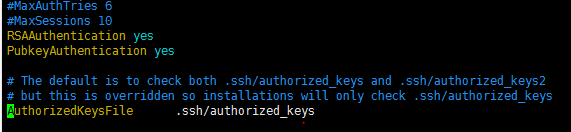
保证 .ssh目录权限 700
保证 authorized_keys 目录权限 600
7.配置多个公匙 要用空格隔开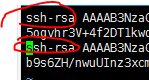
方法2 :
1//添加用户git,(注意这里使用的是adduser,而不是useradd。)
root@myUbuntu:/# adduser git
2. 设置密码 passwd git
3.
su git
//切换git用户,查看是否成功
git@myUbuntu:/$
exit
//退出重新登录,验证密码
4.
//git用户创建成功后,会在home目录下自动生成git的用户目录
5.
//收集所有需要登录的用户的公钥,就是他们自己的id_rsa.pub文件,把所有公钥复制粘贴到/home/git/.ssh/authorized_keys文件里,一行一个。
//我的git目录里没有这个文件,所以需要手动创建
root@myUbuntu:/home/git#
mkdir .ssh
root@myUbuntu:/home/git#
cd .ssh/
root@myUbuntu:/home/git/.ssh# touch authorized_keys
root@myUbuntu:/home/git/.ssh#
vi authorized_keys
//将公钥添加进去
//进入根目录下的srv目录(本目录是Linux为了server而建立的,一般里面是空的)
root@myUbuntu:/srv# mkdir sample.git
root@myUbuntu:/srv# ls
sample.git
root@myUbuntu:/srv#
6.
git init --bare sample.git/
//注意,在srv目录下进行git的初始化
初始化空的 Git 版本库于 /srv/sample.git/
//Git就会创建一个裸仓库,裸仓库没有工作区,因为服务器上的Git仓库纯粹是为了共享,所以不让用户直接登录到服务器上去改工作区,并且服务器上的Git仓库通常都以.git结尾。所以,修改sample.git的用户和用户组的归属
root@myUbuntu:/srv#
7.
chown -R git:git sample.git/
root@myUbuntu:/srv# ll
总用量 12
drwxr-xr-x 3 root root 4096 5月 13 19:22 ./
drwxr-xr-x 22 root root 4096 4月 29 20:40 ../
drwxr-xr-x 7
git git
4096 5月 13 19:22 sample.git/
----------------------------------------------------------------
8.配置账户权限
修改/etc/passwd文件,修改
接下来遇到的问题
9.
克隆仓库: git clone tkgitserver@xxx9:/home/tkgitserver/fallshum.git
克隆仓库: git clone git@xxx:/home/git/gitStore.git
遇到的问题 1:
The authenticity of host 'IP' can't be established:
解决
https://yq.aliyun.com/articles/288093
解决方法
- 根据上面的理论,我们用下面的命令登录就不会出问题了。
ssh -o StrictHostKeyChecking=no username@47.95.xxx.xxx- 还有一种方法是彻底去掉提示,修改/etc/ssh/ssh_config文件(或$HOME/.ssh/config)中的配置,添加如下两行配置:
StrictHostKeyChecking no
UserKnownHostsFile /dev/null
修改好配置后,重新启动sshd服务即可,命令为:/etc/init.d/sshd restart (或 systemctl restart sshd )
当然,这是内网中非常信任的服务器之间的ssh连接,所以不考虑安全问题,就直接去掉了主机密钥(host key)的检查。
2.no such identity: C:/Users/Mt.tk/.ssh/id_rsa_tkserver: No such file or directory
git@3xxxxxxx: Permission denied (publickey,gssapi-keyex,gssapi-with-mic,password).
修改设置文件权限
-
chown -R git:git /home/git
-
chmod 700 /home/git
-
chmod 700 /home/git/.ssh
-
chmod 644 /home/git/.ssh/authorized_keys
-
chmod 600 /root/.ssh/id_rsa
3. 将本地的公匙 合并于git服务器 /服务端为其他程序分配git权限
将客户端的密钥写入密钥存储文件:
[gituser@GitServer ~/.ssh]$ cat id_rsa.pub >> authorized_keys
4.连接自己搭建的 git服务器时  使用   $ git clone 你的用户名@你的服务器地址:/home/tkgitserver/fallshum.git