上周分享了几篇关于React组件封装方面的博文,这周就来分享几篇关于Vue组件封装方面的博文,也好让大家能更好地了解React和Vue在组件封装方面的区别。
在封装Vue组件时,我依旧会交叉使用函数式组件的方式来实现。关于函数式组件,我们可以把它想像成组件里的一个函数,入参是渲染上下文(render context),返回值是渲染好的HTML(VNode)。它比较适用于外层组件仅仅是对内层组件的一次逻辑封装,而渲染的模板结构变化扩展不多的情况,且它一定是无状态、无实例的,无状态就意味着它没有created、mounted、updated等Vue的生命周期函数,无实例就意味着它没有响应式数据data和this上下文。
我们先来一个简单的Vue函数式组件的例子吧,然后照着这个例子来详细介绍一下。
export default {
  functional: true,
  props: {},
  render(createElement, context) {
     return createElement('span', 'hello world')
  }
}
Vue提供了一个functional开关,设置为true后,就可以让组件变为无状态、无实例的函数式组件。因为只是函数,所以渲染的开销相对来说较小。
函数式组件中的Render函数,提供了两个参数createElement和context,我们先来了解下第一个参数createElement。
createElement说白了就是用来创建虚拟DOM节点VNode的。它接收三个参数,第一个参数可以是DOM节点字符串,也可以是一个Vue组件,还可以是一个返回字符串或Vue组件的函数;第二个参数是一个对象,这个参数是可选的,定义了渲染组件所需的参数;第三个参数是子级虚拟节点,可以是一个由createElement函数创建的组件,也可以是一个普通的字符串如:'hello world',还可以是一个数组,当然也可以是一个返回字符串或Vue组件的函数。
createElement有几点需要注意:
-
createElement第一个参数若是组件,则第三个参数可省略,即使写上去也无效;
-
render函数在on事件中可监听组件$emit发出的事件
-
在2.3.0之前的版本中,如果一个函数式组件想要接收prop,则props选项是必须的。在2.3.0或以上的版本中,你可以省略props选项,组件上所有的attribute都会被自动隐式解析为prop。
函数式组件中Render的第二个参数是context上下文,data、props、slots、children以及parent都可以通过context来访问。
在2.5.0及以上版本中,如果你使用了单文件组件,那么基于模板的函数式组件可以这样声明:<template functional></template>, 但是如果Vue组件中的render函数存在,则Vue构造函数不会从template选项或通过el选项指定的挂载元素中提取出的HTML模板编译渲染函数,也就是说一个组件中templete和render函数不能共存,如果一个组件中有了templete,即使有了render函数,render函数也不会执行,因为template选项的优先级比render选项的优先级高。
到这里,Vue函数式组件介绍的就差不多了,我们就来看看Element的表格组件是如何通过函数式组件来实现封装的吧。
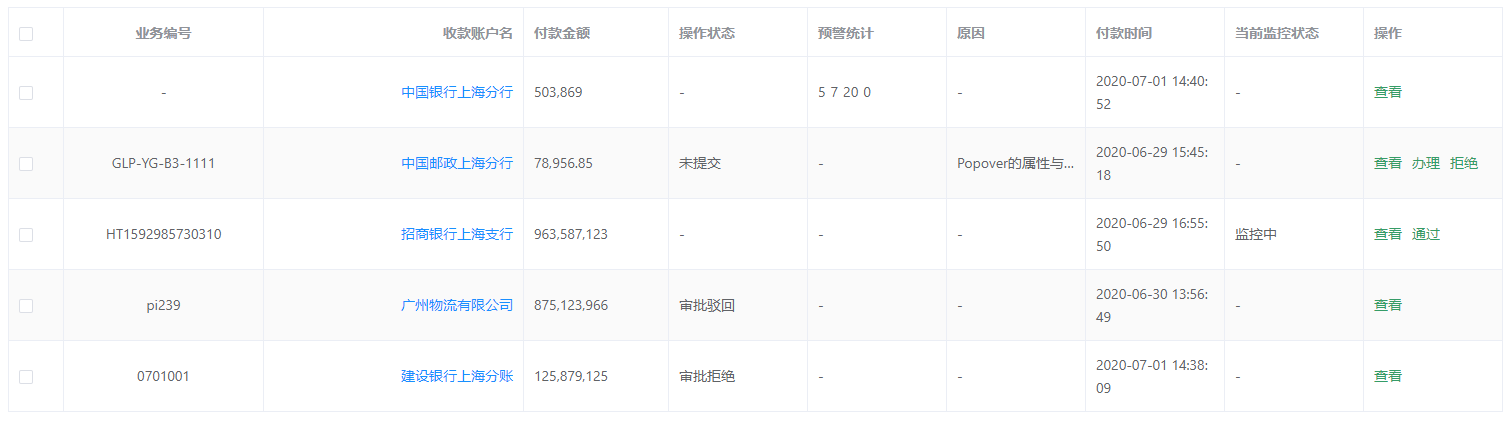
效果图:
1、所封装的table组件
<template>
  <el-table :data="config.tableData" style=" 100%" v-on="cfg.on" v-bind="cfg.attrs">
    <el-table-column v-if="cfg.hasCheckbox" type="selection" width="55" label="xx" />
    <el-table-column v-for="n in cfg.headers" :prop="n.prop" :label="n.name" :key="n.prop" v-bind="{...columnAttrs, ...n.attrs}">
      <template slot-scope="{row}">
        <Cell :config="n" :data="row" />
      </template>
    </el-table-column>
  </el-table>
</template>

<script>
import Cell from './cell'

export default {
  components: {
    Cell,
  },
  props: {
    config: Object,
  },
  data(){
    return {
      columnAttrs: {
        align: 'left',
        resizable: false,
      },
      cfg: {
        on: this.getTableEvents(),
        attrs: {
          border: true,
          stripe: true,
        },
        ...this.config,
      },
      checked: [],
    }
  },
  methods: {
    getTableEvents(){
      let {hasCheckbox = false} = this.config, events = {}, _this = this;
      if(hasCheckbox){
        //绑定事件
        Object.assign(events, {
          'selection-change'(v){
          _this.checked = v;
          },
        });
      }

      return events;
    },
    getChecked(){
      return this.checked;
    },
  },
}
</script>
2、汇总表格每一列的cell.js:
import * as Components from './components';
let empty = '-'
export default {
  props: {
    config: Object,
    data: Object,
  },
  functional: true,
  render: (h, c) => {
    let {props: {config = {}, data = {}}} = c, {prop, type = 'Default'} = config, value = data[prop] || config.value, isEmpty = value === '' || value === undefined;
    return isEmpty ? h(Components.Default, {props: {value: empty}}) : h(Components[type], {props: {value, empty, data, ...config}});
  }
}
3、不同于封装React AntD的table表格组件时将表格的每一列的渲染都集中在了一个table.js中,本次封装将每一列的渲染单独分开成多个vue组件,最后再合并在一个components.js文件中一起进行匹配。
1)整合文件components.js:
import Date         from './Date';
import Default      from './Default';
import Currency     from './Currency';
import Enum         from './Enum';
import Action       from './Action';
import Link         from './Link';
import Loop         from './Loop';
import Popover      from './Popover';

export {
  Default,
  Date,
  Currency,
  Enum,
  Action,
  Link,
  Loop,
  Popover,
}
2)日期列Date.vue
<template functional>
    <span>{{props.value | date(props.format)}}</span>
</template>
3)默认列Default.vue
<template functional>
    <span>{{props.value}}</span>
</template>
4)金额千分位列Currency.vue
<template functional>
    <span>{{props.value | currency}}</span>
</template>
5)映射列Enum.js
let mapIdAndKey = list => list.reduce((c, i) => ({...c, [i.key]: i}), {});

let STATUS = {
    order: mapIdAndKey([
        {
            id: 'draft',
            key: 'CREATED',
            val: '未提交',
        },
        {
            id: 'pending',
            key: 'IN_APPROVAL',
            val: '审批中',
        },
        {
            id: 'reject',
            key: 'REJECT',
            val: '审批驳回',
        },
        {
            id: 'refuse',
            key: 'REFUSE',
            val: '审批拒绝',
        },
        {
            id: 'sign',
            key: 'CONTRACT_IN_SIGN',
            val: '合同签署中',
        },
        {
            id: 'signDone',
            key: 'CONTRACT_SIGNED',
            val: '合同签署成功',
        },
        {
            id: 'lendDone',
            key: 'LENDED',
            val: '放款成功',
        },
        {
            id: 'lendReject',
            key: 'LOAN_REJECT',
            val: '放款驳回',
        },
        {
            id: 'cancel',
            key: 'CANCEL',
            val: '取消成功',
        },
        {
            id: 'inLend',
            key: 'IN_LOAN',
            val: '放款审批中',
        },
    ]),
    monitor: mapIdAndKey([
        {
            key: '00',
            val: '未监控',
        },
        {
            key: '01',
            val: '监控中',
        },
    ]),
}

export default {
    functional: true,
    render(h, {props: {value, Enum, empty}, parent}){
        let enums = Object.assign({}, STATUS, parent.$store.getters.dictionary),
            {name = '', getVal = (values, v) => values[v]} = Enum, _value = getVal(enums[name], value);

        if( _value === undefined) return h('span',  _value === undefined ? empty : _value);

        let {id, val} = _value;
        return h('span', {staticClass: id}, [h('span', val)]);
    }
}
6)操作列Action.js
const getAcitons = (h, value, data) => {
  let result = value.filter(n => {
    let {filter = () => true} = n;
    return filter.call(n, data);
  });

  return result.map(a => h('span', {class: 'btn', on: {click: () => a.click(data)}, key: a.prop}, a.label))
}

export default {
  functional: true,
  render: (h, {props: {value, data}}) => {
    return h('div', {class: 'action'}, getAcitons(h, value, data))
  },
}
7)带有可跳转链接的列Link.vue
<template functional>
  <router-link :to="{ path: props.url, query: {id: props.data.id} }">{{props.value}}</router-link>
</template>
8)可循环展示数组数据的列Loop.vue
<template functional>
  <div v-html="props.Loop(props.value)" />
</template>
9)当内容过多需要省略并在鼠标移入后弹出一个提示窗显示全部内容的列Popover.vue
<template functional>
  <el-popover
    placement="top-start"
    width="300"
    trigger="hover"
    popper-class="popover"
    :content="props.value">
    <span slot="reference" class="popover-txt">{{props.value}}</span>
  </el-popover>
</template>
<style scoped>
.popover-txt{
  overflow:hidden;
  text-overflow:ellipsis;
  white-space:nowrap;
  display: block;
  cursor: pointer;
}
</style>
从以上代码中可以看出,我既使用了基于render函数类型的函数式组件也使用了基于模板的函数式组件,主要是为了在封装时的方便,毕竟使用render这个最接近编译器的函数还是有点麻烦的,不如基于模板的函数式组件来的方便。
4、使用封装后的表格table组件:
<template>
  <div style="margin: 20px;">
    <el-button type="primary" v-if="excelExport" @click="download">获取勾选的表格数据</el-button>
    <Table :config="config" ref="table" />
  </div>
</template>

<script>
import Table from '@/components/table'

export default {
  components: {
    Table,
  },
  data() {
    return {
      config: {
        headers: [
          {prop: 'contractCode', name: '业务编号', attrs: { 200, align: 'center'}},
          {prop: 'payeeAcctName', name: '收款账户名', type: 'Link', url: 'otherElTable', attrs: { 260, align: 'right'}},
          {prop: 'tradeAmt', name: '付款金额', type: 'Currency'},
          {prop: 'status', name: '操作状态', type: 'Enum', Enum: {name: 'order'}},
          {prop: 'statistic', name: '预警统计', type: 'Loop', Loop: (val) => this.loop(val)},
          {prop: 'reason', name: '原因', type: 'Popover'},
          {prop: 'payTime', name: '付款时间', type: "Date", format: 'yyyy-MM-dd hh:mm:ss'},   //不设置format的话,日期格式默认为yyyy/MM/dd
          {prop: 'monitorStatus', name: '当前监控状态', type: 'Enum', Enum: {name: 'monitor'}},
        ].concat(this.getActions()),
        tableData: [
          {id: 1, contractCode: '', payeeAcctName: '中国银行上海分行', tradeAmt: '503869', status: '00', payTime: 1593585652530,
            statistic:[
              {level: 3, total: 5},
              {level: 2, total: 7},
              {level: 1, total: 20},
              {level: 0, total: 0}
            ]
          },
          {id: 2, contractCode: 'GLP-YG-B3-1111', payeeAcctName: '中国邮政上海分行', tradeAmt: '78956.85', status: 'CREATED', payTime: 1593416718317,
            reason: 'Popover的属性与Tooltip很类似,它们都是基于Vue-popper开发的,因此对于重复属性,请参考Tooltip的文档,在此文档中不做详尽解释。',
          },
          {id: 3, contractCode: 'HT1592985730310', payeeAcctName: '招商银行上海支行', tradeAmt: '963587123', status: 'PASS', payTime: 1593420950772, monitorStatus: '01'},
          {id: 4, contractCode: 'pi239', payeeAcctName: '广州物流有限公司', tradeAmt: '875123966', status: 'REJECT', payTime: 1593496609363},
          {id: 5, contractCode: '0701001', payeeAcctName: '建设银行上海分账', tradeAmt: '125879125', status: 'REFUSE', payTime: 1593585489177},
        ],
        hasCheckbox: true,
      },
      status: "01",
      permission: ["handle", "pass", "refuse", "reApply", 'export']
    }
  },
  computed: {
    handle() {
      return this.permission.some(n => n == "handle");
    },
    pass() {
      return this.permission.some(n => n == "pass");
    },
    reject() {
      return this.permission.some(n => n == "reject");
    },
    refuse() {
      return this.permission.some(n => n == "refuse");
    },
    excelExport(){
      return this.permission.some(n => n == "handle") && this.permission.some(n => n == "export");
    },
  },
  methods: {
    getActions(){
      return {prop: 'action', name: '操作', type: "Action", value: [
        {label: "查看", click: data => {console.log(data)}},
        {label: "办理", click: data => {}, filter: ({status}) => status == 'CREATED' && this.handle},
        {label: "通过", click: data => {}, filter: ({status}) => status == 'PASS' && this.pass},
        {label: "驳回", click: data => {}, filter: ({status}) => status == 'REJECT' && this.reject},
        {label: "拒绝", click: data => {}, filter: ({status}) => status == 'CREATED' && this.refuse},
      ]}
    },
    loop(val){
      let str = '';
      val.forEach(t => {
        str += '<span style="margin-right:5px;">' + t.total + '</span>';
      })
      return str;
    },
    download(){
      console.log(this.$refs.table.getChecked())
    },
  },
};
</script>
<style>
.action span{margin-right:10px;color:#359C67;cursor: pointer;}
</style>
关于金额千分位和时间戳格式化的实现,这里就不再贴代码了,可自行实现。