一、spring mvc
Spring框架(框架即:编程注解+xml配置的方式)MVC是Spring框架的一大特征,Spring框架有三大特征(IOC(依赖注入),AOP(面向切面),MVC(建模M-视图V-控制器C)。框架一般用于团队开发,使用分层的方式使每个人完成不同的模块,然后再组合在一起,使完成项目。
以下是Spring mvc具有的能加速开发的功能列表:
- Spring mvc中提供了一个DispatchServlet,无需额外开发
- Spring mvc中使用基于xml的配置文件,可以编辑,而无需重新编译应用程序
- Spring mvc实例化控制器,并根据用户输入来构造Bean。
- Spring mvc可以自动绑定用户输入,并正确的转换数据类型。例如,Spring mvc能自动解析字符串,并设置float或decimal类型的属性.
- Spring mvc可以校验用户输入,若校验不通过,则重定向回输入表单。输入校验是可选的,支持编程方式以及声明。关于这一点,Spring mvc内置了常见的校验器
- Spring mvc是Spring框架的一部分,可以利用Spring提供的其他能力。
- Spring mvc支持国际化和本地化。支持根据用户区域显示多国语言
- Spring mvc支持多种视图技术。最常见的JSP技术以及其他技术包括Velocity和FreeMarker.
配置spring mvc
1、导入Spring需要的jar 包

2、配置spring-mvc.xml
<?xml version="1.0" encoding="UTF-8"?>
<beans xmlns="http://www.springframework.org/schema/beans"
    xmlns:xsi="http://www.w3.org/2001/XMLSchema-instance"
    xmlns:context="http://www.springframework.org/schema/context"
    xmlns:jdbc="http://www.springframework.org/schema/jdbc"
    xmlns:jee="http://www.springframework.org/schema/jee"
    xmlns:tx="http://www.springframework.org/schema/tx"
    xmlns:aop="http://www.springframework.org/schema/aop"
    xmlns:mvc="http://www.springframework.org/schema/mvc"
    xmlns:util="http://www.springframework.org/schema/util"
    xmlns:jpa="http://www.springframework.org/schema/data/jpa"
    xsi:schemaLocation="
        http://www.springframework.org/schema/beans http://www.springframework.org/schema/beans/spring-beans-3.2.xsd
        http://www.springframework.org/schema/context http://www.springframework.org/schema/context/spring-context-3.2.xsd
        http://www.springframework.org/schema/jdbc http://www.springframework.org/schema/jdbc/spring-jdbc-3.2.xsd
        http://www.springframework.org/schema/jee http://www.springframework.org/schema/jee/spring-jee-3.2.xsd
        http://www.springframework.org/schema/tx http://www.springframework.org/schema/tx/spring-tx-3.2.xsd
        http://www.springframework.org/schema/data/jpa http://www.springframework.org/schema/data/jpa/spring-jpa-1.3.xsd
        http://www.springframework.org/schema/aop http://www.springframework.org/schema/aop/spring-aop-3.2.xsd
        http://www.springframework.org/schema/mvc http://www.springframework.org/schema/mvc/spring-mvc-3.2.xsd
        http://www.springframework.org/schema/util http://www.springframework.org/schema/util/spring-util-3.2.xsd">
<!-- HandlerMapping -->
<mvc:annotation-driven/>
开启spring mvc注解扫描,如果不基于注解:   该类需要继承  CommandController   或者 其他很多 参见  spring帮助.我用的是基于注解的,这样比较方便
<!-- 扫描Controller,Service -->
<context:component-scan
    base-package="com.包名"/>
开启组件扫描,请确保所有的控制器都在基本包下,并且不要制定一个太宽泛的基本包
</beans>
补充:
第一个为开启spring mvc注解扫描,如果不基于注解: 该类需要继承 CommandController 或者 其他很多 参见 spring帮助.我用的是基于注解的,这样比较方便
第二个为开启组件扫描
Spring使用扫描机制来找到应用程序中所有基于注解的控制器类,为了能保证Spring你那个找到你的控制器,
a.需要在Spring mvc中配置spring-context
b.在<context:component-scan base-package="com.包名"/>元素中指定控制器类的基本包
基于此,在Controller中可以方便调用了,实例见最下方
3.部署web.xml
DispatcherServlet作为Spring mvc框架中的一级控制器(前端控制器),是浏览器发送请求的入口
该Servlet的全称是org.springframework.web.servlet.DispatcherServlet.
要使用这个Servlet,需要把他配置在部署描述符(web.xml),应用servlet和servlet-mapping元素如下:
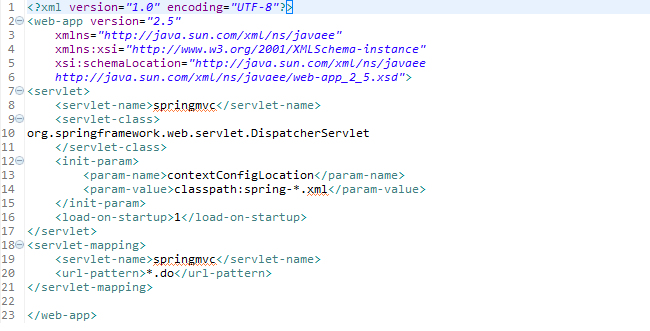
相关解释:
1、servlet元素内的on-startup元素是可选的。if存在,表示它将在应用程序启动时就装在servlet并调用它的init方法。else,则在该servlet的第一个请求是加载。
2、Dispatcher Servlet将会使用spring mvc诸多默认组件。此外,初始化时,它会寻找一个在应用程序下的web-INF目录下 的配置文件,该配置文件的命名规则如下;
servletName-servlet.xml
其中servletName是在部署描述符中的Dispatcher Servlet的名字。如图所示,本例中的servlet-name为springmvc,则在初始化的时候会找到第二步配置的springmvc.xml文件.
3、当然springmvc.xml文件也可以放到应用程序目录中的任何地方,<init-param></init-param>元素就是为了实现这个功能的。
其中的<param-name>不用改,而<param-value>则包含配置文件的路劲。
classpath:只能加载找到的第一个文件
(2) url-pattern的写法
1 三种写法
① 完全匹配
<url-pattern>/test/list.do</url-pattern>
② 目录匹配
<url-pattern>/test/*</url-pattern>
③ 扩展名匹配
<url-pattern>*.do</url-pattern>
2 注意事项
- 容器会首先查找完全匹配,如果找不到,再查找目录匹配,如果也找不到,就查找扩展名匹配。
- 如果一个请求匹配多个“目录匹配”,容器会选择最长的匹配。
- 定义”/*.action”这样一个看起来很正常的匹配会报错?因为这个匹配即属于路径映射,也属于扩展映射,导致容器无法判断。
- “/” 是用来定义default servlet映射的。
- *.do它不是一个文件,并没有一个真正的.do文件存在,只是一个servlet映射.意思是URL里一切以.do结尾的URL都驱动servlet里设置的那个类;
而*则是所有请求都交由servlet里设置的那个类处理!
二、MyBatis的配置和使用
Spring与MyBatis结合,主要是由Spring管理数据库访问组件Dao,数据库访问组件主要是基于MyBatis实现,在Spring环境中使用MyBatis实现数据库访问组件过程是:首先需要引入一个Spring和MyBatis整合的开发包 mybatis-spring-1.2.2.jar。在Spring配置中定义SqlSessionFactoryBean,等价于SqlSessionFactory放入Spring容器管理。(不需要开发者利用手工创建SqlSessionFactory对象,需要开发者定义式注入连接信息和SQL定义的XML信息)在Spring配置中定义MapperFactoryBean,可以根据指定的Mapper接口生成一个Mapper实现类接口。需引入引入开发包:spring ioc,spring aop,dbcp,mybatis,驱动,mybatis-spring.jar。添加Spring框架的配置文件主要有applicationContext.xml,根据user表编写实体类User,编写UserMapper.xml(定义SQL语句),并且编写UserMapper接口(与UserMapper.xml映射),在applicationContext.xml中配置组件SqlSessionFactoryBean,Mapper FactoryBean。最后测试MapperFactoryBean生成的UserMapperDao实例。
MyBatis的两个特点:
1.MyBatis采用SQL与Entity映射,对JDBC封装程度较轻
2.MyBatis自己写SQL,更具有灵活性
配置MyBatis
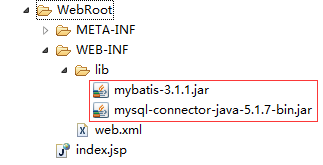
(1)导入jar包
(2)创建数据库
(3)添加MyBatis.xml配置文件
<?xml version="1.0" encoding="UTF-8"?> <beans xmlns="http://www.springframework.org/schema/beans" xmlns:xsi="http://www.w3.org/2001/XMLSchema-instance" xmlns:context="http://www.springframework.org/schema/context" xmlns:jdbc="http://www.springframework.org/schema/jdbc" xmlns:jee="http://www.springframework.org/schema/jee" xmlns:tx="http://www.springframework.org/schema/tx" xmlns:aop="http://www.springframework.org/schema/aop" xmlns:mvc="http://www.springframework.org/schema/mvc" xmlns:util="http://www.springframework.org/schema/util" xmlns:jpa="http://www.springframework.org/schema/data/jpa" xsi:schemaLocation=" http://www.springframework.org/schema/beans http://www.springframework.org/schema/beans/spring-beans-3.2.xsd http://www.springframework.org/schema/context http://www.springframework.org/schema/context/spring-context-3.2.xsd http://www.springframework.org/schema/jdbc http://www.springframework.org/schema/jdbc/spring-jdbc-3.2.xsd http://www.springframework.org/schema/jee http://www.springframework.org/schema/jee/spring-jee-3.2.xsd http://www.springframework.org/schema/tx http://www.springframework.org/schema/tx/spring-tx-3.2.xsd http://www.springframework.org/schema/data/jpa http://www.springframework.org/schema/data/jpa/spring-jpa-1.3.xsd http://www.springframework.org/schema/aop http://www.springframework.org/schema/aop/spring-aop-3.2.xsd http://www.springframework.org/schema/mvc http://www.springframework.org/schema/mvc/spring-mvc-3.2.xsd http://www.springframework.org/schema/util http://www.springframework.org/schema/util/spring-util-3.2.xsd"> <bean id="dbcp" class="org.apache.commons.dbcp.BasicDataSource"> <property name="username" value="****"> </property> <property name="password" value="***"> </property> <property name="driverClassName" value="com.mysql.jdbc.Driver"> </property> <property name="url" value="jdbc:mysql:///cloud_note"> </property> <!-- <property name="url" value="jdbc:mysql://localhost:3306/cloud_note?useUnicode=true&characterEncoding=utf-8"></property> --> </bean> <bean id="ssf" class="org.mybatis.spring.SqlSessionFactoryBean"> <property name="dataSource" ref="dbcp"> </property> <property name="mapperLocations" value="classpath:com/niuniu/sql/*.xml"> </property> </bean> <bean id="mapperscanner" class="org.mybatis.spring.mapper.MapperScannerConfigurer"> <property name="sqlSessionFactory" ref="ssf"> </property> <property name="basePackage" value="com.niuniu.dao"> </property> </bean> </beans>
(4)定义表所对应的实体类,如下图所示

代码如下:
package com.niuniu.entity;

import java.io.Serializable;

public class User implements Serializable {
    private String cn_user_id;
    private String cn_user_name;
    private String cn_user_password;
    private String cn_user_token;
    private String cn_user_nick;
    public String getCn_user_id() {
        return cn_user_id;
    }
    public void setCn_user_id(String cnUserId) {
        cn_user_id = cnUserId;
    }
    public String getCn_user_name() {
        return cn_user_name;
    }
    public void setCn_user_name(String cnUserName) {
        cn_user_name = cnUserName;
    }
    public String getCn_user_password() {
        return cn_user_password;
    }
    public void setCn_user_password(String cnUserPassword) {
        cn_user_password = cnUserPassword;
    }
    public String getCn_user_token() {
        return cn_user_token;
    }
    public void setCn_user_token(String cnUserToken) {
        cn_user_token = cnUserToken;
    }
    public String getCn_user_nick() {
        return cn_user_nick;
    }
    public void setCn_user_nick(String cnUserNick) {
        cn_user_nick = cnUserNick;
    }

}
(5)定义操作users表的sql映射文件UserMapping.xml
<?xml version="1.0" encoding="UTF-8" ?>
<!DOCTYPE mapper PUBLIC "-//ibatis.apache.org//DTD Mapper 3.0//EN"
 "http://ibatis.apache.org/dtd/ibatis-3-mapper.dtd">
<mapper namespace="com.niuniu.dao.UserDao">

<insert id="save" parameterType="com.niuniu.entity.User">
    insert into cn_user(
        cn_user_id,cn_user_name,
    cn_user_password,cn_user_token,
    cn_user_nick)
    values(#{cn_user_id},#{cn_user_name},#{cn_user_password},#{cn_user_token},#{cn_user_nick})
</insert>
<select id="findByName" parameterType="string"
resultType="com.niuniu.entity.User">
select * from cn_user
where cn_user_name=#{name}
</select>

</mapper>
(6)写Controller,进行测试。
@Controller//将类名前加上该注解,当spring启动或者web服务启动 spring会自动扫描所有包(当然,这个可以设置,见上述Springmvc的配置)
作用: 就是告诉服务器这个类是MVC中的C, 这个类可以接收用户请求、处理用户请求
@RequestMapping("/note")//这个控制类里面可以有很多方法,哪个方法用来处理用户请求,就在那个方法前面 加  @RequestMapping(“/xxxxx请求路径”)

public class LoadNoteDetailController {
    @Resource//直接使用@Resource注解一个域(field)同样是可能的。通过不暴露setter方法,代码愈发紧凑并且还提供了域不可修改的额外益处。
//正如下面将要证明的,@Resource注解甚至不需要一个显式的字符串值,在没有提供任何值的情况下,域名将被当作默认值。
//该方式被应用到setter方法的时候,默认名是从相应的属性衍生出来,换句话说,命名为'setDataSource'的方法被用来处理名为'dataSource'的属性。

    private NoteService noteService;
    @RequestMapping("/loaddetail.do")//映射到JSP的前台页面中ajax发布的请求,打开相应的页面↑
    @ResponseBody                                                                     ↑
    public NoteResult execute(String noteId){                                           ↑
        NoteResult result=noteService.loadDetail(noteId);                                  ↑
        return result;//当请求处理完毕后,返回值决定了该处理完毕后,用户将跳转到那个页面.这个很重要。service调util
    }

}
知识补充:
@Resource
@Resource默认按照ByName自动注入,有两个重要的属性:name和type,而Spring将@Resource注解的name属性解析为bean的名字,而type属性 则解析为bean的类型。所以,如果使用name属性,则使用byName的自动注入策略,而使用type属性时则使用byType自动注入策略。如果既 不制定name也不制定type属性,这时将通过反射机制使用byName自动注入策略。
@ResponseBody
作用:
该注解用于将Controller的方法返回的对象,通过适当的HttpMessageConverter转换为指定格式后,写入到Response对象的body数据区。
使用时机:
返回的数据不是html标签的页面,而是其他某种格式的数据时(如json、xml等)使用;