一、Canvas 应用场景
1.游戏
2.图表
3.动画
4.codepen.io (HTML5 动效) 最早
二、Canvas 发展历史
1.最早在apple的safari 1.3中引入
2.ie9之前的浏览器不支持Canvas
3.http://caniuse.com/
三、如何使用Canvas
1.添加canvas标签
<canvas width=500 height=500></canvas>
2.获得canvas元素
var canvas = document.getElementById('myCanvas');
3. 获得canvas上下文对象
var ctx = canvas.getContext('2d')
两个对象
1. 元素对象(canvas元素)和上下文对象(通过getContext('2d')⽅方法获取到的CanvasRenderingContext2D对象)
2. 元素对象相当于我们的画布,上下文对象相当于画笔, 我们接下来的所有操作是基于上下文对象的
绘制线段
1.ctx.moveTo(x, y); 移动到 x,y坐标点
2.ctx.lineTo(x, y); 从当前点绘制直线到x,y点
3.ctx.stroke();描边
4.ctx.lineWidth = 20; 设置线段宽度
5.ctx.closePath(); 闭合当前路径 和回到起始点的区别
6.ctx.fill(); 填充
路径与填充
1.fill和stroke方法都是作用在当前的所有子路径
2.完成一条路径后要重新开始另一条路径时必须使用beginPath()方法, betinPath开始子路径的一个新的集合
<body>
     <canvas id="cans" width=300 height=300></canvas>
     <script>
        var oCanvas = document.getElementById('cans');
        var ctx = oCanvas.getContext('2d');
        ctx.lineWidth = 20;
        ctx.moveTo(100,50);
        ctx.lineTo(100,100);
        ctx.lineTo(50,100);
        ctx.strokeStyle = 'red';
        ctx.closePath();
        ctx.stroke();
        ctx.beginPath();
        ctx.moveTo(200,200);
        ctx.lineTo(200,400);
        ctx.strokeStyle = '#000';
        ctx.stroke();
     </script>
</body>
绘制矩形
1.ctx.rect(x, y, dx, dy); (x,y原点 宽、高)
2.ctx.fillRect(x, y, dx, dy);
3.ctx.strokeRect(x, y, w, h);
擦除当前区域
1.ctx.clearRect(x, y, dx, dy);
        ctx.strokeRect(100,100,100,100);
        ctx.clearRect(0,0,300,300);
2.实现矩形落地动画
   <style>
       canvas{
            300px;
            height:300px;
            border:1px solid #000;
       }
    </style>
</head>
<body>
     <canvas id="cans" width=300 height=300></canvas>
     <script>
        var oCanvas = document.getElementById('cans');
        var ctx = oCanvas.getContext('2d');
        ctx.fillRect(100,100,50,50);
        var y = 100;
        var timer = setInterval(function(){
            ctx.clearRect(0,0,300,300)
            ctx.fillRect(100,y,50,50);
            y += 10;
            if(y>250){
              clearInterval(timer);
            }
        },100)
     </script>
</body>
绘制弧形
1.arc(x, y, r, 起始弧度, 结束弧度,弧形的方向 )
2.角以弧度计,0顺时针 1逆时针
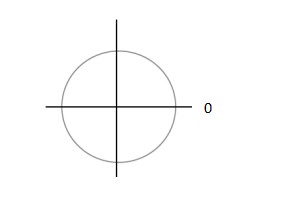
2*Math.PI =360deg Math.PI / 4 3*Math.PI / 4
绘制圆角
1.ctx.arcTo(x1, y1, x2, y2, r)
2. 绘制的弧线与当前点和x1,y1连线,x1,y1和x2,y2连线都相切
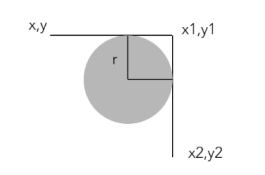
        ctx.moveTo(100,110); //弧度问题加10像素
        ctx.arcTo(100,200,200,200,10);
        ctx.arcTo(200,200,200,100,10);
        ctx.arcTo(200,100,100,100,10);
        ctx.arcTo(100,100,100,200,10);
        ctx.stroke();
贝塞尔曲线
1.quadraticCurveTo(x1, y1,ex,ey ) 二次贝塞尔曲线
x1,y1 控制点
ex,ey 结束点
2. bezierCurveTo(x1, y1, x2, y2, ex, ey) 三次贝塞尔曲线
x1,y1,x2,y2 控制点
ex,ey 结束点
<body>
     <canvas id="cans" width=500 height=300></canvas>
     <script>
        var oCanvas = document.getElementById('cans');
        var ctx = oCanvas.getContext('2d');
        ctx.moveTo(100,100);
        ctx.quadraticCurveTo(200, 300,400,200);
        ctx.stroke();
     </script>
</body>
坐标轴转换
1.translate(dx, dy) 重新映射画布上的 (0,0) 位置
2.scale(sx, sy) 缩放当前绘图
3.rotate(Math.PI) 旋转当前的绘图
4.save() restore() 保存当前图像状态的一份拷贝 从栈中弹出存储的图形状态并恢复
5. setTransform(a, b, c, d, e, f) 先重置再变换
参数:水平缩放、水平倾斜、垂直倾斜、垂直缩放、水平移动、垂直移动
6. transform(a, b, c, d, e, f) 在之前的基础上变换
     <canvas id="cans" width=500 height=500></canvas>
     <script>
        var oCanvas = document.getElementById('cans');
        var ctx = oCanvas.getContext('2d');
        ctx.translate(100,100);
        ctx.fillRect(0,0,100,100);
     </script>
save() restore()
<body>
     <canvas id="cans" width=500 height=500></canvas>
     <script>
        var oCanvas = document.getElementById('cans');
        var ctx = oCanvas.getContext('2d');
        ctx.save();//[tranlate(0,0)]
        //保存这个时候坐标轴状态  [] 放在栈中
        ctx.translate(100,100);

        ctx.save();//[tranlate(0,0),tranlate(100,100)]
        //保存平移时坐标轴的状态
        ctx.rotate(Math.PI/4);
        ctx.fillRect(0,0,100,100);

        ctx.restore();
        //按离restore的save标准
        ctx.fillStyle ='red';
        ctx.fillRect(0,0,50,50);

        ctx.restore();
        ctx.fillStyle ='green';
        ctx.fillRect(0,0,50,50);
     </script>
</body>
setTransform(a, b, c, d, e, f)
        ctx.translate(100,100);
        ctx.setTransform(1, 1, 1, 0.5, 100, 100);//跟上一次变换无关(translate)
        ctx.fillRect(0,0,100,100);
transform(a, b, c, d, e, f)
        ctx.translate(100,100);
        ctx.transform(1, 1, 1, 0.5, 100, 100);//跟上一次变换有关(translate)
        ctx.fillRect(0,0,100,100);
填充图案
1.createPattern(image,"repeat|repeat-x|repeat-y|no-repeat")
2.img元素(Image对象),canvas元素,video元素(有图形的)
        var img = new Image();
        img.src="C:/Users/Administrator/Desktop/1.jpg"
        img.onload = function(){
           var bg = ctx.createPattern(img,'no-repeat');
           ctx.fillStyle = bg;
           ctx.fillRect(0,0,500,500);
        }
     <canvas id="cans" width=500 height=500></canvas>
     <canvas id="cans2" width=100 height=100></canvas>
     <script>
        var oCanvas = document.getElementById('cans');
        var ctx = oCanvas.getContext('2d');
        var oCanvas2 = document.getElementById('cans2');
        var ctx2 = oCanvas.getContext('2d');
        ctx2.fillRect(0,0,100,100)
        var img = new Image();
        img.src="C:/Users/Administrator/Desktop/1.jpg"
        img.onload = function(){
           var bg = ctx.createPattern(oCanvas2,'no-repeat');
           ctx.fillStyle = bg;
           ctx.fillRect(0,0,500,500);
        }
     </script>
渐变
1.createLinearGradient(x1, y1, x2, y2); 线性渐变 必须在填充渐变的区域里定义渐变, 否则 没有效果
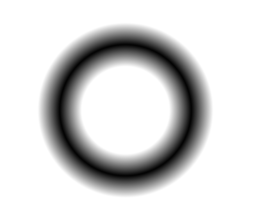
2.createRadialGradient(x1, y1, r1, x2, y2, r2); 径向渐变
3.bg.addColorStop(p, color);
     <canvas id="cans" width=500 height=500></canvas>
     <script>
        var oCanvas = document.getElementById('cans');
        var ctx = oCanvas.getContext('2d');
        var bg = ctx.createLinearGradient(0, 0, 500, 500);
        bg.addColorStop(0,'red');
        bg.addColorStop(0.5,'green');
        bg.addColorStop(1,'yellow');
        ctx.fillStyle = bg;
        ctx.fillRect(0,0,500,500);
     </script>
     //线性渐变
    <canvas id="cans" width=500 height=500></canvas>
     <script>
        var oCanvas = document.getElementById('cans');
        var ctx = oCanvas.getContext('2d');
        var bg = ctx.createRadialGradient(200, 200, 100, 200,200,200);
        bg.addColorStop(0,'#fff');
        bg.addColorStop(0.5,'#000');
        bg.addColorStop(1,'#fff');
        ctx.fillStyle = bg;
        ctx.fillRect(0,0,500,500);
     </script>
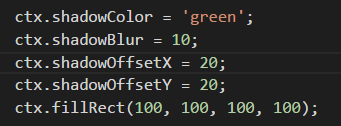
阴影
ctx.shadowColor
ctx.shadowOffsetX
ctx.shadowOffsetY
ctx.shadowBlur
注:这里的阴影偏移量不受坐标系变换的影响
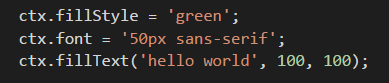
文本
1. fillText()
2. strokeText()
3. measureText('hello world') 了解

线段样式
1.lineCap
2.lineJoin
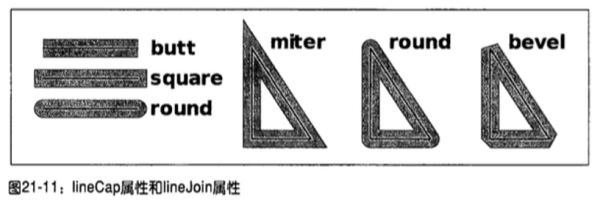
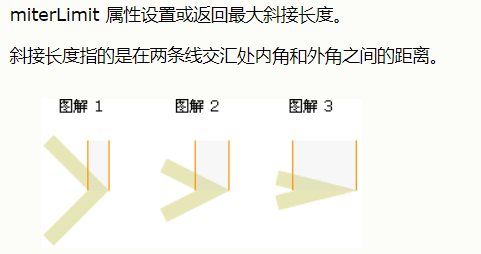
tx.miterLimit; 当lineJoin是miter时,用于控制斜接部分的长度
如果斜接长度超过 miterLimit 的值,变成bevel
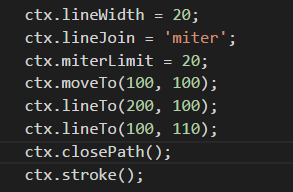
注:实际运算是大于limit*lineWidth/2的值,了解就好
斜接长度