一、下载与安装
官网下载地址:

如果您不想去官网下载且使用的是Centos7系统,那么可以选择我的下载包:
链接 https://pan.baidu.com/s/1scys4Hl-ToSiVnAMHXTZIA提取码 464i
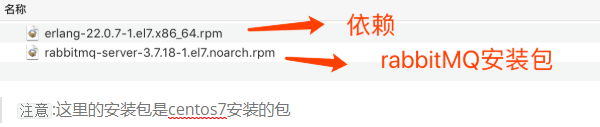
# 1.将rabbitmq安装包上传到linux系统中
erlang-22.0.7-1.el7.x86_64.rpm
rabbitmq-server-3.7.18-1.el7.noarch.rpm
# 2.安装Erlang依赖包
rpm -ivh erlang-22.0.7-1.el7.x86_64.rpm
# 3.安装RabbitMQ安装包(需要联网)
yum install -y rabbitmq-server-3.7.18-1.el7.noarch.rpm
注意:默认安装完成后配置文件模板在:/usr/share/doc/rabbitmq-server-3.7.18/rabbitmq.config.example目录中,需要
将配置文件复制到/etc/rabbitmq/目录中,并修改名称为rabbitmq.config
# 4.复制配置文件
cp /usr/share/doc/rabbitmq-server-3.7.18/rabbitmq.config.example /etc/rabbitmq/rabbitmq.config
# 5.查看配置文件位置
ls /etc/rabbitmq/rabbitmq.config
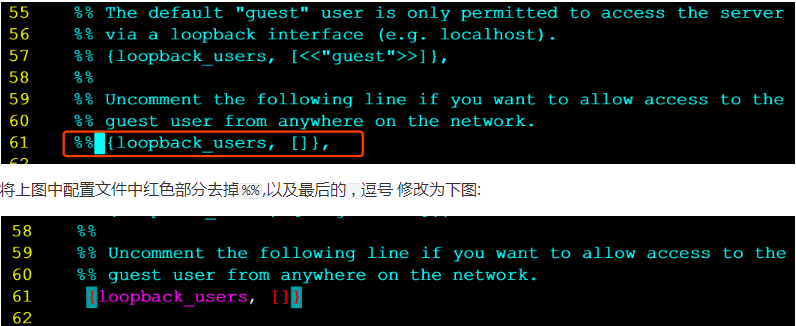
# 6.修改配置文件(参见下图:)
vim /etc/rabbitmq/rabbitmq.config
# 7.执行如下命令,启动rabbitmq中的插件管理
    rabbitmq-plugins enable rabbitmq_management

    出现如下说明:
        Enabling plugins on node rabbit@localhost:
    rabbitmq_management
    The following plugins have been configured:
      rabbitmq_managementsys
      rabbitmq_management_agent
      rabbitmq_web_dispatch
    Applying plugin configuration to rabbit@localhost...
    The following plugins have been enabled:
      rabbitmq_management
      rabbitmq_management_agent
      rabbitmq_web_dispatch

    set 3 plugins.
    Offline change; changes will take effect at broker restart.

# 8.启动RabbitMQ的服务
    systemctl start rabbitmq-server
    systemctl restart rabbitmq-server
    systemctl stop rabbitmq-server


# 9.查看服务状态
    systemctl status rabbitmq-server
# 10.关闭防火墙服务
systemctl disable firewalld
Removed symlink /etc/systemd/system/multi-user.target.wants/firewalld.service.
Removed symlink /etc/systemd/system/dbus-org.fedoraproject.FirewallD1.service.
systemctl stop firewalld
# 11.访问web管理界面
http://10.15.0.8:15672/ #自己的ip地址
# 12.登录管理界面
username: guest
password: guest
二、安装jar包
<dependency>
    <groupId>com.rabbitmq</groupId>
    <artifactId>amqp-client</artifactId>
    <version>5.7.2</version>
</dependency>
三、第一种模型(直连)
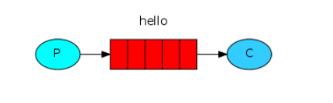
P:生产者,也就是要发送消息的程序
C:消费者:消息的接受者,会一直等待消息到来。
queue:消息队列,图中红色部分。类似一个邮箱,可以缓存消息;生产者向其中投递消息,消费者从其中取出消息。
1. 开发生产者
//创建连接工厂
  ConnectionFactory connectionFactory = new ConnectionFactory();
  connectionFactory.setHost("10.15.0.9");
  connectionFactory.setPort(5672);
  connectionFactory.setUsername("ems");
  connectionFactory.setPassword("123");
  connectionFactory.setVirtualHost("/ems");
  Connection connection = connectionFactory.newConnection();
  //创建通道
  Channel channel = connection.createChannel();
  //参数1: 是否持久化  参数2:是否独占队列 参数3:是否自动删除  参数4:其他属性
  channel.queueDeclare("hello",true,false,false,null);
  channel.basicPublish("","hello", null,"hello rabbitmq".getBytes());
  channel.close();
  connection.close();
2.开发消费者
 //创建连接工厂
  ConnectionFactory connectionFactory = new ConnectionFactory();
  connectionFactory.setHost("10.15.0.9");
  connectionFactory.setPort(5672);
  connectionFactory.setUsername("ems");
  connectionFactory.setPassword("123");
  connectionFactory.setVirtualHost("/ems");
  Connection connection = connectionFactory.newConnection();
  Channel channel = connection.createChannel();
  channel.queueDeclare("hello", true, false, false, null);
  channel.basicConsume("hello",true,new DefaultConsumer(channel){
    @Override
    public void handleDelivery(String consumerTag, Envelope envelope, AMQP.BasicProperties properties, byte[] body) throws IOException {
      System.out.println(new String(body));
    }
  });
3. 参数的说明
 channel.queueDeclare("hello",true,false,false,null);
    '参数1':用来声明通道对应的队列
  '参数2':用来指定是否持久化队列
  '参数3':用来指定是否独占队列
  '参数4':用来指定是否自动删除队列
  '参数5':对队列的额外配置
四、第二种模型(work quene)
Work queues,也被称为(`Task queues`),任务模型。当消息处理比较耗时的时候,可能生产消息的速度会远远大于消息的消费速度。长此以往,消息就会堆积越来越多,无法及时处理。此时就可以使用work 模型:**让多个消费者绑定到一个队列,共同消费队列中的消息**。队列中的消息一旦消费,就会消失,因此任务是不会被重复执行的。
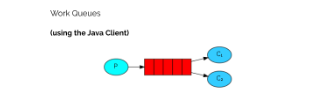
角色:
- P:生产者:任务的发布者
- C1:消费者-1,领取任务并且完成任务,假设完成速度较慢
- C2:消费者-2:领取任务并完成任务,假设完成速度快
1. 开发生产者
channel.queueDeclare("hello", true, false, false, null);
for (int i = 0; i < 10; i++) {
  channel.basicPublish("", "hello", null, (i+"====>:我是消息").getBytes());
}
2.开发消费者1
channel.queueDeclare("hello",true,false,false,null);
channel.basicConsume("hello",true,new DefaultConsumer(channel){
  @Override
  public void handleDelivery(String consumerTag, Envelope envelope, AMQP.BasicProperties properties, byte[] body) throws IOException {
    System.out.println("消费者1: "+new String(body));
  }
});
3.开发消费者2
channel.queueDeclare("hello",true,false,false,null);
channel.basicConsume("hello",true,new DefaultConsumer(channel){
  @Override
  public void handleDelivery(String consumerTag, Envelope envelope, AMQP.BasicProperties properties, byte[] body) throws IOException {
    try {
      Thread.sleep(1000);   //处理消息比较慢 一秒处理一个消息
    } catch (InterruptedException e) {
      e.printStackTrace();
    }
    System.out.println("消费者2: "+new String(body));
  }
});
4.消息自动确认机制
channel.basicQos(1);//一次只接受一条未确认的消息
//参数2:关闭自动确认消息
channel.basicConsume("hello",false,new DefaultConsumer(channel){
  @Override
  public void handleDelivery(String consumerTag, Envelope envelope, AMQP.BasicProperties properties, byte[] body) throws IOException {
    System.out.println("消费者1: "+new String(body));
    channel.basicAck(envelope.getDeliveryTag(),false);//手动确认消息
  }
});
五、第三种模型(fanout)
fanout 扇出 也称为广播
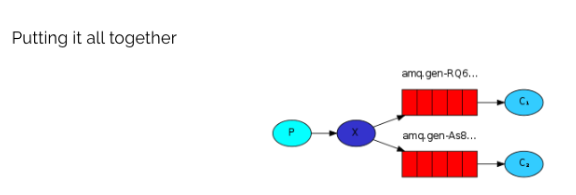
在广播模式下,消息发送流程是这样的:
- 可以有多个消费者
- 每个**消费者有自己的queue**(队列)
- 每个**队列都要绑定到Exchange**(交换机)
- **生产者发送的消息,只能发送到交换机**,交换机来决定要发给哪个队列,生产者无法决定。
- 交换机把消息发送给绑定过的所有队列
- 队列的消费者都能拿到消息。实现一条消息被多个消费者消费
1. 开发生产者
//声明交换机
channel.exchangeDeclare("logs","fanout");//广播 一条消息多个消费者同时消费
//发布消息
channel.basicPublish("logs","",null,"hello".getBytes());
2. 开发消费者-1
//绑定交换机
channel.exchangeDeclare("logs","fanout");
//创建临时队列
String queue = channel.queueDeclare().getQueue();
//将临时队列绑定exchange
channel.queueBind(queue,"logs","");
//处理消息
channel.basicConsume(queue,true,new DefaultConsumer(channel){
  @Override
  public void handleDelivery(String consumerTag, Envelope envelope, AMQP.BasicProperties properties, byte[] body) throws IOException {
    System.out.println("消费者1: "+new String(body));
  }
});
3. 开发消费者-2
//绑定交换机
channel.exchangeDeclare("logs","fanout");
//创建临时队列
String queue = channel.queueDeclare().getQueue();
//将临时队列绑定exchange
channel.queueBind(queue,"logs","");
//处理消息
channel.basicConsume(queue,true,new DefaultConsumer(channel){
  @Override
  public void handleDelivery(String consumerTag, Envelope envelope, AMQP.BasicProperties properties, byte[] body) throws IOException {
    System.out.println("消费者2: "+new String(body));
  }
});
4.开发消费者-3
//绑定交换机
channel.exchangeDeclare("logs","fanout");
//创建临时队列
String queue = channel.queueDeclare().getQueue();
//将临时队列绑定exchange
channel.queueBind(queue,"logs","");
//处理消息
channel.basicConsume(queue,true,new DefaultConsumer(channel){
  @Override
  public void handleDelivery(String consumerTag, Envelope envelope, AMQP.BasicProperties properties, byte[] body) throws IOException {
    System.out.println("消费者3: "+new String(body));
  }
});
六、第四种模型(Routing)
该模型分为直连和订阅
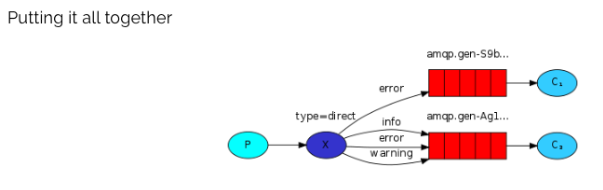
Routing 之订阅模型-Direct(直连)
在Fanout模式中,一条消息,会被所有订阅的队列都消费。但是,在某些场景下,我们希望不同的消息被不同的队列消费。这时就要用到Direct类型的Exchange。
在Direct模型下:
- 队列与交换机的绑定,不能是任意绑定了,而是要指定一个`RoutingKey`(路由key)
- 消息的发送方在 向 Exchange发送消息时,也必须指定消息的 `RoutingKey`。
- Exchange不再把消息交给每一个绑定的队列,而是根据消息的`Routing Key`进行判断,只有队列的`Routingkey`与消息的 `Routing key`完全一致,才会接收到消息
流程:
图解:
- P:生产者,向Exchange发送消息,发送消息时,会指定一个routing key。
- X:Exchange(交换机),接收生产者的消息,然后把消息递交给 与routing key完全匹配的队列
- C1:消费者,其所在队列指定了需要routing key 为 error 的消息
- C2:消费者,其所在队列指定了需要routing key 为 info、error、warning 的消息
1. 开发生产者
//声明交换机  参数1:交换机名称 参数2:交换机类型 基于指令的Routing key转发
channel.exchangeDeclare("logs_direct","direct");
String key = "";
//发布消息
channel.basicPublish("logs_direct",key,null,("指定的route key"+key+"的消息").getBytes());
2.开发消费者-1
//声明交换机
channel.exchangeDeclare("logs_direct","direct");
//创建临时队列
String queue = channel.queueDeclare().getQueue();
//绑定队列和交换机
channel.queueBind(queue,"logs_direct","error");
channel.queueBind(queue,"logs_direct","info");
channel.queueBind(queue,"logs_direct","warn");

//消费消息
channel.basicConsume(queue,true,new DefaultConsumer(channel){
  @Override
  public void handleDelivery(String consumerTag, Envelope envelope, AMQP.BasicProperties properties, byte[] body) throws IOException {
    System.out.println("消费者1: "+new String(body));
  }
});
3.开发消费者-2
//声明交换机
channel.exchangeDeclare("logs_direct","direct");
//创建临时队列
String queue = channel.queueDeclare().getQueue();
//绑定队列和交换机
channel.queueBind(queue,"logs_direct","error");
//消费消息
channel.basicConsume(queue,true,new DefaultConsumer(channel){
  @Override
  public void handleDelivery(String consumerTag, Envelope envelope, AMQP.BasicProperties properties, byte[] body) throws IOException {
    System.out.println("消费者2: "+new String(body));
  }
});
Routing 之订阅模型-Topic
Topic`类型的`Exchange`与`Direct`相比,都是可以根据`RoutingKey`把消息路由到不同的队列。只不过`Topic`类型`Exchange`可以让队列在绑定`Routing key` 的时候使用通配符!这种模型`Routingkey` 一般都是由一个或多个单词组成,多个单词之间以”.”分割,例如: `item.insert`
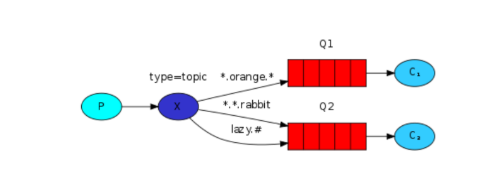
# 统配符
        * (star) can substitute for exactly one word.    匹配不多不少恰好1个词
        # (hash) can substitute for zero or more words.  匹配一个或多个词
# 如:
        audit.#    匹配audit.irs.corporate或者 audit.irs 等
    audit.*   只能匹配 audit.irs
1.开发生产者
//生命交换机和交换机类型 topic 使用动态路由(通配符方式)
channel.exchangeDeclare("topics","topic");
String routekey = "user.save";//动态路由key
//发布消息
channel.basicPublish("topics",routekey,null,("这是路由中的动态订阅模型,route key: ["+routekey+"]").getBytes());
2.开发消费者-1
Routing Key中使用*通配符方式`
 //声明交换机
channel.exchangeDeclare("topics","topic");
//创建临时队列
String queue = channel.queueDeclare().getQueue();
//绑定队列与交换机并设置获取交换机中动态路由
channel.queueBind(queue,"topics","user.*");

//消费消息
channel.basicConsume(queue,true,new DefaultConsumer(channel){
  @Override
  public void handleDelivery(String consumerTag, Envelope envelope, AMQP.BasicProperties properties, byte[] body) throws IOException {
    System.out.println("消费者1: "+new String(body));
  }
});
3.开发消费者-2
Routing Key中使用#通配符方式
//声明交换机
channel.exchangeDeclare("topics","topic");
//创建临时队列
String queue = channel.queueDeclare().getQueue();
//绑定队列与交换机并设置获取交换机中动态路由
channel.queueBind(queue,"topics","user.#");

//消费消息
channel.basicConsume(queue,true,new DefaultConsumer(channel){
  @Override
  public void handleDelivery(String consumerTag, Envelope envelope, AMQP.BasicProperties properties, byte[] body) throws IOException {
    System.out.println("消费者2: "+new String(body));
  }
});
Springboot和RabbitMQ整合和更详细的介绍请下载链接中的实战教程