分片和副本
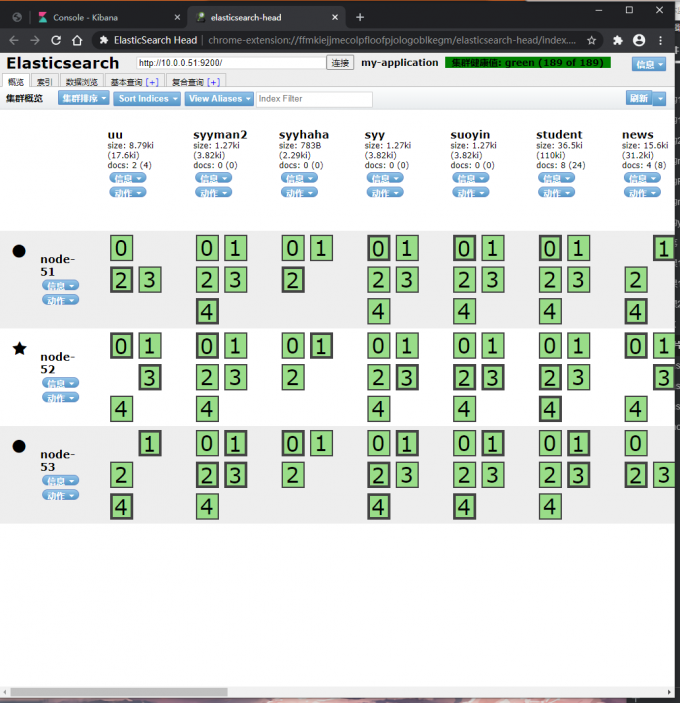
elasticsearch中,分片所在的位置与节点无关
主节点负责调度数据,从节点负责接收数据
主分片被读写,副本只是做备胎
elasticsearch中,一个文档存储在哪个节点由算法决定,算法决定主分片的数量不能修改,所以,后期想要增加主节点的话,需要把数据重新存储(节点自动迁移 复制)
副本和分片的数量可以在配置文件中指定
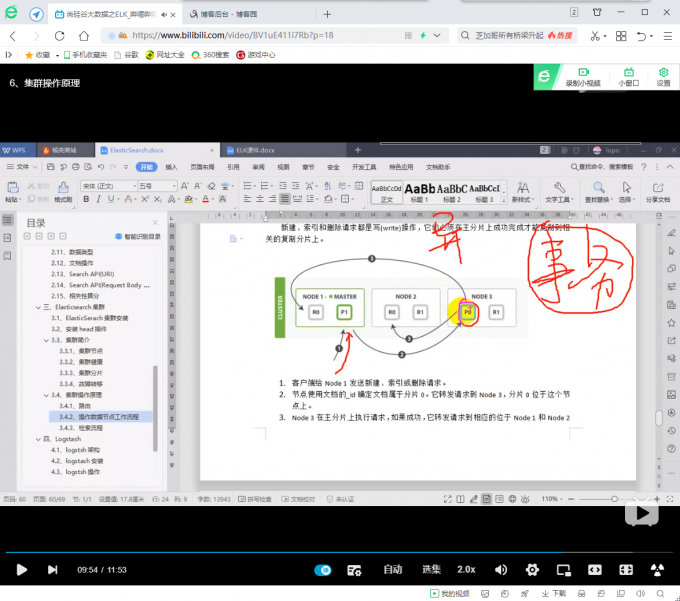
每个节点都有能力处理任意请求,每个节点都知道任意文档所在的节点,所以可以将请求转发到需要的节点
logstsh架构:
数据收集 --> 过滤 --> 处理
logstsh使用ruby语言写出来的,启动时间较长,需要指定脚本执行
logstsh中有很多插件:
input
filter 操作数据 数据类型转化 数据解析 输出
分片是 Elasticsearch 集群分发数据的'单元'。 Elasticsearch 在重新平衡数据时可以移动分片的速度,例如发生故障后,将取决于分片的大小和数量以及网络和磁盘性能。
集群(cluster):由一个或多个节点组成, 并通过集群名称与其他集群进行区分
节点(node):单个 ElasticSearch 实例. 通常一个节点运行在一个隔离的容器或虚拟机中
索引(index):在 ES 中, 索引是一组'文档的集合'
分片(shard):因为 ES 是个分布式的搜索引擎, 所以'索引通常都会分解成不同部分', 而这些'分布在不同节点的数据就是分片'. ES自动管理和组织分片, 并在必要的时候对分片数据进行再平衡分配, 所以用户基本上不用担心分片的处理细节.
ES中所有'数据'均衡的存储在集群中各个节点的分片中
副本(replica):ES '默认'为一个索引创建 5 个主分片, 并分别为其创建一个副本分片. 也就是说每个索引都由 5 个主分片, 而每个主分片都相应的有一个 copy。
对于分布式搜索引擎来说, 分片及副本的分配将是高可用及快速搜索响应的设计核心.'主分片与副本都能处理查询请求',它们的唯一区别在于只有主分片才能处理索引请求.副本对搜索性能非常重要,同时用户也可在任何时候添加或删除副本。额外的副本能给带来更大的容量, 更高的呑吐能力及更强的故障恢复能力。
注1:避免使用非常大的分片,因为这会对群集从故障中恢复的能力产生负面影响。 对分片的大小没有固定的限制,但是通常情况下很多场景限制在 50GB 的分片大小以内。
小的分片会造成小的分段,从而会增加开销。我们的目的是将平均分片大小控制在几 GB 到几十 GB 之间。对于基于时间的数据的使用场景来说,通常将分片大小控制在 20GB 到 40GB 之间。
注2:当在ElasticSearch集群中配置好你的索引后, 你要明白在集群运行中你无法调整分片设置. 既便以后你发现需要调整分片数量, 你也只能新建创建并对数据进行重新索引(reindex)(虽然reindex会比较耗时, 但至少能保证你不会停机).
SN(分片数) = IS(索引大小) / 30
NN(节点数) = SN(分片数) + MNN(主节点数[无数据]) + NNN(负载节点数)
分词器
standard analyzer(标准分词器)
simple analyzer(简单分词器)
whitespace analyzer(空格分词器)
language analyzer(语言分词器)
一、集群修改
1.配置ES默认分片数和副本数
设置索引的分片数,默认为5
#index.number_of_shards: 5

设置索引的副本数,默认为1:
#index.number_of_replicas: 1
2.修改指定索引的副本数
PUT /index/_settings
{
  "number_of_replicas": 2
}

#可以在head插件看到副本数量的变化
#不能修改已经创建好的索引的分片数
3.修改所有索引副本数
PUT _all/_settings
{
  "number_of_replicas": 2
}
4.创建索引时指定分片数和副本数
PUT /qiudao
{
  "settings": {
    "number_of_shards": 3,
    "number_of_replicas": 2
  }
}

#注意:
1.分片数不是越多越好,会占用资源
2.每个分片都会占用文件句柄数(65535)
3.查询数据时会根据算法去指定节点获取数据,分片数越少,查询成本越低
5.企业中一般怎么设置
1.跟开发沟通
2.看一共要几个节点
    2个节点,默认就可以了
    3个节点,重要的数据,2副本5分片,不重要的数据,1副本5分片
3.在开始阶段, 一个好的方案是根据你的节点数量按照1.5~3倍的原则来创建分片.
    例如:如果你有3个节点, 则推荐你创建的分片数最多不超过9(3x3)个.
4.存储数据量多的可以设置分片多一些,存储数据量少的,可以少分写分片

SN(分片数) = IS(索引大小) / 30
NN(节点数) = SN(分片数) + MNN(主节点数[无数据]) + NNN(负载节点数)
三、集群的监控
1.监控内容
1.查看集群健康状态
	GET _cat/health

2.查看所有节点,使用 wc 可以得到正在运行的节点数
	GET _cat/nodes

#两者有一个产生变化,说明集群出现故障

#查看主节点
GET _cat/master
e7EDJ7X8TMq-zPrbkLF5ew 10.0.0.52 10.0.0.52 node-52

#查看所有索引
GET _cat/indices
green open  e SvafbN49QdGfTcBN89Zkqg 5 2     1   0  15.1kb     5kb
2.脚本监控
[root@db01 ~]# vim es_cluster_status.py
#!/usr/bin/env python
#coding:utf-8
#Author:_syy_
#Date:2017.02.12
import smtplib
from email.mime.text import MIMEText
from email.utils import formataddr
import subprocess
body = ""
false = "false"
clusterip = "10.0.0.51"
obj = subprocess.Popen(("curl -sXGET http://"+clusterip+":9200/_cluster/health?pretty=true"),shell=True, stdout=subprocess.PIPE)
data = obj.stdout.read()
data1 = eval(data)
status = data1.get("status")
if status == "green":
print "�33[1;32m 集群运行正常 �33[0m"
elif status == "yellow":
print "�33[1;33m 副本分片丢失 �33[0m"
else:
print "�33[1;31m 主分片丢失 �33[0m"
[root@db01 ~]# python es_cluster_status.py
集群运行正常
3.监控插件 x-pack
四、ES优化
1.限制内存
1.es启动内存最大是32G,超过则es起不来
2.服务器一半的内存全都给ES,剩下的一半给lucenc使用
3.设置可以先给小一点,慢慢提高内存
4.'内存不足时'
	1)让开发删除数据
	2)增加es节点
	3)提高es服务器硬件配置
5.关闭swap空间,swap off,业务服务器一半开启swap空间
2.文件描述符
1.配置文件描述符
[root@db02 ~]# vim /etc/security/limits.conf
* soft memlock unlimited
* hard memlock unlimited
* soft nofile 131072
* hard nofile 131072
* - nofile 65535

2.普通用户
[root@db02 ~]# vim /etc/security/limits.d/20-nproc.conf
*          soft    nproc     65535
root       soft    nproc     unlimited

[root@db02 ~]# vim /etc/security/limits.d/90-nproc.conf
*          soft    nproc     65535
root       soft    nproc     unlimited
3.语句优化
1.条件查询时,使用term查询,减少range的查询
2.建索引的时候,尽量使用命中率高的词
五、数据备份与恢复
0.安装npm环境
#安装npm(只需要在一个节点安装即可,如果前端还有nginx做反向代理可以每个节点都装)
[root@elkstack01 ~]# yum install -y npm
#进入下载head插件代码目录
[root@elkstack01 src]# cd /usr/local/
#从GitHub上克隆代码到本地
[root@elkstack01 local]# git clone git://github.com/mobz/elasticsearch-head.git
#克隆完成后,进入elasticsearch插件目录
[root@elkstack01 local]# cd elasticsearch-head/
#清除缓存
[root@elkstack01 elasticsearch-head]# npm cache clean -f
#使用npm安装n模块(不同的项目js脚本所需的node版本可能不同,所以就需要node版本管理工具)
1.安装备份工具
[root@db01 ~]# npm install elasticdump -g
2.备份命令
帮助文档:https://github.com/elasticsearch-dump/elasticsearch-dump
[elasticsearch](https://www.cnblogs.com/JimShi/p/11244126.html)
1)备份参数
--input: 数据来源
--output: 接收数据的目标
--type: 导出的数据类型(settings, analyzer, data, mapping, alias, template)
2)备份数据到另一个ES集群
elasticdump
  --input=http://10.0.0.51:9200/student
  --output=http://100.10.0.51:9200/student
  --type=analyzer

elasticdump
  --input=http://10.0.0.51:9200/student
  --output=http://100.10.0.51:9200/student
  --type=mapping

elasticdump
--input=http://10.0.0.51:9200/student
--output=http://100.10.0.51:9200/student
--type=data

elasticdump
  --input=http://10.0.0.51:9200/student
  --output=http://100.10.0.51:9200/student
  --type=template
3)备份数据到本地的json文件
elasticdump
  --input=http://10.0.0.51:9200/student
  --output=/tmp/student_mapping.json
  --type=mapping

elasticdump
  --input=http://10.0.0.51:9200/student
  --output=/tmp/student_data.json
  --type=data
......
4)导出文件打包
elasticdump
  --input=http://10.0.0.51:9200/student
  --output=$
  | gzip > /data/student.json.gz
5)备份指定条件的数据
elasticdump
  --input=http://10.0.0.51:9200/student
  --output=query.json
  --searchBody="{"query":{"term":{"username": "admin"}}}"
3.导入命令
elasticdump
  --input=./student_template.json
  --output=http://10.0.0.51:9200
  --type=template

elasticdump
  --input=./student_mapping.json
  --output=http://10.0.0.51:9200
  --type=mapping

elasticdump
  --input=./student_data.json
  --output=http://10.0.0.51:9200
  --type=data

elasticdump
  --input=./student_analyzer.json
  --output=http://10.0.0.51:9200
  --type=analyzer

#恢复数据的时候,如果数据已存在,会覆盖原数据
4.备份脚本
#!/bin/bash
read -p '要备份的机器是:' host
read -p '要备份的索引是:' index_name

for index in `echo $index_name`
do
    echo "start output index ${index}"
    elasticdump --input=http://${host}:9200/${index} --output=/data/${index}_alias.json --type=alias &> /dev/null
    elasticdump --input=http://${host}:9200/${index} --output=/data/${index}_analyzer.json --type=analyzer &> /dev/null
    elasticdump --input=http://${host}:9200/${index} --output=/data/${index}_data.json --type=data &> /dev/null
    elasticdump --input=http://${host}:9200/${index} --output=/data/${index}_alias.json --type=mapping &> /dev/null
    elasticdump --input=http://${host}:9200/${index} --output=/data/${index}_template.json --type=template &> /dev/null
done

mkdir /data -p
5.导入脚本
#!/bin/bash
read -p '要备份的机器是:' host
read -p '要备份的索引是:' index_name

for index in `echo $index_name`
do
    echo "start input index ${index}"
    elasticdump --input=/data/${index}_alias.json --output=http://${host}:9200/${index} --type=alias &> /dev/null
    elasticdump --input=/data/${index}_analyzer.json --output=http://${host}:9200/${index} --type=analyzer &> /dev/null
    elasticdump --input=/data/${index}_data.json --output=http://${host}:9200/${index} --type=data &> /dev/null
    elasticdump --input=/data/${index}_template.json --output=http://${host}:9200/${index} --type=template &> /dev/null
    elasticdump --input=/data/${index}_mapping.json --output=http://${host}:9200/${index} --type=template &> /dev/null
done
六、中文分词器 ik
1.插入数据
POST /index/_doc/1
{"content":"美国留给伊拉克的是个烂摊子吗"}

POST /index/_doc/2
{"content":"公安部:各地校车将享最高路权"}

POST /index/_doc/3
{"content":"中韩渔警冲突调查:韩警平均每天扣1艘中国渔船"}

POST /index/_doc/4
{"content":"中国驻洛杉矶领事馆遭亚裔男子枪击 嫌犯已自首"}
2.查询数据
POST /index/_search
{
  "query" : { "match" : { "content" : "中国" }},
  "highlight" : {
      "pre_tags" : ["<tag1>", "<tag2>"],
      "post_tags" : ["</tag1>", "</tag2>"],
      "fields" : {
          "content" : {}
      }
  }
}

#查看结果,会获取到带中字和国字的数据,我们查询的词被分开了,所以我们要使用ik中文分词器
3.配置中文分词器
1)安装插件
[root@db01 ~]# /usr/share/elasticsearch/bin/elasticsearch-plugin install https://github.com/medcl/elasticsearch-analysis-ik/releases/download/v6.6.0/elasticsearch-analysis-ik-6.6.0.zip
[root@db02 ~]# /usr/share/elasticsearch/bin/elasticsearch-plugin install https://github.com/medcl/elasticsearch-analysis-ik/releases/download/v6.6.0/elasticsearch-analysis-ik-6.6.0.zip
[root@db03 ~]# /usr/share/elasticsearch/bin/elasticsearch-plugin install https://github.com/medcl/elasticsearch-analysis-ik/releases/download/v6.6.0/elasticsearch-analysis-ik-6.6.0.zip

#解压到es目录下
[root@db01 ~]# unzip elasticsearch-analysis-ik-6.6.0.zip -d /etc/elasticsearch/
2)创建索引与mapping
curl -XPOST http://localhost:9200/news/text/_mapping -H 'Content-Type:application/json' -d'
{
    "properties": {
         "content": {
            "type": "text",
            "analyzer": "ik_max_word",
            "search_analyzer": "ik_smart"
        }
    }
}
3)编辑我们要定义的词
[root@redis01 ~]# vim /etc/elasticsearch/analysis-ik/IKAnalyzer.cfg.xml
<?xml version="1.0" encoding="UTF-8"?>
<!DOCTYPE properties SYSTEM "http://java.sun.com/dtd/properties.dtd">
<properties>
    <comment>IK Analyzer 扩展配置</comment>
    <!--用户可以在这里配置自己的扩展字典 -->
    <entry key="ext_dict">/etc/elasticsearch/analysis-ik/my.dic</entry>

[root@redis01 ~]# vim /etc/elasticsearch/analysis-ik/my.dic
中国

[root@redis01 ~]# chown -R elasticsearch.elasticsearch /etc/elasticsearch/analysis-ik/my.dic
4)重新插入数据
POST /news/text/1
{"content":"美国留给伊拉克的是个烂摊子吗"}

POST /news/text/2
{"content":"公安部:各地校车将享最高路权"}

POST /news/text/3
{"content":"中韩渔警冲突调查:韩警平均每天扣1艘中国渔船"}

POST /news/text/4
{"content":"中国驻洛杉矶领事馆遭亚裔男子枪击 嫌犯已自首"}
5)重新查询数据
POST /news/_search
{
  "query" : { "match" : { "content" : "中国" }},
  "highlight" : {
      "pre_tags" : ["<tag1>", "<tag2>"],
      "post_tags" : ["</tag1>", "</tag2>"],
      "fields" : {
          "content" : {}
      }
   }
}