Step 21: Data Types
设置文字列的格式。
修改InvoiceList.view.xml
<mvc:View
   controllerName="sap.ui.demo.walkthrough.controller.InvoiceList"
   xmlns="sap.m"
   xmlns:mvc="sap.ui.core.mvc">
   <List
      headerText="{i18n>invoiceListTitle}"
      class="sapUiResponsiveMargin"
      width="auto"
      items="{invoice>/Invoices}">
      <items>
         <ObjectListItem
        title="{invoice>Quantity} x {invoice>ProductName}"
        number="{
            parts: [{path: 'invoice>ExtendedPrice'}, {path: 'view>/currency'}],
            type: 'sap.ui.model.type.Currency',
            formatOptions: {
                showMeasure: false
            }
        }"
        numberUnit="{view>/currency}"/>
    </items>
   </List>
</mvc:View>
向ObjectListItem中添加number和numberUnit属性,然后通过指定number的type,将货币数据类型应用于该数字。
我们对number属性,使用了一种特殊的绑定语法,这种绑定语法被称为"Calculated Fields",允许来自多个模型的多个属性,绑定到控件的单个属性。
来自不同模型的属性被称为"parts",在这个例子中,控件的属性是number,从两个不同模型中检索,绑定到parts是invoice>ExtendedPrice和view>/currency。
我们希望用欧元来显示价格,通常货币单位是数据模型的一部分。但是在我们的例子中,则不是这样的,所以我们需要定义货币单位。为该view新建一个controller,并设置货币单位作为parts的第二部分。
Currency type 会根据货币类型来帮助我们处理价格的格式。这里价格显示为2位小数。
之后将showMeasure设置为false,他会隐藏number中的货币单位,而使用numberUnit这个属性。
新建InvoiceList.controller.js
sap.ui.define([
    "sap/ui/core/mvc/Controller",
    "sap/ui/model/json/JSONModel"
], function (Controller, JSONModel) {
    "use strict";

    return Controller.extend("sap.ui.demo.walkthrough.controller.InvoiceList", {

        onInit : function () {
            var oViewModel = new JSONModel({
                currency: "EUR"
            });
            this.getView().setModel(oViewModel, "view");
        }

    });
});
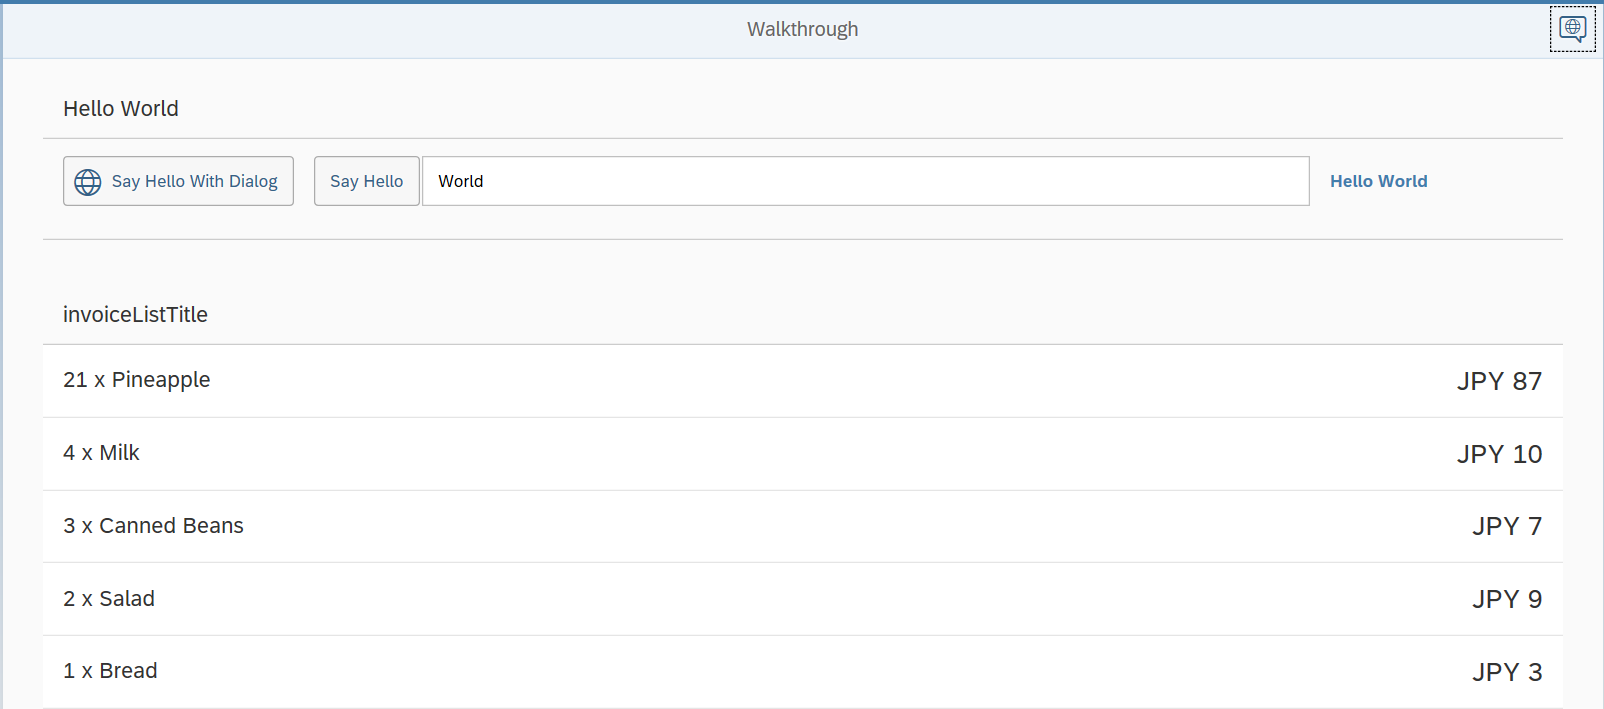
设置货币的单位为EUR。

如果将货币单位设置为:JPY,那么将不会显示两位小数,因为日元没有小数,如果将showMeasure设置为true,并且删除numberUnit属性,那么金额的显示,会变的不同。
Step 22: Expression Binding
可以通过表达式来格式化数据。
修改InvoiceList.view.xml
<mvc:View
controllerName="sap.ui.demo.walkthrough.controller.InvoiceList"
xmlns="sap.m"
   xmlns:mvc="sap.ui.core.mvc">
   <List
      headerText="{i18n>invoiceListTitle}"
      class="sapUiResponsiveMargin"
      width="auto"
      items="{invoice>/Invoices}" >
      <items>
         <ObjectListItem
            title="{invoice>Quantity} x {invoice>ProductName}"
            number="{
        parts: [{path: 'invoice>ExtendedPrice'}, {path: 'view>/currency'}],
        type: 'sap.ui.model.type.Currency',
        formatOptions: {
            showMeasure: false
        }
        }"
        numberUnit="{view>/currency}"
        numberState="{= ${invoice>ExtendedPrice} > 50 ? 'Error' : 'Success' }"/>
      </items>
   </List>
</mvc:View>
这里用表达式来格式化数据的显示,需要用括号内的=来开头,这里作了一个判断,大于50,显示红色,否则为蓝色。

只在一些不重要的计算中,使用表达式。
Step 23: Custom Formatters
自定义格式化。
新建formatter.js
sap.ui.define([], function () {
    "use strict";
    return {
        statusText: function (sStatus) {
            var resourceBundle = this.getView().getModel("i18n").getResourceBundle();
            switch (sStatus) {
                case "A":
                    return resourceBundle.getText("invoiceStatusA");
                case "B":
                    return resourceBundle.getText("invoiceStatusB");
                case "C":
                    return resourceBundle.getText("invoiceStatusC");
                default:
                    return sStatus;
            }
        }
    };
});
创建一个新的文件夹model,新的formatter文件放在model文件夹中,formatter将处理数据属性,并将其格式化以便在ui上进行显示。
这次我们不扩展任何对象,只返回一个javascript对象,并在sap.ui.define被调用的时候,使用formatter函数。
statusText函数从i18n中读取信息,并返回给页面。
修改InvoiceList.controller.js
sap.ui.define([
    "sap/ui/core/mvc/Controller",
    "sap/ui/model/json/JSONModel",
    "../model/formatter"
], function (Controller, JSONModel, formatter) {
    "use strict";
    return Controller.extend("sap.ui.demo.walkthrough.controller.InvoiceList", {
        formatter: formatter,
        onInit : function () {
            var oViewModel = new JSONModel({
                currency: "EUR"
            });
            this.getView().setModel(oViewModel, "view");
        }
    });
});
向controller中添加,依赖formatter model。并将formatter存储在本地的属性formatter中,以便可以利用他。
修改InvoiceList.view.xml
<mvc:View
    controllerName="sap.ui.demo.walkthrough.controller.InvoiceList"
    xmlns="sap.m"
    xmlns:mvc="sap.ui.core.mvc">
    <List
            headerText="{i18n>invoiceListTitle}"
        class="sapUiResponsiveMargin"
        width="auto"
        items="{invoice>/Invoices}">
        <items>
            <ObjectListItem
                title="{invoice>Quantity} x {invoice>ProductName}"
                number="{
                    parts: [{path: 'invoice>ExtendedPrice'}, {path: 'view>/currency'}],
                    type: 'sap.ui.model.type.Currency',
                    formatOptions: {
                        showMeasure: false
                    }
                }"
                numberUnit="{view>/currency}"
                numberState="{=    ${invoice>ExtendedPrice} > 50 ? 'Error' : 'Success' }">
                <firstStatus>
                    <ObjectStatus text="{
                        path: 'invoice>Status',
                        formatter: '.formatter.statusText'
                    }"/>
                </firstStatus>
            </ObjectListItem>
        </items>
    </List>
</mvc:View>
添加一个firstStatus的aggregation 用来显示状态,自定义的formatter函数通过保留属性formatter来进行绑定,"."开头表示在当前的controller中寻找该函数,因为我们之前定义了formatter属性来存放formatter函数,所以这里用.formatter.statusText来进行查找。
修改i18.properties
# App Descriptor
appTitle=Hello World
appDescription=A simple walkthrough app that explains the most important concepts of SAPUI5

# Hello Panel
showHelloButtonText=Say Hello
helloMsg=Hello {0}
homePageTitle=Walkthrough
helloPanelTitle=Hello World
openDialogButtonText=Say Hello With Dialog
dialogCloseButtonText=Ok

# Invoice List
invoiceListTitle=Invoices
invoiceStatusA=New
invoiceStatusB=In Progress
invoiceStatusC=Done
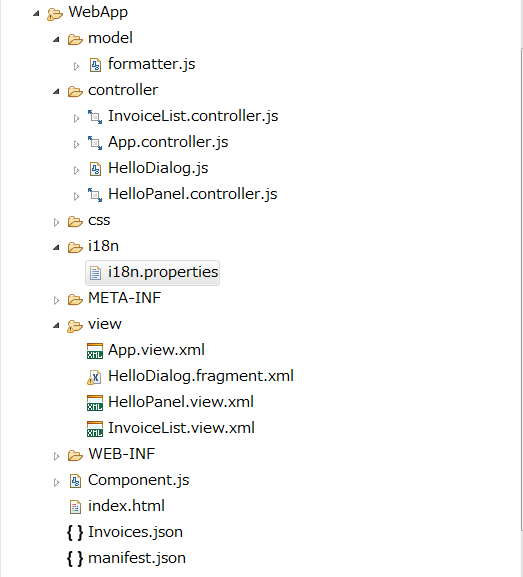
目录结构

Step 24: Filtering
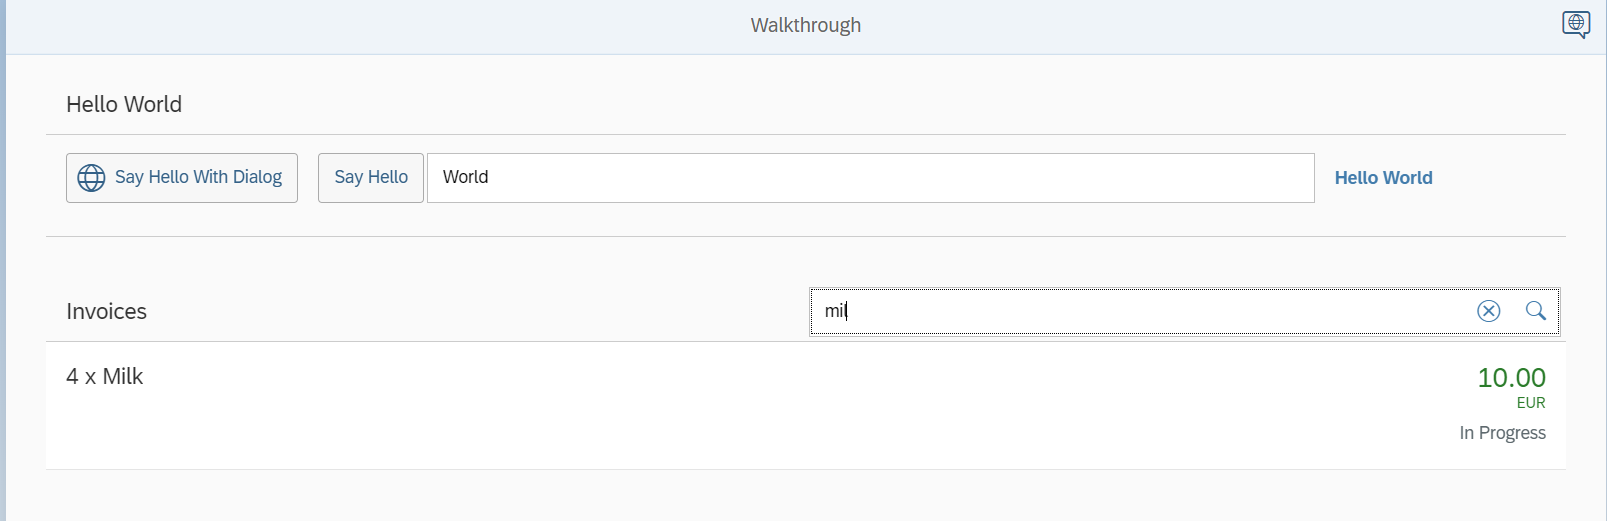
添加搜索过滤
修改InvoiceList.view.xml
<mvc:View
   controllerName="sap.ui.demo.walkthrough.controller.InvoiceList"
   xmlns="sap.m"
   xmlns:mvc="sap.ui.core.mvc">
   <List
      id="invoiceList"
      class="sapUiResponsiveMargin"
      width="auto"
      items="{invoice>/Invoices}" >
      <headerToolbar>
         <Toolbar>
            <Title text="{i18n>invoiceListTitle}"/>
            <ToolbarSpacer/>
            <SearchField width="50%" search=".onFilterInvoices"/>
         </Toolbar>
      </headerToolbar>
      <items>
         <ObjectListItem>
        …
         </ObjectListItem/>
      </items>
   </List>
</mvc:View>
对当前的list进行扩展,添加一个用于检索的控件,为list设置id,以便添加的检索控件中的onFilterInvoices函数可以识别该列表。
使用headerToolbar aggregation替换之前的title控件,使list更加的灵活。
修改InvoiceList.controller.js
sap.ui.define([
    "sap/ui/core/mvc/Controller",
    "sap/ui/model/json/JSONModel",
    "../model/formatter",
    "sap/ui/model/Filter",
    "sap/ui/model/FilterOperator"
], function (Controller, JSONModel, formatter, Filter, FilterOperator) {
    "use strict";
    return Controller.extend("sap.ui.demo.walkthrough.controller.InvoiceList", {
        formatter: formatter,
        onInit : function () {
            var oViewModel = new JSONModel({
                currency: "EUR"
            });
            this.getView().setModel(oViewModel, "view");
        },
        onFilterInvoices : function (oEvent) {

            // build filter array
            var aFilter = [];
            var sQuery = oEvent.getParameter("query");
            if (sQuery) {
                aFilter.push(new Filter("ProductName", FilterOperator.Contains, sQuery));
            }

            // filter binding
            var oList = this.byId("invoiceList");
            var oBinding = oList.getBinding("items");
            oBinding.filter(aFilter);
        }
    });
});
我们需要添加两个新的依赖,Filter对象保持filter操作的配置,FilterOperator为了指定filter使用的helper type。
在onFilterInvoices中,创建一个过滤器对象,通过oEvent.getParameter("query");来获取页面search field中输入的字符串。
这里只搜索ProductName,并指定FilterOperator。
通过当前byId获取到当前的控件,之后我们访问aggregation items,使用filter对他进行过滤。
Step 25: Sorting and Grouping
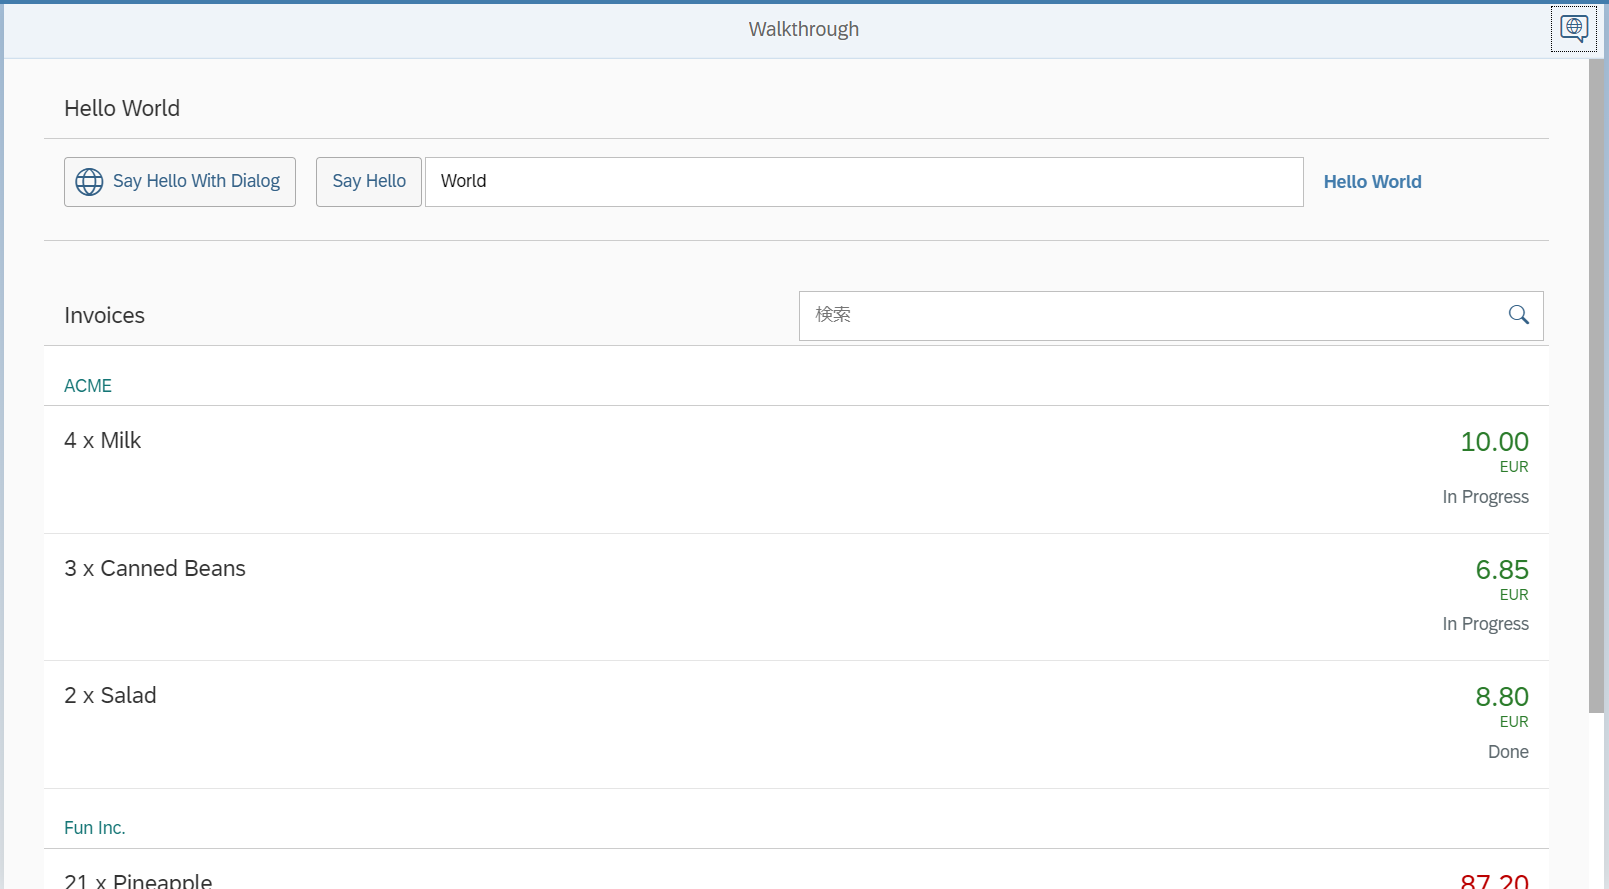
排序与分组
修改InvoiceList.view.xml
<mvc:View
   controllerName="sap.ui.demo.walkthrough.controller.InvoiceList"
   xmlns="sap.m"
   xmlns:mvc="sap.ui.core.mvc">
   <List
      id="invoiceList"
      class="sapUiResponsiveMargin"
      width="auto"
      items="{
         path : 'invoice>/Invoices',
         sorter : {
            path : 'ProductName'
         }
      }" >
      <headerToolbar>
         ...
      </headerToolbar>
      <items>
         ...
      </items>
   </List>
</mvc:View>
添加排序,让items以ProductName进行排序。
修改InvoiceList.view.xml
<mvc:View
controllerName="sap.ui.demo.walkthrough.controller.InvoiceList"
xmlns="sap.m"
xmlns:mvc="sap.ui.core.mvc">
<List
        id="invoiceList"
        class="sapUiResponsiveMargin"
        width="auto"
        items="{
            path : 'invoice>/Invoices',
            sorter : {
                path : 'ShipperName',
                group : true
            }
        }">
    <headerToolbar>
        <Toolbar>
            <Title text="{i18n>invoiceListTitle}"/>
            <ToolbarSpacer/>
            <SearchField width="50%" search=".onFilterInvoices"/>
        </Toolbar>
    </headerToolbar>
    <items>
        …
    </items>
</List>
</mvc:View>
使用ShipperName进行排序,并且进行分组。
Additionally, we set the formatting option
showMeasureto
false. This hides the currency code in the property
number, because it is passed on to the
ObjectListItemcontrol as a separate property
numberUnit.