编辑器:HBuilderx
axios文档:http://www.axios-js.com/zh-cn/docs/
echarts实例:https://echarts.apache.org/examples/zh/index.html
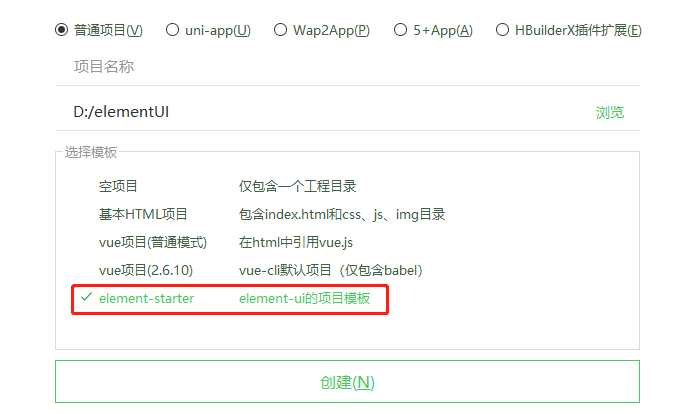
- 用HBuilderx新建elementUI项目。
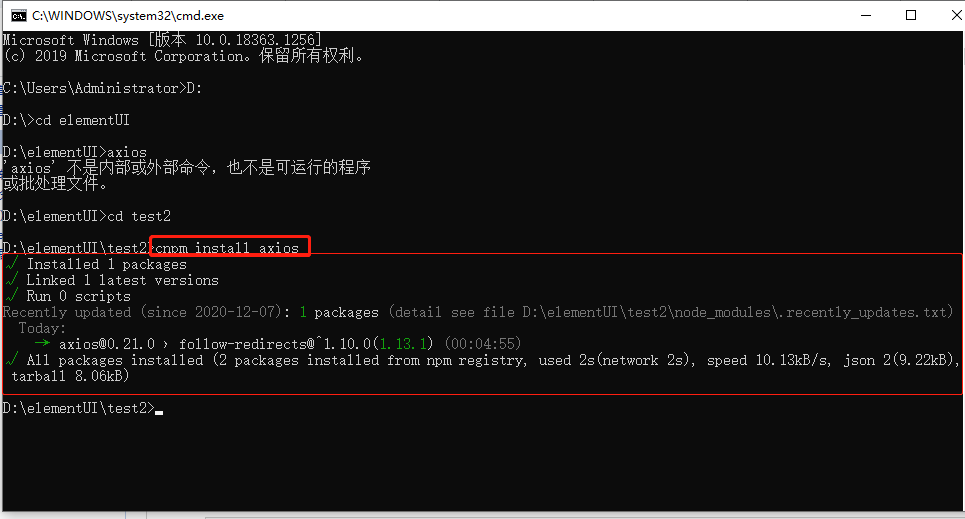
- 安装axios:打开命令行,进入项目文件夹下,输入:
cnpm install axios
- main.js中添加:
import echarts from 'echarts' import VueResource from 'vue-resource' import axios from 'axios'; /* 引入axios进行地址访问*/ //Vue.config.productionTip = false Vue.prototype.$echarts = echarts Vue.prototype.$http = axios; - 在App.vue中新建一个div容器:
<div id="echart1" style="height: 300px; 100%;"></div>
- 新建options.js和option.json文件(内容来自echarts折线图例子:https://echarts.apache.org/examples/zh/editor.html?c=line-smooth)
新建以后的项目目录如下: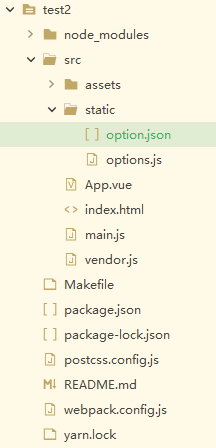
options.js
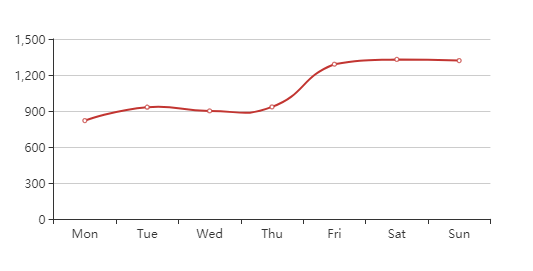
export const option =  {
    xAxis: {
        type: 'category',
        data: ['Mon', 'Tue', 'Wed', 'Thu', 'Fri', 'Sat', 'Sun']
    },
    yAxis: {
        type: 'value'
    },
    series: [{
        data: [],//把echarts例子中这里的数据去掉了
        type: 'line',
        smooth: true
    }]
};
option.json
{ "data": [820, 932, 901, 934, 1290, 1330, 1320] } - 在<script></script>中引入:
import {option} from "../src/static/options.js" import axios from 'axios'; var echarts = require('echarts'); - 在methods:{ }中新建drawBarChart()
methods: { drawBarChart() { // 基于准备好的dom,初始化echarts实例 var myChart = echarts.init(document.getElementById('echart1')); // 绘制基本图表 myChart.setOption(option); //option是一个详细的配置参数 axios .get("../src/static/option.json") .then(res => ( myChart.setOption({ series: [{ data: res.data.data //用option.json中的数据给data赋值 }] }) )); } } - 在mounted:function(){ }中添加:
this.drawBarChart();
全部代码如下:
main.js
import Vue from 'vue'
import ElementUI from 'element-ui'
import 'element-ui/lib/theme-chalk/index.css'
import App from './App.vue'

import echarts from 'echarts'
import VueResource from 'vue-resource'
import axios from 'axios'; /* 引入axios进行地址访问*/

// Vue.config.productionTip = false
Vue.prototype.$echarts = echarts
Vue.prototype.$http = axios;

Vue.use(ElementUI)

new Vue({
  el: '#app',
  render: h => h(App)
})
App.vue
<template>
    <div id="app">
        <div>
            <div id="echart1" style="height: 300px;  100%;"></div>
        </div>
    </div>
</template>

<script>
    import {
        option
    } from "../src/static/options.js"
    import axios from 'axios';

    var echarts = require('echarts');
    export default {
        mounted: function() {
            this.drawBarChart();
        },
        methods: {
            drawBarChart() {
                // 基于准备好的dom,初始化echarts实例
                var myChart = echarts.init(document.getElementById('echart1'));
                // 绘制基本图表
                myChart.setOption(option); //option是一个详细的配置参数
                axios
                    .get("../src/static/option.json")
                    .then(res => (
                        myChart.setOption({
                            series: [{
                                data: res.data.data //用option.json中的数据给data赋值
                            }]
                        })
                    ));
            }
        }
    }
</script>

<style>
    #app {
        font-family: Helvetica, sans-serif;
        text-align: center;
    }
</style>