LAMP源码编译安装
php加速器
XCache
快速而且稳定的PHP opcode缓存,经过严格测试且被大量用于生产环境。
项目地址:http://xcache.lighttpd.net/,收录EPEL源
实现XCache源码编译
(1)官网下载xcache包,传到linux中并解压
[root@centos777~]#rz
[root@centos777~]#tar xvf  xcache-3.2.0.tar.gz
(2)切换到解压的目录中开始编译安装开发环境包
[root@centos777xcache-3.2.0]#cd xcache-3.2.0/
[root@centos777xcache-3.2.0]#yum groupinstall "development tools" -y
(3)查看编译INSTALL帮助文档

(4)安装php包及依赖的php-devel开发包
[root@centos777xcache-3.2.0]#yum install php -y
[root@centos777xcache-3.2.0]#yum  install php-devel  -y

(5)再执行一次phpize工具,生成configure
[root@centos777xcache-3.2.0]#phpize
Configuring for:
PHP Api Version:         20100412
Zend Module Api No:      20100525
Zend Extension Api No:   220100525

(6)开始./configure、make && make install
[root@centos777xcache-3.2.0]#./configure --prefix=/app/xcache  --enable-xcache
[root@centos777xcache-3.2.0]#make && make install
(7)将xcache.ini配置文件复制到/etc/php.ini目录下并重启httpd服务
[root@centos777xcache-3.2.0]#cp xcache.ini /etc/php.d/
[root@centos777xcache-3.2.0]#systemctl restart httpd
实验准备:
环境准备:
下载相关的源码包
wordpress官网下载地址:https://cn.wordpress.org/
mariadb官网下载地址:https://downloads.mariadb.org/mariadb/10.2.29/
apache官网下载地址:http://httpd.apache.org/
php官网下载地址: http://www.php.net/downloads.php
apr-1.6.5.tar.bz2
apr-util-1.6.1.tar.bz2
httpd-2.4.39.tar.bz2
php-7.1.18.tar.bz2
wordpress-4.9.4-zh_CN.tar.gz
mariadb-10.2.29-linux-x86_64.tar.gz
A主机:192.168.34.100 编译httpd
B主机:192.168.34.101 安装二进制mariadb
LAMP源码编译
A主机进行源码编译httpd服务
(1)解压httpd、arp、apr-util包
[root@centos7src]#mkdir src
[root@centos7src]#cd src
[root@centos7src]#tar xf httpd-2.4.39.tar.bz2
[root@centos7src]#tar xf apr-util-1.6.1.tar.bz2
[root@centos7src]#tar xf apr-1.6.5.tar.bz2
[root@centos7src]#cp -r apr-1.6.5 httpd-2.4.39/srclib/apr
[root@centos7src]#cp -r apr-util-1.6.1  httpd-2.4.39/srclib/apr-util
(2)开始安装httpd开发包组及依赖包
[root@centos7httpd-2.4.39]#yum groupinstall "development tools" -y
[root@centos7httpd-2.4.39]#yum install pcre-devel  openssl-devel expat-devel -y
(3)切换到httpd目录下,编译httpd
[root@centos7~]#cd src/httpd-2.4.39/
./configure
--prefix=/app/httpd24
--enable-so
--enable-ssl
--enable-cgi
--enable-rewrite
--with-zlib
--with-pcre
--with-included-apr
--enable-modules=most
--enable-mpms-shared=all
--with-mpm=prefork
(4)开始多线程编译安装httpd
[root@centos7httpd-2.4.39]#make -j 4 && make install
(5)指定PATH变量路径并生效
[root@centos7~]#echo 'PATH=/app/httpd24/bin:$PATH' > /etc/profile.d/lamp.sh
[root@centos7~]#.  /etc/profile.d/lamp.sh
(6)创建apache账号并在配置文件中修改启动账号
[root@centos7src]#useradd -s -r /sbin/nologin apache
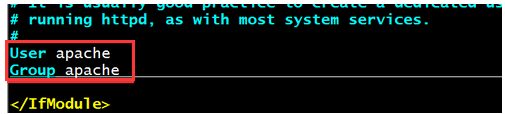
[root@centos7src]#vim /app/httpd24/conf/httpd.conf
User apache
Group apache <br>
<IfModule dir_module>
DirectoryIndex index.php index.html 默认只支持index.html页面,可以添加一个支持index.php页面选项
</IfModule>
<br>在最后一行写上以下内容,为了支持php程序
AddType application/x-httpd-php .php
AddType application/x-httpd-php-source .phps
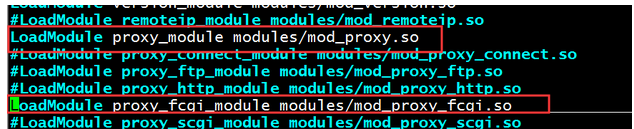
启动fcgi和proxy代理服务,取消两行的注释,并制定应用程序路径:
LoadModule proxy_fcgi_module modules/mod_proxy_fcgi.so
LoadModule proxy_module modules/mod_proxy.so
ProxyPassMatch ^/(.*.php)$ fcgi://127.0.0.1:9000/app/httpd24/htdocs/$1    开启FCGI反向代理,//前面的/相对于后面的/app/httpd24/htdocs而言,后面的$1是指前面的/(.*.php)
修改apache登陆账号
支持一个index.php格式的页面

写到最后一行,使httpd服务支持php,并指定应用程序路径

启动代理,取消注释的两行
注意:此时由于还没有编译安装php包,apache暂时无法启动,等php包安装完一并启动
B主机进行mariadb二进制安装
官网下载地址:https://downloads.mariadb.org/mariadb/10.2.29/
(1)将mariadb包传到linux中,并解压到指定的文件中
rz
[root@centos7~]#tar xvf mariadb-10.3.20.tar.gz  -C /usr/local/
(2)创建用户账号、修改权限及创建软链接
[root@centos7local]#cd /usr/local
root@centos7local]#useradd -s /sbin/nologin  -r mysql -d /data/mysql
[root@centos7local]#ls
bin  etc  games  include  lib  lib64  libexec  mariadb-10.3.20  sbin  share  src
[root@centos7local]#chown -R root.root mariadb-10.3.20/
[root@centos7local]#ln -s mariadb-10.3.20/  mysql
[root@centos7local]#ll mysql
lrwxrwxrwx 1 root root 16 Nov 30 21:16 mysql -> mariadb-10.3.20/
(3)执行脚本指定数据库目录文件
[root@centos7mysql]#mkdir /data/mysql
[root@centos7mysql]#cd /usr/local/mysql
[root@centos7mysql]#scripts/mysql_install_db  --user=mysql  --datadir=/data/mysql
(4)创建配置文件
[root@centos7mysql]#mkdir /etc/mysql
[root@centos7local]#cd mariadb-10.2.29-linux-x86_64/
[root@centos7mysql]#cp support-files/my-huge.cnf /etc/mysql/my.cnf
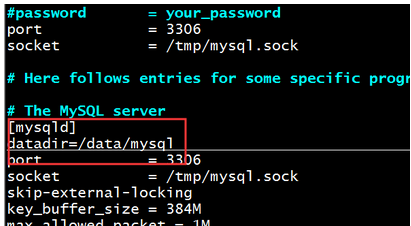
修改my.conf配置文件
[root@centos7mysql]#vim /etc/mysql/my.cnf
[mysqld]
datadir=/data/mysql
(5)复制mysqld服务启动脚本,并加入到服务中
[root@centos7mysql]#cp support-files/mysql.server  /etc/init.d/mysqld  将启动服务复制到etc/init.d目录下,起名叫mysqld
[root@centos7mysql]#chkconfig --add mysqld
[root@centos7mysql]#chkconfig --list  mysqld


Note: This output shows SysV services only and does not include native
      systemd services. SysV configuration data might be overridden by native
      systemd configuration.

      If you want to list systemd services use 'systemctl list-unit-files'.
      To see services enabled on particular target use
      'systemctl list-dependencies [target]'.

mysqld          0:off   1:off   2:on    3:on    4:on    5:on    6:off
(6)启动mariadb服务并制定PATH变量路径
[root@centos7mysql]#service  mysqld start
[root@centos7mysql]#echo 'PATH=/usr/local/mysql/bin:$PATH' > /etc/profile.d/mysql.sh
[root@centos7mysql]#. /etc/profile.d/mysql.sh
(7)创建一个数据库和用户名
[root@centos7mysql]#mysql
Welcome to the MariaDB monitor.  Commands end with ; or g.
Your MariaDB connection id is 10
Server version: 10.2.29-MariaDB-log MariaDB Server

Copyright (c) 2000, 2018, Oracle, MariaDB Corporation Ab and others.

Type 'help;' or 'h' for help. Type 'c' to clear the current input statement.

MariaDB [(none)]> create database wpdb;  创建wpdb数据库
Query OK, 1 row affected (0.01 sec)

MariaDB [(none)]> grant all on wpdb.* to wpuser@'192.168.34.%'  identified by 'centos'; 创建用户名
Query OK, 0 rows affected (0.00 sec)
在A主机源码编译php
(1)先安装php依赖相关包,并解压php包
[root@centos7~]#cd src
[root@centos7src]#ls
apr-1.6.5  apr-1.6.5.tar.bz2  apr-util-1.6.1  apr-util-1.6.1.tar.bz2  httpd-2.4.39  httpd-2.4.39.tar.bz2  php-7.1.18.tar.bz2
[root@centos7src]#yum install libxml2-devel bzip2-devel libmcrypt-devel -y
[root@centos7src]#tar xfv php-7.1.18.tar.bz2
(2)切换到php解压后包目录下,并进行./configure安装,可以查看./configure --help帮助文档
[root@centos7src]#cd php-7.1.18/
./configure --prefix=/app/php
--enable-mysqlnd
--with-mysqli=mysqlnd
--with-openssl
--with-pdo-mysql=mysqlnd
--enable-mbstring
--with-freetype-dir
--with-jpeg-dir
--with-png-dir
--with-zlib
--with-libxml-dir=/usr
--enable-xml
--enable-sockets
--enable-fpm
--with-config-file-path=/etc
--with-config-file-scan-dir=/etc/php.d
--enable-maintainer-zts
--disable-fileinfo
(3)开始多线程编译安装php
[root@centos7httpd-2.4.39]#make -j 4 && make install
(4)在php目录下,复制一个php的配置文件到/etc/目录下
[root@centos7php-7.1.18]#cp php.ini-production /etc/php.ini
(5)在php目录下复制一个启动脚本到/etc/init.d/目录下,并加上执行权限
[root@centos7php-7.1.18]#cp sapi/fpm/init.d.php-fpm /etc/init.d/php-fpm   启动脚本名
[root@centos7php-7.1.18]#chmod +x  /etc/init.d/php-fpm
[root@centos7php-7.1.18]#chkconfig --add php-fpm  将php-fpm加入到启动服务中
(6)解压wordpress包,并将包移动到htdocs目录下
[root@centos7src]#tar xvf wordpress-4.9.4-zh_CN.tar.gz
[root@centos7src]#cd wordpress/
[root@centos7wordpress]#ls
index.php wp-activate.php wp-comments-post.php wp-cron.php wp-load.php wp-settings.php xmlrpc.php
license.txt wp-admin wp-config-sample.php wp-includes wp-login.php wp-signup.php
readme.html wp-blog-header.php wp-content wp-links-opml.php wp-mail.php wp-trackback.php
[root@centos7wordpress]#mv * /app/httpd24/htdocs/   将wordpress目录下的文件全部移动到htdocs目录下
(7)在/app/httpd24/htdocs目录下修改配置文件的名称并修改配置文件
[root@centos7wordpress]#cd /app/httpd24/htdocs
[root@centos7htdocs]#ls
index.html   readme.html      wp-blog-header.php    wp-content   wp-links-opml.php  wp-mail.php      wp-trackback.php
index.php    wp-activate.php  wp-comments-post.php  wp-cron.php  wp-load.php        wp-settings.php  xmlrpc.php
license.txt  wp-admin         wp-config-sample.php  wp-includes  wp-login.php       wp-signup.php
[root@centos7htdocs]#mv wp-config-sample.php  wp-config.php
[root@centos7htdocs]#vim wp-config.php

(8)修改配置文件名称
[root@centos7~]#cd /app/php/etc
[root@centos7etc]#cp php-fpm.conf.default   php-fpm.conf
[root@centos7etc]#cd php-fpm.d/
[root@centos7php-fpm.d]#cp www.conf.default   www.conf
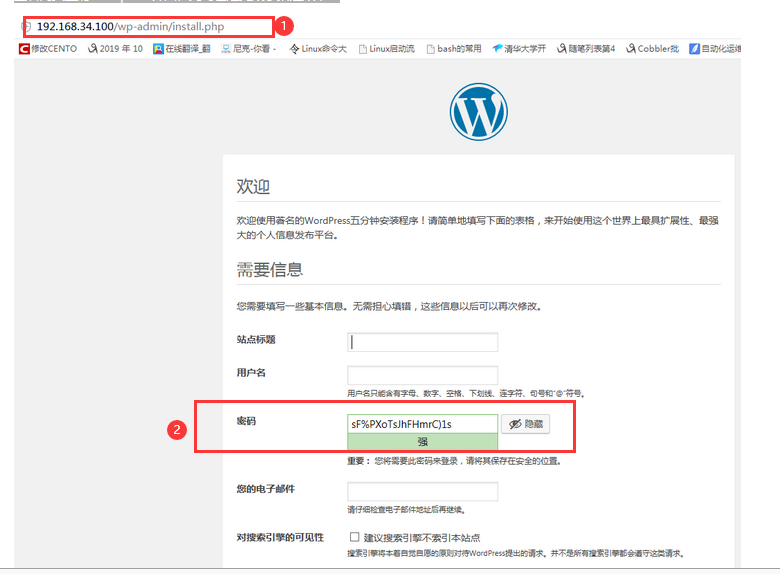
(9)启动php服务,此时所有的编译完成,可以在网页上查看wordpress搭建后的效果
[root@centos7php-fpm.d]#service php-fpm start
[root@centos7php-fpm.d]#apachectl start
查看网页上的wordpress界面,此时已经完成了搭建效果:
最后:我们来测试一下编译后最新版本的php、httpd、mariadb搭建的wordpress运行速度
[root@centos777.ssh]#ab -c 10 -n 200 http://192.168.34.100/   ab命令测试
This is ApacheBench, Version 2.3 <$Revision: 1430300 $>
Copyright 1996 Adam Twiss, Zeus Technology Ltd, http://www.zeustech.net/
Licensed to The Apache Software Foundation, http://www.apache.org/

Benchmarking 192.168.34.100 (be patient)
Completed 100 requests
Completed 200 requests
Finished 200 requests


Server Software:        Apache/2.4.39
Server Hostname:        192.168.34.100
Server Port:            80

Document Path:          /
Document Length:        0 bytes

Concurrency Level:      10
Time taken for tests:   9.022 seconds
Complete requests:      200
Failed requests:        0
Write errors:           0
Non-2xx responses:      200
Total transferred:      68000 bytes
HTML transferred:       0 bytes
Requests per second:    22.17 [#/sec] (mean)   测试结果,每秒可以请求22个文件
Time per request:       451.093 [ms] (mean)
Time per request:       45.109 [ms] (mean, across all concurrent requests)
Transfer rate:          7.36 [Kbytes/sec] received

Connection Times (ms)
              min  mean[+/-sd] median   max
Connect:        0    5   7.8      2      42
Processing:    79  437  91.8    428     702
Waiting:       79  436  91.5    428     702
Total:         81  442  92.5    430     705

Percentage of the requests served within a certain time (ms)
  50%    430
  66%    463
  75%    490
  80%    513
  90%    558
  95%    603
  98%    670
  99%    693
 100%    705 (longest request)