关于TensorFlow Object Detection API配置,可以参考之前的文章https://becominghuman.ai/tensorflow-object-detection-api-tutorial-training-and-evaluating-custom-object-detector-ed2594afcf73
在本文中,我将讨论如何更改预训练模型的配置。本文的目的是您可以根据您的应用程序配置TensorFlow/models,而API将不再是一个黑盒!
本文的概述:
- 了解协议缓冲区和
proto文件。 - 利用
proto文件知识,我们如何了解模型的配置文件 - 遵循3个步骤来更新模型的参数
- 其他示例:
- 更改重量初始值设定项
- 更改体重优化器
- 评估预训练模型
协议缓冲区
要修改模型,我们需要了解它的内部机制。TensorFlow对象检测API使用协议缓冲区(Protocol Buffers),这是与语言无关,与平台无关且可扩展的机制,用于序列化结构化数据。就像XML规模较小,但更快,更简单。API使用协议缓冲区语言的proto2版本。我将尝试解释更新预配置模型所需的语言。有关协议缓冲区语言的更多详细信息,请参阅此文档和Python教程。
协议缓冲区的工作可分为以下三个步骤:
- 在
.proto文件中定义消息格式。该文件的行为就像所有消息的蓝图一样,它显示消息所接受的所有参数是什么,参数的数据类型应该是什么,参数是必需的还是可选的,参数的标记号是什么,什么是参数的默认值等。API的protos文件可在此处找到。为了理解,我使用grid_anchor_generator.proto文件。 -
syntax = "proto2";

package object_detection.protos;

// Configuration proto for GridAnchorGenerator. See
// anchor_generators/grid_anchor_generator.py for details.
message GridAnchorGenerator {
   // Anchor height in pixels.
  optional int32 height = 1 [default = 256];

  // Anchor width in pixels.
  optional int32 width = 2 [default = 256];

  // Anchor stride in height dimension in pixels.
  optional int32 height_stride = 3 [default = 16];

  // Anchor stride in width dimension in pixels.
  optional int32 width_stride = 4 [default = 16];

  // Anchor height offset in pixels.
  optional int32 height_offset = 5 [default = 0];

  // Anchor width offset in pixels.
  optional int32 width_offset = 6 [default = 0];

  // At any given location, len(scales) * len(aspect_ratios) anchors are
  // generated with all possible combinations of scales and aspect ratios.

  // List of scales for the anchors.
  repeated float scales = 7;

  // List of aspect ratios for the anchors.
  repeated float aspect_ratios = 8;
}
它是从线30-33的参数明确
scales,并aspect_ratios是强制性的消息GridAnchorGenerator,而参数的其余部分都是可选的,如果不通过,将采取默认值。- 定义消息格式后,我们需要编译协议缓冲区。该编译器将从文件生成类
.proto文件。在安装API的过程中,我们运行了以下命令,该命令将编译协议缓冲区: -
# From tensorflow/models/research/
protoc object_detection/protos/*.proto --python_out=.
- 在定义和编译协议缓冲区之后,我们需要使用Python协议缓冲区API来写入和读取消息。在我们的例子中,我们可以将配置文件视为协议缓冲区API,它可以在不考虑TensorFlow API的内部机制的情况下写入和读取消息。换句话说,我们可以通过适当地更改配置文件来更新预训练模型的参数。
-
了解配置文件
显然,配置文件可以帮助我们根据需要更改模型的参数。弹出的下一个问题是如何更改模型的参数?本节和下一部分将回答这个问题,在这里
proto文件的知识将很方便。出于演示目的,我正在使用faster_rcnn_resnet50_pets.config文件。 -
# Faster R-CNN with Resnet-50 (v1), configured for Oxford-IIIT Pets Dataset.
# Users should configure the fine_tune_checkpoint field in the train config as
# well as the label_map_path and input_path fields in the train_input_reader and
# eval_input_reader. Search for "PATH_TO_BE_CONFIGURED" to find the fields that
# should be configured.

model {
  faster_rcnn {
    num_classes: 37
    image_resizer {
      keep_aspect_ratio_resizer {
        min_dimension: 600
        max_dimension: 1024
      }
    }
    feature_extractor {
      type: 'faster_rcnn_resnet50'
      first_stage_features_stride: 16
    }
    first_stage_anchor_generator {
      grid_anchor_generator {
        scales: [0.25, 0.5, 1.0, 2.0]
        aspect_ratios: [0.5, 1.0, 2.0]
        height_stride: 16
        width_stride: 16
      }
    }
    first_stage_box_predictor_conv_hyperparams {
      op: CONV
      regularizer {
        l2_regularizer {
          weight: 0.0
        }
      }
      initializer {
        truncated_normal_initializer {
          stddev: 0.01
        }
      }
    }
    first_stage_nms_score_threshold: 0.0
    first_stage_nms_iou_threshold: 0.7
    first_stage_max_proposals: 300
    first_stage_localization_loss_weight: 2.0
    first_stage_objectness_loss_weight: 1.0
    initial_crop_size: 14
    maxpool_kernel_size: 2
    maxpool_stride: 2
    second_stage_box_predictor {
      mask_rcnn_box_predictor {
        use_dropout: false
        dropout_keep_probability: 1.0
        fc_hyperparams {
          op: FC
          regularizer {
            l2_regularizer {
              weight: 0.0
            }
          }
          initializer {
            variance_scaling_initializer {
              factor: 1.0
              uniform: true
              mode: FAN_AVG
            }
          }
        }
      }
    }
    second_stage_post_processing {
      batch_non_max_suppression {
        score_threshold: 0.0
        iou_threshold: 0.6
        max_detections_per_class: 100
        max_total_detections: 300
      }
      score_converter: SOFTMAX
    }
    second_stage_localization_loss_weight: 2.0
    second_stage_classification_loss_weight: 1.0
  }
}

train_config: {
  batch_size: 1
  optimizer {
    momentum_optimizer: {
      learning_rate: {
        manual_step_learning_rate {
          initial_learning_rate: 0.0003
          schedule {
            step: 900000
            learning_rate: .00003
          }
          schedule {
            step: 1200000
            learning_rate: .000003
          }
        }
      }
      momentum_optimizer_value: 0.9
    }
    use_moving_average: false
  }
  gradient_clipping_by_norm: 10.0
  fine_tune_checkpoint: "PATH_TO_BE_CONFIGURED/model.ckpt"
  from_detection_checkpoint: true
  # Note: The below line limits the training process to 200K steps, which we
  # empirically found to be sufficient enough to train the pets dataset. This
  # effectively bypasses the learning rate schedule (the learning rate will
  # never decay). Remove the below line to train indefinitely.
  num_steps: 200000
  data_augmentation_options {
    random_horizontal_flip {
    }
  }
  max_number_of_boxes: 50
}

train_input_reader: {
  tf_record_input_reader {
    input_path: "PATH_TO_BE_CONFIGURED/pet_train.record"
  }
  label_map_path: "PATH_TO_BE_CONFIGURED/pet_label_map.pbtxt"
}

eval_config: {
  num_examples: 2000
  # Note: The below line limits the evaluation process to 10 evaluations.
  # Remove the below line to evaluate indefinitely.
  max_evals: 10
}

eval_input_reader: {
  tf_record_input_reader {
    input_path: "PATH_TO_BE_CONFIGURED/pet_val.record"
  }
  label_map_path: "PATH_TO_BE_CONFIGURED/pet_label_map.pbtxt"
  shuffle: false
  num_readers: 1
}
第7至10行表示这
num_classes是faster_rcnnmessage 的参数之一,而后者又是message的参数model。同样,optimizer是父train_config消息的子消息,而message的batch_size另一个参数train_config。我们可以通过签出相应的protos文件来验证这一点。 -
syntax = "proto2";

package object_detection.protos;

import "object_detection/protos/anchor_generator.proto";
import "object_detection/protos/box_predictor.proto";
import "object_detection/protos/hyperparams.proto";
import "object_detection/protos/image_resizer.proto";
import "object_detection/protos/losses.proto";
import "object_detection/protos/post_processing.proto";

// Configuration for Faster R-CNN models.
// See meta_architectures/faster_rcnn_meta_arch.py and models/model_builder.py
//
// Naming conventions:
// Faster R-CNN models have two stages: a first stage region proposal network
// (or RPN) and a second stage box classifier.  We thus use the prefixes
// `first_stage_` and `second_stage_` to indicate the stage to which each
// parameter pertains when relevant.
message FasterRcnn {

  // Whether to construct only the Region Proposal Network (RPN).
  optional int32 number_of_stages = 1 [default=2];

  // Number of classes to predict.
  optional int32 num_classes = 3;

  // Image resizer for preprocessing the input image.
  optional ImageResizer image_resizer = 4;
从第20行和第26行可以明显看出,这
num_classes是optional消息的参数之一faster_rcnn。我希望到目前为止的讨论有助于理解配置文件的组织。现在,是时候正确更新模型的参数之一了。 -
步骤1:确定要更新的参数
假设我们需要更新fast_rcnn_resnet50_pets.config文件的
image_resizer第10行中提到的参数。步骤2:在存储库中搜索给定参数
目标是找到
proto参数文件。为此,我们需要在存储库中搜索。 
我们需要搜索以下代码:
-
parameter_name path:research/object_detection/protos
#in our case parameter_name="image_resizer" thus,
image_resizer path:research/object_detection/protos
在此
path:research/object_detection/protos限制搜索域。在此处可以找到有关如何在GitHub上搜索的更多信息。搜索的输出image_resizer path:research/object_detection/protos如下所示: 
-
从输出中很明显,要更新
image_resizer参数,我们需要分析image_resizer.proto文件。步骤3:分析
proto档案syntax = "proto2"; package object_detection.protos; // Configuration proto for image resizing operations. // See builders/image_resizer_builder.py for details. message ImageResizer { oneof image_resizer_oneof { KeepAspectRatioResizer keep_aspect_ratio_resizer = 1; FixedShapeResizer fixed_shape_resizer = 2; } } // Enumeration type for image resizing methods provided in TensorFlow. enum ResizeType { BILINEAR = 0; // Corresponds to tf.image.ResizeMethod.BILINEAR NEAREST_NEIGHBOR = 1; // Corresponds to tf.image.ResizeMethod.NEAREST_NEIGHBOR BICUBIC = 2; // Corresponds to tf.image.ResizeMethod.BICUBIC AREA = 3; // Corresponds to tf.image.ResizeMethod.AREA } // Configuration proto for image resizer that keeps aspect ratio. message KeepAspectRatioResizer { // Desired size of the smaller image dimension in pixels. optional int32 min_dimension = 1 [default = 600]; // Desired size of the larger image dimension in pixels. optional int32 max_dimension = 2 [default = 1024]; // Desired method when resizing image. optional ResizeType resize_method = 3 [default = BILINEAR]; // Whether to pad the image with zeros so the output spatial size is // [max_dimension, max_dimension]. Note that the zeros are padded to the // bottom and the right of the resized image. optional bool pad_to_max_dimension = 4 [default = false]; // Whether to also resize the image channels from 3 to 1 (RGB to grayscale). optional bool convert_to_grayscale = 5 [default = false]; // Per-channel pad value. This is only used when pad_to_max_dimension is True. // If unspecified, a default pad value of 0 is applied to all channels. repeated float per_channel_pad_value = 6; } // Configuration proto for image resizer that resizes to a fixed shape. message FixedShapeResizer { // Desired height of image in pixels. optional int32 height = 1 [default = 300]; // Desired width of image in pixels. optional int32 width = 2 [default = 300]; // Desired method when resizing image. optional ResizeType resize_method = 3 [default = BILINEAR]; // Whether to also resize the image channels from 3 to 1 (RGB to grayscale). optional bool convert_to_grayscale = 4 [default = false]; }
从第8-10行可以看出,我们可以使用
keep_aspect_ratio_resizer或调整图像的大小fixed_shape_resizer。在分析行23-44,我们可以观察到的消息keep_aspect_ratio_resizer有参数:min_dimension,max_dimension,resize_method,pad_to_max_dimension,convert_to_grayscale,和per_channel_pad_value。此外,fixed_shape_resizer有参数:height,width,resize_method,和convert_to_grayscale。proto文件中提到了所有参数的数据类型。因此,要更改image_resizer类型,我们可以在配置文件中更改以下几行。 -
#before
image_resizer {
keep_aspect_ratio_resizer {
min_dimension: 600
max_dimension: 1024
    }
}
#after
image_resizer {
fixed_shape_resizer {
height: 600
 500
resize_method: AREA
  }
}
上面的代码将使用AREA调整大小方法将图像调整为500 * 600。TensorFlow中可用的各种调整大小的方法可以在这里找到。
-
其他例子
我们可以使用上一节中讨论的步骤更新/添加任何参数。我将在此处演示一些经常使用的示例,但是上面讨论的步骤可能有助于更新/添加模型的任何参数。
更改重量初始化器
- 决定更改fast_rcnn_resnet50_pets.config文件的
initializer第35行的参数。 initializer path:research/object_detection/protos在存储库中搜索。根据搜索结果,很明显我们需要分析hyperparams.proto文件。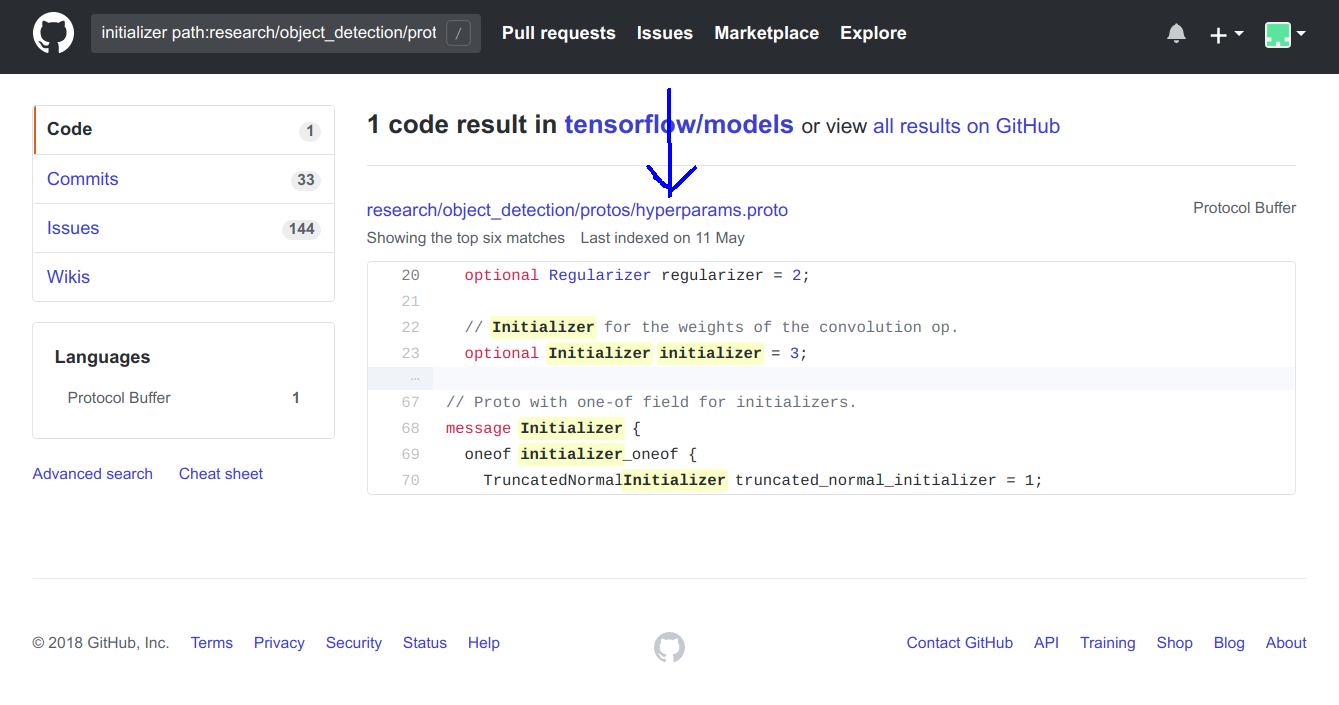
-
- hyperparams.proto文件中的第68–74行说明了
initializer配置。 -
message Initializer {
  oneof initializer_oneof {
    TruncatedNormalInitializer truncated_normal_initializer = 1;
    VarianceScalingInitializer variance_scaling_initializer = 2;
    RandomNormalInitializer random_normal_initializer = 3;
  }
}
我们可以使用
random_normal_intializer代替truncated_normal_initializer,因为我们需要分析hyperparams.proto文件中的第99–102行。 - message RandomNormalInitializer {
optional float mean = 1 [default = 0.0];
optional float stddev = 2 [default = 1.0];
} - 显然
random_normal_intializer有两个参数mean和stddev。我们可以将配置文件中的以下几行更改为userandom_normal_intializer。 -
#before
initializer {
    truncated_normal_initializer {
        stddev: 0.01
       }
}
#after
initializer {
    random_normal_intializer{
       mean: 1
       stddev: 0.5
       }
}
更改体重优化器
- 决定更改faster_rcnn_resnet50_pets.config文件的第87行
momentum_optimizer的父消息的参数。optimizer optimizer path:research/object_detection/protos在存储库中搜索。根据搜索结果,很明显我们需要分析optimizer.proto文件。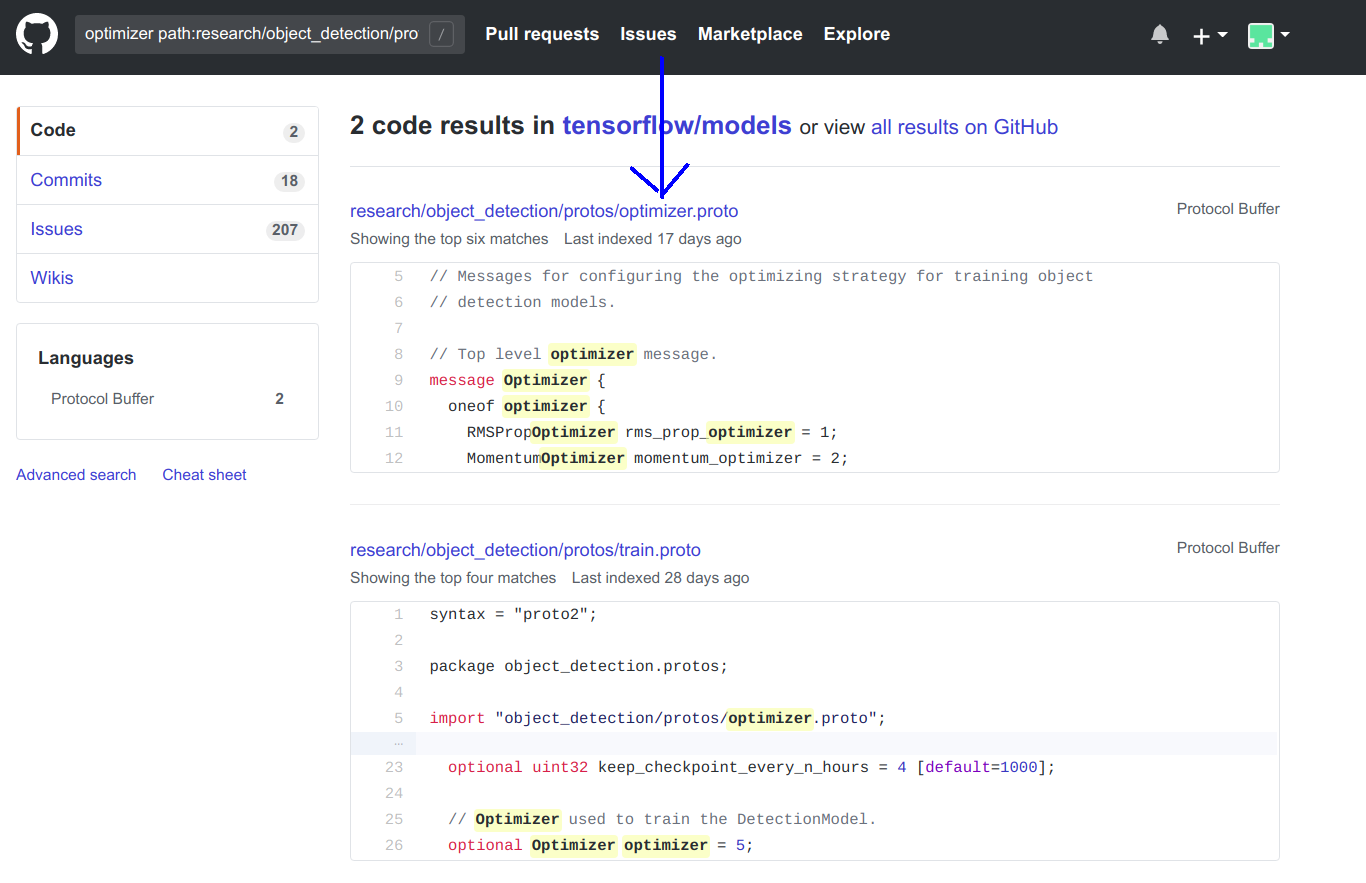
-
- optimizer.proto文件中的9-14行,解释
optimizer配置。
message Optimizer {
  oneof optimizer {
    RMSPropOptimizer rms_prop_optimizer = 1;
    MomentumOptimizer momentum_optimizer = 2;
    AdamOptimizer adam_optimizer = 3;
  }
显然,代替
momentum_optimizer我们可以使用adam_optimizer已被证明是良好的优化程序。为此,我们需要在f aster_rcnn_resnet50_pets.config文件中进行以下更改。 - optimizer.proto文件中的9-14行,解释
- 决定更改faster_rcnn_resnet50_pets.config文件的第87行
#before
optimizer {
  momentum_optimizer: {
      learning_rate: {
           manual_step_learning_rate {
          initial_learning_rate: 0.0003
          schedule {
            step: 900000
            learning_rate: .00003
          }
          schedule {
            step: 1200000
            learning_rate: .000003
          }
        }
      }
      momentum_optimizer_value: 0.9
    }
#after
optimizer {
  adam_optimizer: {
      learning_rate: {
       manual_step_learning_rate {
          initial_learning_rate: 0.0003
          schedule {
            step: 900000
            learning_rate: .00003
          }
          schedule {
            step: 1200000
            learning_rate: .000003
          }
        }
      }
    }
评估预训练模型
Eval等待300秒,以检查训练模型是否已更新!如果您的GPU不错,那么您可以同时进行训练和评估!通常,资源将被耗尽。为了克服这个问题,我们可以先训练模型,将其保存在目录中,然后再评估模型。为了稍后进行评估,我们需要在配置文件中进行以下更改:
- hyperparams.proto文件中的第68–74行说明了
-
#Before
eval_config: {
  num_examples: 2000
  # Note: The below line limits the evaluation process to 10 evaluations.
  # Remove the below line to evaluate indefinitely.
  max_evals: 10
}
#after
eval_config: {
num_examples: 10
num_visualizations: 10
eval_interval_secs: 0
}
num_visualizations应该等于要评估的数量!可视化的数量越多,评估所需的时间就越多。如果您的GPU具有足够的能力同时进行训练和评估,则可以保留eval_interval_secs: 300。此参数决定运行评估的频率。我按照上面讨论的3个步骤得出了这个结论。简而言之,协议缓冲区的知识帮助我们理解了模型参数是以消息形式传递的,并且可以更新我们可以引用的
.proto文件的参数。讨论了3个简单的步骤来找到.proto用于更新参数的正确文件。请在注释的配置文件中提及您要更新/添加的任何参数。
-
关注【OpenCV与AI深度学习】获得更多资讯
扫描下面二维码即可关注

- 决定更改fast_rcnn_resnet50_pets.config文件的
- 定义消息格式后,我们需要编译协议缓冲区。该编译器将从文件生成类