推文:官方手册,十分详细
一.git使用
1.git安装
(1)windows
网站:https://git-scm.com/download/win下载安装即可
(2)linux安装
yum install curl-devel expat-devel gettext-devel openssl-devel zlib-devel 安装依赖环境 Ubuntu18.04直接安装git即可,不需要我们设置依赖环境
yum install git
2.版本库创建
(1)创建项目目录
mkdir git_test
cd git_test
(2)版本库创建
$ git init
Initialized empty Git repository in D:/MyPython/day26/git_test/.git/
#创建了一个空的git仓库在当前目录下的隐藏目录.git下
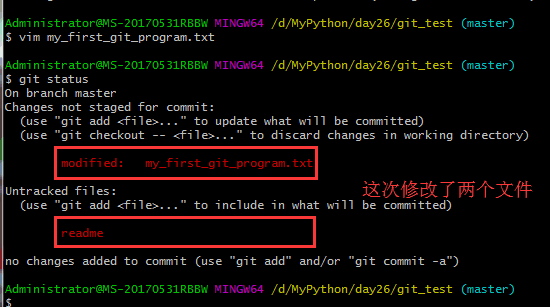
(3)创建一个文件,将文件添加到版本库
1.vim my_first_git_program.txt #创建文件,向其中写入一些数据
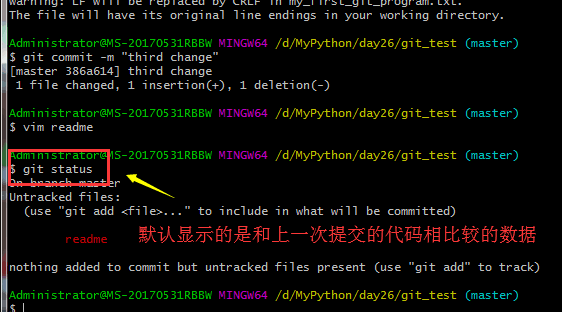
2.$ git status  #查看当前工作区状态
On branch master

No commits yet

Untracked files:
  (use "git add <file>..." to include in what will be committed)

        my_first_git_program.txt  #文件被修改,我们应该去进行添加

nothing added to commit but untracked files present (use "git add" to track)
3.git add my_first_git_program.txt #将当前文件添加到暂存区
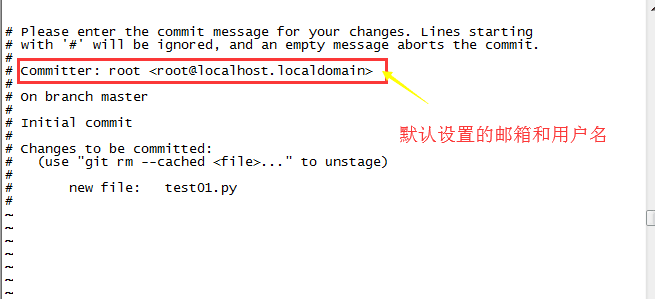
4.git commit -m "fitst commit my_first_git_program.txt" #将当前暂存区中的数据全部放入仓库,必须提供注解
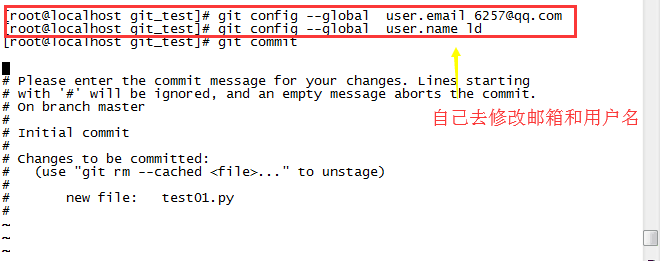
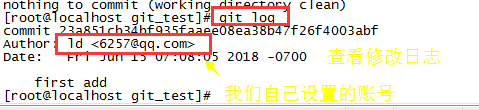
5.在commit数据时,有可能是需要我们填写提交人的邮箱和姓名,有时是默认的
我们可以使用:
git config --global user.email 6257@qq.com
git config --global user.name ld
去配置全局信息
补充:
git commit -m与-am的区别
git commit -m用于提交暂存区的文件,
git commit -am用于提交跟踪过的文件
补充:


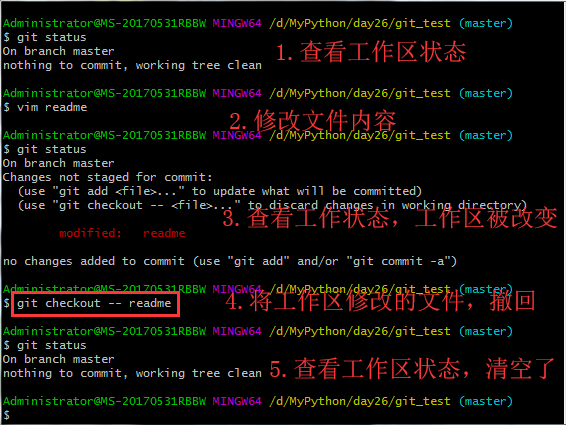
3.代码回滚
(1)对于我们修改后的文件,只要还在工作区。我们都可以直接使用git checkout -- 文件名,将数据还原。就是让这个文件回到最近一次git commit或git add时的状态
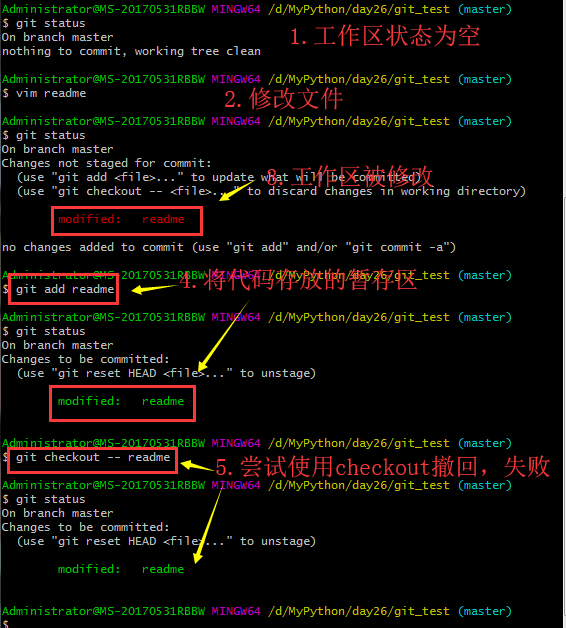
补充:
对于添加到暂存区的代码,不能使用checkout撤销,checkout只是针对工作区的代码
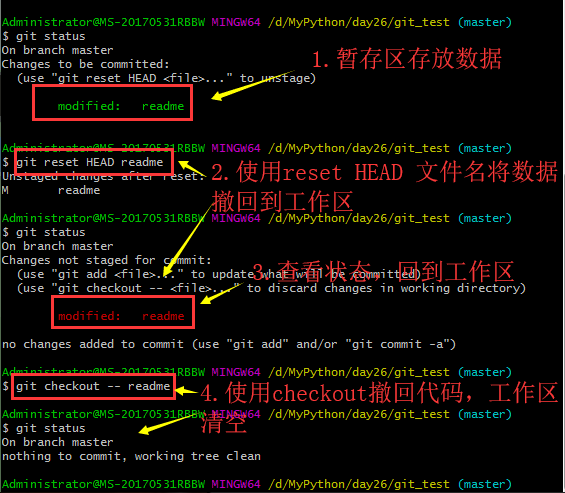
(2)对于我们要去回滚暂存区的数据,我们可以使用reset
$ git reset HEAD readme  #将数据从暂存区,回滚到工作区
Unstaged changes after reset:
M       readme
补充:HEAD
HEAD是一个指针,指向master分支的最新版本号

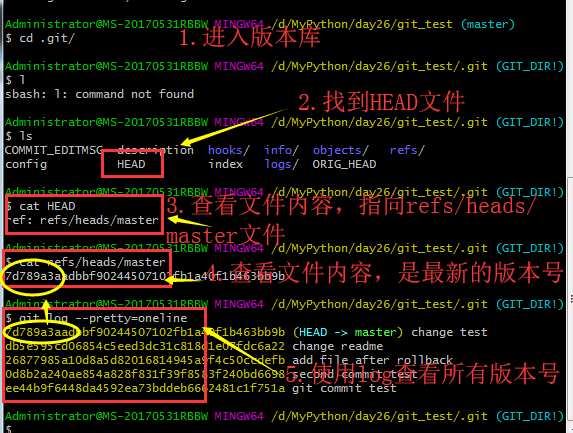
注意:HEAD指向当前最新的版本号,HEAD^是代表上一个版本号,^^代表上上个版本,以此类推
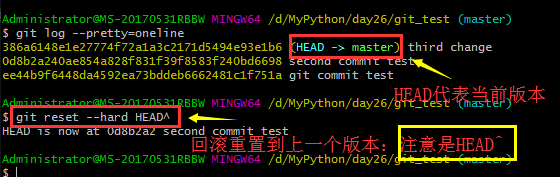
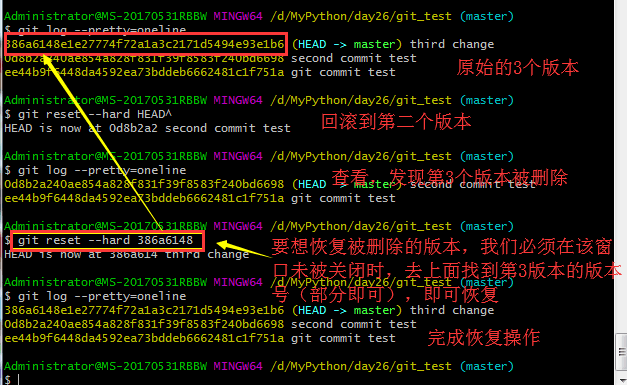
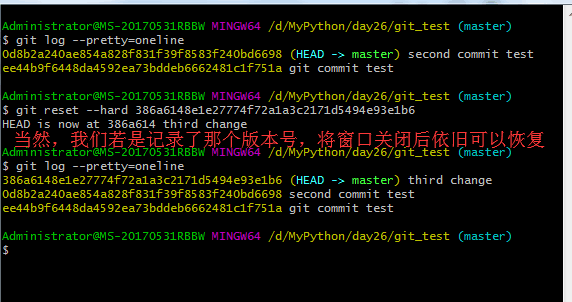
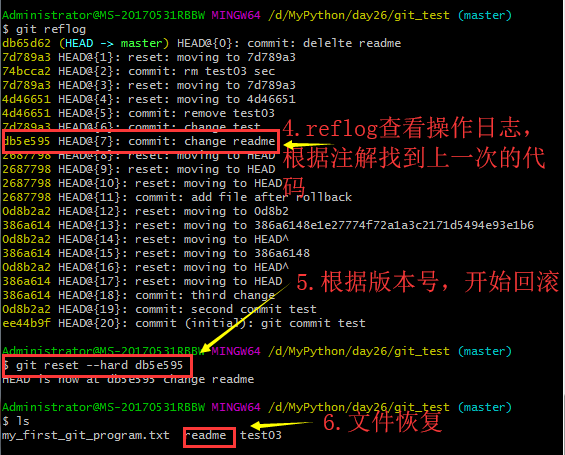
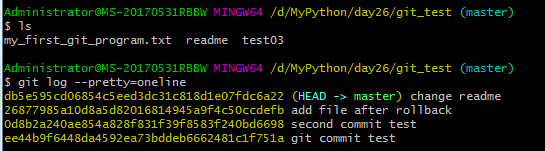
(3)对于commit提交的数据,我们可以使用reset --hard HEAD^回到上一个版本,或者使用reset --hard 版本号(部分,6位及以上)回到指定的版本号
使用git log --pretty=oneline查看当前版本库的状态

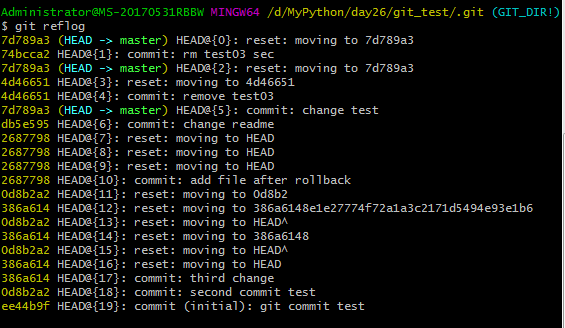
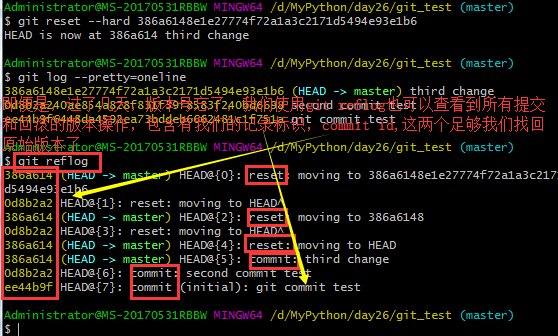
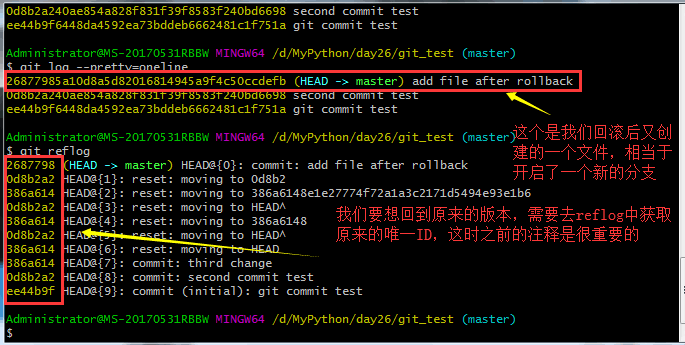
使用git reflog可以查看每一次添加和回滚操作的记录日志,含有版本号和注解。方便我们回到某一版本
演示:
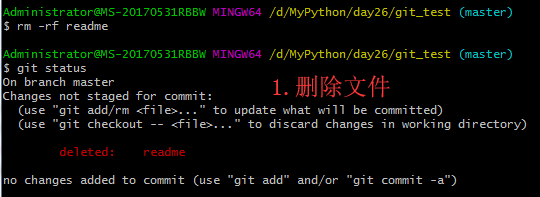
4.删除操作
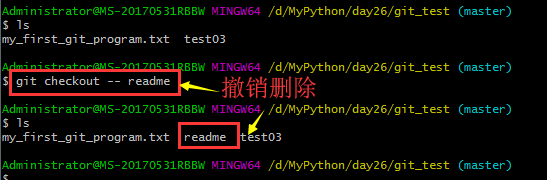
(1)直接删除文件,在暂存区中状态会改变,可以使用checkout -- file撤回
rm -rf 文件名 #强制删除文件

git checkout -- 文件 #可以直接恢复删除的文件
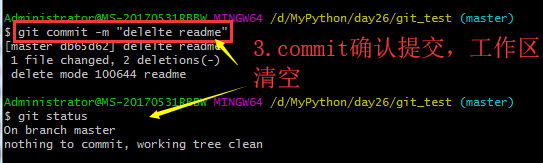
(2)使用rm直接删除文件后,确实要删除该文件,使用命令git rm删除,在commit,可以通过版本号回滚

二.github远程仓库管理
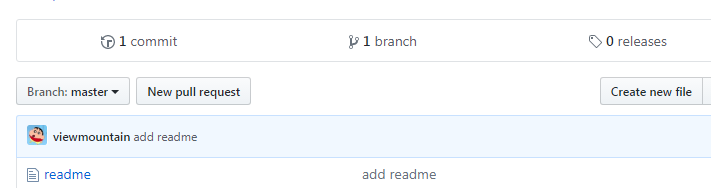
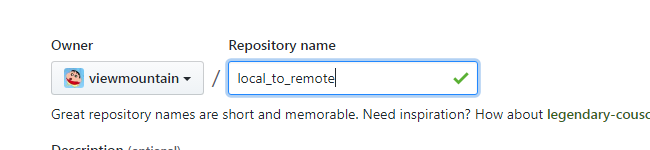
1.创建远程仓库

2.本地仓库和远程仓库关联
(1)将刚刚创建的仓库,克隆到本地使用
1>将远程仓库克隆岛本地

$ git clone https://github.com/viewmountain/github_operate.git
Cloning into 'github_operate'...
warning: You appear to have cloned an empty repository.
2>在本地操作代码

3>上传到远程仓库
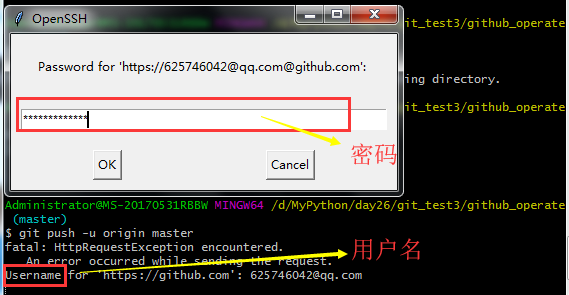
git push -u origin master #需要输入用户名密码
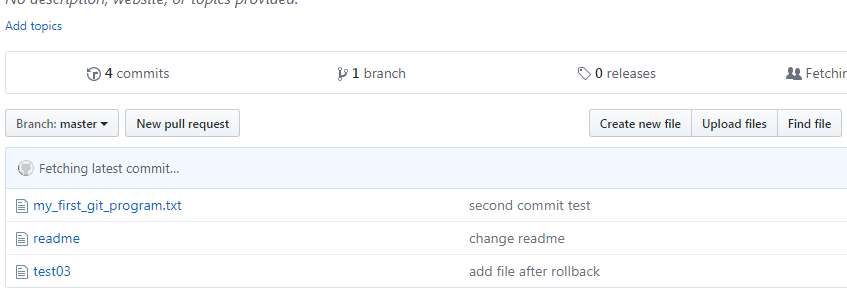
4>上传成功
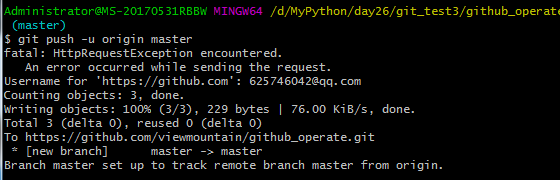
注意:
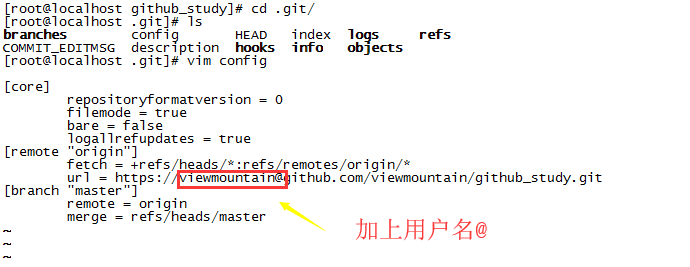
1.可能会出现403错误

我们需要去修改配置文件:
2.可能出现Gtk警告

我们需要使用
unset SSH_ASKPASS
(2)先有本地仓库,再创建了一个空的远程仓库,想要上传到远程仓库上去
1.本地已存在仓库
2.创建一个远程空仓库
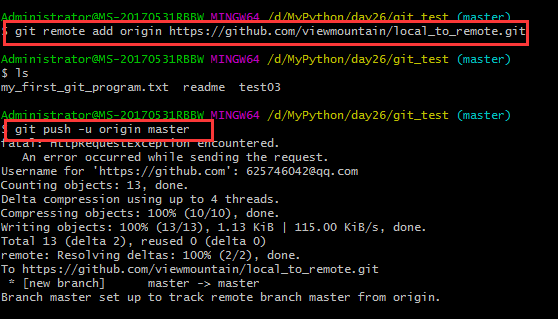
3.将本地仓库和远程仓库关联
git remote add origin https://github.com/viewmountain/local_to_remote.git
git push -u origin master
3.上面使用的是HTTPS方式关联,下面使用SSH方式
(1)生成公钥私钥
linux:linux下请看
window:在git bash中使用
$ ssh-keygen
Generating public/private rsa key pair.
Enter file in which to save the key (/c/Users/Administrator/.ssh/id_rsa):
Enter passphrase (empty for no passphrase):
Enter same passphrase again:
Your identification has been saved in /c/Users/Administrator/.ssh/id_rsa.
Your public key has been saved in /c/Users/Administrator/.ssh/id_rsa.pub.
The key fingerprint is:
SHA256:Vz2QZuY+oDKXwL81BtlQrL/XLkfG3Hp7bl9fzCnJ6sQ Administrator@MS-20170531RBBW
The key's randomart image is:
+---[RSA 2048]----+
|         o. ..   |
|        . . =o   |
|     .   = =. o  |
|      o + o..  . |
|       oS=.o o . |
|      o =.* + *oo|
|       + + E O o=|
|        . o + = B|
|          .+ +.=B|
+----[SHA256]-----+
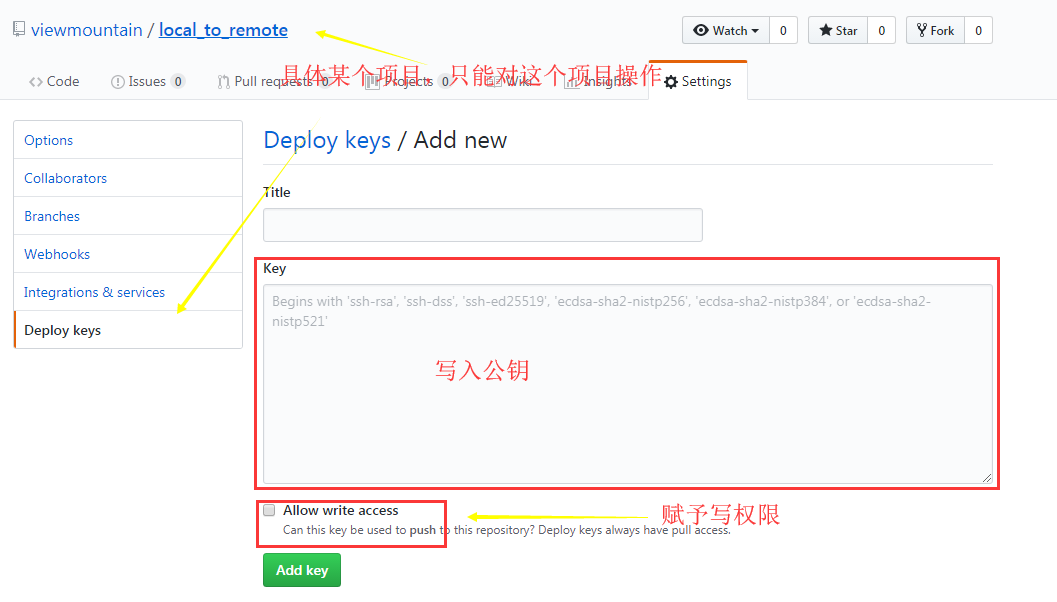
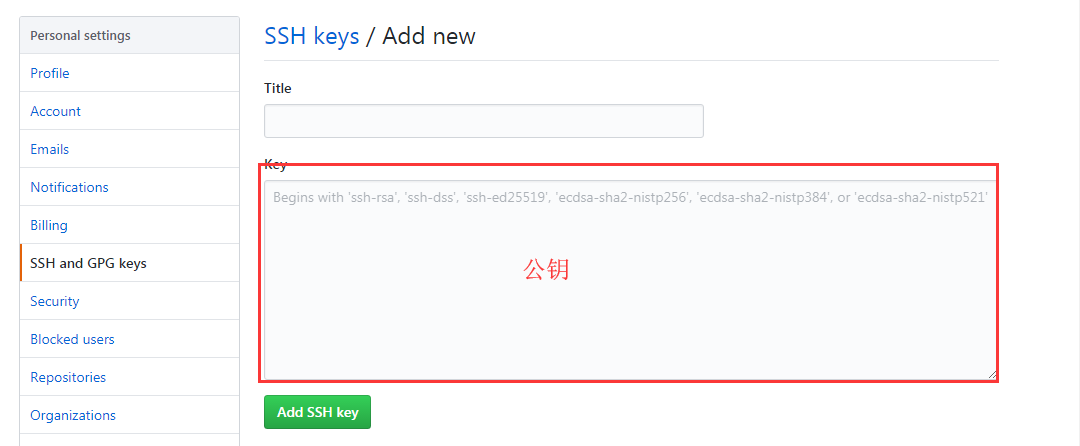
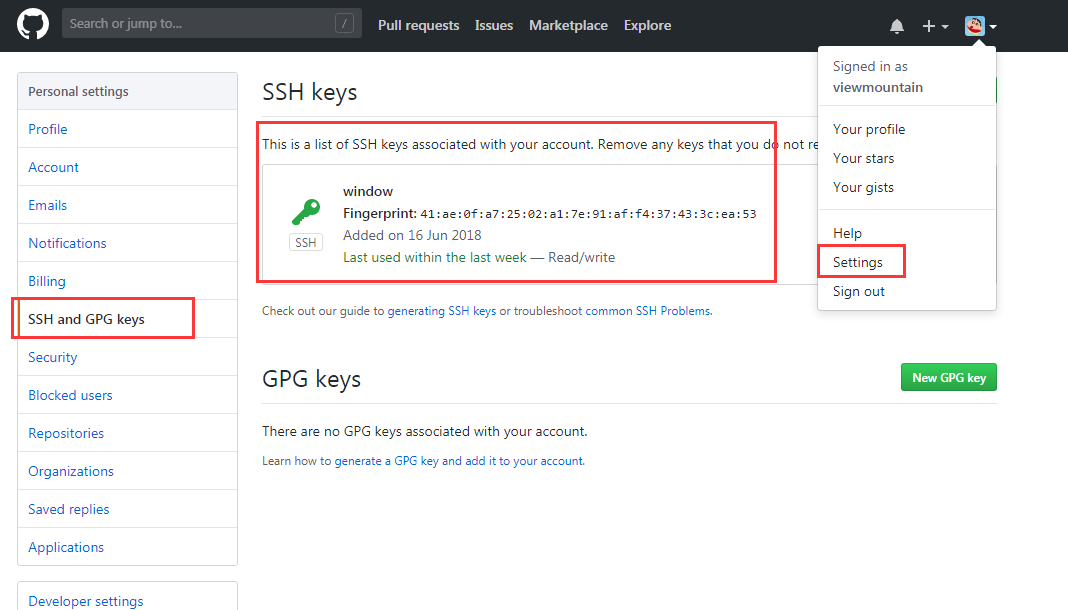
(2)将公钥上传到github上
1>对某个项目使用ssh操作
2>对所有仓库都可以使用SSH管理
(3)使用ssh远程操作仓库
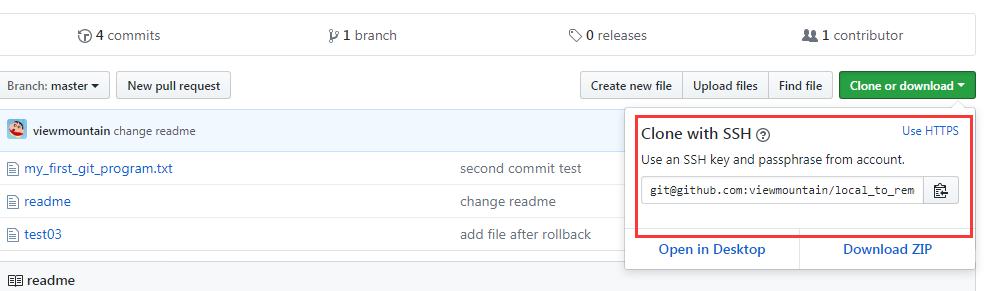
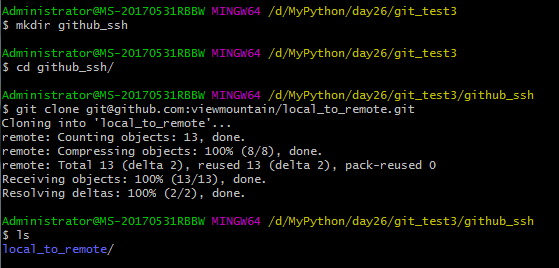
1>使用远程将项目获取
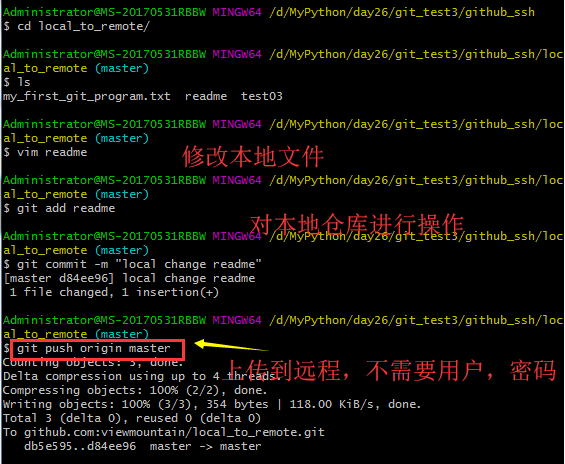
2>修改项目,操作本地仓库,将本地仓库上传到远程
$ git push origin master
三:git分支管理
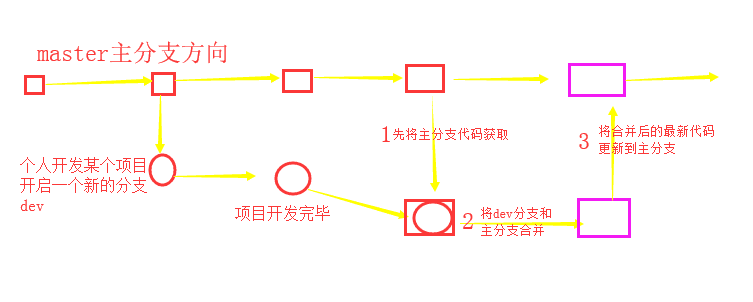
1.git分支合并,示意图
2.创建分支
$ git checkout -b dev  #创建dev分支,会自动切换到dev分支
Switched to a new branch 'dev'

Administrator@MS-20170531RBBW MINGW64 /d/MyPython/day26/git_test3/github_ssh/local_to_remote (dev)
3.查看分支
$ git branch
* dev  #带星号,是表示位于当前分支
  master

Administrator@MS-20170531RBBW MINGW64 /d/MyPython/day26/git_test3/github_ssh/local_to_remote (dev)
4.分支切换
$ git checkout master
Switched to branch 'master'
Your branch is up-to-date with 'origin/master'.

Administrator@MS-20170531RBBW MINGW64 /d/MyPython/day26/git_test3/github_ssh/local_to_remote (master)
$ git branch
dev
* master
Administrator@MS-20170531RBBW MINGW64 /d/MyPython/day26/git_test3/github_ssh/local_to_remote (master)
5.在主分支master下修改文件
$ vim readme  #修改文件

$ cat readme
hhhhh
test
dawf
change on master

$ git add readme  #存放到暂存区

Administrator@MS-20170531RBBW MINGW64 /d/MyPython/day26/git_test3/github_ssh/local_to_remote (master)
$ git commit -m "change on master"  #提交到仓库中
[master 09dbb59] change on master
 1 file changed, 1 insertion(+)

Administrator@MS-20170531RBBW MINGW64 /d/MyPython/day26/git_test3/github_ssh/local_to_remote (master)
6.切换分支dev,查看文件内容
$ git checkout dev
Switched to branch 'dev'

Administrator@MS-20170531RBBW MINGW64 /d/MyPython/day26/git_test3/github_ssh/local_to_remote (dev)
$ cat readme
hhhhh
test
dawf

Administrator@MS-20170531RBBW MINGW64 /d/MyPython/day26/git_test3/github_ssh/local_to_remote (dev)
7.发现可以实现master和dev两个分支相互平行,不干扰
四.分支融合merge
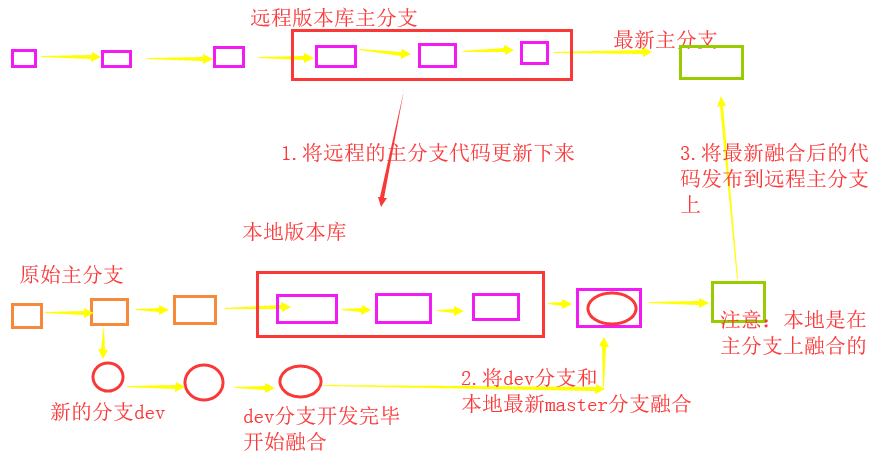
1.git pull更新当前分支到最新版本(更新主分支)
$ git pull
Already up-to-date.

Administrator@MS-20170531RBBW MINGW64 /d/MyPython/day26/git_test3/github_ssh/local_to_remote (master)
2.在本地主分支上,融合开发的分支dev
$ git merge dev  #下面显示自动融合出现矛盾,因为我们我们在dev分支修改了readme,在最新的主分支上也修改过readme,冲突了
Auto-merging readme
CONFLICT (content): Merge conflict in readme
Automatic merge failed; fix conflicts and then commit the result.

Administrator@MS-20170531RBBW MINGW64 /d/MyPython/day26/git_test3/github_ssh/local_to_remote (master|MERGING)
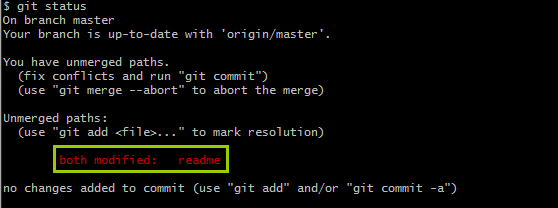
解决方法:
1.vim编辑手工筛选
2.选择更好工具:beyond compare等
3.在本地融合,处理完冲突后,上传主分支到远程
$  vim readme

Administrator@MS-20170531RBBW MINGW64 /d/MyPython/day26/git_test3/github_ssh/local_to_remote (master|MERGING)
$ git add readme

Administrator@MS-20170531RBBW MINGW64 /d/MyPython/day26/git_test3/github_ssh/local_to_remote (master|MERGING)
$ git commit -m "conflict solve"
[master a69bed3] conflict solve

Administrator@MS-20170531RBBW MINGW64 /d/MyPython/day26/git_test3/github_ssh/local_to_remote (master)
$ git merge dev  #本地融合完成
Already up-to-date.

Administrator@MS-20170531RBBW MINGW64 /d/MyPython/day26/git_test3/github_ssh/local_to_remote (master)
$ git push origin master  #向远程上传更新
Counting objects: 3, done.
Delta compression using up to 4 threads.
Compressing objects: 100% (2/2), done.
Writing objects: 100% (3/3), 338 bytes | 112.00 KiB/s, done.
Total 3 (delta 1), reused 0 (delta 0)
remote: Resolving deltas: 100% (1/1), completed with 1 local object.
To github.com:viewmountain/local_to_remote.git
   606b1b0..a69bed3  master -> master
4.注意:可能在我们使用git pull更新主分支时,会报错
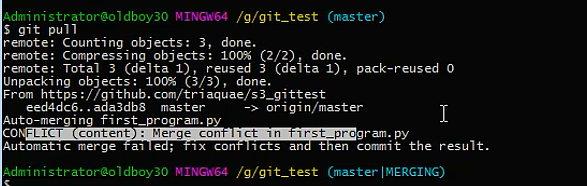
原因是因为,我们手中的是原来老版本主分支,
我们在开发dev时,
其他人员开发其他应用时可能会去修改主分支中的代码,而且有可能会修改到我们原来老版本部分的代码。
这时我们手中部分老版本代码会出现冲突。这时就需要我们再手动去修改冲突文件(根据提示)
补充:远程其他分支操作(毕竟多人操作,需要共用一个分支,而这个分支不可能是master主分支,例如dev,bug)
1>查看远程仓库分支
$ git remote
origin

Administrator@MS-20170531RBBW MINGW64 /d/MyPython/day26/git_test3/github_ssh/local_to_remote (dev)
$ git remote -v
origin  git@github.com:viewmountain/local_to_remote.git (fetch)
origin  git@github.com:viewmountain/local_to_remote.git (push)

Administrator@MS-20170531RBBW MINGW64 /d/MyPython/day26/git_test3/github_ssh/local_to_remote (dev)
注意:远程主分支是origin,而git自动把本地的master分支和远程的master分支对应
2>推送分支dev
$ git push origin dev  #将dev分支推送到远程
Counting objects: 3, done.
Delta compression using up to 4 threads.
Compressing objects: 100% (3/3), done.
Writing objects: 100% (3/3), 400 bytes | 133.00 KiB/s, done.
Total 3 (delta 1), reused 0 (delta 0)
remote: Resolving deltas: 100% (1/1), completed with 1 local object.
To github.com:viewmountain/local_to_remote.git
   f39dc34..3101afb  dev -> dev

Administrator@MS-20170531RBBW MINGW64 /d/MyPython/day26/git_test3/github_ssh/local_to_remote (master)
推送分支原则:
master分支是主分支,因此要时刻与远程同步;

dev分支是开发分支,团队所有成员都需要在上面工作,所以也需要与远程同步;

bug分支只用于在本地修复bug,就没必要推到远程了,除非老板要看看你每周到底修复了几个bug;

feature分支是否推到远程,取决于你是否和你的小伙伴合作在上面开发。

其他的,放在本地自己看
3>抓取分支
空项目,git克隆远程库后,默认,只能看到master主分支
$ git branch
* master
Administrator@MS-20170531RBBW MINGW64 /d/MyPython/day26/git_test (master)
想要获取其他分支
$ git branch
* master
Administrator@MS-20170531RBBW MINGW64 /d/MyPython/day26/git_test (master)
$ git checkout -b dev origin/dev
Switched to a new branch 'dev'
Branch dev set up to track remote branch dev from origin.
Administrator@MS-20170531RBBW MINGW64 /d/MyPython/day26/git_test (dev)
$ git branch
* dev
master
Administrator@MS-20170531RBBW MINGW64 /d/MyPython/day26/git_test (dev)
五.bug分支
前景:
当前正在dev分支开发一个项目,开发了大部分。发现之前上传的主分支版本出现bug,错误码101(是属于我们开发的代码),需要紧急修复。
分析:
1.我们需要保存现在dev分支的状态 git stash
2.因为bug出现在上一个我们开发的master分支上,所以我们只需要针对本地的master主分支去生成一个bug分支。将bug修复后,在与远程仓库融合提交。
3.bug修复后,回到开发分支,恢复原来状态 git stash apply
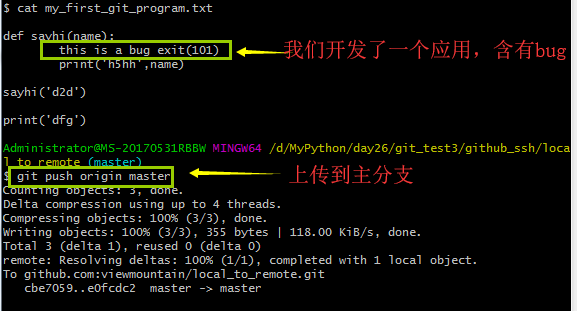
1.前景实现
(1)开发了一个应用,含有bug
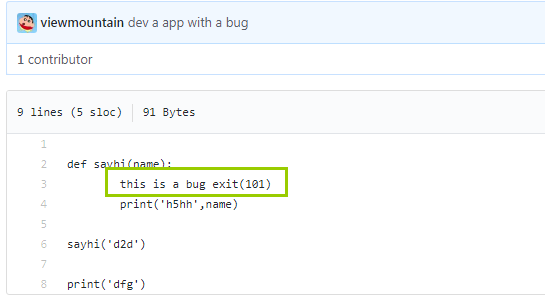
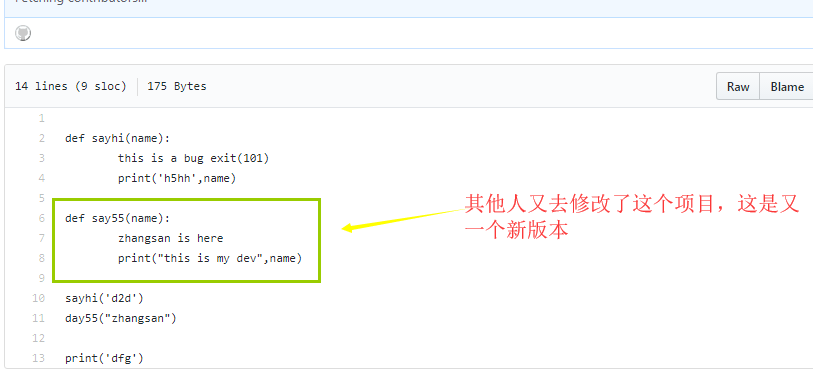
(2)其他人员也正常开发其他应用。对主分支进行了更新
注意:
我们本地的版本是原始的出现bug的那一个版本,所以我们只需要去修改本地出现bug的那个本地master主分支代码,之后与远程主分支融合
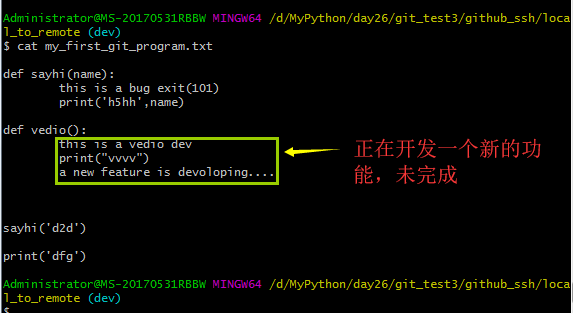
(3)我们正在开发一个新的应用,在dev分支上
2.场景处理:被告知我们开发的上一个项目有bug,需要紧急处理
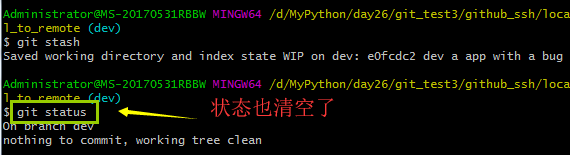
(1)当前分支没有被完成,而且不想现在add,commit
$ git stash  #将当前分支工作区存储下来。
Saved working directory and index state WIP on dev: e0fcdc2 dev a app with a bug

Administrator@MS-20170531RBBW MINGW64 /d/MyPython/day26/git_test3/github_ssh/local_to_remote (dev)
(2)回到本地主分支,在其基础上创建一个bug分支
$ git checkout master  #回到主分支
Switched to branch 'master'
Your branch is up-to-date with 'origin/master'.

Administrator@MS-20170531RBBW MINGW64 /d/MyPython/day26/git_test3/github_ssh/local_to_remote (master)


$ git checkout -b bug-101  #在其基础上创建一个bug分支,去处理bug
Switched to a new branch 'bug-101'

Administrator@MS-20170531RBBW MINGW64 /d/MyPython/day26/git_test3/github_ssh/local_to_remote (bug-101)
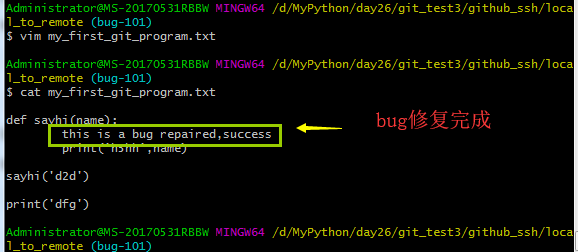
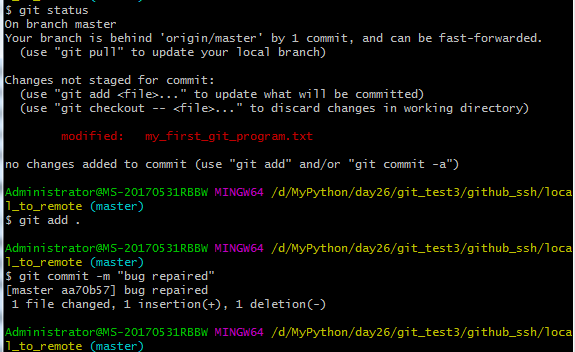
(3)在bug-101分支处理bug
(4)回到主分支,更新当前主分支代码。然后将bug分支代码融合
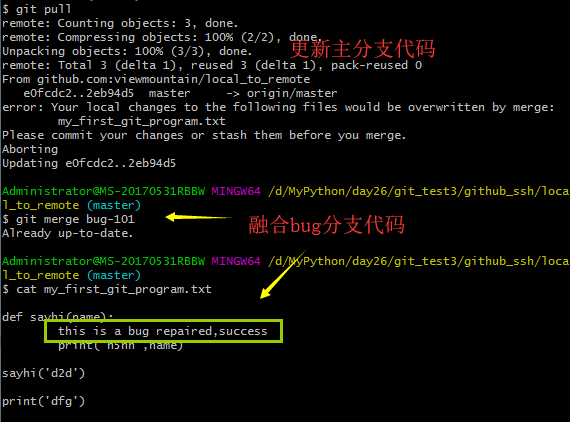
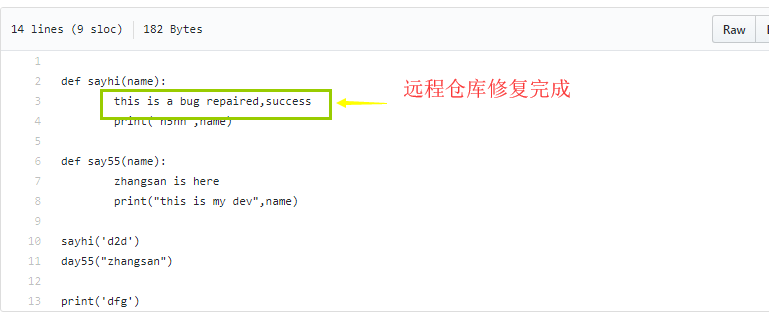
(5)上传更新远程主分支代码
$ git push origin master
Counting objects: 6, done.
Delta compression using up to 4 threads.
Compressing objects: 100% (6/6), done.
Writing objects: 100% (6/6), 641 bytes | 128.00 KiB/s, done.
Total 6 (delta 4), reused 0 (delta 0)
remote: Resolving deltas: 100% (4/4), completed with 2 local objects.
To github.com:viewmountain/local_to_remote.git
   2eb94d5..64a31b3  master -> master

Administrator@MS-20170531RBBW MINGW64 /d/MyPython/day26/git_test3/github_ssh/local_to_remote (master)
(6)回到dev分支,恢复工作区状态
$ git checkout dev  #回到dev分支
Switched to branch 'dev'

Administrator@MS-20170531RBBW MINGW64 /d/MyPython/day26/git_test3/github_ssh/local_to_remote (dev)
$ git stash list  #查看临时保存的列表
stash@{0}: WIP on dev: e0fcdc2 dev a app with a bug

Administrator@MS-20170531RBBW MINGW64 /d/MyPython/day26/git_test3/github_ssh/local_to_remote (dev)
$ git stash apply  #恢复之前保存的临时工作
On branch dev
Changes not staged for commit:
  (use "git add <file>..." to update what will be committed)
  (use "git checkout -- <file>..." to discard changes in working directory)

        modified:   my_first_git_program.txt

no changes added to commit (use "git add" and/or "git commit -a")

Administrator@MS-20170531RBBW MINGW64 /d/MyPython/day26/git_test3/github_ssh/local_to_remote (dev)
$ git stash drop  #上传当前临时保存的列表
Dropped refs/stash@{0} (97e9105ea76ab63334eae953fae20f2f6c074185)

Administrator@MS-20170531RBBW MINGW64 /d/MyPython/day26/git_test3/github_ssh/local_to_remote (dev)
$ git stash list

Administrator@MS-20170531RBBW MINGW64 /d/MyPython/day26/git_test3/github_ssh/local_to_remote (dev)
补充:
git stash pop 恢复并删除临时保存的备份
六:忽略特殊文件.gitignore(工作区)
对于某些特殊,敏感的文件,不希望提交上去
忽略操作系统自动生成的文件,比如缩略图等; 忽略编译生成的中间文件、可执行文件等,也就是如果一个文件是通过另一个文件自动生成的,那自动生成的文件就没必要放进版本库,比如Java编译产生的.class文件; 忽略你自己的带有敏感信息的配置文件,比如存放口令的配置文件。
具体语言的相关配置:https://github.com/github/gitignore
我们只需要将要忽略的文件添加到.gitignore中即可
注意:
对于已经提交过的文件,不会去维护,我们需要先删除这个文件,再提交的时候才会被忽略