前言

一、docker
1、docker是什么?
Docker的英文本意是“搬运工”,Docker搬运的是集装箱(Container)可以成为容器,我可以把写的Django的WEB应用以及Python依赖库打包进一个可移植的容器里传播,解决了应用部署的平台兼容性问题,同时她也是一种轻量级的虚拟化技术可以做到秒级启动一个容器(类似小虚拟机,区别启动快、可以传播);
 j
j
2、docker和镜像的关系
镜像是docker 创建、启动一个容器的文件系统,这个文件系统包含依赖包、命令工具、APP等;
3、在centos7中安装docker
yum -y install epel* #添加epel Yum源 由于Docker要求Linux内核版本必须在要在3.10,所以centos6.X版本需要 yum install docker-io
systemctl start docker.service #开启docker服务
docker info #查看docker信息
4、docker基本使用
4.0、镜像制造
关于镜像的制造方法有2种
1)、dockerhub 镜像------》容器-------》修改容器-------》新的镜像
2)、docker file:在基础镜像上,执行dockerfile 中定义的一系列命令,执行完毕后得到一个自定义新镜像;
docker file 语法
From centos  #设置基础镜像
MAINTAINER egon zhanggen@le.com  #标注该镜像的作者 邮箱
ENV name=egon  设置变量
ENV age=18
RUN mkdir /dockerfile  执行的命令
RUN echo 'hellow world' > /dockerfile/file.txt
CMD echo '欢迎来到新的容器'  开机自动执行命令(参数会被覆盖)
ENTYRPOINT ['hell']                开机自动执行命令(参数不可以重复,和覆盖)
WORKDIR: 设置进入容器后的 默认(pwd)工作目录


ADD: 把宿主机的目录  打包到容器目录 (注意使用的是当前 build目录下的文件)
docker history centos 查看镜像打包的过程 执行了那些指令
EXPOSE 80 指定容器对外开放的端口
3)、dockerfile制作Django web应用镜像 例子
From centos
MAINTAINER egon zhanggen@le.com
CMD /usr/sbin/init
RUN yum -y install epel*
RUN yum -y install python-pip
RUN pip install django
RUN pip install gunicorn
ADD /zhanggen/ /zhanggen/
CMD cd /zhanggen/djproject
CMD systemctl start nginx
WORKDIR /zhanggen/djproject
CMD gunicorn djproject.wsgi:application --bind=0.0.0.0:8000
EXPOSE 8000
4)、生成镜像
docker build -t zhanggen .
[root@localhost nginx]# cd /build/
[root@localhost build]# ls
Dockerfile  web.conf  zhanggen
[root@localhost build]# vim Dockerfile
[root@localhost build]# ls
Dockerfile  web.conf  zhanggen
[root@localhost build]# docker build -t zhanggen .
5)、补充
修改docker的 -log-driver(日志引擎) 为fluentd 收集日志模式
docker run -id --log-driver=fluentd --log-opt fluentd-address=192.168.182.146:24224 -p 8000:8000 zhanggen
docker logs -f -t --since="2017-05-31" --tail=10 容器ID  查看容器的日志
4.1、镜像管理
docker pull hello-world 从Docker Hub拉取镜像
docker rmi 18 删除镜像
docker run -it centos bash 使用centos镜像启动一个容器
docker镜像的传播
docker save nginx > nginx.tar 打包镜像
docker load < nginx.tar 解压
4.2、容器管理
docker ps 查看已经启动的容器

docker top 容器ID 查看容器中运行的程序

docker run -idt  365 /bin/bash 在后台启动容器(exit)

docker exec -it 4a bash 进入容器

docker stop 0 关闭后台运行的容器

docker ps -a 查看已经关闭的容器

docker rm f 删除容器信息(容器关闭后,容器信息还会存在)

 docker rmi -f 4a725d3b3b1c  强制删除

docker rm `docker ps -aq` 删除所有容器

docker inspect 16 查看容器的相关信息
4.3、docker的网络模型
1)docker network list 查看容器使用的网络连接方式
bridge bridge local 默认使用桥接主机模式
662180063e96 host host local HOST模式和主机公用一个IP
9a36997e04cd none null local none模式容器不使用IP地址
2)添加容器和主机间的端口映射
                宿主机/docker
docker run -d -p 8080:80 nginx  (切记开启systemctl start firewalld.service
)
二、Nginx+Gunicorn+Django(docker)+Fluentd 收集docker日志

1、安装gunicorn


pip install gunicorn
2、修改Django项目的setings文件
ALLOWED_HOSTS = ['*']

STATIC_URL = '/static/'
STATICFILES_DIRS=(
    os.path.join(BASE_DIR,'static'),
                )
STATIC_ROOT = os.path.join(BASE_DIR,"static_assets")
3、创建static文件、media文件路径,将django admin和django app的静态文件收集到STATIC_ROOT目录下并设置 静态文件的访问路径
[root@cmdb /]# ls
WorkOrderSystemData
static_assets
python manage.py collectstatic
from django.contrib.staticfiles.urls import staticfiles_urlpatterns


urlpatterns = [
    url(r'^admin/', admin.site.urls),
    url(r'^$', views.login),
    url(r'^media/(?P<path>.*)$',serve,{'document_root': settings.MEDIA_ROOT}),
    url(r'^arya/', (v1.site.urls,None,'arya')),
    url(r'^login/', views.login,name='login'),
    url(r'^chart/', views.chart),
    url(r'^chartdown/', views.chartdown),
    url(r'^chartdownload/', views.chartdownload),
    url(r'^check_code/', views.check_code),
    url(r'^login_first/$', views.login_first),
    url(r'^login_first/changepwd/$', views.changepwd), #修改密码
    url(r'^work_order_api/$', views.work_order_api),#zabbix报警转换成工单的API
    url(r'^users_api/$', views.user_list),
    url(r'^DBshow/', include('DBshow.urls')),
    url(r'^track_work_api/$', views.track_work_api, name='track_work_api'),               #把工单转移到跟进表
    url(r'^list_trackwork_api/$', views.trackwork_list_api, name='trackwork_list_api'),      #获取跟进表数据
    url(r'^multitask/',include('multitask.urls')),
    url(r'^webcron/', include('webcron.urls')),
    url(r'^oauth2/sina/', views.oauth_sina),
    url(r'^pc-geetest/register', views.get_geetest, name='get_geetest'),  # 极验获取验证码url
    url(r'^ajax_cmdb_details/',views.ajax_cmdb_details,name='ajax_cmdb_details'), #cmdb详情页api
    url(r'^chat/', include('chat.urls')),
    url(r'^auto_option/',include('DB_auto.urls')),
    url(r'^chart_warn',views.chart_warn),

]


urlpatterns += [url(r'^static/(?P<path>.*)$', serve,{'document_root': settings.STATIC_ROOT})]
4、配置文件
Nginx配置文件
user root root;
worker_processes  4;

#error_log  logs/error.log;
#error_log  logs/error.log  notice;
#error_log  logs/error.log  info;

#pid        logs/nginx.pid;


events {
    worker_connections  1024;
}


http {
    include       mime.types;
    default_type  application/octet-stream;

    log_format  main  '$remote_addr - $remote_user [$time_local] "$request" '
                      '$status $body_bytes_sent "$http_referer" '
                      '"$http_user_agent" "$http_x_forwarded_for"';

    #access_log  logs/access.log  main;

    sendfile        on;
    tcp_nopush     on;
    #keepalive_timeout  0;
    keepalive_timeout  65;
    gzip  on;

   # upstream app_server {
   #     server 127.0.0.1:8000;  #与gunicorn配置中bind的地址一致
   # }

    server {
        listen       8080;
        server_name  172.17.10.112;  #域名或主机地址

        access_log  logs/host.access.log  main;

        location / {
            proxy_set_header X-Forwarded-For $proxy_add_x_forwarded_for;
            proxy_set_header Host $http_host;
            proxy_redirect off;
            proxy_pass http://172.17.10.112:8001;
        }

        location /static/ {
            alias /static_assets/;
        }

        location /media/ {
            alias /WorkOrderSystemData/cmdb_media/;
        }

        error_page   500 502 503 504  /50x.html;
        location = /50x.html {
            root   html;
        }

    }

}
PS:
alias是绝对路径, root是/下的相对路径
gunicorn配置文件
import logging
import logging.handlers
from logging.handlers import WatchedFileHandler
import os
import multiprocessing

bind = "0.0.0.0:8001"   #绑定的ip与端口
backlog = 512                #监听队列数量,64-2048
#chdir = '/home/test/server/bin'  #gunicorn要切换到的目的工作目录
worker_class = 'sync' #使用gevent模式,还可以使用sync 模式,默认的是sync模式
workers = 4 # multiprocessing.cpu_count()    #进程数
threads = 2 #multiprocessing.cpu_count()*4 #指定每个进程开启的线程数
loglevel = 'info' #日志级别,这个日志级别指的是错误日志的级别,而访问日志的级别无法设置
access_log_format = '%(t)s %(p)s %(h)s "%(r)s" %(s)s %(L)s %(b)s %(f)s" "%(a)s"'

# accesslog = "/home/log/gunicorn_access.log"      #访问日志文件
#errorlog = "/home/log/gunicorn_error.log"        #错误日志文件
accesslog = "-"  #访问日志文件,"-" 表示标准输出
errorlog = "-"   #错误日志文件,"-" 表示标准输出
proc_name = 'fof_api'   #进程名
5、通过gunicorn管理Django项目 (切记在manage.py 这个目录下)
启动Django
[root@cmdb cmdb_rbac_arya]# gunicorn -c gunicorn.conf.py cmdb_rbac_arya.wsgi:application
[2019-04-01 15:19:28 +0800] [9222] [INFO] Starting gunicorn 19.9.0
[2019-04-01 15:19:28 +0800] [9222] [INFO] Listening at: http://0.0.0.0:8001 (9222)
[2019-04-01 15:19:28 +0800] [9222] [INFO] Using worker: threads
[2019-04-01 15:19:28 +0800] [9225] [INFO] Booting worker with pid: 9225
[2019-04-01 15:19:28 +0800] [9226] [INFO] Booting worker with pid: 9226
[2019-04-01 15:19:28 +0800] [9228] [INFO] Booting worker with pid: 9228
[2019-04-01 15:19:28 +0800] [9229] [INFO] Booting worker with pid: 9229
重启Django
[root@cmdb arya]# pstree -ap|grep gunicorn
  |-gunicorn,929 /usr/bin/gunicorn -c gunicorn.conf.py cmdb_rbac_arya.wsgi:application
  |   |-gunicorn,979 /usr/bin/gunicorn -c gunicorn.conf.py cmdb_rbac_arya.wsgi:application
  |   |   |-{gunicorn},11343
  |   |   |-{gunicorn},11344
  |   |   |-{gunicorn},11345
  |   |   |-{gunicorn},11346
  |   |   |-{gunicorn},11347
  |   |   |-{gunicorn},11348
  |   |   |-{gunicorn},11349
  |   |   |-{gunicorn},11350
  |   |   |-{gunicorn},11351
  |   |   |-{gunicorn},11352
  |   |   |-{gunicorn},11353
  |   |   |-{gunicorn},11354
  |   |   |-{gunicorn},11355
  |   |   |-{gunicorn},11356
  |   |   |-{gunicorn},11357
  |   |   |-{gunicorn},11358
  |   |   |-{gunicorn},11359
  |   |   |-{gunicorn},11360
  |   |   |-{gunicorn},11361
  |   |   |-{gunicorn},11362
  |   |   |-{gunicorn},11363
  |   |   |-{gunicorn},11364
  |   |   |-{gunicorn},11365
  |   |   |-{gunicorn},11366
  |   |   |-{gunicorn},11367
  |   |   |-{gunicorn},11368
  |   |   |-{gunicorn},11369
  |   |   |-{gunicorn},11370
  |   |   |-{gunicorn},11371
  |   |   |-{gunicorn},11372
  |   |   |-{gunicorn},11373
  |   |   |-{gunicorn},11374
  |   |   `-{gunicorn},11409
  |   |-gunicorn,980 /usr/bin/gunicorn -c gunicorn.conf.py cmdb_rbac_arya.wsgi:application
  |   |   |-{gunicorn},18450
  |   |   |-{gunicorn},18451
  |   |   |-{gunicorn},18452
  |   |   |-{gunicorn},18453
  |   |   |-{gunicorn},18454
  |   |   |-{gunicorn},18455
  |   |   |-{gunicorn},18456
  |   |   |-{gunicorn},18457
  |   |   |-{gunicorn},18458
  |   |   |-{gunicorn},18459
  |   |   |-{gunicorn},18460
  |   |   |-{gunicorn},18461
  |   |   |-{gunicorn},18462
  |   |   |-{gunicorn},18463
  |   |   |-{gunicorn},18464
  |   |   |-{gunicorn},18465
  |   |   |-{gunicorn},18466
  |   |   |-{gunicorn},18467
  |   |   |-{gunicorn},18468
  |   |   |-{gunicorn},18469
  |   |   |-{gunicorn},18470
  |   |   |-{gunicorn},18471
  |   |   |-{gunicorn},18472
  |   |   |-{gunicorn},18473
  |   |   |-{gunicorn},18474
  |   |   |-{gunicorn},18475
  |   |   |-{gunicorn},18476
  |   |   |-{gunicorn},18477
  |   |   |-{gunicorn},18478
  |   |   |-{gunicorn},18479
  |   |   |-{gunicorn},18480
  |   |   |-{gunicorn},18481
  |   |   `-{gunicorn},18482
  |   |-gunicorn,982 /usr/bin/gunicorn -c gunicorn.conf.py cmdb_rbac_arya.wsgi:application
  |   |   |-{gunicorn},11376
  |   |   |-{gunicorn},11377
  |   |   |-{gunicorn},11378
  |   |   |-{gunicorn},11379
  |   |   |-{gunicorn},11380
  |   |   |-{gunicorn},11381
  |   |   |-{gunicorn},11382
  |   |   |-{gunicorn},11383
  |   |   |-{gunicorn},11384
  |   |   |-{gunicorn},11385
  |   |   |-{gunicorn},11386
  |   |   |-{gunicorn},11387
  |   |   |-{gunicorn},11388
  |   |   |-{gunicorn},11389
  |   |   |-{gunicorn},11390
  |   |   |-{gunicorn},11391
  |   |   |-{gunicorn},11392
  |   |   |-{gunicorn},11393
  |   |   |-{gunicorn},11394
  |   |   |-{gunicorn},11395
  |   |   |-{gunicorn},11396
  |   |   |-{gunicorn},11397
  |   |   |-{gunicorn},11398
  |   |   |-{gunicorn},11399
  |   |   |-{gunicorn},11400
  |   |   |-{gunicorn},11401
  |   |   |-{gunicorn},11402
  |   |   |-{gunicorn},11403
  |   |   |-{gunicorn},11404
  |   |   |-{gunicorn},11405
  |   |   |-{gunicorn},11406
  |   |   |-{gunicorn},11407
  |   |   `-{gunicorn},11410
  |   `-gunicorn,984 /usr/bin/gunicorn -c gunicorn.conf.py cmdb_rbac_arya.wsgi:application
  |       |-{gunicorn},11411
  |       |-{gunicorn},11412
  |       |-{gunicorn},11413
  |       |-{gunicorn},11414
  |       |-{gunicorn},11415
  |       |-{gunicorn},11416
  |       |-{gunicorn},11417
  |       |-{gunicorn},11418
  |       |-{gunicorn},11419
  |       |-{gunicorn},11420
  |       |-{gunicorn},11421
  |       |-{gunicorn},11422
  |       |-{gunicorn},11423
  |       |-{gunicorn},11424
  |       |-{gunicorn},11425
  |       |-{gunicorn},11426
  |       |-{gunicorn},11427
  |       |-{gunicorn},11428
  |       |-{gunicorn},11429
  |       |-{gunicorn},11430
  |       |-{gunicorn},11431
  |       |-{gunicorn},11432
  |       |-{gunicorn},11433
  |       |-{gunicorn},11434
  |       |-{gunicorn},11435
  |       |-{gunicorn},11436
  |       |-{gunicorn},11437
  |       |-{gunicorn},11438
  |       |-{gunicorn},11439
  |       |-{gunicorn},11440
  |       |-{gunicorn},11441
  |       |-{gunicorn},11442
  |       `-{gunicorn},11443
  |   |       |-grep,16177 gunicorn
[root@cmdb arya]# kill -HUP 979
停止Django
[root@cmdb arya]# pstree -ap|grep gunicorn
  |-gunicorn,929 /usr/bin/gunicorn -c gunicorn.conf.py cmdb_rbac_arya.wsgi:application
  |   |-gunicorn,980 /usr/bin/gunicorn -c gunicorn.conf.py cmdb_rbac_arya.wsgi:application
  |   |   |-{gunicorn},18450
  |   |   |-{gunicorn},18451
  |   |   |-{gunicorn},18452
  |   |   |-{gunicorn},18453
  |   |   |-{gunicorn},18454
  |   |   |-{gunicorn},18455
  |   |   |-{gunicorn},18456
  |   |   |-{gunicorn},18457
  |   |   |-{gunicorn},18458
  |   |   |-{gunicorn},18459
  |   |   |-{gunicorn},18460
  |   |   |-{gunicorn},18461
  |   |   |-{gunicorn},18462
  |   |   |-{gunicorn},18463
  |   |   |-{gunicorn},18464
  |   |   |-{gunicorn},18465
  |   |   |-{gunicorn},18466
  |   |   |-{gunicorn},18467
  |   |   |-{gunicorn},18468
  |   |   |-{gunicorn},18469
  |   |   |-{gunicorn},18470
  |   |   |-{gunicorn},18471
  |   |   |-{gunicorn},18472
  |   |   |-{gunicorn},18473
  |   |   |-{gunicorn},18474
  |   |   |-{gunicorn},18475
  |   |   |-{gunicorn},18476
  |   |   |-{gunicorn},18477
  |   |   |-{gunicorn},18478
  |   |   |-{gunicorn},18479
  |   |   |-{gunicorn},18480
  |   |   |-{gunicorn},18481
  |   |   `-{gunicorn},18482
  |   |-gunicorn,982 /usr/bin/gunicorn -c gunicorn.conf.py cmdb_rbac_arya.wsgi:application
  |   |   |-{gunicorn},11376
  |   |   |-{gunicorn},11377
  |   |   |-{gunicorn},11378
  |   |   |-{gunicorn},11379
  |   |   |-{gunicorn},11380
  |   |   |-{gunicorn},11381
  |   |   |-{gunicorn},11382
  |   |   |-{gunicorn},11383
  |   |   |-{gunicorn},11384
  |   |   |-{gunicorn},11385
  |   |   |-{gunicorn},11386
  |   |   |-{gunicorn},11387
  |   |   |-{gunicorn},11388
  |   |   |-{gunicorn},11389
  |   |   |-{gunicorn},11390
  |   |   |-{gunicorn},11391
  |   |   |-{gunicorn},11392
  |   |   |-{gunicorn},11393
  |   |   |-{gunicorn},11394
  |   |   |-{gunicorn},11395
  |   |   |-{gunicorn},11396
  |   |   |-{gunicorn},11397
  |   |   |-{gunicorn},11398
  |   |   |-{gunicorn},11399
  |   |   |-{gunicorn},11400
  |   |   |-{gunicorn},11401
  |   |   |-{gunicorn},11402
  |   |   |-{gunicorn},11403
  |   |   |-{gunicorn},11404
  |   |   |-{gunicorn},11405
  |   |   |-{gunicorn},11406
  |   |   |-{gunicorn},11407
  |   |   `-{gunicorn},11410
  |   |-gunicorn,984 /usr/bin/gunicorn -c gunicorn.conf.py cmdb_rbac_arya.wsgi:application
  |   |   |-{gunicorn},11411
  |   |   |-{gunicorn},11412
  |   |   |-{gunicorn},11413
  |   |   |-{gunicorn},11414
  |   |   |-{gunicorn},11415
  |   |   |-{gunicorn},11416
  |   |   |-{gunicorn},11417
  |   |   |-{gunicorn},11418
  |   |   |-{gunicorn},11419
  |   |   |-{gunicorn},11420
  |   |   |-{gunicorn},11421
  |   |   |-{gunicorn},11422
  |   |   |-{gunicorn},11423
  |   |   |-{gunicorn},11424
  |   |   |-{gunicorn},11425
  |   |   |-{gunicorn},11426
  |   |   |-{gunicorn},11427
  |   |   |-{gunicorn},11428
  |   |   |-{gunicorn},11429
  |   |   |-{gunicorn},11430
  |   |   |-{gunicorn},11431
  |   |   |-{gunicorn},11432
  |   |   |-{gunicorn},11433
  |   |   |-{gunicorn},11434
  |   |   |-{gunicorn},11435
  |   |   |-{gunicorn},11436
  |   |   |-{gunicorn},11437
  |   |   |-{gunicorn},11438
  |   |   |-{gunicorn},11439
  |   |   |-{gunicorn},11440
  |   |   |-{gunicorn},11441
  |   |   |-{gunicorn},11442
  |   |   `-{gunicorn},11443
  |   `-gunicorn,16185 /usr/bin/gunicorn -c gunicorn.conf.py cmdb_rbac_arya.wsgi:application
  |   |       |-grep,16195 gunicorn
[root@cmdb arya]# kill -9 929
nohup启动
[root@cmdb cmdb_rbac_arya]# nohup gunicorn -c gunicorn.conf.py cmdb_rbac_arya.wsgi:application &
ps:生产环境中发现Django修改了代码之后,一定要重启gunicorn,才会生效!
6、安装Fluend
curl -L https://toolbelt.treasuredata.com/sh/install-redhat-td-agent2.sh | sh
7、启动Fluend
systemctl restart td-agent.service
8、配置Fluend
1、
vim /etc/td-agent/td-agent.conf
2、
<source>
  @type forward
</source>

<source>
    @type http
    port 8888
    bind 0.0.0.0
</source>

<match *>
  @type file
  path /log/zhanggen.log
  flush_interval 10000000000000s #日志从缓存写到文件的刷新时间
 </match>
9、Fluend配置参考:
http://www.cnblogs.com/kaituorensheng/p/5146133.html
三、提升网站性能相关
1、 RabbitMQ
RabbitMQ消息队列是一个消息队列,在学习消息队列前先来回顾一下Python的 queue模块
import queue
q=queue.Queue() #创建1个队列 q

q.put('1')   #在q 队列中存放1个为1的值
q.put('2')   #在q 队列中存放1个为1的值

print(q.get()) #1   #注意获取顺序:先进先出 frist in frist out
print(q.get()) #2
队列解决的2个问题:
问题1:解耦
问题2:异步
什么是同步和异步?
同步:用户A 向web服务器发送请求,web服务器去连接数据库、连表...查询,等待数据库响应给web服务期之后,web服务器在把结果响应给用户A;
在web服务器连接数据库、查询数据 期间web服务器和用户A都不能做其他的事情,如果其他B、C、D用户请求过来也只能排队;
优点:保证当前任务及时执行
缺点:排队、耗时问题
异步:用户A如果想要访问web服务器,就把请求信息放到队列里,队列生成唯一任务ID,队列响应用户A;用户B,C...请求过来也是放在队列,由队列生成唯一任务ID;
web服务去队列里面拿任务并执行,执行完毕响应给队列,队列根据任务ID,再把web服务的执行的结果响应给各位用户;
这就大大降低了用户和服务端的耦合性;
优点:解决排队问题,解耦
缺点:不能任务及时执行
消息队列:
1.存储消息
2.保证消息顺序
3.保证任务的交付
为什么要用RabbitMQ而不用Python的queue模块?
Python的queue模块只能在同1个进程中 开子线程往队列里面放消息,再开子线程往队列里面取消息,不能夸进程也不就不能用在生产环境;
RabbitMQ的架构
RabbitMQ的架构就是一个分布式得生产者和消费者模型,它是1个独立的组件可以单独监听在服务器的某个端口上;

RabbitMQ使用
1.安装RabbitMQ
1.安装erlang
下载rpm仓库:wget http://packages.erlang-solutions.com/erlang-solutions-1.0-1.noarch.rpm

安装rpm仓库
rpm -Uvh erlang-solutions-1.0-1.noarch.rpm

安装erlang
yum -y install erlang


2.安装RabbitMQ
下载RabbitMQ的rpm:wget http://www.rabbitmq.com/releases/rabbitmq-server/v3.6.6/rabbitmq-server-3.6.6-1.el6.noarch.rpm

yum -y install rabbitmq-server-3.6.6-1.el6.noarch.rpm

注:

如果报:Requires: socat

更新源wget –no-cache http://www.convirture.com/repos/definitions/rhel/6.x/convirt.repo -O /etc/yum.repos.d/convirt.repo
yum install socat
启动rabbitmq服务:

关闭防火墙:systemctl stop firewalld.service
前台运行:rabbitmq-server start (用户关闭连接后,自动结束进程)

后台运行:rabbitmq-server -detached   (RabbitMQ默认监听5672端口)

参考链接:https://www.cnblogs.com/crazylqy/p/6567253.html
2、RabbitMQ服务器
rabbitmqctl list_queues:显示当前的队列列表
[root@localhost ~]# rabbitmqctl list_queues
Listing queues ...
q1 队列中有5个任务
[root@localhost ~]#
add_user zhanggen password :在rabbitmq server上创建一个用户并设置密码
rabbitmqctl set_permissions -p / zhanggen ".*" ".*" ".*":同时还要配置权限,允许从外面访问;set_permissions [-p vhost] {user} {conf} {write} {read}
vhost
The name of the virtual host to which to grant the user access, defaulting to /.

user
The name of the user to grant access to the specified virtual host.

conf
A regular expression matching resource names for which the user is granted configure permissions.

write
A regular expression matching resource names for which the user is granted write permissions.

read
A regular expression matching resource names for which the user is granted read permissions.
3、生产者使用RabbitMQ
#!/usr/bin/env/python
# -*- coding: utf-8 -*-
import pika
auth=pika.PlainCredentials('zhanggen','123.com') #创建连接需要认证信息
conn=pika.BlockingConnection(pika.ConnectionParameters(host="192.168.226.128",credentials=auth)) #创建连接

channel=conn.channel() #建立连接通道


channel.queue_declare(queue='q1') #在RabbitMQ服务器中创建1个队列

channel.basic_publish(exchange='',routing_key='q1',body='hello world') #在q1队列里放消息
#exchange :消息过滤模块,空代表使用默认
#routing_key:告诉exchange把hello world转发到q1队列上

conn.close() #关闭连接
4、消费者使用RabbitMQ
import pika
auth=pika.PlainCredentials('zhanggen','123.com') #创建连接需要认证信息
conn=pika.BlockingConnection(pika.ConnectionParameters(host="192.168.226.128",credentials=auth)) #创建连接

channel=conn.channel() #建立连接通道


def callback(ch,method,properties,body):
    print(body)

#callback:获取到消息之后调用的函数
#queue='q1:获取消息的队列
channel.basic_consume(callback,queue='q1',no_ack=True)

channel.start_consuming() #开始消费获取数据 (阻塞模式有接收,没有一直等待)
5、RabbitMQ消息的持久化
生产者指定自己发送的数据持久化,消费者把消息消费完毕之后手动向RabbitMQ确认,RabbitMQ确认之后删除本次任务;(保证消费者在执行任务过程中宕机,队列消息不丢失)
#!/usr/bin/env/python
# -*- coding: utf-8 -*-
import pika
auth=pika.PlainCredentials('zhanggen','123.com') #创建连接需要认证信息
conn=pika.BlockingConnection(pika.ConnectionParameters(host="192.168.226.128",credentials=auth)) #创建连接

channel=conn.channel() #建立连接通道


channel.queue_declare(queue='q1') #在RabbitMQ服务器中创建1个队列

channel.basic_publish(exchange='',routing_key='q1',body='hello world',properties=pika.BasicProperties(delivery_mode=2)) #在q1队列里放消息
#exchange :消息过滤模块,空代表使用默认
#routing_key:告诉exchange把hello world转发到q1队列上
#properties:发送的消息持久化

conn.close() #关闭连接
import pika
auth=pika.PlainCredentials('zhanggen','123.com') #创建连接需要认证信息
conn=pika.BlockingConnection(pika.ConnectionParameters(host="192.168.226.128",credentials=auth)) #创建连接

channel=conn.channel() #建立连接通道


def callback(ch,method,properties,body):
    print(body)
    ch.basic_ack(delivery_tag=method.delivery_tag) #手动确认

#callback:获取到消息之后调用的函数
#queue='q1:获取消息的队列
#no_ack=True:消息处理完毕后不向ranbit-server汇报任务执行完毕!如果服务器端没有收到确认,服务端就会一直保留任务
channel.basic_consume(callback,queue='q1',)

channel.start_consuming() #开始消费获取数据 (阻塞模式有接收,没有一直等待)
6、队列持久化(durable=True)
消息持久化是足以应对生产环境的, 如果RabbitMQ-server宕机了,重启之后所有队列就会全部消失,这无疑是灾难;所有在创建队列的时候就要设置队列持久化;
#!/usr/bin/env/python
# -*- coding: utf-8 -*-
import pika
auth=pika.PlainCredentials('zhanggen','123.com') #创建连接需要认证信息
conn=pika.BlockingConnection(pika.ConnectionParameters(host="192.168.226.128",credentials=auth)) #创建连接

channel=conn.channel() #建立连接通道


channel.queue_declare(queue='task1',durable=True) #在RabbitMQ服务器中创建1个队列,durable=True保证队列持久化

channel.basic_publish(exchange='',routing_key='task1',body='hello world',properties=pika.BasicProperties(delivery_mode=2)) #在q1队列里放消息
#exchange :消息过滤模块,空代表使用默认
#routing_key:告诉exchange把hello world转发到q1队列上
#properties:发送的消息持久化

conn.close() #关闭连接
import pika
auth=pika.PlainCredentials('zhanggen','123.com') #创建连接需要认证信息
conn=pika.BlockingConnection(pika.ConnectionParameters(host="192.168.226.128",credentials=auth)) #创建连接

channel=conn.channel() #建立连接通道


def callback(ch,method,properties,body):
    print(body)
    ch.basic_ack(delivery_tag=method.delivery_tag) #手动确认

#callback:获取到消息之后调用的函数
#queue='q1:获取消息的队列
#no_ack=True:消息处理完毕后不向ranbit-server汇报任务执行完毕!如果服务器端没有收到确认,服务端就会一直保留任务
channel.basic_consume(callback,queue='task1',)

channel.start_consuming() #开始消费获取数据 (阻塞模式有接收,没有一直等待)
7、RabbitMQ消息公平消费
RabbitMQ是生产者和消费者模型,默认情况下是RabbitMQ-server收到生产者的消息之后,会按照轮询规则把任务分发 给连接到RabbitMQ-server的消费者们;
不考虑消费者负载不同的话,很可能出现,一个机器配置不高的消费者那里堆积了很多消息处理不完,同时配置高的消费者却一直很轻松。为解决此问题,可以在各个消费者端,配置perfetch=1,意思就是告诉RabbitMQ在我这个消费者当前消息还没处理完的时候就不要再给我发新消息了;
#!/usr/bin/env/python
# -*- coding: utf-8 -*-
import pika
auth=pika.PlainCredentials('zhanggen','123.com') #创建连接需要认证信息
conn=pika.BlockingConnection(pika.ConnectionParameters(host="192.168.226.128",credentials=auth)) #创建连接

channel=conn.channel() #建立连接通道


channel.queue_declare(queue='task1',durable=True) #在RabbitMQ服务器中创建1个队列,durable=True保证队列持久化

channel.basic_publish(exchange='',routing_key='task1',body='hello world',properties=pika.BasicProperties(delivery_mode=2)) #在q1队列里放消息
#exchange :消息过滤模块,空代表使用默认
#routing_key:告诉exchange把hello world转发到q1队列上
#properties:发送的消息持久化

conn.close() #关闭连接
import pika
auth=pika.PlainCredentials('zhanggen','123.com') #创建连接需要认证信息
conn=pika.BlockingConnection(pika.ConnectionParameters(host="192.168.226.128",credentials=auth)) #创建连接

channel=conn.channel() #建立连接通道


def callback(ch,method,properties,body):
    import time
    time.sleep(10)
    print(body)
    ch.basic_ack(delivery_tag=method.delivery_tag) #手动确认


#在开始消费之前声明消费消息的个数
channel.basic_qos(prefetch_count=1)

#callback:获取到消息之后调用的函数
#queue='q1:获取消息的队列
#no_ack=True:消息处理完毕后不向ranbit-server汇报任务执行完毕!如果服务器端没有收到确认,服务端就会一直保留任务
channel.basic_consume(callback,queue='task1',)

channel.start_consuming() #开始消费获取数据 (阻塞模式有接收,没有一直等待)
import pika
auth=pika.PlainCredentials('zhanggen','123.com') #创建连接需要认证信息
conn=pika.BlockingConnection(pika.ConnectionParameters(host="192.168.226.128",credentials=auth)) #创建连接

channel=conn.channel() #建立连接通道


def callback(ch,method,properties,body):
    import time
    time.sleep(2)
    print(body)
    ch.basic_ack(delivery_tag=method.delivery_tag) #手动确认


#在开始消费之前声明消费消息的个数
channel.basic_qos(prefetch_count=100000)

#callback:获取到消息之后调用的函数
#queue='q1:获取消息的队列
#no_ack=True:消息处理完毕后不向ranbit-server汇报任务执行完毕!如果服务器端没有收到确认,服务端就会一直保留任务
channel.basic_consume(callback,queue='task1',)

channel.start_consuming() #开始消费获取数据 (阻塞模式有接收,没有一直等待)
8、RabbitMQ消息发布和订阅
之前的例子都基本都是1对1的消息发送和接收,即消息只能发送到指定的queue里,但有些时候你想让你的消息被所有的Queue收到,类似广播的效果,这时候就要用到消息过滤exchange了,
Exchange在定义的时候是有类型的,以决定到底是哪些Queue符合条件,可以接收消息,
广播(fanout): 所有bind到此exchange的queue都可以接收消息
组播( direct): 通过routingKey和exchange决定的那个唯一的queue可以接收消息
根据特定规则推送(topic):所有符合routingKey(此时可以是一个表达式)的routingKey所bind的queue可以接收消息

1、消息广播(exchange_type='fanout')

生产者推送消息到exchange过滤器,过滤器不做任何 路由规则过滤, 把消息转发至 所有和本过滤器有订阅关系的队列;
#!/usr/bin/env/python
# -*- coding: utf-8 -*-
import pika

#1、创建连接
conn=pika.BlockingConnection(pika.ConnectionParameters(host='192.168.226.128'))

#2、建立队列连接通道
channel=conn.channel()

#3、创建生产者推送消息的exchange(消息过滤器)和消息过滤器的类型为广播
# 注意exchange不负责存消息,只负责转发消息,如果没有队列和exchange绑定,生产者转发到exchange的消息会丢失。
channel.exchange_declare(exchange='exchange1',exchange_type='fanout')


#4、生产者 推送发送消息到名称为exchange1的过滤器
mssage='info:Hello World'
channel.basic_publish(exchange='exchange1',routing_key='',body=mssage)

#5、关闭连接
conn.close()


#注意exchange只负责转发消息,不负责存消息,如果消费者端 没声明队列 并和exchange1进行绑定,生产者转发到exchange1的消息将会全部丢失!!
注意:exchange只负责转发生产者端投递得消息到和本exchange有绑定关系的队列,不负责存储消息;
如果消费者端 没声明队列 并和exchange1进行绑定,生产者转发到exchange1的消息将会全部丢失!!
#!/usr/bin/env/python
# -*- coding: utf-8 -*-

import pika
conn=pika.BlockingConnection(pika.ConnectionParameters(host='192.168.226.128'))

channel=conn.channel()

channel.exchange_declare(exchange='exchange1',exchange_type='fanout')
#为什么生产者已经声明exchange,消费者也需要声明exchange,
#这就是为了防止 消费者先启动起来没有exchange报错,生产者启动后会检查 队列是否已经声明exchange?如果已经声明直接使用


#动态生成对队列名称唯一、且不重复的队列
queue_obj=channel.queue_declare(exclusive=True)

#获取动态队列的 队列名称
queue_name=queue_obj.method.queue

#绑定队列 和exchange的关系
channel.queue_bind(exchange='exchange1',queue=queue_name)


def callback(ch, method, properties, body):
    print(" [x] %r" % body)


#指定消费者接收 消息的队列
channel.basic_consume(callback,queue=queue_name)

channel.start_consuming()
注意:
1.channel.queue_declare(exclusive=True) 会动态生成1个动态生成对队列名称唯一、且不重复的队列;
2.为什么建议生产者和消费者端都要声明队列?
防止 消费者先启动起来连接不到可以领取任务的队列而导致报错;
如果消费者端已经声明队列,生产者启动后会检查自己声明的队列名称是否已经存在?如果存在直接使用,开始往改队列里放任务!
3.为什么生产者把消息转发到队列之后宕机了,消费者却获取不到任务呢?
消费者领取消息时,双方都要在线;
2、消息组播(exchange type=direct)
routing key: 生产者channel.basic_publish(exchange='direct_logs',body=message,我们称之为routing key;routing_key='路由key')
binding key:消费者channel.queue_bind(exchange='direct_logs',queue=queue_name,routing_key='绑定key')我们称之为 binding key;
direct类型的Exchange路由规则也很简单,它会把消息路由到那些binding key与routing key完全匹配的Queue中。


!/usr/bin/env/python
# -*- coding: utf-8 -*-
import pika

#1、创建连接
conn=pika.BlockingConnection(pika.ConnectionParameters(host='192.168.226.128',))

#2、建立队列连接通道
channel=conn.channel()

#3、创建生产者推送消息的exchange(消息过滤器)和消息过滤器的类型为广播
# 注意exchange不负责存消息,只负责转发消息,如果没有队列和exchange绑定,生产者转发到exchange的消息会丢失。
channel.exchange_declare(exchange='direct_exchange',exchange_type='direct')


#4、生产者 推送发送消息到名称为exchange1的过滤器,设置routing_key='zhanggen
mssage='info:Hello World'
channel.basic_publish(exchange='direct_exchange',routing_key='zhanggen',body=mssage)

#5、关闭连接
conn.close()

'''
注意:生产者 推送发送消息到名称为direct_exchange的过滤器,设置routing_key='zhanggen;
此时directexchange 就会把生产者发送到direct_exchange过滤器的消息,发送到和directexchange过滤器具有绑定关系,
channel.queue_bind(exchange='direct_logs',routing_key='zhanggen')切绑定key="zhanggen"的队列上

'''
#!/usr/bin/env/python
# -*- coding: utf-8 -*-

import pika
conn=pika.BlockingConnection(pika.ConnectionParameters(host='192.168.226.128'))

channel=conn.channel()

channel.exchange_declare(exchange='direct_exchange',exchange_type='direct')
#为什么生产者已经声明exchange,消费者也需要声明exchange,
#这就是为了防止 消费者先启动起来没有exchange报错,生产者启动后会检查 队列是否已经声明exchange?如果已经声明直接使用


#动态生成对队列名称唯一、且不重复的队列
queue_obj=channel.queue_declare(exclusive=True)

#获取动态队列的 队列名称
queue_name=queue_obj.method.queue

#绑定队列 和exchange的关系
channel.queue_bind(exchange='direct_exchange',queue=queue_name,routing_key='zhanggen')


def callback(ch, method, properties, body):
    print(" [x] %r" % body)


#指定消费者接收 消息的队列
channel.basic_consume(callback,queue=queue_name)

channel.start_consuming()
3、按照规则分发(exchange type=topic)
routing key: 生产者channel.basic_publish(exchange='direct_logs',body=message,我们称之为routing key;routing_key='路由key')
binding key:消费者channel.queue_bind(exchange='direct_logs',queue=queue_name,routing_key='绑定key')我们称之为 binding key;
Topic 类型的Exchange路由规则也很简单,则会按照正则表达式,对RoutingKey与BindingKey进行匹配,如果匹配成功,则发送到对应的Queue中。


#!/usr/bin/env/python
# -*- coding: utf-8 -*-
import pika

#1、创建连接
conn=pika.BlockingConnection(pika.ConnectionParameters(host='192.168.226.128',))

#2、建立队列连接通道
channel=conn.channel()

#3、创建生产者推送消息的exchange(消息过滤器)和消息过滤器的类型为广播
# 注意exchange不负责存消息,只负责转发消息,如果没有队列和exchange绑定,生产者转发到exchange的消息会丢失。
channel.exchange_declare(exchange='topic_logs_exchange',exchange_type='topic')


#4、生产者 推送发送消息到名称为exchange1的过滤器,设置routing_key='zhanggen
mssage='info:Hello World'
# channel.basic_publish(exchange='topic_logs_exchange',routing_key='dddsss.mysql.error',body=mssage)

# channel.basic_publish(exchange='topic_logs_exchange',routing_key='dddsss.redis.error',body=mssage)

channel.basic_publish(exchange='topic_logs_exchange',routing_key='.dejhjg',body=mssage)

#5、关闭连接
conn.close()

'''
 生产者             过滤器正则匹配        消费者
dddsss.mysql.error -------------->   *.mysql.error
dddsss.redis.error -------------->   *.mysql.error
   all             -------------->   #

注意 # 匹配所有 routing_key

'''
#!/usr/bin/env/python
# -*- coding: utf-8 -*-

import pika
conn=pika.BlockingConnection(pika.ConnectionParameters(host='192.168.226.128'))

channel=conn.channel()

channel.exchange_declare(exchange='topic_logs_exchange',exchange_type='topic')
#为什么生产者已经声明exchange,消费者也需要声明exchange,
#这就是为了防止 消费者先启动起来没有exchange报错,生产者启动后会检查 队列是否已经声明exchange?如果已经声明直接使用


#动态生成对队列名称唯一、且不重复的队列
queue_obj=channel.queue_declare(exclusive=True)

#获取动态队列的 队列名称
queue_name=queue_obj.method.queue

#绑定队列 和exchange的关系
# channel.queue_bind(exchange='topic_logs_exchange',queue=queue_name,routing_key='*.mysql.error')
# channel.queue_bind(exchange='topic_logs_exchange',queue=queue_name,routing_key='*.redis.error')

channel.queue_bind(exchange='topic_logs_exchange',queue=queue_name,routing_key='#')


def callback(ch, method, properties, body):
    print(" [x] %r" % body)


#指定消费者接收 消息的队列
channel.basic_consume(callback,queue=queue_name)

channel.start_consuming()


'''
 生产者             过滤器正则匹配        消费者
dddsss.mysql.error -------------->   *.mysql.error
dddsss.redis.error -------------->   *.mysql.error
   all             -------------->   #

注意 # 匹配所有 routing_key

'''
4、Remote procedure call (RPC)
通过队列在远程服务器执行一条命令,在通过另一队列返回执行结果;

__author__ = 'Administrator'

#1 。 定义fib函数
#2. 声明接收指令的队列名rpc_queue
#3. 开始监听队列,收到消息后 调用fib函数
#4 把fib执行结果,发送回客户端指定的reply_to 队列
import subprocess
import pika
import time
credentials = pika.PlainCredentials('alex', 'alex3714')

parameters = pika.ConnectionParameters(host='192.168.11.106',credentials=credentials)
connection = pika.BlockingConnection(parameters)

channel = connection.channel() #队列连接通道

channel.queue_declare(queue='rpc_queue2')

def fib(n):
    if n == 0:
        return 0
    elif n == 1:
        return 1
    else:
        return fib(n-1) + fib(n-2)


def run_cmd(cmd):
    cmd_obj = subprocess.Popen(cmd,shell=True,stdout=subprocess.PIPE,stderr=subprocess.PIPE)
    result = cmd_obj.stdout.read() + cmd_obj.stderr.read()

    return result


def on_request(ch, method, props, body):
    cmd = body.decode("utf-8")

    print(" [.] run (%s)" % cmd)
    response = run_cmd(cmd)

    ch.basic_publish(exchange='',
                     routing_key=props.reply_to, #队列
                     properties=pika.BasicProperties(correlation_id =
                                                         props.correlation_id),
                     body=response)

    ch.basic_ack(delivery_tag = method.delivery_tag)

channel.basic_consume(on_request, queue='rpc_queue2')

print(" [x] Awaiting RPC requests")
channel.start_consuming()
_author__ = 'Administrator'

# 1.声明一个队列,作为reply_to返回消息结果的队列
# 2.  发消息到队列,消息里带一个唯一标识符uid,reply_to
# 3.  监听reply_to 的队列,直到有结果
import queue

import pika
import uuid

class CMDRpcClient(object):
    def __init__(self):
        credentials = pika.PlainCredentials('alex', 'alex3714')
        parameters = pika.ConnectionParameters(host='192.168.11.106',credentials=credentials)
        self.connection = pika.BlockingConnection(parameters)
        self.channel = self.connection.channel()

        result = self.channel.queue_declare(exclusive=True)
        self.callback_queue = result.method.queue #命令的执行结果的queue

        #声明要监听callback_queue
        self.channel.basic_consume(self.on_response, no_ack=True,
                                   queue=self.callback_queue)

    def on_response(self, ch, method, props, body):
        """
        收到服务器端命令结果后执行这个函数
        :param ch:
        :param method:
        :param props:
        :param body:
        :return:
        """
        if self.corr_id == props.correlation_id:
            self.response = body.decode("gbk") #把执行结果赋值给Response

    def call(self, n):
        self.response = None
        self.corr_id = str(uuid.uuid4()) #唯一标识符号
        self.channel.basic_publish(exchange='',
                                   routing_key='rpc_queue2',
                                   properties=pika.BasicProperties(
                                         reply_to = self.callback_queue,
                                         correlation_id = self.corr_id,
                                         ),
                                   body=str(n))


        while self.response is None:
            self.connection.process_data_events()  #检测监听的队列里有没有新消息,如果有,收,如果没有,返回None
            #检测有没有要发送的新指令
        return self.response

cmd_rpc = CMDRpcClient()

print(" [x] Requesting fib(30)")
response = cmd_rpc.call('ipconfig')

print(response)
非关系型内存数据库memcached、redis
redis是一种把数据以键值对(不使用二维表)形式,存储在内存中的非关系(无1对1、1对多、多对多..关系)型数据库,由于数据存储在内存中所以redis的读写速度非常快,一般应用在页面缓存;
memcached 和redis有什么区别?
由于 memcached 和redis都是非关系型数据库所有应用十分广泛,二者功能相似有什么区别呢?http://blog.csdn.net/e_wsq/article/details/9183749
1、redis和memcached都是以键值对形式来存储数据的redis有5大数据类型,而memcached:数据类型单一;
a.memcached:支持数据类型
k(字符串):v(字符串)
b.redis支持数据类型
k='字符串' (注意数字也是以str存储)
k='列表'
k='hash'
k='set'
k='有序集合'
2、持久化
memcached:不支持持久化,服务器断电内存清空
redis:支持持久化(redis启动后会创建另1个进程做持久化,由于开启了2个进程性能会减低。);
3、redis只能使用单核,而memcached可以使用多核
memcached数据库
准备安装
1、服务端:安装 memcached服务:
安装: yum -y install memcached
启动服务: systemctl restart memcached
检查服务是否启动?:ps -aux | grep memcached 、 lsof -i :11211
2、客户端: 安装 Python连接memcached数据库 :memcache模块
a.源码包安装
wget http://ftp.tummy.com/pub/python-memcached/old-releases/python-memcached-1.54.tar.gz
tar -zxvf python-memcached-1.54.tar.gz
cd python-memcached-1.54
python setup.py install 直接安装到Python的Site package目录下,就可以直接 import memcache
b. whl文件安装
https://pypi.python.org/pypi/python-memcached#downloads
pip install wheel
pip install python_memcached-1.59-py2.py3-none-any.whl
pycham操作memcache
1、第一次操作
import memcache
conn=memcache.Client([('192.168.226.128:11211',2)],debug=True)
# 第一次使用 memcha模块
# 天生支持机器 memcache.Client(['192.168.226.128:11211',....],)内部使用一致性hash算法

# conn=memcache.Client([ ('192.168.226.128:11211',],)
conn=memcache.Client([('192.168.226.128:11211',2)]) #设置权重

conn.set( 'name','alex',time=37) #time=37:37秒之后消失
ret=conn.get('name')
print(ret)
2、天生支持集群(一致性hash算法)
python-memcached模块原生支持集群操作,其原理是在内存维护一个主机列表,且集群中主机的权重值和主机在列表中重复出现的次数成正比
     主机    权重
    1.1.1.1   1
    1.1.1.2   2
    1.1.1.3   1

那么在内存中主机列表为:
    host_list = ["1.1.1.1", "1.1.1.2", "1.1.1.2", "1.1.1.3", ]
如果用户根据如果要在内存中创建一个键值对(如:k1 = "v1"),那么要执行一下步骤:
- 根据算法将 k1 转换成一个数字
- 将数字和主机列表长度求余数,得到一个值 N( 0 <= N < 列表长度 )
- 在主机列表中根据 第2步得到的值为索引获取主机,例如:host_list[N]
- 连接 将第3步中获取的主机,将 k1 = "v1" 放置在该服务器的内存中
3、add 增加key操作
添加一条键值对,如果已经存在的 key,重复执行add操作异常;
#add key操作
conn=memcache.Client([('192.168.226.128:11211',2)],debug=True)
conn.add('name','alex')  #如果添加的key已经在存在,会报错;(debug=True)
conn.add('name','egon')
ret=conn.get('name')
print(ret)

'''
报错信息
MemCached: while expecting 'STORED', got unexpected response 'NOT_STORED'
MemCached: while expecting 'STORED', got unexpected response 'NOT_STORED'
zhanggen
'''
4、replace 替换key的value操作
replace 修改某个key的值,如果key不存在,则异常;
#replace替换某个键的值
conn=memcache.Client([('192.168.226.128:11211',2)],debug=True)
conn.replace('name',252)
conn.replace('ssss',252) #replace 修改某个key的值,如果key不存在,则异常;
ret=conn.get('name')
print(type(ret))
print(ret)

'''
异常信息
MemCached: while expecting 'STORED', got unexpected response 'NOT_STORED'

'''
5、set 和 set_multi 设置key的value 、同时设置多个key的value操作
set 设置一个键值对,如果key不存在,则创建,如果key存在,则修改;
set_multi 设置多个键值对,如果key不存在,则创建,如果key存在,则修改;
#5、set 和 set_multi


conn=memcache.Client([('192.168.226.128:11211',2)],debug=True)
conn.set('name',252)
print()
conn.set('name',304)  # 如果key不存在,则创建,如果key存在,则修改
ret=conn.get('name')
print(ret)  #304

conn.set_multi({'name':'999','gender':'man','age':19,  }) #set_multi 设置多个键值对,如果key不存在,则创建;
ret1=conn.get('name')  #如果key存在,则修改;
print(ret1) #999
6、delete 和 delete_multi 删除key 、同时删除多个key操作
delete 在Memcached中删除指定的一个键值对;
delete_multi 在Memcached中删除指定的多个键值对;
#6、delete 和 delete_multi

conn=memcache.Client([('192.168.226.128:11211',2)],debug=True)
conn.set('name',252)
conn.set('name',304)  # 如果key不存在,则创建,如果key存在,则修改
conn.set_multi({'name':'999','gender':'man','age':19,  }) #set_multi 设置多个键值对,如果key不存在,则创建;
ret1=conn.get('name')  #如果key存在,则修改;

conn.delete('name') #删除单个key
print(conn.get('name'))  # 如果删除返回 None

conn.delete_multi(['name','gender','age'])  #同时删除多个[keys] 注意:如果删除的 key不存在会报错
print(conn.get('age'))
7、get 和 get_multi 获取多个key的值
get 获取一个键值对
get_multi 获取多一个键值对 字典
#7、get 和 get_multi

conn=memcache.Client([('192.168.226.128:11211',2)],debug=True)
conn.set('name',252)
conn.set('name',304)  # 如果key不存在,则创建,如果key存在,则修改
conn.set_multi({'name':'999','gender':'man','age':19,  }) #set_multi 设置多个键值对,如果key不存在,则创建;


ret1=conn.get('name')  #获取某个key的值
print(ret1) #999
item_dict = conn.get_multi(["name", "gender", "age",'艹' ]) #获取键值对字段 注意获取不到不会报错
print(item_dict)                           #{'name': '999', 'gender': 'man', 'age': 19}
8、append 和 prepend 编辑 key的值
append 修改指定key的值,在该值 后面 追加内容
prepend 修改指定key的值,在该值 前面 插入内容
conn=memcache.Client([('192.168.226.128:11211',2)],debug=True)
conn.set('name',252)
conn.set('name',304)  # 如果key不存在,则创建,如果key存在,则修改
conn.set_multi({'name':'999','gender':'man','age':19,  }) #set_multi 设置多个键值对,如果key不存在,则创建;

conn.append('name','after') #在999后面追加after
conn.prepend('name','befor') #在999前面增加befor
print(conn.get('name'))       # 结果  befor999after
9、decr 和 incr 对 value进行加减操作
incr 自增,将Memcached中的某一个值增加 N ( N默认为1 )
decr 自减,将Memcached中的某一个值减少 N ( N默认为1 )
#9.decr 和 incr  + - 操作

conn=memcache.Client([('192.168.226.128:11211',2)],debug=True)
conn.set('name',252)

conn.decr('name') #默认 -1
conn.decr('name',100) #-100
conn.incr('name')  #默认+1
conn.incr('name',100) #+100
print(conn.get('name'))
10、gets 和 cas 并发获取数据控制
假设A 从memcached获取到了munbr=100的数据,同时B也获取到了munbr=100的数据;
A进行加1操作设置munbr=101,然后B也想对自己获取到的number进行加1操作,但是此时B得number(已经被A+1了)已不在是当时B获取到的100了;
如果允许B进行+1操作,将会造成数据错乱,正确的做法应该是给B抛出一个异常,提醒B然后让B重新获取一下number进行+1操作;
以上的功能 memcached的set 和 get方法是无法实现的,需要借助gets 和 cas 进行并发控制;
import memcache
conn=memcache.Client([('192.168.226.128:11211',2)],debug=True,cache_cas=True)
print(conn.gets('number'))
v=input('............')
conn.cas('number','111112222')

'''
异常信息

MemCached: while expecting 'STORED', got unexpected response 'EXISTS'
'''
import memcache
conn=memcache.Client([('192.168.226.128:11211',2)],debug=True,cache_cas=True)  #开启并发控制
# print(conn.get_multi(['number',]))
print(conn.gets('number')) #
v=input('............')
conn.cas('number','rrwwwwwwwwwwwwwwwweeqqdd')
11、memcached+Django缓存
Django支持把网页缓存存在memcached中,目前还不支持redis,所以memcached有了用武之地;
STATIC_URL = '/static/'
STATICFILES_DIRS=(
os.path.join(BASE_DIR,'static'),
)


CACHES = {
    'default': {
        'BACKEND': 'django.core.cache.backends.memcached.MemcachedCache',
        'LOCATION': '192.168.226.128:11211',
            # 通过本地网络socket缓存memcache 数据库
    }
}
from django.shortcuts import render,HttpResponse
from django.views.decorators.cache import cache_page  #导入设置缓存的装饰器
import time
from app01 import models
@cache_page(3)  #注意 60*3 是缓存时间为3分钟,(3)3秒,如果更换了设置,记得更新url
def new2(request):
    users=time.time()
    print(users)
    return HttpResponse(users)
Python操作redis数据库
前言:
redis-py 的API的使用可以分类为:
- 连接方式
- 连接池
- 操作
- String 操作
- Hash 操作
- List 操作
- Set 操作
- Sort Set 操作
- 管道(支持事物)
- 发布订阅
1.连接redis数据库的2种方式
redis有2种连接方式 普通连接和连接池
使用connection pool来管理对一个redis server的所有连接,避免每次建立、释放连接的开销。默认,每个Redis实例都会维护一个自己的连接池。可以直接建立一个连接池,然后作为参数Redis,这样就可以实现多个Redis实例共享一个连接池。
import redis

conn=redis.Redis(host='192.168.226.128',port=6379)
conn.set('name','alex666666')   #ex:过期时间(秒)
# conn.set('name','alex',px=100,xx=True) #px:过期时间为毫秒
print(conn.get('name')) #注意Python3中 获取到的结果是 字节类型
#连接池连接
import redis
#创建1个连接池
conn_pool=redis.ConnectionPool(host='192.168.226.128',port=6379)
#从连接池中获取1个连接
conn=redis.Redis(connection_pool=conn_pool)
#开始操作
conn.set('name','zhanggen')
print(conn.get('name'))
2、字符串 操作
String操作,redis中的String在在内存中按照一个name对应一个value来存储。如图:

set()方法:
不存在设置value,如果key已经存在覆盖原来key的值;
import redis
#创建1个连接池
conn_pool=redis.ConnectionPool(host='192.168.226.128',port=6379)
#从连接池中获取1个连接
conn=redis.Redis(connection_pool=conn_pool)
#开始操作
conn.set('name','alex')  #set():不存在设置value,如果key已经存在覆盖原来key的值
conn.set('name','alex666')
print(conn.get('name')) #b'alex666'
setnx()方法:
如果key不存在设置value,存在不会覆盖;
import redis
#创建1个连接池
conn_pool=redis.ConnectionPool(host='192.168.226.128',port=6379)
#从连接池中获取1个连接
conn=redis.Redis(connection_pool=conn_pool)
#开始操作
conn.setnx('name','alex')  #setnx:key不存在设置value成功如果key已经存在不覆盖key的值
conn.setnx('name','alex666')
print(conn.get('name'))
setex(name, value, time)方法:
设置key,value的时候必需设置过期时间单位为秒,和set方法一样,如果设置的key已经存在,会覆盖原来key的值;
import redis
#创建1个连接池
conn_pool=redis.ConnectionPool(host='192.168.226.128',port=6379)
#从连接池中获取1个连接
conn=redis.Redis(connection_pool=conn_pool)
#开始操作
conn.setex('name','alex',11)  #key已经存在会覆盖原有key的值,必需设置过期时间
conn.setex('name','alex666',11)
print(conn.get('name'))
psetex(name, time_ms, value)方法:
key已经存在会覆盖原有key的value,必需设置过期时间:,注意过期时间在k v中间,且单位为毫秒;
import redis
#创建1个连接池
conn_pool=redis.ConnectionPool(host='192.168.226.128',port=6379)
#从连接池中获取1个连接
conn=redis.Redis(connection_pool=conn_pool)
#开始操作
conn.psetex('name',11,'alex',)  #key已经存在会覆盖原有key的值,必需设置过期时间,注意过期时间在k v中间,单位为毫秒
conn.psetex('name',11,'alex666')
print(conn.get('name'))
mset(*args, **kwargs)和mget(keys, *args)方法:
批量设置值和获取值
import redis
#创建1个连接池
conn_pool=redis.ConnectionPool(host='192.168.226.128',port=6379)
#从连接池中获取1个连接
conn=redis.Redis(connection_pool=conn_pool)

#批量设置
conn.mset(k1='v1',k2='v2') #关键字参
conn.mset({'name':'alex','name1':'egon'}) #字典

#批量获取
print(conn.mget('k1','k2'))
print(conn.mget(['name','name1']))
getset(name, value)方法:
获取原来的value,并且设置新的value进行覆盖;
#6、getset(*args, **kwargs)
 #获取老值,设置新值

import redis
#创建1个连接池
conn_pool=redis.ConnectionPool(host='192.168.226.128',port=6379)
#从连接池中获取1个连接
conn=redis.Redis(connection_pool=conn_pool)

conn.set('name','alex')
print(conn.getset('name','alex666')) #获取老值并且设置新值; b'alex'
print(conn.get('name'))                #b'alex666'
getrange(key, start, end)方法:
对获取到的value进行切片操作
#7、getrange(key, start, end)

import redis
#创建1个连接池
conn_pool=redis.ConnectionPool(host='192.168.226.128',port=6379)
#从连接池中获取1个连接
conn=redis.Redis(connection_pool=conn_pool)

print(conn.getset('name','alex666')) #获取老值并且设置新值; b'alex'
print(conn.getrange('name',1,2))       #b'le'对获取到的 value进行切片操作
setrange(name, offset, value)方法:
获取key的老value进行切片后 和新的value进行组;
#7、setrange(key, start, end)

import redis
#创建1个连接池
conn_pool=redis.ConnectionPool(host='192.168.226.128',port=6379)
#从连接池中获取1个连接
conn=redis.Redis(connection_pool=conn_pool)

conn.set('key','Hello ')
conn.setrange('key',6,'zhanggen') #获取key的老value进行切片后 和新的value进行组合
print(conn.get('key')) #b'Hello zhanggen'
setbit(key, bit, 0/1)方法:
对key进行二进制操作
参数:
key:键
bit:键转换成二进制之后的 位数
0/1:转成0或者1
#setbit(name, bit, 0/1)

import redis
#创建1个连接池
conn_pool=redis.ConnectionPool(host='192.168.226.128',port=6379)
#从连接池中获取1个连接
conn=redis.Redis(connection_pool=conn_pool)

conn.set('key','foo ')
conn.setbit('key',7,1) #对key进行二进制操作
print(conn.get('key')) #b'goo '
注:如果在Redis中有一个对应: n1 = "foo",
那么字符串foo的二进制表示为:01100110 01101111 01101111 所以,如果执行 setbit('n1', 7, 1),则就会将第7位设置为1, 那么最终二进制则变成 01100111 01101111 01101111,即:"goo"getbit(key, bit) 方法:
获取name对应的值的二进制表示中的某位的值 (0或1)
#getbit(name, offset)
import redis
#创建1个连接池
conn_pool=redis.ConnectionPool(host='192.168.226.128',port=6379)
#从连接池中获取1个连接
conn=redis.Redis(connection_pool=conn_pool)
conn.set('name','A')
print(conn.getbit('name',1))  #获取A转成二进制之后的第1位
bitcount(key, start=None, end=None)方法:
获取key对应的value转换成二进制之后,指定范围, 1 的个数;
# bitcount(key, start=None, end=None)

import redis
#创建1个连接池
conn_pool=redis.ConnectionPool(host='192.168.226.128',port=6379)
#从连接池中获取1个连接
conn=redis.Redis(connection_pool=conn_pool)
conn.set('name','Awwww')
print(conn.bitcount('name',1,4)) #获取key对应的值的二进制表示中 1 的个数; 执行结果:24个1
bitop(operation, dest, *keys)
对老key对应的value做 逻辑运行,生成新key的value;
参数:
operation,AND(并) 、 OR(或) 、 NOT(非) 、 XOR(异或)dest, 新的Redis的name*keys,要查找的Redis的name
import redis
#创建1个连接池
conn_pool=redis.ConnectionPool(host='192.168.226.128',port=6379)
#从连接池中获取1个连接
conn=redis.Redis(connection_pool=conn_pool)
conn.set('name1','alex1')
conn.set('name2','alex2')
conn.set('name3','alex3')

conn.bitop('and','name4','name1','name2','name3') #对'name1','name2','name3'对应的value做 逻辑运行,生成新key的value
print(conn.get('name4'))
strlen(key)
返回name对应值的字节长度(一个汉字3个字节)
import redis
#创建1个连接池
conn_pool=redis.ConnectionPool(host='192.168.226.128',port=6379)
#从连接池中获取1个连接
conn=redis.Redis(connection_pool=conn_pool)
conn.set('name1','alex1')
conn.set('name2','1234')
print(conn.strlen('name1')) #返回 key对应value的字节长度 执行结果5
print(conn.strlen('name2')) #执行结果4
incr(self, name, amount=1)和decr(self, name, amount=1)
自增和自减 key对应的值,当name不存在时,则创建key=amount,否则,则自增或自减。
#incr(self, name, amount=1)和decr(self, name, amount=1)

import redis
#创建1个连接池
conn_pool=redis.ConnectionPool(host='192.168.226.128',port=6379)
#从连接池中获取1个连接
conn=redis.Redis(connection_pool=conn_pool)
conn.set('name2','1234')

print(conn.incr(name='name2',amount=123 )) #整数自增操作1234+123=1357
print(conn.decr('name2',amount=123))       #正数自减操作
incrbyfloat(self, name, amount=浮点型)
自增数为浮点型增加操作
#incrbyfloat(self, name, amount=1.0) 以为浮点型增加

import redis
#创建1个连接池
conn_pool=redis.ConnectionPool(host='192.168.226.128',port=6379)
#从连接池中获取1个连接
conn=redis.Redis(connection_pool=conn_pool)
conn.set('name2','1234')
print(conn.incrbyfloat(name='name2',amount=3.1415926)) #整数自增操作 浮点型 #1237.1415926
append(key, value)
对key对应的值,进行内容追加操作;
#append(key, value)

import redis
#创建1个连接池
conn_pool=redis.ConnectionPool(host='192.168.226.128',port=6379)
#从连接池中获取1个连接
conn=redis.Redis(connection_pool=conn_pool)
conn.set('name','Hello')
conn.append('name',' World')   #对key对应的value进行追究操作
print(conn.get('name'))  #b'Hello World'
3、Hash(嵌套字典)操作:
redis中Hash在内存中的存储格式如下图:

hset(name, key, value)和hget(name,key)方法:
name对应的hash中设置一个键值对(不存在,则创建;否则,修改)
# hset(name, key, value)

import redis
#创建1个连接池
conn_pool=redis.ConnectionPool(host='192.168.226.128',port=6379)
#从连接池中获取1个连接
conn=redis.Redis(connection_pool=conn_pool)
conn.hset('SessionID','username','123.com')
print(conn.hget('SessionID','username'))   #b'123.com'
hmset(name, mapping) 和hmget()方法:
在name对应的hash(Python字典)中批量设置键值对;
# hmset(name, mapping) 批量操作

import redis
#创建1个连接池
conn_pool=redis.ConnectionPool(host='192.168.226.128',port=6379)
#从连接池中获取1个连接
conn=redis.Redis(connection_pool=conn_pool)
conn.hmset('1',{'name':'alex','pwd':'alec2098'}) #{'1':{'name':'alex','pwd':'alec2098'}}

print(conn.hmget('1',['name','pwd']))
hgetall(name)方法:
获取name对应hash的所有键值
#hgetall 获取所有的键值对


import redis
#创建1个连接池
conn_pool=redis.ConnectionPool(host='192.168.226.128',port=6379)
#从连接池中获取1个连接
conn=redis.Redis(connection_pool=conn_pool)
conn.hmset('1',{'name':'alex','pwd':'alec2098'}) #{'1':{'name':'alex','pwd':'alec2098'}}
print(conn.hgetall('1'))  #{b'name': b'alex', b'pwd': b'alec2098'}
hlen(name)
获取name对应的hash(字典)中键值对的个数
#  hlen(name) 获取
import redis
#创建1个连接池
conn_pool=redis.ConnectionPool(host='192.168.226.128',port=6379)
#从连接池中获取1个连接
conn=redis.Redis(connection_pool=conn_pool)
conn.hmset('1',{'name':'alex','pwd':'alec2098','age':19}) #{'1':{'name':'alex','pwd':'alec2098'}}
print(conn.hlen('1'))  #获取 key 对应 hash(字典)中键值对个数
hash(字典)操作方法:(hkeys、hexists、hdel、hincrby、hincrbyfloat、负数为自减)
#  hlen(name) 获取
import redis
#创建1个连接池
conn_pool=redis.ConnectionPool(host='192.168.226.128',port=6379)
#从连接池中获取1个连接
conn=redis.Redis(connection_pool=conn_pool)
conn.hmset('1',{'name':'alex','pwd':'alec2098','age':19,'gender':'woman'}) #{'1':{'name':'alex','pwd':'alec2098'}}
print(conn.hkeys('1')) #获取hash所有的key
print(conn.hexists('1', 'pwd')) #检查name对应的hash中是否存在该key! 执行结果:True
print(conn.hdel('1','gender'))  #删除name对应hash中对应的key      !  执行结果:1
print(conn.hincrby('1','age',100))   #对name对应的hash中的key进行增加操作 119 (整型)
print(conn.hincrbyfloat('1','age',3.2345))  # #对name对应的hash中的key进行增加操作 119(浮点型)


# #ps:有自增为什么没有自减方法呢?变成 负数就是自减  #注意浮点之间整型不能,自加或者自减。

print(conn.hgetall('1'))
print(conn.hincrbyfloat('1','age',-3.2345))  # #对name对应的hash中的key进行增加操作 119(浮点型)
print(conn.hincrby('1','age',-100))   #对name对应的hash中的key进行增加操作 119 (整型)
生成器获取 hash数据
增量式迭代获取,对于数据大的数据非常有用,hscan可以实现分片的获取数据,并非一次性将数据全部获取完,从而放置内存被撑爆
hscan(name, cursor=0, match=None, count=None)
参数:
name,redis的name
cursor,游标(基于游标分批取获取数
match,匹配指定key,默认None 表示所有的key (支持模糊正则)
count,每次分片最少获取个数,默认None表示采用Redis的默认分片个数
如:
第一次:cursor1, data1 = r.hscan('xx', cursor=0, match=None, count=None)
第二次:cursor2, data1 = r.hscan('xx', cursor=cursor1, match=None, count=None) 第 N次: ... 直到返回值cursor的值为0时,表示数据已经通过分片获取完毕
# hscan()方法 迭代器获取 hash数据
import redis
#创建1个连接池
conn_pool=redis.ConnectionPool(host='192.168.226.128',port=6379)
#从连接池中获取1个连接
conn=redis.Redis(connection_pool=conn_pool)
conn.hmset('1',{'name':'alex','pwd':'alec2098','age':19,'gender':'woman'}) #{'1':{'name':'alex','pwd':'alec2098'}}
cursor1, data1=conn.hscan('1',cursor=0,match=None, count=1)
print(data1,cursor1)
cursor2,data2=conn.hscan('1',cursor=cursor1,match="*",count=2)
print(data2,cursor2)
hscan_iter(name, match=None, count=None)
hscan方法虽然解决了大数据获取的问题,但是操作有点复杂,所以有了hscan_iter() 方法;
# hscan_iter() 方法

import redis
#创建1个连接池
conn_pool=redis.ConnectionPool(host='192.168.226.128',port=6379)
#从连接池中获取1个连接
conn=redis.Redis(connection_pool=conn_pool)
conn.hmset('1',{'name':'alex','pwd':'alec2098','age':19,'gender':'woman'}) #{'1':{'name':'alex','pwd':'alec2098'}}
gen=conn.hscan_iter('1',match='*',count=None) #得到1个生成器对象
for item in gen:     #循环获取
    print(item)
3、List操作:
redis中的List在在内存中按照一个name对应一个List来存储。如图:

lpushx(name,value)和rpushx(name,value)列表追加操作方法:
找到name对应的list,
从list的左边(头)开始添加,最后1个参数放在最左边;(lpush())
从list的最右边(尾)开始添加,最后1个参数放在最右边(rpush());
#lpush(name,values) 和name,values)
import redis
#创建1个连接池
conn_pool=redis.ConnectionPool(host='192.168.226.128',port=6379)
#从连接池中获取1个连接
conn=redis.Redis(connection_pool=conn_pool)
conn.lpush('mylist6','.. ','Hello')  #从list的左边(头)开始添加,最后的参数放在最左边;
conn.rpush('mylist6','zhang','gen')  #从list的最右边(尾)开始添加,最后到参数放在最右边;
print(conn.lrange('mylist6',0,-1))     #从左到右获取  [b'Hello', b'.. ', b'zhang', b'gen']
lpushx(name,value) ,lpushx(name,value) 方法:
在name已经存在的情况下,
从list的左边(头)开始添加,最后1个参数放在最左边;
从list的最右边(尾)开始添加,最后1个参数放在最右边;
#lpushx 和 rpushx
import redis
#创建1个连接池
conn_pool=redis.ConnectionPool(host='192.168.226.128',port=6379)
#从连接池中获取1个连接
conn=redis.Redis(connection_pool=conn_pool)
conn.lpushx('mylist6','Left ')  #在name已经存在的情况下,从list的左边(头)开始添加,最后1个参数放在最左边;
conn.rpushx('mylist6','Right')  #在name已经存在的情况下, 从list的最右边(尾)开始添加,最后1个参数放在最右边;
print(conn.lrange('mylist6',0,-1))
llen(name)方法:
获取name对应list的列表长度
#llen(name)

import redis
#创建1个连接池
conn_pool=redis.ConnectionPool(host='192.168.226.128',port=6379)
#从连接池中获取1个连接
conn=redis.Redis(connection_pool=conn_pool)
print(conn.llen('mylist6'))  #获取 mylist6对应 list的长度
linsert(name, where, refvalue, value))
在 Xname对应的list元素中,值为X的 左/右边插入 'x'
参数:
name,redis的namewhere,BEFORE(左)或AFTER(右)refvalue,标杆值,即:在它前后插入数据value,要插入的数据
#linsert(name, where, refvalue, value))

import redis
#创建1个连接池
conn_pool=redis.ConnectionPool(host='192.168.226.128',port=6379)
#从连接池中获取1个连接
conn=redis.Redis(connection_pool=conn_pool)
conn.linsert('mylist6','AFTER',44,'88') #在mylist6的元素 44右边插入 '88'

print(conn.lrange('mylist6',0,-1))
r.lset(name, index, value)方法:
对name对应的list中某个索引位置,插入value;
参数:
name,redis的name index,list的索引位置 value,要设置的值
# r.lset(name, index, value)
import redis
#创建1个连接池
conn_pool=redis.ConnectionPool(host='192.168.226.128',port=6379)
#从连接池中获取1个连接
conn=redis.Redis(connection_pool=conn_pool)
conn.lset('mylist6',0,'frist')#在name对应的列表中的某个索引位置,插入值;
print(conn.lrange('mylist6',0,-1))
r.lrem(name, value, num)方法:
在name对应的list中删除指定的值,
参数:
name,redis的name value,要删除的值 num, num=0,删除列表中所有的指定值; num=2,从前到后,删除2个; num=-2,从后向前,删除2个
# r.lset(name, index, value)
import redis
#创建1个连接池
conn_pool=redis.ConnectionPool(host='192.168.226.128',port=6379)
#从连接池中获取1个连接
conn=redis.Redis(connection_pool=conn_pool)
conn.lrem('mylist6','Left',99)  #删除 mylist6对应列表中,Left元素,如果有99个重复的删除99个;
print(conn.lrange('mylist6',0,-1))
lpop(name)和rpop(name)方法:
pop最左/最右侧的值
# lpop(name)和rpop(name)方法
import redis
#创建1个连接池
conn_pool=redis.ConnectionPool(host='192.168.226.128',port=6379)
#从连接池中获取1个连接
conn=redis.Redis(connection_pool=conn_pool)
conn.lpop('mylist6')  #弹出mylist6对应的list中最左侧的元素
conn.rpop('mylist6')  #弹出mylist6对应的list中最右侧的元素
print(conn.lrange('mylist6',0,-1))
ltrim(name, start, end)方法:
删除name对应list中指定范围的元素,从索引1开始;
#ltrim(name, start, end)方法
import redis
#创建1个连接池
conn_pool=redis.ConnectionPool(host='192.168.226.128',port=6379)
#从连接池中获取1个连接
conn=redis.Redis(connection_pool=conn_pool)
conn.lpush('mylist8', 'alex','egon','eric')  #存储顺序 4,3,2,1,0
conn.ltrim('mylist8',1,2) #从索引1开始,不是从0
print(conn.lrange('mylist8',0,-1))
lindex(name, index)方法:
按索引获取name对应list中元素;
# lindex(name, index)方法
import redis
#创建1个连接池
conn_pool=redis.ConnectionPool(host='192.168.226.128',port=6379)
#从连接池中获取1个连接
conn=redis.Redis(connection_pool=conn_pool)
conn.lpush('mylist6', 0,1,2,3,4)  #存储顺序 4,3,2,1,0
print(conn.lindex('mylist6',1)) #获取mylist6对应的list中 索引为1的value;
lrange(name, start, end)方法:
在name对应的list做切边操作
# lrange(name, start, end)方法
import redis
#创建1个连接池
conn_pool=redis.ConnectionPool(host='192.168.226.128',port=6379)
#从连接池中获取1个连接
conn=redis.Redis(connection_pool=conn_pool)
conn.lpush('mylist6', 0,1,2,3,4)  #存储顺序 4,3,2,1,0
print(conn.lrange('mylist6',0,3)) # [b'4', b'3', b'2', b'1']
rpoplpush(src, dst)方法:
从一个列表取出最右边的元素,同时将其添加至另一个列表的最左边;
参数: src,要取数据的列表的name dst,要添加数据的列表的name
#rpoplpush(src, dst)
import redis
#创建1个连接池
conn_pool=redis.ConnectionPool(host='192.168.226.128',port=6379)
#从连接池中获取1个连接
conn=redis.Redis(connection_pool=conn_pool)
# #
conn.lpush('List1','5','4','3','2','1','0')
conn.lpush('List2','order')

conn.rpoplpush('List1','List2')
print(conn.lrange('List1',0,-1)) #从一个列表取出最右边的元素,同时将其添加至另一个列表的最左边
print(conn.lrange('List2',0,-1)) #[b'2', b'order', b'3', b'order', b'4', b'order', b'5', b'order']
brpoplpush(src, dst, timeout=0)方法:
从一个列表的右侧移除一个元素并将其添加到另一个列表的左侧
参数: src,取出并要移除元素的列表对应的name dst,要插入元素的列表对应的name timeout,当src对应的列表中没有数据时,阻塞等待其有数据的超时时间(秒),0 表示永远阻塞blpop(keys, timeout)和brpop(keys, timeout)方法:
将多个列表排列,按照从左到右去pop对应列表的元素;
参数:
keys,redis的name的集合 timeout,超时时间,当元素所有列表的元素获取完之后,阻塞等待列表内有数据的时间(秒), 0 表示永远阻塞更多: r.brpop(keys, timeout),从右向左获取数据
#blpop(keys, timeout),brpop
import redis
#创建1个连接池
conn_pool=redis.ConnectionPool(host='192.168.226.128',port=6379)
#从连接池中获取1个连接
conn=redis.Redis(connection_pool=conn_pool)
conn.lpush('List1','5','4','3','2','1','0')
print(conn.blpop('List1',1)) #将多个列表排列,按照从左到右去pop对应列表的元素
print(conn.brpop('List1',1)) #将多个列表排列,按照从右到左去pop对应列表的元素
print(conn.lrange('List1',0,-1))
自定义list迭代器获取
如果redis的list里面存有大数据,一次性获取会把内存称霸,但是list数据类型,没有想hash那样迭代器的方法,所有需要自己实现;
# 由于redis类库中没有提供对列表元素的增量迭代,如果想要循环name对应的列表的所有元素,那么就需要:
    # 1、获取name对应的所有列表
    # 2、循环列表
# 但是,如果列表非常大,那么就有可能在第一步时就将程序的内容撑爆,所有有必要自定义一个增量迭代的功能:

def list_iter(name):
    """
    自定义redis列表增量迭代
    :param name: redis中的name,即:迭代name对应的列表
    :return: yield 返回 列表元素
    """
    list_count = r.llen(name)
    for index in xrange(list_count):
        yield r.lindex(name, index)

# 使用
for item in list_iter('pp'):
    print item
#blpop(keys, timeout),brpop
import redis
#创建1个连接池
conn_pool=redis.ConnectionPool(host='192.168.226.128',port=6379)
#从连接池中获取1个连接
conn=redis.Redis(connection_pool=conn_pool)
conn.lpush('List1','5','4','3','2','1','0')
def list_iter(name):
    list_count = conn.llen(name)
    for index in range (list_count):
        yield conn.lindex(name, index)

for item in list_iter('List1'):
    print(item)
4、Set操作
(Set集合就是不允许重复的列表)
sadd(name,values)方法:
添加name对应的集合中成员
sismember(name, value)
获取name对应的集合的所有成员 **常用
scard(name)方法:
获取name对应集合中的成员个数;
#添加集合成员
import redis
#创建1个连接池
conn_pool=redis.ConnectionPool(host='192.168.226.128',port=6379)
#从连接池中获取1个连接
conn=redis.Redis(connection_pool=conn_pool)
conn.sadd( 'set1',1,2,3,4,4,4)  # 在name对应的set1集合中,添加的成员1,2,3,4;注意成员是不会重复的
print(conn.smembers('set1'))  #查看name对应的所有集合成员;{b'2', b'1', b'3', b'4
print(conn.scard('set1'))     #查看 set的成员个数, 4
sdiff(keys, *args) 方法:差集
在第1个name对应的集合,和且其他name对应的集合的差集
#sdiff(keys, *args)
# 求差集
import redis
#创建1个连接池
conn_pool=redis.ConnectionPool(host='192.168.226.128',port=6379)
#从连接池中获取1个连接
conn=redis.Redis(connection_pool=conn_pool)
conn.sadd( 'set1',1,2,3,4,4,4,)  # 在name对应的set1集合中,添加的成员1,2,3,4;注意成员是不会重复的
conn.sadd('set2',2,6,7)
conn.sadd('set2',2,9,'A')
print(conn.sdiff('set1','set2','set3')) # 求在se1和其他集合的差集 {b'1', b'3', b'4'}
sdiffstore(dest, keys, *args)方法:
求差集 添加到新的集合
import redis
#创建1个连接池
conn_pool=redis.ConnectionPool(host='192.168.226.128',port=6379)
#从连接池中获取1个连接
conn=redis.Redis(connection_pool=conn_pool)
conn.sadd( 'set1',1,2,3,4,4,4,)  # 在name对应的set1集合中,添加的成员1,2,3,4;注意成员是不会重复的
conn.sadd('set2',2,6,7)
conn.sadd('set2',2,9,'A')

conn.sdiffstore('set666','set1','set2','set3') #求set1和其他集合的差集,添加到set666成员中
print(conn.smembers('set666')) #{b'3', b'1', b'4'}
sinter(set1, set2,set3...)方法:
求set1和其他集合的并集
#求并集
import redis
#创建1个连接池
conn_pool=redis.ConnectionPool(host='192.168.226.128',port=6379)
#从连接池中获取1个连接
conn=redis.Redis(connection_pool=conn_pool)
conn.sadd( 'set_name1',1,2,3,4,4,4,)  # 在name对应的set1集合中,添加的成员1,2,3,4;注意成员是不会重复的
conn.sadd('set_name2',2,6,7)
conn.sadd('set_name3',2,9,'A')

print(conn.sinter('set_name1','set_name2','set_name3')) #求set_name1 和其他集合的并集;
sinterstore(dest, set1, set2,set3...)方法:
求set1和其他集合的并集,添加到dest集合
#sinterstore(dest, set1, set2,set3...)方法:
import redis
#创建1个连接池
conn_pool=redis.ConnectionPool(host='192.168.226.128',port=6379)
#从连接池中获取1个连接
conn=redis.Redis(connection_pool=conn_pool)
conn.sadd( 'set1',1,2,3,4,4,4,)  # 在name对应的set1集合中,添加的成员1,2,3,4;注意成员是不会重复的
conn.sadd('set2',2,6,7)
conn.sadd('set3',2,9,'A')
conn.sinterstore( 'set999','set1','set2','set3') #求set1和其他集合的并集,添加到set999成员中
print(conn.smembers('set999'))
smove(src, dst, value)方法:
将某个成员从一个集合中移动到另外一个集合
#smove(src, dst, value)方法:
import redis
#创建1个连接池
conn_pool=redis.ConnectionPool(host='192.168.226.128',port=6379)
#从连接池中获取1个连接
conn=redis.Redis(connection_pool=conn_pool)
conn.smove('set1','set2','1') #把set1集合中的1,移除到set2
print(conn.smembers('set2'))
spop(name)方法:
从集合的右侧(尾部)移除一个成员,并将其返回
import redis
#创建1个连接池
conn_pool=redis.ConnectionPool(host='192.168.226.128',port=6379)
#从连接池中获取1个连接
conn=redis.Redis(connection_pool=conn_pool)
print(conn.smembers('set2'))
print(conn.spop('set2'))  #把 set2集合的最后1个成员,移除并返回!
srandmember(name, numbers)方法:
从name对应集合中获取numbers个成员,并返回;注意:不删除
#srandmember(name, numbers)
import redis
#创建1个连接池
conn_pool=redis.ConnectionPool(host='192.168.226.128',port=6379)
#从连接池中获取1个连接
conn=redis.Redis(connection_pool=conn_pool)
print(conn.smembers('set3'))
print(conn.srandmember('set3',2)) #从set集合中获取2个成员,并返回;注意不删除
srem(name, values)方法:
从name对应集合中删除某个值
#srem(name, values)

import redis
#创建1个连接池
conn_pool=redis.ConnectionPool(host='192.168.226.128',port=6379)
#从连接池中获取1个连接
conn=redis.Redis(connection_pool=conn_pool)
print(conn.smembers('set3'))
conn.srem('set3',2)    #从set集合中删除 2
print(conn.smembers('set3'))
sunion(keys, *args)
获取多个name对应的集合的的并集 注意:sinter 和sdiff方法是求第1个集合和其他集合;
#srem(name, values)

import redis
#创建1个连接池
conn_pool=redis.ConnectionPool(host='192.168.226.128',port=6379)
#从连接池中获取1个连接
conn=redis.Redis(connection_pool=conn_pool)
conn.sadd('set1',1,2,3)
conn.sadd('set2',2,3,4)
conn.sadd('set3',2,5,6)
print(conn.smembers('set1'))
print(conn.smembers('set2'))
print(conn.smembers('set3'))
print(conn.sunion('set1','set2','set3')) #求所有集合的并集


'''

{b'2', b'4', b'1', b'3', b'A'}
{b'2', b'9', b'5', b'A', b'6'}
{b'2', b'1', b'4', b'3', b'9', b'5', b'A', b'6'}

'''
sunionstore(dest,keys, *args)方法:
求获取多个name对应的集合的的并集 ,然后保存到dest集合中;
#sunionstore(dest,keys, *args)
import redis
#创建1个连接池
conn_pool=redis.ConnectionPool(host='192.168.226.128',port=6379)
#从连接池中获取1个连接
conn=redis.Redis(connection_pool=conn_pool)
conn.sadd('set1',1,2,3)
conn.sadd('set2',2,3,4)
conn.sadd('set3',2,5,6)
print(conn.smembers('set1'))
print(conn.smembers('set2'))
print(conn.smembers('set3'))
conn.sunionstore ('set555' ,'set1','set2','set3') #求所有集合的并集,并将并集全部保存到 set555

print(conn.smembers('set555'))

'''

{b'2', b'3', b'1'}
{b'2', b'1', b'4', b'3', b'A'}
{b'5', b'2', b'6', b'9', b'A'}
{b'5', b'2', b'1', b'6', b'4', b'3', b'9', b'A'}

'''
sscan(name, cursor=0, match=None, count=None)
sscan_iter(name, match=None, count=None)
迭代器获取集合成员,避免内存消耗太大;
# sscan_iter/sscan
import redis
#创建1个连接池
conn_pool=redis.ConnectionPool(host='192.168.226.128',port=6379)
#从连接池中获取1个连接
conn=redis.Redis(connection_pool=conn_pool)

print(conn.sscan('set2',cursor=0,match=None,count=2))
print(conn.sscan_iter('set2',match=None,count=2)) #返回迭代器
有序集合
有序集合,在集合的基础上,为每元素排序;元素的排序需要根据另外一个值来进行比较,所以,对于有序集合,每一个元素有两个值,即:值和分数,分数专门用来做排序。
zadd(name, *args, **kwargs)方法:
在name对应的有序集合中添加元素
如:
     # zadd('zz', 'n1', 1, 'n2', 2)
     # 或
     # zadd('zz', n1=11, n2=22)
zcard(name)方法:
获取有序集合的成员个数
print(conn.zcard('score')) #获取有序集合的成员个数
zcount(name, min, max)方法:
获取name对应的有序集合中分数 在 [min,max] 之间的个数;例如:考了60-100分的人个数;
# print(conn.zcount('score',60,100)) #获取name对应的有序集合中分数 在 [min,max] 之间的个数,例如:考了60-100分的人个数
zincrby(name, value, amount)方法:
自增name对应的有序集合中,成员对应的分数;
print(conn.zincrby('score','A',amount=100)) #自增name对应的有序集合的 name 对应的分数,默认分数自增1
zrank(name, value)方法:
查看有序集合中的排行,zrevrank(name, value),从大到小排行
print(conn.zrank('score','A'))
r.zrange( name, start, end, desc=False, withscores=False, score_cast_func=float)方法:
按照索引范围获取name对应的有序集合的元素;
# print(conn.zrange('score',0,0,desc=True,withscores=True,score_cast_func=float))
'''
 按照索引范围获取name对应的有序集合的元素
 desc=True,按照降序排列,默认是升序
 withscores=True 获取分值
 score_cast_func  指定获取分值的类型int/float
 '''


# 参数:
    # name,redis的name
    # start,有序集合索引起始位置(非分数)
    # end,有序集合索引结束位置(非分数)
    # desc,排序规则,默认按照分数从小到大排序
    # withscores,是否获取元素的分数,默认只获取元素的值
    # score_cast_func,对分数进行数据转换的函数

# 更多:
    # 从大到小排序
    # zrevrange(name, start, end, withscores=False, score_cast_func=float)

    # 按照分数范围获取name对应的有序集合的元素
    # zrangebyscore(name, min, max, start=None, num=None, withscores=False, score_cast_func=float)
    # 从大到小排序
    # zrevrangebyscore(name, max, min, start=None, num=None, withscores=False, score_cast_func=float)
zrangebylex(name, min, max, start=None, num=None)方法:
当有序集合的所有成员都具有相同的分值时,有序集合的元素会根据成员的 值 (lexicographical ordering)来进行排序
而这个命令则可以返回给定的有序集合键 key 中, 元素的值介于 min 和 max 之间的成员;(区间)
import redis
#创建1个连接池
conn_pool=redis.ConnectionPool(host='192.168.226.128',port=6379)
#从连接池中获取1个连接
conn=redis.Redis(connection_pool=conn_pool)
conn.zadd('myzset',aa=0,ba=1,ca=2,da=3,ea=4,fa=5,ga=6)
print(conn.zrangebylex('myzset',min='-',max='[ca',start=0,num=2)) #[b'aa', b'ba']

'''
min:+ 表示正无限; - 表示负无限; ( 表示开区间; [ 则表示闭区间

max:+ 表示正无限; - 表示负无限; ( 表示开区间; [ 则表示闭区间

start,对结果进行 二次分片处理,索引位置

num,对结果进行二次分片处理,索引后面的num个元素

'''
zrem(name, values)方法:
删除name对应有序集合中的成员;
#删除name对应的有序集合中值是values的成员
import redis
#创建1个连接池
conn_pool=redis.ConnectionPool(host='192.168.226.128',port=6379)
#从连接池中获取1个连接
conn=redis.Redis(connection_pool=conn_pool)
print(conn.zrange('score',0,-1,))
print(conn.zrem('score','B','C')) #删除score有序集合中的 'B','C'成员
print(conn.zrange('score',0,-1,))
zremrangebyrank(name, min, max)方法:
根据排行 范围删除
# zremrangebyrank(name, min, max)
#根据排行 范围删除
import redis
#创建1个连接池
conn_pool=redis.ConnectionPool(host='192.168.226.128',port=6379)
#从连接池中获取1个连接
conn=redis.Redis(connection_pool=conn_pool)
print(conn.zrange('myzset',0,-1))
conn.zremrangebyrank('myzset',0,2) # 根据排行 范围删除
print(conn.zrange('myzset',0,-1))
zremrangebyscore(name, min, max)方法:
根据分数范围删除
conn.zremrangebyscore('myzset',2,3) #根据分数范围进行删除
zremrangebylex(name, min, max)方法:
根据zrangebylex进行查询,把返回的结果remove;
conn.zremrangebylex('myzset', '-','+') #根据zrangebylex查询,并删除根据返回得结果;
zscore(name, value)方法:
获取有序集合中某成员的分值
print(conn.zrange('score',0,-1,withscores=True))
print(conn.zscore('score','A')) #获取 score对应集合中成员 A对应的分数 执行结果1.0
print(conn.zrange('score',0,-1,withscores=True))#[(b'A', 1.0)]

执行结果:
[(b'A', 1.0)]
1.0
[(b'A', 1.0)]
zinterstore(dest, keys, aggregate=None)方法:
获取两个有序集合的交集,如果遇到相同值不同分数,对分数进行 aggregate操作获取。
aggregate的值为: SUM MIN MAX
#zinterstore(dest, keys, aggregate=None)方法:
import redis
#创建1个连接池
conn_pool=redis.ConnectionPool(host='192.168.226.128',port=6379)
#从连接池中获取1个连接
conn=redis.Redis(connection_pool=conn_pool)
conn.zadd('myset',A=1,B=2,C=3,D=4)
conn.zadd('myset1',A=1,B=2,C=3,D=111)
conn.zinterstore('myset2',('myset','myset1'),aggregate='MIN') #MIN保留分值小的
print(conn.zrange('myset2',0,-1))
print(conn.zscore('myset2','D')) #4.0
zunionstore(dest, keys, aggregate=None)方法:
获取两个有序集合的并集,如果遇到相同值不同分数,则按照aggregate进行操作
aggregate的值为: SUM MIN MAX
#zunionstore(dest, keys, aggregate=None)
import redis
#创建1个连接池
conn_pool=redis.ConnectionPool(host='192.168.226.128',port=6379)
#从连接池中获取1个连接
conn=redis.Redis(connection_pool=conn_pool)
conn.zadd('myset',A=1,B=2,C=3,D=4)
conn.zadd('myset1',A=1,B=2,C=3,D=111)
conn.zunionstore('myset3',('myset','myset1','myset2'),aggregate='MAX') #MIN保留分值小的
print(conn.zscore('myset3','D'))
有序集合的迭代器操作
zscan(name, cursor=0, match=None, count=None, score_cast_func=float)
zscan_iter(name, match=None, count=None,score_cast_func=float)
5 、redis全局操作
以上是针对不同数据类型的操作,以下是全局操作;
keys(pattern='*')方法:
获取redis数据库中所有key,支持正则匹配;
更多: KEYS * 匹配数据库中所有 key 。 KEYS h?llo 匹配 hello , hallo 和 hxllo 等。 KEYS h*llo 匹配 hllo 和 heeeeello 等。 KEYS h[ae]llo 匹配 hello 和 hallo ,但不匹配 hilloprint(conn.keys(pattern='*')) #获取redis数据库中所有key
delete('set_name1')方法:
删除name为set_name1的key
conn.delete('set_name1') #删除name为set_name1的key
exists(name)方法:
检查name是否存在
print(conn.exists('name4')) #检查数据库中是否存在name4 key,存在返回True,否则False
expire(name ,time)方法:
为某个redis的某个name设置超时时间
conn.expire( 'name4',4) # 为某个redis的某个name设置超时时间
rename(src, dst)方法:
对redis的name进行重命名
conn.rename('List6666','List6666wwwwwwwwwwwwwwwwwwww') #对redis的name重命名为
move(name, db)方法:
redis为了合理使用内存空间,启动redis之后默认会创建16个内存空间大小不同的db,以保障对数据的分门别类存放,move就是 把name切换到其他db中;
conn.move('mylist',9) #9代表第9个数据库
randomkey()方法:
随机获取一个redis的name(不删除)
print(conn.randomkey())
type(name)方法:
查看name对应的数据类型
randomkey=conn.randomkey()

print(conn.type(randomkey))
迭代器方式获取name
scan(cursor=0, match=None, count=None)
scan_iter(match=None, count=None)
同字符串操作,用于增量迭代获取key
6、redis事物操作
redis-py默认在执行每次请求都会创建(连接池申请连接)和断开(归还连接池)一次连接操作,如果想要在一次请求中指定多个命令,则可以使用pipline实现一次请求指定多个命令,并且默认情况下一次pipline 是原子性操作。
# !/usr/bin/env python
# -*- coding:utf-8 -*-

import redis

pool = redis.ConnectionPool(host='192.168.226.128', port=6379)

r = redis.Redis(connection_pool=pool)

# pipe = r.pipeline(transaction=False)
pipe = r.pipeline(transaction=True) #transaction=True连接的时候支持事物

pipe.set('name', 'alex')
pipe.set('role', 'sb')

pipe.execute()
7、redis 发布订阅
redis也有消息队列的功能并支持发布和订阅,但是对发布消息的过滤功能不如RabbitMQ;

import redis
#创建1个连接池
conn_pool=redis.ConnectionPool(host='192.168.226.128',port=6379)
#从连接池中获取1个连接
conn=redis.Redis(connection_pool=conn_pool)
#创建1个频道
conn.publish('fm103.9','alexSB')
import redis
#创建1个连接池
conn_pool=redis.ConnectionPool(host='192.168.226.128',port=6379)
#从连接池中获取1个连接
conn=redis.Redis(connection_pool=conn_pool)

#开始订阅
pb=conn.pubsub()
#订阅fm103.9频道
pb.subscribe('fm103.9')
#开始循环接收来自 fm103.频道的消息
while True:
    msg=pb.parse_response()
    print(msg)
Celery分布式任务队列
前言
Celery 是一个 基于python开发的分布式异步消息任务队列,通过它可以轻松的实现任务的异步处理,其配合redis/RabbitMQ消息队列,让生产者发任务,消费者处理任务的操作变得更加简单,通过它可以轻松的实现任务的异步处理。
异步处理:
客户端发送请求到server端,客户端无需等待server端处理完毕之后把结果响应客户端,而是立即响应1个唯一的任务ID;
客户端拿着任务ID,再去请求server端查询任务执行结果;
Celery 在执行任务时需要通过一个消息中间件来接收和发送任务消息,以及存储任务结果, 默认使用rabbitMQ还可以使用Redis;
举几个实例场景中可用的例子:
- 你想对100台机器执行一条批量命令,可能会花很长时间 ,但你不想让你的程序等着结果返回,而是给你返回 一个任务ID,你过一段时间只需要拿着这个任务id就可以拿到任务执行结果, 在任务执行ing进行时,你可以继续做其它的事情。
- 你想做一个定时任务,比如每天检测一下你们所有客户的资料,如果发现今天 是客户的生日,就给他发个短信祝福
3. 例如你再做1个报警推送模块,该模块接收到 报警信息之后,无需响应执行结果,而是再次转发给tembition平台;
celery的优点:
- 简单:一单熟悉了celery的工作流程后,配置和使用还是比较简单的
- 高可用:当任务执行失败或执行过程中发生连接中断,celery 会自动尝试重新执行任务
- 快速:一个单进程的celery每分钟可处理上百万个任务
- 灵活:由于celery是分布式的消息队列,所有几乎celery的各个组件都可以被横向扩展及自定制
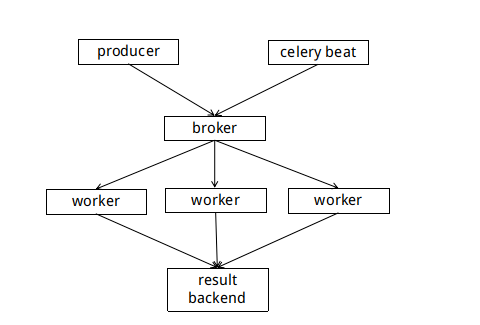
Celery的架构由三部分组成,消息中间件(message broker),任务执行单元(worker)和任务执行结果存储(task result store)组成。
一、celery的安装和简单使用
1.安装celery(注意目前只能在Linux平台使用)
root@localhost zhanggen]# pip install -i https://pypi.douban.com/simple celery #使用国内豆瓣源
测试是否安装成功?
>>> from celery import Celery
2.启动redis消息中间件
[root@localhost celery_study]# pip install -i https://pypi.douban.com/simple redis #安装Python连接redis数据库的模块
[root@localhost zhanggen]# systemctl restart redis.service #启动redis数据库
3.创建任务列表并启动任务 (ceclery)
# !/usr/bin/env python
# -*- coding:utf-8 -*-

from celery import Celery
app=Celery('tasks',broker='redis://localhost',backend='redis://localhost')

'''
实例化1个celery的app对象,可以调用对象封装的API生产任务,也可以添加任务;
broker:提交执行任务的消息队列
backend:存储任务的执行结果
'''
@app.task #添加装饰器就等于注册 1个celery任务 def add(x,y): print("running...",x,y) return x+y #注意return的结果必须是可json的,因为celery要转成json数据存储到消息中间件
在任务列表中添加任务
# !/usr/bin/env python
# -*- coding:utf-8 -*-

from celery import Celery
import subprocess
import time


app=Celery('tasks',broker='redis://localhost',backend='redis://localhost')

@app.task
def add(x,y):
    print("running...",x,y)
    return x+y


@app.task
def run_cmd(cmd):
    print('run %s'%(cmd))
    time.sleep(5)
    cmd_obj=subprocess.Popen(cmd,shell=True,stdout=subprocess.PIPE,stderr=subprocess.PIPE)
    return cmd_obj.stdout.read().decode('utf-8')
4、启动1个celery work(任务消费者)

重启任务注意:celery只能识别新增的代码,不能识别修改之后的代码进行reload重新加载,所以任务修改之后要重启worker;
cd 至项目所在目录
celery -A task worker --loglevel=info      #celery -A 任务列表文件 worker --loglevel=info
5.生产任务(任务生产者)

只要当前目录能导入celery任务.py文件这个模块,就可以向celery提交你的任务了;
[zhanggen@localhost ~]$ cd celery_study/
[zhanggen@localhost celery_study]$ ls
task.py  task.pyc
[zhanggen@localhost celery_study]$ python
Python 2.7.5 (default, Nov  6 2016, 00:28:07)
[GCC 4.8.5 20150623 (Red Hat 4.8.5-11)] on linux2
Type "help", "copyright", "credits" or "license" for more information.
>>> from task import add                            #导入任务列表
>>> add.delay(6,8)                                  #调用任务 注意必须使用delay方法才能调用task执行任务
<AsyncResult: b1a631d4-214f-4c86-9997-43ccbfa30b00> #异步返回任务ID 注意:这里就体现出celery的异步了,不用等结果返回任务ID,而是拿着任务ID去get结果;
>>> r=add.delay(6,8) #提交任务
>>> r.get() #获取任务执行结果
14
>>>
在redis消息队列查看任务状态
[root@localhost zhanggen]# redis-cli
127.0.0.1:6379> keys *
 1) "mylist22"
 2) "k2"
 3) "SessionID"
 4) "celery-task-meta-b1a631d4-214f-4c86-9997-43ccbfa30b00"

127.0.0.1:6379> get "celery-task-meta-b1a631d4-214f-4c86-9997-43ccbfa30b00"


"{"status": "SUCCESS", "traceback": null, "result": 14, "task_id": "b1a631d4-214f-4c86-9997-43ccbfa30b00", "children": []}"
127.0.0.1:6379>

'''
任务执行信息(json数据),验证celecy的任务和任务执行结果都存储在redis消息中间件
status:SUCCESS 执行状态
traceback:null 执行过程中出现的错误信息
result:14 该任务的执行结果
task_id:b1a631d4-214f-4c86-9997-43ccbfa30b00 该任务的任务ID
children:[] 该任务包含的子任务
'''
6.celery常用API
>>> r=task.run_cmd.delay('df -h')
>>> r.ready() #查看任务是否执行完毕
True
>>>
>>> r=task.run_cmd.delay('df -h')
>>> r.get(timeout=1)                 #指定获取任务结果时等待得时间
Traceback (most recent call last):
  File "<stdin>", line 1, in <module>
  File "/usr/lib/python2.7/site-packages/celery/result.py", line 194, in get
    on_message=on_message,
  File "/usr/lib/python2.7/site-packages/celery/backends/async.py", line 189, in wait_for_pending
    for _ in self._wait_for_pending(result, **kwargs):
  File "/usr/lib/python2.7/site-packages/celery/backends/async.py", line 260, in _wait_for_pending
    raise TimeoutError('The operation timed out.')
celery.exceptions.TimeoutError: The operation timed out.
>>> r=task.run_cmd.delay('df -h')
>>> r.get(propagate=False) #如果获取结果时出现错误,不会导致程序因异常退出
r.traceback #锁定保存代码的位置
7.退出任务
worker: Warm shutdown (MainProcess) :保存任务然后退出;
worker: Cold shutdown (MainProcess) :按2次Ctrl+c 强制退出,重启之后重新执行任务;
二、在项目中使用celery
在实际生产环境可以把celery配置成1个应用,(celery配置和celery任务列表的分离;)
MyProject
    __init__.py
    celery.py #注意必须名为celery.py
    MyTasks.py #任务列表
from __future__ import  absolute_import,unicode_literals
'''
为了适应Python 3.x的新的字符串的表示方法,在2.7版本的代码中,可以通过unicode_literals来使用Python 3.x的新的语法
在 3.0 以前的旧版本中启用相对导入等特性所必须的 future 语句。
'''
from celery import Celery

app=Celery(
    'MyProject',
    broker='redis://localhost', # 设置提交任务的消息队列
    backend='redis://localhost', #设置存储任务消息队列
    include=['MyProject.MyTasks']#设置任务列表所在位置
          )


app.conf.update(
    result_expires=3600, #设置执行结果的保质期,1小时之后没来获取删除
)

if __name__ == '__main__':
    app.start()
from __future__ import absolute_import, unicode_literals
from . celery import app


@app.task
def add(x, y):
    return x + y


@app.task
def mul(x, y):
    return x * y


@app.task
def xsum(numbers):
    return sum(numbers)
启动应用:
celery -A MyProject worker -l info
调用任务:
>>> r=MyTasks.add.delay(1,1)
>>> r.get()
2
后台启动多个worker
通过shell终端启动的worker,只能启动单个worker,而且在终端退出后woker也会终止,所以需要celery multi管理多个worker在后台启动;
a.后台启动
celery multi start w8 -A cmdb_rbac_arya -l info -f nohup.out -c1


-f: 指定worker日志的存储路径
-c :指定worker并发的数量
b.后台重启
celery multi restart w8 -A cmdb_rbac_arya -l info -f nohup.out -c1
c.停止
celery multi stop w8 -A cmdb_rbac_arya -l info -f nohup.out -c1
d.停止所有tasks
ps -ef | grep celery | grep -v grep | awk '{print "kill -9 "$2}'|sh
PS:
有一次我启动celery提示我装 各种项目已经安装的模块,为什么呢?
后来发现二逼运维给我装了 2个 3.6.1版本的python,所有我告诉了celery
#!/usr/local/python3/bin/python3
# -*- coding: utf-8 -*-
import re
import sys

from celery.__main__ import main

if __name__ == '__main__':
    sys.argv[0] = re.sub(r'(-script.pyw?|.exe)?$', '', sys.argv[0])
    sys.exit(main())
~
三、定时任务
celery支持定时任务,设定好任务的执行时间,celery就会定时自动帮你执行, 这个定时任务模块叫celery beat,类似于Linux的crontab服务;
# !/usr/bin/env python
# -*- coding:utf-8 -*-
from celery import Celery
from celery.schedules import crontab #导入crontab模块支持

app=Celery(
    'periodic_task',
    broker='redis://localhost', # 设置提交任务的消息队列
    backend='redis://localhost', #设置存储任务消息队列
          )

@app.on_after_configure.connect
def setup_periodic_tasks(sender, **kwargs): #设置定时任务列表,sender固定参数()
    #每隔5秒执行1次 test任务
    sender.add_periodic_task(5.0, test.s('hello'), name='add every 10')

    #每隔10秒执行1次
    sender.add_periodic_task(10.0, test.s('world'))

    #每周六 间隔1分钟执行1次
    sender.add_periodic_task(
       crontab(hour="*", minute="*", day_of_week='sat'),
       test.s('Happy Saturday!'),
     )


@app.task
def test(arg):
    print('run_test',arg)
生产者(启动之后自动通过beat配置任务计划、检查任务计划并发送任务)
celery -A periodic_task beat -l debug
消费者(执行任务)
celery -A periodic_task worker -l debug
四、Celery结合Django
Django默认是一个阻塞式IO的web框架,没有Tornado的异步非阻塞功能,但只需要简单配置 就可以和Celery分布式队列结合,完成web应用的异步功能;

1.Django配置文件
# 设置celery提交任务的消息队列
CELERY_BROKER_URL='redis://localhost'
CELERY_RESULT_BACKEND='redis://localhost'
2.celery配置文件
# !/usr/bin/env python
# -*- coding:utf-8 -*-


# Create your tasks here

from __future__ import absolute_import, unicode_literals
import os
from celery import Celery

# set the default Django settings module for the 'celery' program.
#设置Django的默认配置文件
os.environ.setdefault('DJANGO_SETTINGS_MODULE', 'celery_test.settings')

app = Celery('celery_test')

# Using a string here means the worker don't have to serialize
# the configuration object to child processes.
# - namespace='CELERY' means all celery-related configuration keys
#   should have a `CELERY_` prefix.

#配置celery到配置文件寻找连接中间件的 key名称 CELERY
app.config_from_object('django.conf:settings', namespace='CELERY')

# Load task modules from all registered Django app configs.
#配置去Django的所有app里面寻找celery任务
app.autodiscover_tasks()


@app.task(bind=True)
def debug_task(self):
    print('Request: {0!r}'.format(self.request))
3.Django项目的__init__.py
# !/usr/bin/env python
# -*- coding:utf-8 -*-

from __future__ import absolute_import, unicode_literals
# This will make sure the app is always imported when
# Django starts so that shared_task will use this app.
from .celery import app as celery_app        #Django启动时自动导入celery

__all__ = ['celery_app']
4.在app下创建任务列表
# !/usr/bin/env python
# -*- coding:utf-8 -*-
from __future__ import absolute_import, unicode_literals
from celery import shared_task
import time

# Create your tasks here

@shared_task     #支持各个app导入任务
def add(x, y):
    time.sleep(10) #设置任务异常执行
    return x + y


@shared_task
def mul(x, y):
    time.sleep(10)
    return x * y


@shared_task
def xsum(numbers):
    time.sleep(10)
    return sum(numbers)
5.Django视图调用任务
from django.shortcuts import render,HttpResponse
from app01 import tasks #导入任务列表
def index(request):
    res=tasks.add.delay(444,987) #调用任务列表中的 add任务
    return HttpResponse(res.task_id)
6.启动Django项目(生产者)
cd celery_test #进入项目目录
[root@localhost celery_test]# python manage.py runserver 0.0.0.0:8001 #注意关闭防火墙:systemctl stop firewalld.service
7.启动worker(消费者)
cd celery_test                                      #进入项目目录
celery -A celery_test worker -l info                #如果Django项目已经配置了和celery的结合直接启动Django项目就是worker
8.通过返回的任务ID获取任务执行结果API
# !/usr/bin/env python
# -*- coding:utf-8 -*-
from app01 import views
urlpatterns = [
    url(r'^admin/', admin.site.urls),
    url(r'^index/', views.index),      #任务执行API
    url(r'^result/', views.get_result),#通过任务ID获取结果API

]


'''

http://192.168.226.128:8001/index/     #提交任务

7d74fa4a-0083-49f2-9141-28e6cc7dc5eb   #得到任ID


http://192.168.226.128:8001/result/?taskid=7d74fa4a-0083-49f2-9141-28e6cc7dc5eb #通过任务ID获取任务执行状态/结果

PENDING/SUCCESS/执行结果
'''
def get_result(request):
    task_id=request.GET.get('taskid')
    from celery.result import AsyncResult #导入结果获取模块
    res=AsyncResult(id=task_id)             #获取任务id:AsyncResult(id=task_id)
    if res.status == 'SUCCESS':           #获取任务状态:res.status
        msg=res.get()                        #获取任务执行结果:res.get()
    msg=res.status
    return HttpResponse(msg)
五、在django+celery任务计划
celery有2大功能 分布式消息队列+beat模块的任务计划,如果Celery和Django结合也可以使用django-celery-beat模块支持任务计划功能;
此时celery的任务计划会保存在Django后台的数据中,所有通过编辑后台数据的表就可以编辑任务计划;(注意Django只负责把任务计划信息保存在后台数据库,不负责生产任务和消费)

1.yum安装python-devel(centos7)
yum install python-devel #注意如果一直在尝试同一个镜像就把那个镜像从/etc/yum.repos.d/目录下移除;
2.pip安装django-celery-beat
django-celery-beat 依赖python.h库,所以在centos7先安装python-devel;
pip install -i https://pypi.douban.com/simple django-celery-beat # 支持国产,请使用国内豆瓣源!
3.Django配置文件中注册'django_celery_beat'
INSTALLED_APPS =[

'django.contrib.admin',
'django.contrib.auth',
'django.contrib.contenttypes',
'django.contrib.sessions',
'django.contrib.messages',
'django.contrib.staticfiles',
'app01.apps.App01Config',
'django_celery_beat',

]
4.把任务计划信息迁移到Django的后台数据库
如果celery和Django结合它的计划任务是保存在数据库表中的;
[root@localhost celery_test]# python manage.py migrate
Operations to perform:
  Apply all migrations: admin, auth, contenttypes, django_celery_beat, sessions
Running migrations:
  Applying contenttypes.0001_initial... OK
  Applying auth.0001_initial... OK
  Applying admin.0001_initial... OK
  Applying admin.0002_logentry_remove_auto_add... OK
  Applying contenttypes.0002_remove_content_type_name... OK
  Applying auth.0002_alter_permission_name_max_length... OK
  Applying auth.0003_alter_user_email_max_length... OK
  Applying auth.0004_alter_user_username_opts... OK
  Applying auth.0005_alter_user_last_login_null... OK
  Applying auth.0006_require_contenttypes_0002... OK
  Applying auth.0007_alter_validators_add_error_messages... OK
  Applying auth.0008_alter_user_username_max_length... OK
  Applying django_celery_beat.0001_initial... OK
  Applying django_celery_beat.0002_auto_20161118_0346... OK
  Applying django_celery_beat.0003_auto_20161209_0049... OK
  Applying django_celery_beat.0004_auto_20170221_0000... OK
  Applying sessions.0001_initial... OK
5.编辑任务计划表
由于Celery和Django结合之后计划任务会报存到Django后台,所以对表的操作就是对celery任务计划的编辑;
a.创建超级用户
[root@localhost celery_test]# python manage.py createsuperuser
Username (leave blank to use 'zhanggen'): zhanggen
Email address:
Password:
Password (again):
Superuser created successfully.
[root@localhost celery_test]#
b.通过Django-admin编辑任务计划
http://192.168.226.128:8001/admin/ #输入上边创建的用户名密码,就可以对以下3张表做编辑操作了!

c.添加任务计划


d.启动beat和worker
开启celery beat(生产者)
[root@localhost celery_test]# celery -A celery_test beat -l info  -S django
celery beat v4.1.0 (latentcall) is starting.
__    -    ... __   -        _
LocalTime -> 2018-01-08 11:11:13
Configuration ->
    . broker -> redis://localhost:6379//
    . loader -> celery.loaders.app.AppLoader
    . scheduler -> django_celery_beat.schedulers.DatabaseScheduler

    . logfile -> [stderr]@%INFO
    . maxinterval -> 5.00 seconds (5s)
[2018-01-08 11:11:13,051: INFO/MainProcess] beat: Starting...
[2018-01-08 11:11:13,051: INFO/MainProcess] Writing entries...
[2018-01-08 11:11:13,136: INFO/MainProcess] Scheduler: Sending due task 每10秒中执行1次 (app01.tasks.add)
[2018-01-08 11:11:13,154: INFO/MainProcess] Writing entries...
[2018-01-08 11:11:24,128: INFO/MainProcess] Scheduler: Sending due task 每10秒中执行1次 (app01.tasks.add)
[2018-01-08 11:11:35,130: INFO/MainProcess] Scheduler: Sending due task 每10秒中执行1次 (app01.tasks.add)
[2018-01-08 11:11:46,131: INFO/MainProcess] Scheduler: Sending due task 每10秒中执行1次 (app01.tasks.add)
开启worker消费任务
celery -A celery_test worker -l info
e.注意,经测试,每添加或修改一个任务,celery beat都需要重启一次,要不然新的配置不会被celery beat进程读到
参考:
http://blog.csdn.net/samxx8/article/details/47417133
http://www.cnblogs.com/alex3714/articles/5248247.html
redis和memcached参考: http://www.cnblogs.com/wupeiqi/articles/5132791.html , https://www.cnblogs.com/melonjiang/p/5342505.html
redis命令中文文档: http://doc.redisfans.com/