整合Redis
一. 注解方式实现添加缓存
1.在pom.xml加入依赖
<!-- 配置使用redis启动器 -->
<dependency>
    <groupId>org.springframework.boot</groupId>
    <artifactId>spring-boot-starter-redis</artifactId>
</dependency>
2. 修改引导类
修改开启缓存,添加注解@EnableCaching
import org.springframework.boot.SpringApplication;
import org.springframework.boot.autoconfigure.SpringBootApplication;
import org.springframework.cache.annotation.EnableCaching;

@SpringBootApplication
@EnableCaching
public class Application {
    public static void main(String[] args) {
        SpringApplication.run(Application.class, args);
    }

}
3. 设置实现序列化接口
要缓存到redis中的实体,需要让实体实现序列化接口
public class User implements Serializable {
    private Long id;
    private String userName;
    private String password;
    private String name;

。。。。。。
}
4. 实现添加/删除缓存
修改UserServiceImpl,
添加@Cacheable注解实现缓存添加
添加@CacheEvict注解实现缓存删除
@Override
@CacheEvict(value = "userCache", key = "'user.queryAll'")
public List<User> queryUserByName(String name) {
    System.out.println("缓存清理了!");
    List<User> list = this.userMapper.queryUserByName(name);
    return list;
}

// 调用使用UserMapper.xml的Mapper
@Override
@Cacheable(value = "userCache", key = "'user.queryAll'")
public List<User> queryAll() {
    System.out.println("从MySQL中查询");
    List<User> list = this.userMapper.queryAll();
    return list;
}
这样设置完成后,执行queryAll()方法就会使用缓存,如果缓存没有就添加缓存,而queryUserByName(String name)方法则是删除缓存
@Cacheable:添加/使用缓存
@CacheEvict:删除缓存
参数value是缓存的名字,在执行的时候,会找叫这个名字的缓存使用/删除
参数key默认情况下是空串””,是Spring的一种表达式语言SpEL,我们这里可以随意指定,但是需要注意一定要加单引号
二. redis的深入使用
1. 直接操作redis
redis除了作为缓存使用,还有很多其他的作用,例如利用redis的单线程获取唯一数,例如使用redis为单点登录系统存储用户登录信息等,我们就需要直接操作redis。
官网提供了三种接口RedisConnectionFactory, StringRedisTemplate 和 RedisTemplate,我们可以直接注入或者自己实现其他的实现类,来直接操作redis。我们这里使用RedisTemplate来操作Redis。
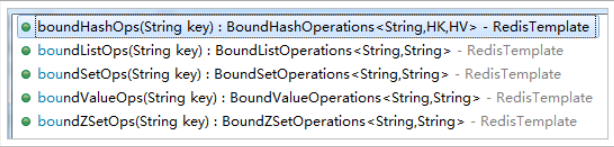
如下所示,我们只需要直接注入RedisTemplate即可使用以下方法操作redis的五种不同的数据类型
测试:
@Autowired
private RedisTemplate<String, String> redisTemplate;

@Override
@CacheEvict(value = "userCache", key = "'user.findAll'")
public List<User> queryUserByName(String name) {
    // 保存数据
    this.redisTemplate.boundValueOps("redis").set("Hello redis !");
    // 设置有效时间为100秒
    this.redisTemplate.boundValueOps("redis").expire(100l, TimeUnit.SECONDS);
    // 给value每次执行加一操作
    this.redisTemplate.boundValueOps("count").increment(1l);

    System.out.println("缓存清理了!");
    List<User> list = this.userMapper.queryUserByName(name);
    return list;
}
2. 设置redis连接属性
redis单机版
redis启动器默认情况下会找本地的redis服务,端口号默认是6379如果需要访问其他服务器的redis,则需要在application.properties中进行如下配置:
#Redis
spring.redis.host=192.168.37.161
spring.redis.port=6379
这表示会去找ip为192.168.37.161和端口为6379的服务
redis集群版
#Redis
#spring.redis.host=192.168.37.161
#spring.redis.port=6379

#Redis Cluster
spring.redis.cluster.nodes=192.168.37.161:7001,192.168.37.161:7002,192.168.37.161:7003,192.168.37.161:7004,192.168.37.161:7005,192.168.37.161:7006
Sentinel版同cluster配置nodes节点
切换到集群版只需要做以上配置,配置集群版节点信息,注释掉单机版信息