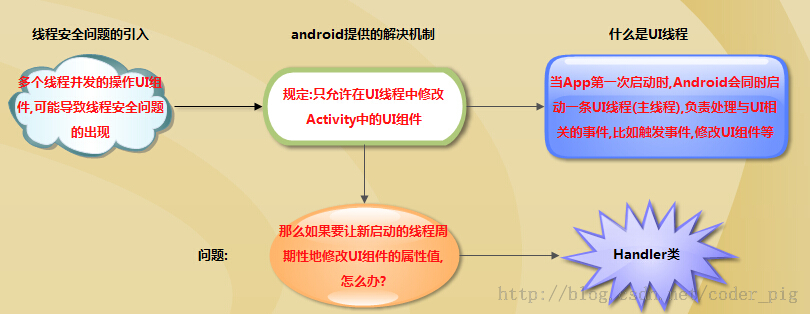
一、android中需要另开线程处理耗时、网络的任务,但是有必须要在UI线程中修改组件。这样做是为了:
①只能在UI线程中修改组件,避免了多线程造成组件显示混乱
②不使用加锁策略是为了提高性能,因为android中经常使用多线程。
handler就是为了解决在多个线程之间的通信问题。
二、基本使用:


  1 package com.dqxst.first.multithread;
  2
  3 import android.app.Activity;
  4 import android.os.Bundle;
  5 import android.os.Handler;
  6 import android.os.Handler.Callback;
  7 import android.os.Message;
  8 import android.util.Log;
  9 import android.view.View;
 10 import android.widget.TextView;
 11
 12 import com.dqxst.first.R;
 13
 14 public class HandlerActivity extends Activity {
 15     private TextView tv,msg_tv;
 16     private Handler handler = new Handler();
 17     final Handler msgHandler=new Handler(new Callback() {
 18         @Override
 19         public boolean handleMessage(Message msg) {
 20             //!!!在这里可以进行一些操作,返回true则将msg进行拦截
 21             return false;
 22         }
 23     }){
 24         @Override
 25         public void handleMessage(Message msg) {
 26             switch(msg.what){
 27             case 200:
 28                 msg_tv.setText("网络请求成功.");
 29                 break;
 30             case 404:
 31                 msg_tv.setText("not found!");
 32                 break;
 33             }
 34             super.handleMessage(msg);
 35         }
 36
 37     };
 38     private MyRunnable runnable = new MyRunnable();
 39
 40     @Override
 41     protected void onCreate(Bundle savedInstanceState) {
 42         super.onCreate(savedInstanceState);
 43         setContentView(R.layout.activity_handler);
 44         init();
 45
 46         Log.i("main", "主线程=" + Thread.currentThread().toString());
 47     }
 48
 49     class MyRunnable implements Runnable {
 50         @Override
 51         public void run() {
 52             int time = Integer.parseInt(tv.getText().toString());
 53             int now = time + 1;
 54             Log.i("main", "处理UI更新线程=" + Thread.currentThread().toString());
 55             tv.setText(now + "");
 56             //这里是将Runnable间隔1秒重新发送到消息队列中,所以是定时操作的效果
 57             handler.postDelayed(runnable, 1000);
 58         }
 59
 60     }
 61
 62     //下面主要是在子线程中调用post将消息加入到消息队列中
 63     public void startCallback(View view) {
 64         new Thread() {
 65             public void run() {
 66                 try {
 67                     Thread.sleep(1000);
 68                 } catch (InterruptedException e) {
 69                     e.printStackTrace();
 70                 }
 71
 72                 Log.i("main", "新线程=" + Thread.currentThread().toString());
 73
 74                 handler.post(runnable);
 75             }
 76         }.start();
 77     }
 78
 79     //这里是移除消息中的执行体部分,就是那个Runnable
 80     public void stopCallback(View view){
 81         handler.removeCallbacks(runnable);
 82     }
 83
 84     public void msgChange(View view){
 85         new Thread(new Runnable() {
 86             @Override
 87             public void run() {
 88                 Message message=Message.obtain();
 89                 if(Math.random()>0.3){
 90                     message.what=200;
 91                 }else{
 92                     message.what=404;
 93                 }
 94                 msgHandler.sendMessage(message);
 95             }
 96         }).start();
 97     }
 98
 99     private void init() {
100         tv = (TextView) findViewById(R.id.handler_tv);
101         tv.setText("0");
102         msg_tv=(TextView) findViewById(R.id.handler_tv_message);
103     }
104 }
由上例可以看到,handler使用有两种形式:
①post/postDelayed:这时传递的是一个Runnable对象,会封装到一个Message对象中发送到消息队列中
②sendMessage:这时需要重写handler的handleMessage或者在构造时传入一个实现Callback接口的对象(该对象的方法也是前面重写的方法名一样,但是先执行,可以用来对消息进行拦截)
三、源码分析:与handler机制有关的类有Looper、MessageQueue、Message以及Handler本身。
1、Looper:主要有两个作用
①创建一个与当前线程相关的Looper实例,通过调用prepare()
 1    public static void prepare() {
 2         prepare(true);
 3     }
 4
 5     private static void prepare(boolean quitAllowed) {
 6         if (sThreadLocal.get() != null) {
 7             throw new RuntimeException("Only one Looper may be created per thread");
 8         }
 9         sThreadLocal.set(new Looper(quitAllowed));
10     }
②不断的读取MessageQueue中的消息,通过调用loop(),MessageQueue是和Looper相关的,由其创建和管理。注意:这个过程是阻塞的。
 1     public static void loop() {
 2         final Looper me = myLooper();
 3         if (me == null) {
 4             throw new RuntimeException("No Looper; Looper.prepare() wasn't called on this thread.");
 5         }
 6         final MessageQueue queue = me.mQueue;
 7
 8         // Make sure the identity of this thread is that of the local process,
 9         // and keep track of what that identity token actually is.
10         Binder.clearCallingIdentity();
11         final long ident = Binder.clearCallingIdentity();
12
13         //这里是一个死循环,读取message
14         for (;;) {
15             Message msg = queue.next(); // might block
16             //!!!这里注意:通常不会执行这一句,除非使用quit退出Looper
17             if (msg == null) {
18                 // No message indicates that the message queue is quitting.
19                 return;
20             }
21
22             // This must be in a local variable, in case a UI event sets the logger
23             Printer logging = me.mLogging;
24             if (logging != null) {
25                 logging.println(">>>>> Dispatching to " + msg.target + " " +
26                         msg.callback + ": " + msg.what);
27             }
28
29             //这里是一个重点,说明了消息的具体执行方法
30             msg.target.dispatchMessage(msg);
31
32             if (logging != null) {
33                 logging.println("<<<<< Finished to " + msg.target + " " + msg.callback);
34             }
35
36             // Make sure that during the course of dispatching the
37             // identity of the thread wasn't corrupted.
38             final long newIdent = Binder.clearCallingIdentity();
39             if (ident != newIdent) {
40                 Log.wtf(TAG, "Thread identity changed from 0x"
41                         + Long.toHexString(ident) + " to 0x"
42                         + Long.toHexString(newIdent) + " while dispatching to "
43                         + msg.target.getClass().getName() + " "
44                         + msg.callback + " what=" + msg.what);
45             }
46
47             msg.recycleUnchecked();
48         }
49     }
2、Message:就是消息对象,一般使用都只是用来传递数据(从网络获取的)等,常用属性有
①what :int类型,用于标识不同的消息,在handler中使用
②arg1,arg2 :int类型,用于传递int型的数据
③obj :Object类型,用于传递对象
④data :Bundle类型,
创建Message有一些需要注意的点:
①使用Message.obtain()或者Handler.obtainMessage()进行创建而不是new,可以利用公共池中对象避免重新分配空间。
②一个Message是和一个handler关联的,表现为Message中的target属性,但是通常这个属性是由系统自动赋值的,就是那个发送该消Message到MessageQueue的handler。
3、Handler:主要作用有以下三点
①关联所在线程的Looper对象和其所管理的MessageQueue对象,这是在构造函数中体现的,最终都会调用以下两个构造函数
 1     public Handler(Callback callback, boolean async) {
 2         if (FIND_POTENTIAL_LEAKS) {
 3             final Class<? extends Handler> klass = getClass();
 4             if ((klass.isAnonymousClass() || klass.isMemberClass() || klass.isLocalClass()) &&
 5                     (klass.getModifiers() & Modifier.STATIC) == 0) {
 6                 Log.w(TAG, "The following Handler class should be static or leaks might occur: " +
 7                     klass.getCanonicalName());
 8             }
 9         }
10
11         mLooper = Looper.myLooper();
12         if (mLooper == null) {
13             throw new RuntimeException(
14                 "Can't create handler inside thread that has not called Looper.prepare()");
15         }
16         mQueue = mLooper.mQueue;
17         mCallback = callback;
18         mAsynchronous = async;
19     }
20
21
22     public Handler(Looper looper, Callback callback, boolean async) {
23         mLooper = looper;
24         mQueue = looper.mQueue;
25         mCallback = callback;
26         mAsynchronous = async;
27     }
!!!注意:在构造函数中,必须有一个Looper对象与其绑定,因为handler要将Message发送到MessageQueue中,而MessageQueue是由Looper创建的。
②发送消息到上面关联的消息队列,可以使用post和sendMessage两种类型方法。可以看到他们内部的调用过程是一样的。最终都是调用MessageQueue中的方法将消息绑定到一个链表上。
 1     public final boolean post(Runnable r)
 2     {
 3        return  sendMessageDelayed(getPostMessage(r), 0);
 4     }
 5
 6     public final boolean postDelayed(Runnable r, long delayMillis)
 7     {
 8         return sendMessageDelayed(getPostMessage(r), delayMillis);
 9     }
10     //这是上面用到的将Runnable封装到Message中的方法
11     private static Message getPostMessage(Runnable r) {
12         Message m = Message.obtain();
13         m.callback = r;
14         return m;
15     }
16
17
18     public final boolean sendMessage(Message msg)
19     {
20         return sendMessageDelayed(msg, 0);
21     }
 1     public final boolean sendMessageDelayed(Message msg, long delayMillis)
 2     {
 3         if (delayMillis < 0) {
 4             delayMillis = 0;
 5         }
 6         return sendMessageAtTime(msg, SystemClock.uptimeMillis() + delayMillis);
 7     }
 8
 9
10     public boolean sendMessageAtTime(Message msg, long uptimeMillis) {
11         MessageQueue queue = mQueue;
12         if (queue == null) {
13             RuntimeException e = new RuntimeException(
14                     this + " sendMessageAtTime() called with no mQueue");
15             Log.w("Looper", e.getMessage(), e);
16             return false;
17         }
18         return enqueueMessage(queue, msg, uptimeMillis);
19     }
20
21
22     private boolean enqueueMessage(MessageQueue queue, Message msg, long uptimeMillis) {
23         msg.target = this;
24         if (mAsynchronous) {
25             msg.setAsynchronous(true);
26         }
27         return queue.enqueueMessage(msg, uptimeMillis);
28     }
③在Looper.loop()的循环读取过程中,读取的Message将通过msg.target.dispatchMessage(msg);交由Handler中的dispatchMessage()进行处理。
 1     public void dispatchMessage(Message msg) {
 2         if (msg.callback != null) {
 3             handleCallback(msg);
 4         } else {
 5             if (mCallback != null) {
 6                 if (mCallback.handleMessage(msg)) {
 7                     return;
 8                 }
 9             }
10             handleMessage(msg);
11         }
12     }
这里就说明了Handler处理消息有三种方式,需要说明的是:
a、msg.callback就是通过post/postDelayed或者构造函数传入的Runnable对象
b、mCallback就是通过构造函数传入的实现其内部接口的对象,该方法返回true则退出,否则向下执行
四、扩展:
0、HandlerThread:在上面的基本使用中,是创建一个子线程,然后在子线程中通过主线程中的handler实例向主线程的MessageQueue中发送消息。而该类的实现是在子线程中开启一个Looper,然后在使用时将handler与该子线程中的Looper/MessageQueue进行绑定,即可通过handler将消息发送到子线程中进行处理,避免了主线程的阻塞。通过上述的描述,该类的使用只需简单的两步即可:
①实例化一个线程对象并开启该线程:HandlerThread downThread=new HandlerThread("ThreadName");downThread.start();
②将Handler与该线程的Looper绑定:Handler handler=new Handler(downThread.getLooper());
1、在子线程中使用Handler(这里指的是在子线程中创建Handler实例来接受和Message)。通过上面的说明我们知道,Handler创建之前必须有一个该线程的Looper对象被创建。在主线程中直接使用是因为已经由系统进行创建了,此时在创建则会出错。下面是android中给出的标准使用方法:
 1 class LooperThread extends Thread {
 2         public Handler mHandler;
 3
 4         public void run() {
 5             Looper.prepare();
 6
 7             mHandler = new Handler() {
 8                 public void handleMessage(Message msg) {
 9                     // process incoming messages here
10                 }
11             };
12
13             Looper.loop();
14         }
15     }
2、上面说主线程不能再创建Looper,这是因为主线程被初始化是就是一个Looper线程,各种消息都是通过Handler机制处理的。
3、AsyncTask:异步消息处理机制,在内部封装了Handler处理流程。
①首先是android推荐的标准使用方式:创建一个子类,然后调用execute()即可
 1 private class DownloadFilesTask extends AsyncTask<URL, Integer, Long> {
 2      protected Long doInBackground(URL... urls) {
 3          int count = urls.length;
 4          long totalSize = 0;
 5          for (int i = 0; i < count; i++) {
 6              totalSize += Downloader.downloadFile(urls[i]);
 7              publishProgress((int) ((i / (float) count) * 100));
 8              // Escape early if cancel() is called
 9              if (isCancelled()) break;
10          }
11          return totalSize;
12      }
13
14      protected void onProgressUpdate(Integer... progress) {
15          setProgressPercent(progress[0]);
16      }
17
18      protected void onPostExecute(Long result) {
19          showDialog("Downloaded " + result + " bytes");
20      }
21  }
这里简要说明三个泛型参数的作用:
a、Params:就是后台执行需要的参数,例如下载时需要url
b、Progress:就是任务执行的进度,在onProgressUpdate(Progress...)中会被使用,
c、Result:就是任务完成返回的结果,在onPostExecute(Result)中进行处理。
②源码解析:首先说明,Handler机制就是在子线程中处理任务,通过Handler将需要处理的消息传递到与其绑定的Looper的消息队列中,再由Looper取出交由Handler处理。
a、任务在子线程中处理,这里就是通过线程池处理,而任务就是doInBackground()中的部分,该函数被放在线程池的工作任务之中
 1    public AsyncTask() {
 2         mWorker = new WorkerRunnable<Params, Result>() {
 3             public Result call() throws Exception {
 4                 mTaskInvoked.set(true);
 5
 6                 Process.setThreadPriority(Process.THREAD_PRIORITY_BACKGROUND);
 7                 //noinspection unchecked
 8 //!!!重点:doInBackground()在这里被封装
 9                 Result result = doInBackground(mParams);
10                 Binder.flushPendingCommands();
11                 return postResult(result);
12             }
13         };
14
15         mFuture = new FutureTask<Result>(mWorker) {
16             @Override
17             protected void done() {
18                 try {
19                     postResultIfNotInvoked(get());
20                 } catch (InterruptedException e) {
21                     android.util.Log.w(LOG_TAG, e);
22                 } catch (ExecutionException e) {
23                     throw new RuntimeException("An error occurred while executing doInBackground()",
24                             e.getCause());
25                 } catch (CancellationException e) {
26                     postResultIfNotInvoked(null);
27                 }
28             }
29         };
30     }
调用execute()就是用默认线程池来进行处理任务
 1     @MainThread
 2     public final AsyncTask<Params, Progress, Result> execute(Params... params) {
 3         return executeOnExecutor(sDefaultExecutor, params);
 4     }
 5
 6
 7     public final AsyncTask<Params, Progress, Result> executeOnExecutor(Executor exec,
 8             Params... params) {
 9         if (mStatus != Status.PENDING) {
10             switch (mStatus) {
11                 case RUNNING:
12                     throw new IllegalStateException("Cannot execute task:"
13                             + " the task is already running.");
14                 case FINISHED:
15                     throw new IllegalStateException("Cannot execute task:"
16                             + " the task has already been executed "
17                             + "(a task can be executed only once)");
18             }
19         }
20
21         mStatus = Status.RUNNING;
22
23         onPreExecute();
24
25         mWorker.mParams = params;
26         exec.execute(mFuture);
27
28         return this;
29     }
下面是这个线程池的本身部分,但是要注意:这是默认的情况,即调用execute()时的默认处理,默认处理是指:1、通过执行器模仿单一线程池的效果,即多个任务(一个AsyncTask实例的一次execute()创建一个任务)时只能有一个在线程中执行,2、而且线程中只能有128个任务(这是由阻塞队列的大小限制的)。
其实这是升级之后的效果,我们可以通过执行executeOnExecutor(Executor exec, Params... params)而不是execute()传入定制的线程池来解决上面问题。
 1 //这是一个执行器,负责添加任务到一个ArrayDeque队列中,并且将第一个任务分配给线程池处理。注意下面的execute是synchronized的,说明一次只能有一个线程在处理一个任务。
 2     private static volatile Executor sDefaultExecutor = SERIAL_EXECUTOR;
 3     public static final Executor SERIAL_EXECUTOR = new SerialExecutor();
 4     private static class SerialExecutor implements Executor {
 5         final ArrayDeque<Runnable> mTasks = new ArrayDeque<Runnable>();
 6         Runnable mActive;
 7
 8         public synchronized void execute(final Runnable r) {
 9             mTasks.offer(new Runnable() {
10                 public void run() {
11                     try {
12                         r.run();
13                     } finally {
14                         scheduleNext();
15                     }
16                 }
17             });
18             if (mActive == null) {
19                 scheduleNext();
20             }
21         }
22
23         protected synchronized void scheduleNext() {
24             if ((mActive = mTasks.poll()) != null) {
25                 THREAD_POOL_EXECUTOR.execute(mActive);
26             }
27         }
28     }
29
30 //这是上面用到的线程池的设置
31     private static final int CPU_COUNT = Runtime.getRuntime().availableProcessors();
32     private static final int CORE_POOL_SIZE = CPU_COUNT + 1;
33     private static final int MAXIMUM_POOL_SIZE = CPU_COUNT * 2 + 1;
34     private static final int KEEP_ALIVE = 1;
35
36     private static final ThreadFactory sThreadFactory = new ThreadFactory() {
37         private final AtomicInteger mCount = new AtomicInteger(1);
38
39         public Thread newThread(Runnable r) {
40             return new Thread(r, "AsyncTask #" + mCount.getAndIncrement());
41         }
42     };
43
44     private static final BlockingQueue<Runnable> sPoolWorkQueue =
45             new LinkedBlockingQueue<Runnable>(128);
46
47     public static final Executor THREAD_POOL_EXECUTOR
48             = new ThreadPoolExecutor(CORE_POOL_SIZE, MAXIMUM_POOL_SIZE, KEEP_ALIVE,
49                     TimeUnit.SECONDS, sPoolWorkQueue, sThreadFactory);
可以看到构造函数的任务对象中的最后一句是postResult(result),而该方法就是向AsyncTask内部的Handler发送消息。
b、下面就到了Handler的部分,
 1     //获取内部Handler
 2     private static Handler getHandler() {
 3         synchronized (AsyncTask.class) {
 4             if (sHandler == null) {
 5                 sHandler = new InternalHandler();
 6             }
 7             return sHandler;
 8         }
 9     }
10
11     private static class InternalHandler extends Handler {
12         public InternalHandler() {
13             super(Looper.getMainLooper());
14         }
15
16         @SuppressWarnings({"unchecked", "RawUseOfParameterizedType"})
17         @Override
18         public void handleMessage(Message msg) {
19             AsyncTaskResult<?> result = (AsyncTaskResult<?>) msg.obj;
20             switch (msg.what) {
21                 case MESSAGE_POST_RESULT:
22                     // There is only one result
23                     result.mTask.finish(result.mData[0]);
24                     break;
25                 case MESSAGE_POST_PROGRESS:
26                     result.mTask.onProgressUpdate(result.mData);
27                     break;
28             }
29         }
30     }
可以看到,这个handler处理两种类型的消息,一种是MESSAGE_POST_PROGRESS,由publishProgress发送,触发;一种是MESSAGE_POST_RESULT,由postResult发送。
 1 //发送MESSAGE_POST_PROGRESS消息,触发onProgressUpdate()
 2     protected final void publishProgress(Progress... values) {
 3         if (!isCancelled()) {
 4             getHandler().obtainMessage(MESSAGE_POST_PROGRESS,
 5                     new AsyncTaskResult<Progress>(this, values)).sendToTarget();
 6         }
 7     }
 8     //所以重写这个方法可以在主UI中更新界面
 9     protected void onProgressUpdate(Progress... values) {
10     }
11
12
13     //发送MESSAGE_POST_RESULT消息,触发finish()
14     private Result postResult(Result result) {
15         @SuppressWarnings("unchecked")
16         Message message = getHandler().obtainMessage(MESSAGE_POST_RESULT,
17                 new AsyncTaskResult<Result>(this, result));
18         message.sendToTarget();
19         return result;
20     }
21     //!!!这里的结束有两种情况,一种是被取消,一种是执行完成。
22     private void finish(Result result) {
23         if (isCancelled()) {
24             onCancelled(result);
25         } else {
26             onPostExecute(result);
27         }
28         mStatus = Status.FINISHED;
29     }
有关AsyncTask的使用还有一个问题就是如果在执行耗时任务时用户退出Activity,此时该任务线程可能没有执行完所以不会退出,这是可能造成内存泄露,需要在onPause中进行判断。还有其他问题参见http://droidyue.com/blog/2014/11/08/bad-smell-of-asynctask-in-android/index.html
参考: