Android - TabHost
Overview
TabHost 虽然早早的就被抛弃了,而且十分不灵活,但是还是值得我们学习的,虽然我们可能并不会用到它。
TabHost的替代品有
- FragmentTabHost
- TabLayout(Material Design)
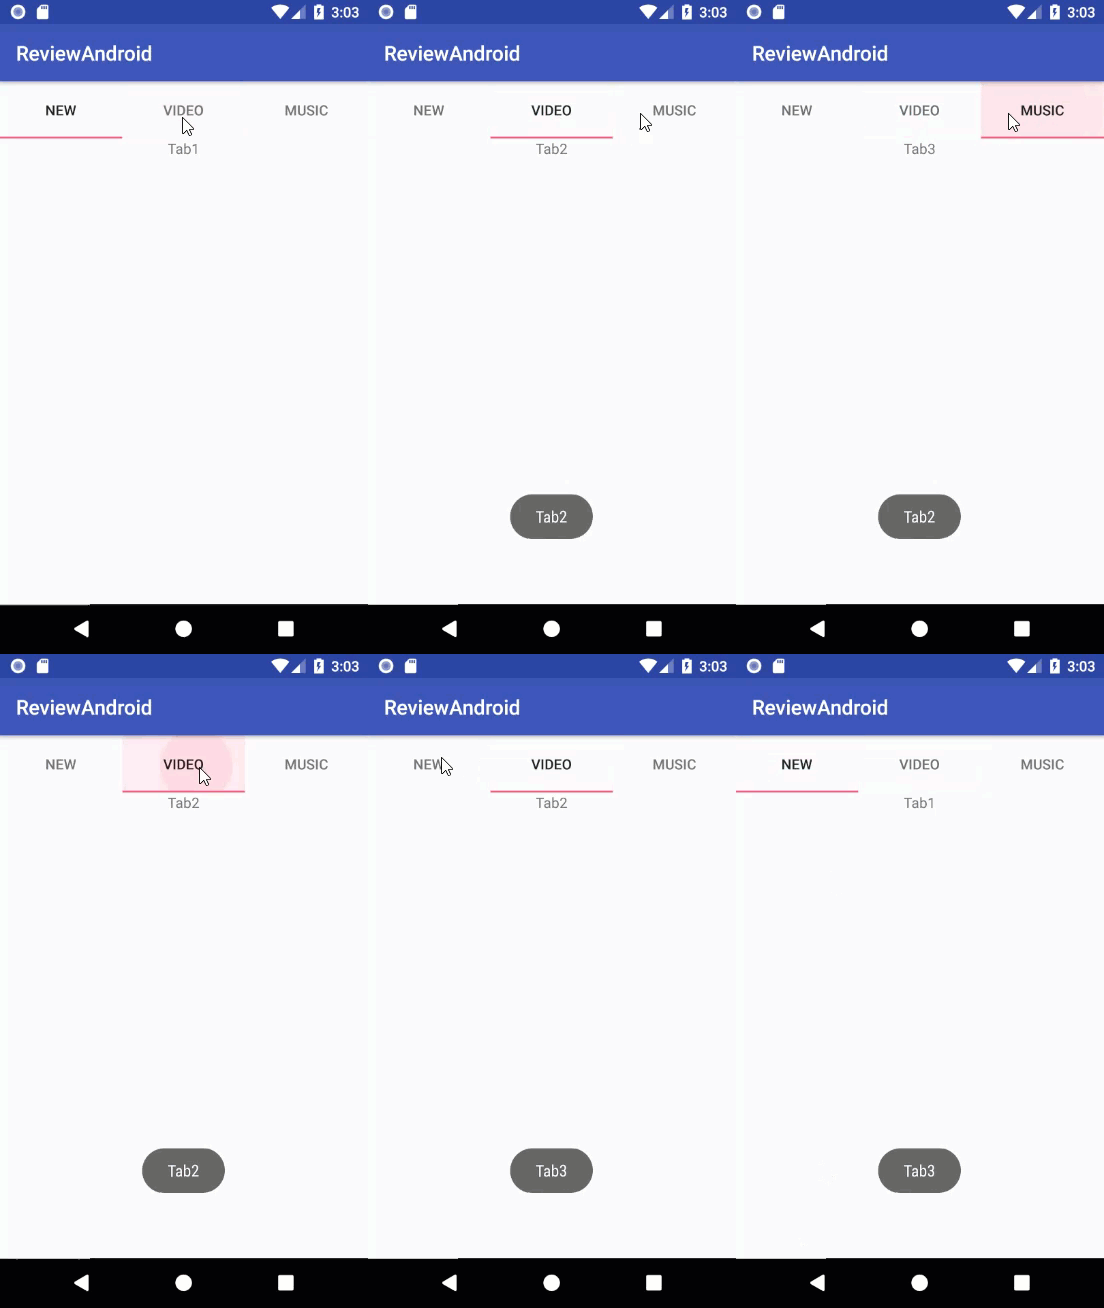
效果图

第一种实现方式 - 将所有的布局都放在一起
Activity布局文件
<?xml version="1.0" encoding="utf-8"?>
<LinearLayout
    xmlns:android="http://schemas.android.com/apk/res/android"
    xmlns:tools="http://schemas.android.com/tools"
    android:id="@+id/activity_table_host"
    android:layout_width="match_parent"
    android:layout_height="match_parent"
    android:orientation="vertical"
    tools:context="com.example.it.reviewandroid.activity.ui.TableHostActivity">

    <TabHost
        android:id="@+id/navTH"
        android:layout_width="match_parent"
        android:layout_height="wrap_content">
        <!--
        在TabWidget外层一定要有一层布局来包裹他
        否则TabHost的显示样式会错乱
        -->
        <LinearLayout
            android:layout_width="match_parent"
            android:layout_height="match_parent"
            android:orientation="vertical">
            <!--TabWidget的Id不能够更改-->
            <TabWidget
                android:id="@android:id/tabs"
                android:layout_width="match_parent"
                android:layout_height="wrap_content"/>
            <!--注意FrameLayout的Id不能够更改-->
            <FrameLayout
                android:id="@android:id/tabcontent"
                android:layout_width="match_parent"
                android:layout_height="match_parent">
                <!--第一个TAB1-->
                <RelativeLayout
                    android:id="@+id/tab1RLayout"
                    android:layout_width="match_parent"
                    android:layout_height="match_parent">

                    <TextView
                        android:layout_width="wrap_content"
                        android:layout_height="wrap_content"
                        android:layout_centerInParent="true"
                        android:text="Tab1"/>
                </RelativeLayout>
                <!--第一个TAB2-->
                <RelativeLayout
                    android:id="@+id/tab2RLayout"
                    android:layout_width="match_parent"
                    android:layout_height="match_parent">

                    <TextView
                        android:layout_width="wrap_content"
                        android:layout_height="wrap_content"
                        android:layout_centerInParent="true"
                        android:text="Tab2"/>
                </RelativeLayout>
                <!--第一个TAB3-->
                <RelativeLayout
                    android:id="@+id/tab3RLayout"
                    android:layout_width="match_parent"
                    android:layout_height="match_parent">

                    <TextView
                        android:layout_width="wrap_content"
                        android:layout_height="wrap_content"
                        android:layout_centerInParent="true"
                        android:text="Tab3"/>
                </RelativeLayout>
            </FrameLayout>
        </LinearLayout>
    </TabHost>
</LinearLayout>
布局代码有点长...,但是其中关键的地方已经加上了注释。如果大家这样写比较臃肿的话,可以使用 include标签,将各个Tab 提取出来。
Activity代码
public class TableHostActivity extends AppCompatActivity {

    private TabHost mNavTH;

    @Override
    protected void onCreate(Bundle savedInstanceState) {
        super.onCreate(savedInstanceState);
        setContentView(R.layout.activity_table_host);
        initFindView();
        init();
    }

    void initFindView() {
        mNavTH = (TabHost) this.findViewById(R.id.navTH);
    }

    void init() {

        //在添加Tab之前需要调用此方法
        mNavTH.setup();

        //添加Tab
        mNavTH.addTab(mNavTH.newTabSpec("Tab1").setIndicator("New").setContent(R.id.tab1RLayout));
        mNavTH.addTab(mNavTH.newTabSpec("Tab2").setIndicator("Video").setContent(R.id.tab2RLayout));
        mNavTH.addTab(mNavTH.newTabSpec("Tab3").setIndicator("Music").setContent(R.id.tab3RLayout));

        //切换Tab触发的事件
        mNavTH.setOnTabChangedListener(new TabHost.OnTabChangeListener() {
            @Override
            public void onTabChanged(String tabId) {
                Toast.makeText(TableHostActivity.this, tabId, Toast.LENGTH_SHORT).show();
            }
        });
    }
}
第二种实现方式 - 将Tab的布局提取出来
我想第一种方式,应该不会有人用吧,毕竟布局代码都写在一个布局文件中实在不是一件令人赏心悦目的事情,所以,将每一个Tab独立出来是很有必要的。
首先是Activity的布局文件
<?xml version="1.0" encoding="utf-8"?>
<LinearLayout
    xmlns:android="http://schemas.android.com/apk/res/android"
    xmlns:tools="http://schemas.android.com/tools"
    android:id="@+id/activity_tab_host2"
    android:layout_width="match_parent"
    android:layout_height="match_parent"
    android:orientation="vertical"
    tools:context="com.example.it.reviewandroid.activity.ui.TabHost2Activity">

    <TabHost
        android:layout_width="match_parent"
        android:layout_height="wrap_content">
        <LinearLayout
            android:layout_width="match_parent"
            android:layout_height="match_parent"
            android:orientation="vertical">
            <TabWidget
                android:id="@android:id/tabs"
                android:layout_width="match_parent"
                android:layout_height="wrap_content"/>
            <FrameLayout
                android:id="@android:id/tabcontent"
                android:layout_width="match_parent"
                android:layout_height="match_parent"/>
        </LinearLayout>
    </TabHost>
</LinearLayout>
各个Tab的布局文件,因为所有的Tab都是类似,所以这里仅仅贴出了一个
<?xml version="1.0" encoding="utf-8"?>
<RelativeLayout xmlns:android="http://schemas.android.com/apk/res/android"
                android:layout_width="match_parent"
                android:layout_height="match_parent">
    <TextView
        android:layout_width="match_parent"
        android:layout_height="match_parent"
        android:gravity="center"
        android:text="Tab1"/>
</RelativeLayout>
Activity代码
/**
 * 这里实现了TabHost.TabContentFactory,TabHost 将通过此接口来获得View
 */
public class TabHost2Activity extends AppCompatActivity implements TabHost.TabContentFactory {

    View tab1;
    View tab2;
    View tab3;

    private TabHost mNavTH;

    @Override
    protected void onCreate(Bundle savedInstanceState) {
        super.onCreate(savedInstanceState);
        setContentView(R.layout.activity_tab_host2);
        mNavTH = (TabHost) this.findViewById(R.id.navTH);
        inflateView();
        init();
    }

    void inflateView() {
        LayoutInflater inflater = LayoutInflater.from(this);
        tab1 = inflater.inflate(R.layout.item_tabhost_tab1, null, false);
        tab2 = inflater.inflate(R.layout.item_tabhost_tab2, null, false);
        tab3 = inflater.inflate(R.layout.item_tabhost_tab3, null, false);
    }

    void init() {
        mNavTH.setup();

        mNavTH.addTab(mNavTH.newTabSpec("tab1").setIndicator("New").setContent(this));
        mNavTH.addTab(mNavTH.newTabSpec("tab2").setIndicator("Video").setContent(this));
        mNavTH.addTab(mNavTH.newTabSpec("tab3").setIndicator("Music").setContent(this));
    }

    @Override
    public View createTabContent(String tag) {
        switch (tag) {
            case "tab1":
                return tab1;
            case "tab2":
                return tab2;
            case "tab3":
                return tab3;
        }
        return null;
    }
}
第三种实现方式 - Activity实现
如果说第二种通过view 来实现的方式还是会让大量的代码都堆积在一个Activity中让你不痛快的话,不要紧,还有第三种方式,通过Activity来实现。
首先还是布局代码,与第二中方式的布局代码相同
<?xml version="1.0" encoding="utf-8"?>
<LinearLayout
    xmlns:android="http://schemas.android.com/apk/res/android"
    xmlns:tools="http://schemas.android.com/tools"
    android:id="@+id/activity_tab_host2"
    android:layout_width="match_parent"
    android:layout_height="match_parent"
    android:orientation="vertical"
    tools:context="com.example.it.reviewandroid.activity.ui.TabHost2Activity">

    <TabHost
        android:id="@+id/navTH"
        android:layout_width="match_parent"
        android:layout_height="wrap_content">

        <LinearLayout
            android:layout_width="match_parent"
            android:layout_height="match_parent"
            android:orientation="vertical">

            <TabWidget
                android:id="@android:id/tabs"
                android:layout_width="match_parent"
                android:layout_height="wrap_content"/>

            <FrameLayout
                android:id="@android:id/tabcontent"
                android:layout_width="match_parent"
                android:layout_height="match_parent"/>
        </LinearLayout>
    </TabHost>
</LinearLayout>
建立需要的Activity
<?xml version="1.0" encoding="utf-8"?>
<RelativeLayout
    xmlns:android="http://schemas.android.com/apk/res/android"
    xmlns:tools="http://schemas.android.com/tools"
    android:id="@+id/activity_temp"
    android:layout_width="match_parent"
    android:layout_height="match_parent"
    tools:context="com.example.it.reviewandroid.activity.TempActivity">

    <TextView
        android:layout_width="wrap_content"
        android:layout_height="wrap_content"
        android:layout_centerInParent="true"
        android:text="Activity1"/>
</RelativeLayout>
Activity的代码
public class TabHost3Activity extends AppCompatActivity {

    private TabHost mNavTH;

    @Override
    protected void onCreate(Bundle savedInstanceState) {
        super.onCreate(savedInstanceState);
        setContentView(R.layout.activity_tab_host3);
        mNavTH = (TabHost) this.findViewById(R.id.navTH);
        init(savedInstanceState);
    }

    void init(Bundle saveInstanceState) {
        LocalActivityManager localActivityManager = new LocalActivityManager(this, true);
        localActivityManager.dispatchCreate(saveInstanceState);

        this.mNavTH.setup(localActivityManager);

        mNavTH.addTab(mNavTH.newTabSpec("Tab1").setIndicator("New").setContent(new Intent(this, TempActivity.class)));
        mNavTH.addTab(mNavTH.newTabSpec("Tab2").setIndicator("Video").setContent(new Intent(this, Temp2Activity.class)));
    }
}
遇到的异常
在通过Activity的方式实现TahHost时出现了这个样的一个异常LocalActivymanager Activities can't be added until the containing group has been created. 后再StackOverFlow上找到了解决方案。
总结
关于TabHost的使用已经结束,我们来回忆一下需要注意的地方
- TabHost 的布局问题
- TabWeight 和 Fragment 必须使用固定的Id不能够更改,Id分别是
android.id.tabs和android.id.tabcontent. - TabWeight要有一层父布局来包裹
- TabWeight 和 Fragment 必须使用固定的Id不能够更改,Id分别是
- 在添加Tab之前需要调用
setUp方法 - 使用TabHost时要注意LocalActivityManager的使用,需要调用
setup(LocalActivityManager) - 对LocalActivityManager进行设置
dispatchCreate()方法