一、基本权限
文件权限设置: 可以赋于某个用户或组 能够以何种方式 访问某个文件
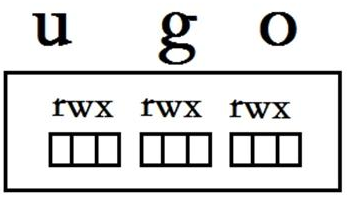
权限对象:
属主: u
属组: g
其他人: o
基本权限类型:
读:r 4
写:w 2
执行: x 1
rwx          rw-          r--           alice     hr      file1.txt
属主权限        属组权限        其他人权限    属主          属组
(一)、设置权限
1. 更改文件的属主、属组
=chown:
[root@linux ~]# chown alice.hr file1             //改属主、属组
[root@linux ~]# chown alice     file1             //只改属主
[root@linux ~]# chown        .hr file1            //只改属组
[root@linux ~]# chown -R zhouchen.hr dir1
=chgrp:
[root@linux ~]# chgrp it file1                        //改文件属组
[root@linux ~]# chgrp -R it dir1                    //改文件属组
2. 更改权限
=a. 使用符号
                    对象        赋值符        权限类型
                    u                +                r
chmod             g                 -                w          file1
                    o                =                x
                    a
[root@linux ~]# chmod u+x file1                 //属主增加执行
[root@linux ~]# chmod a=rwx file1             //所有人等于读写执行
[root@linux ~]# chmod a=- file1                 //所有人没有权限
[root@linux ~]# chmod ug=rw,o=r file1   //属主属组等于读写,其他人只读
[root@linux ~]# ll file1                               //以长模式方式查看文件权限
-rw-rw-r-- 1 alice it 17 10-25 16:45 file1          //显示的结果

=b. 使用数字
[root@linux ~]# chmod 644 file1
[root@linux ~]# ll file1
-rw-r--r-- 1 alice it 17 10-25 16:45 file1
二、基本权限ACL
文件权限管理之: ACL设置基本权限(r、w、x)
UGO设置基本权限: 只能一个用户,一个组和其他人
ACL 设置基本权限: r,w,x
(一)、ACL基本用法
设置:
[root@linux ~]# touch /home/test.txt
[root@linux ~]# ll /home/test.txt
-rw-r--r-- 1 root root 0 10-26 13:59 /home/test.txt

[root@linux ~]# getfacl /home/test.txt
[root@linux ~]# setfacl -m u:alice:rw /home/test.txt            //增加用户alice权限
[root@linux ~]# setfacl -m u:jack:- /home/test.txt             //增加用户jack权限
[root@linux ~]# setfacl -m o::rw /home/test.txt

查看/删除:
[root@linux ~]# ll /home/test.txt
-rw-rw-r--+ 1 root root 0 10-26 13:59 /home/test.txt
[root@linux ~]# getfacl /home/test.txt

[root@linux ~]# setfacl -m g:hr:r /home/test.txt
[root@linux ~]# setfacl -x g:hr /home/test.txt                     //删除组hr的acl权限
[root@linux ~]# setfacl -b /home/test.txt                              //删除所有acl权限
(二)、查看帮助
[root@linux ~]# man setfacl
/EXAMPLES
[root@linux ~]# getfacl file1 |setfacl  --set-file=- file2       //复制file1的ACL权限给file2
(三)、ACL高级特性
mask:
用于临时降低用户或组(除属主和其他人)的权限
mask决定了他们的最高权限
建议:为了方便管理文件权限,其他人的权限置为空
[root@linux ~]# setfacl -m o::- /home/file100.txt              //chmod o=- /home/file100.txt
[root@linux ~]# setfacl -m m::--- /home/file100.txt
default: 继承(默认)
要求: 希望alice能够对/home以及以后在/home下新建的文件有读、写、执行权限
思路:
步骤一: 赋予alice对/home读、写、执行权限
[root@linux ~]# setfacl -R -m u:alice:rwx /home
步骤二: 赋予alice对以后在/home下新建的文件有读、写、执行权限 (使alice的权限继承)
[root@linux ~]# setfacl -m d:u:alice:rwx /home
三、高级权限
文件权限管理之:高级权限suid,sgid,sticky
(一)、问题
为什么会失败!
[root@linux ~]# ll /root/file1.txt
-rw-r--r-- 1 root root 4 7月  27 14:14 /root/file1.txt
[alice@linux ~]$ cat /root/file1.txt
cat: /root/file1.txt: 权限不够
分析:
root            /usr/bin/cat (root)            /root/file1.txt          OK
alice           /usr/bin/cat (alice)            /root/file1.txt
高级权限的类型
suid        4
sgid        2
sticky        1   粘滞位
设置特殊权限
a、字符
chmod u+s file
chmod g+s file
chmod g+s dir
chmod o+t dir

b、数字
chmod 4777 file
chmod 7777 file
chmod 2770 dir
chmod 3770 dir
(二)、示例
示例1:suid 普通用户通过suid提权 <针对文件>
[root@linux ~]# chmod u+s /usr/bin/cat
[root@linux ~]# chmod u+s /usr/bin/rm
[alice@linux ~]$ cat /root/file1.txt
示例2:sticky 用户只能删除自己的文件 <针对目录>
[root@linux ~]# mkdir /home/dir1
[root@linux ~]# chmod 777 /home/dir1
测试:user1在/home/dir1建立文件, user2尝试删除!

[root@linux ~]# chmod o+t /home/dir1
[root@linux ~]# ll -d /home/dir1
rwxrwxrwt 2 root root 4096 09-02 02:26 /home/dir1
谁可以删除:
root
文件的所有者
目录的所有者
示例3:sgid 新建文件继承目录属组 <针对目录>
[root@linux ~]# mkdir /home/hr
[root@linux ~]# chgrp hr /home/hr/
[root@linux ~]# chmod g+s /home/hr
[root@linux ~]# ll -d /home/hr/
drwxr-sr-x. 2 root hr 4096 Dec  5 16:03 /home/hr/

[root@linux ~]# touch /home/hr/file9
[root@linux ~]# ll /home/hr/
-rw-r--r--. 1 root hr   0 Dec  5 16:03 file9
=================================================================
小知识:注意以下目录的正确权限,否则会导致程序不能正常运行
[root@linux ~]# ll -d /tmp /var/tmp/
drwxrwxrwt 14 root root 4096 07-26 10:15 /tmp
drwxrwxrwt 2 root root 4096 07-24 19:02 /var/tmp/
=================================================================
四、文件属性
文件权限管理之: 文件属性
注:设置文件属性(权限),针对所有用户,包括root
[root@linux ~]# touch file100 file200 file300
[root@linux ~]# lsattr file100 file200 file300
-------------e- file100
-------------e- file200
-------------e- file300
(一)示例
[root@linux ~]# man chattr
[root@linux ~]# chattr +a file100
[root@linux ~]# chattr +i file200
[root@linux ~]# chattr +A file300
查看:
[root@linux ~]# lsattr file100 file200 file300
-----a-------e- file100
----i--------e- file200
-------A-----e- file300
[root@linux ~]# echo 111 > file100                 //以覆盖的方式写入
bash: file100: Operation not permitted
[root@linux ~]# rm -rf file100
rm: cannot remove `file100': Operation not permitted
[root@linux ~]# echo 111 >> file100                //以追加的方式写入,例如日志文件

[root@linux ~]# echo 111 > file200
bash: file200: Permission denied
[root@instructor ~]# echo 111 >> file200
bash: file200: Permission denied
[root@linux ~]# rm -rf file200
rm: cannot remove `file200': Operation not permitted
(二)、取消权限
[root@linux ~]# chattr -a file100
[root@linux ~]# chattr -i file200
[root@linux ~]# chattr -A file300
五、文件掩码
文件权限管理之: 进程umask
进程 新建文件、目录的默认权限会受到umask的影响,umask表示要减掉的权限
shell (vim,touch)      =======umask======>    新文件或目录权限
vsftpd                         =======umask======>    新文件或目录权限
samba                        =======umask======>    新文件或目录权限
useradd                      =======umask======>    用户HOME
示例1: 在shell进程中创建文件
[root@linux ~]# umask                                     //查看当前用户的umask权限
0022
[root@linux ~]# touch file800
[root@linux ~]# mkdir dir800
[root@linux ~]# ll -d dir800 file800
drwxr-xr-x. 2 root root 4096 3月  11 19:40 dir800
-rw-r--r--. 1 root root    0 3月  11 19:40 file800
示例2:修改shell umask值(临时)
[root@linux ~]# umask 000
[root@linux ~]# mkdir dir900
[root@linux ~]# touch file900
[root@linux ~]# ll -d dir900 file900
drwxrwxrwx. 2 root root 4096 3月  11 19:44 dir900
-rw-rw-rw-. 1 root root    0 3月  11 19:44 file900
示例3:修改shell umask值(永久 建议不要)
[root@linux ~]# vim /etc/profile
if [ $UID -gt 199 ] && [ "`id -gn`" = "`id -un`" ]; then
    umask 002
else
    umask 022
fi
[root@linux ~]# source /etc/profile       //立即在当前shell中生效
示例4:通过umask决定新建用户HOME目录的权限
[root@linux ~]# vim /etc/login.defs
UMASK           077
[root@linux ~]# useradd linux
[root@linux ~]# ll -d /home/linux/
drwx------. 4 linux linux 4096 3月  11 19:50 /home/linux/

[root@linux ~]# vim /etc/login.defs
UMASK           000
[root@linux ~]# useradd linux1
[root@linux ~]# ll -d /home/linux1/
drwxrwxrwx. 4 linux1 linux1 4096 3月  11 19:53 /home/linux1/