1. spring cloud config配置记录
1.1. pom
<!-- 分布式配置中心 -->
<dependency>
    <groupId>org.springframework.cloud</groupId>
    <artifactId>spring-cloud-starter-config</artifactId>
</dependency>
1.2. 创建bootstrap.yml
- 配置eureka和config相关配合
spring:
  application:
    name: carer
  cloud:
    config:
      uri: http://i.xxx.com:8888
      profile: dev
      username: dev
      password: xxxx
eureka:
  instance:
    appname: carer-test
    prefer-ip-address: true
  client:
    serviceUrl:
      defaultZone: http://dev:xxxx@i.tzxylao.com:8761/eureka/
- 其他配置全部移至application-dev.properties和application.pro.properties
1.3. 配置刷新
1.3.1. 添加注解
- 添加@RefreshScope注解
- example
@Component
@RefreshScope
public class SysConfig {

    @Value("${openTradeTest}")
    private String openTradeCode;

    @Value("${sysId}")
    private String sysId;

    @Value("${authUrl}")
    private String authUrl;

    public String getOpenTradeCode() {
        return openTradeCode;
    }

    public void setOpenTradeCode(String openTradeCode) {
        this.openTradeCode = openTradeCode;
    }

    public String getSysId() {
        return sysId;
    }
}
1.3.2. 添加pom
<dependency>
    <groupId>org.springframework.cloud</groupId>
    <artifactId>spring-cloud-starter-bus-amqp</artifactId>
</dependency>

<dependency>
    <groupId>org.springframework.boot</groupId>
    <artifactId>spring-boot-starter-actuator</artifactId>
</dependency>
1.3.3. 配置
spring.rabbitmq.virtual-host=xxx
spring.rabbitmq.addresses=localhost:5672
spring.rabbitmq.username=xxx
spring.rabbitmq.password=***
上述两个步骤在服务端和客户端都得做
1.3.4. 刷新
- 调用 localhost:8888/bus/refresh 实现连接同一个服务的所有相同客户端配置刷新
1.4. 自动刷新
1.4.1. gitlab上配置
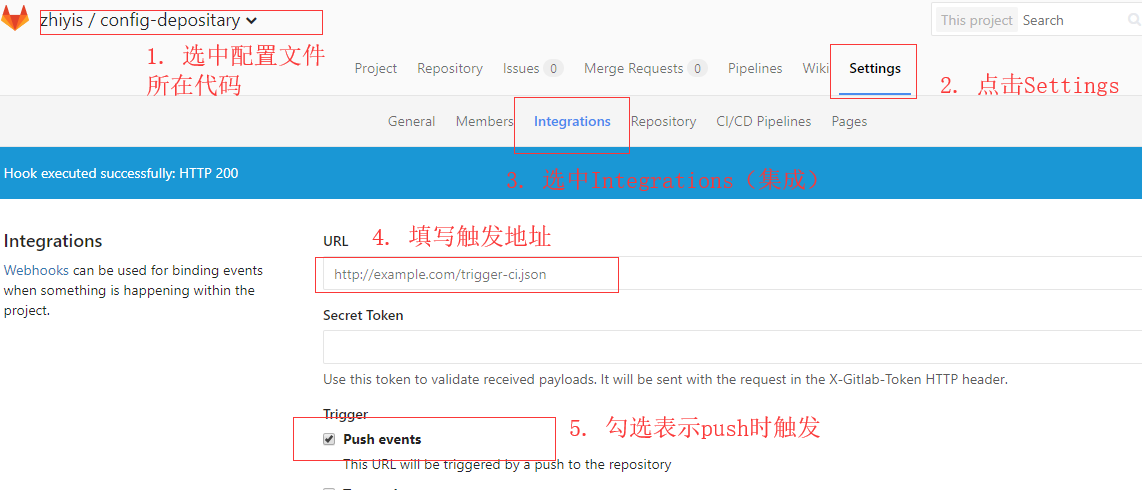
2. 最后记得add Webhook按钮点下添加
3. 因为设置了登录密码,填写地址的时候,可以这样
http://username:password@localhost:8888/bus/refresh